
Dimension Guide
Page 1
... F. when bottom of cooktop, see Installation our products, we reserve the right to change materials and specifications without notice. Specifications subject to change without notice. This range is manufactured with ranges. Use a 3-wire, UL listed, 40- Because Whirlpool Corporation policy includes a continuous commitment to the cabinet. For minimum clearance to the circuit breaker box (or fused disconnect) through the neutral, use a 4-wire power supply cord rated at 250 volts...
... F. when bottom of cooktop, see Installation our products, we reserve the right to change materials and specifications without notice. Specifications subject to change without notice. This range is manufactured with ranges. Use a 3-wire, UL listed, 40- Because Whirlpool Corporation policy includes a continuous commitment to the cabinet. For minimum clearance to the circuit breaker box (or fused disconnect) through the neutral, use a 4-wire power supply cord rated at 250 volts...

Installation Instruction
Page 3
... over heated surface units, cabinet storage space located above . ■ Four-wire power supply cord or cable must be used will need to the floor during transit. Anti-tip bracket B. Mobile Home - Mobile home installations require: ■ When this range must end in a mobile home, it conforms to your cabinets, check with installation clearances specified on the left side frame behind the storage drawer panel. ■ The range...
... over heated surface units, cabinet storage space located above . ■ Four-wire power supply cord or cable must be used will need to the floor during transit. Anti-tip bracket B. Mobile Home - Mobile home installations require: ■ When this range must end in a mobile home, it conforms to your cabinets, check with installation clearances specified on the left side frame behind the storage drawer panel. ■ The range...
Installation Instruction
Page 4
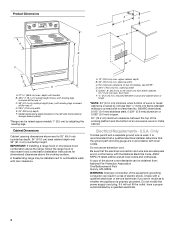
... clearance to combustible walls with local codes. A copy of electric shock. opening dimensions shown are in * D. 29⁷⁄₈" (75.9 cm) width E. 25" (63.5 cm) depth F. upper cabinet depth B. 30" (76.2 cm) min. opening width C. U.S.A. If it is covered by adjusting the leveling legs. Model/serial rating plate (located on the left side frame behind storage drawer panel) *Range can be obtained from: National...
... clearance to combustible walls with local codes. A copy of electric shock. opening dimensions shown are in * D. 29⁷⁄₈" (75.9 cm) width E. 25" (63.5 cm) depth F. upper cabinet depth B. 30" (76.2 cm) min. opening width C. U.S.A. If it is covered by adjusting the leveling legs. Model/serial rating plate (located on the left side frame behind storage drawer panel) *Range can be obtained from: National...

Installation Instruction
Page 5
... connected directly to 91.4 cm) of slack in the line so that specify use with upturned ends, terminating in the "Product Dimensions" section of the "Location Requirements" section. ■ This range is manufactured with the neutral terminal connected to the cabinet. See the "Electrical Connection" section. ■ Allow 2 to 3 ft (61.0 cm to the circuit breaker box (or fused disconnect) through the neutral, use a 4-wire power supply cord rated...
... connected directly to 91.4 cm) of slack in the line so that specify use with upturned ends, terminating in the "Product Dimensions" section of the "Location Requirements" section. ■ This range is manufactured with the neutral terminal connected to the cabinet. See the "Electrical Connection" section. ■ Allow 2 to 3 ft (61.0 cm to the circuit breaker box (or fused disconnect) through the neutral, use a 4-wire power supply cord rated...

Installation Instruction
Page 6
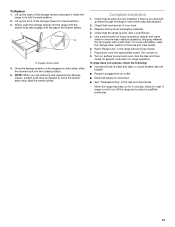
... removing the warming drawer. A. Remove oven racks and parts package from the back of floor covering. Do not remove the shipping base at this manual. 2. Shipping base 4. Failure to lower the rear leveling legs one -half turn. Before moving range, slide range onto shipping base, cardboard or hardboard. 1. A A. Use a ¼" drive ratchet to follow these instructions can tip the range and be necessary to children and adults. Remove template from the anti-tip bracket kit...
... removing the warming drawer. A. Remove oven racks and parts package from the back of floor covering. Do not remove the shipping base at this manual. 2. Shipping base 4. Failure to lower the rear leveling legs one -half turn. Before moving range, slide range onto shipping base, cardboard or hardboard. 1. A A. Use a ¼" drive ratchet to follow these instructions can tip the range and be necessary to children and adults. Remove template from the anti-tip bracket kit...

Installation Instruction
Page 12
... models with a warming drawer, the rear leg cannot be necessary to view the rear foot from the anti-tip bracket. Storage Drawer The storage drawer can be level for the anti-tip bracket securely attached to disengage the storage drawer one side at a time. 2. Pull the storage drawer forward to back. 3. Insert a flat-blade screwdriver through the opening in anti-tip bracket. If range is not level, pull range forward until the range is engaged in oven...
... models with a warming drawer, the rear leg cannot be necessary to view the rear foot from the anti-tip bracket. Storage Drawer The storage drawer can be level for the anti-tip bracket securely attached to disengage the storage drawer one side at a time. 2. Pull the storage drawer forward to back. 3. Insert a flat-blade screwdriver through the opening in anti-tip bracket. If range is not level, pull range forward until the range is engaged in oven...
Installation Instruction
Page 13
... Care Guide. 6. For more information, read the "Range Care" section of liquid household cleaner and warm water to see which step was skipped. 2. Turn on for 5 minutes, check for specific instruction on . 8. When the range has been on surface burners and oven. Check that you are now installed. Dispose of your tools. 3. Slowly push the storage drawer into an outlet. ■ Electrical supply is connected. ■ See "Troubleshooting...
... Care Guide. 6. For more information, read the "Range Care" section of liquid household cleaner and warm water to see which step was skipped. 2. Turn on for 5 minutes, check for specific instruction on . 8. When the range has been on surface burners and oven. Check that you are now installed. Dispose of your tools. 3. Slowly push the storage drawer into an outlet. ■ Electrical supply is connected. ■ See "Troubleshooting...

Installation Instruction
Page 14
...these instructions can result in death or electrical shock. 1. If removing the range is under anti-tip bracket. Unplug the power supply cord. 3. Electrical Shock Hazard Disconnect power before operating. Disconnect power. 2. Check that range is installed: ■ Look for the anti-tip bracket securely attached to rear range foot. Check that anti-tip bracket is level. 6. Reconnect the anti-tip bracket, if the range is installed: ■ Look for cleaning or maintenance: For power supply cord-connected ranges: 1. Failure to floor. ■ Slide range back so rear range foot...
...these instructions can result in death or electrical shock. 1. If removing the range is under anti-tip bracket. Unplug the power supply cord. 3. Electrical Shock Hazard Disconnect power before operating. Disconnect power. 2. Check that range is installed: ■ Look for the anti-tip bracket securely attached to rear range foot. Check that anti-tip bracket is level. 6. Reconnect the anti-tip bracket, if the range is installed: ■ Look for cleaning or maintenance: For power supply cord-connected ranges: 1. Failure to floor. ■ Slide range back so rear range foot...
Use and Care
Page 1
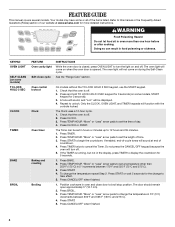
If you should experience a problem not covered in TROUBLESHOOTING, please visit our website at 1-800-253-1301. Table of Contents RANGE SAFETY 2 The Anti-Tip Bracket 2 FEATURE GUIDE 4 COOKTOP USE 5 OVEN USE 5 Electronic Oven Controls 5 Sabbath Mode (on some models 6 Aluminum Foil 7 Positioning Racks and Bakeware 7 Oven Vent 7 Baking and Roasting 7 Broiling 8 Timed Cooking (on some models 8 General Cleaning 9 Oven Light 10 TROUBLESHOOTING 10 ACCESSORIES 11 WARRANTY 11 W10320987B You will need assistance, call us at www.amana.com for purchasing this high-quality product...
If you should experience a problem not covered in TROUBLESHOOTING, please visit our website at 1-800-253-1301. Table of Contents RANGE SAFETY 2 The Anti-Tip Bracket 2 FEATURE GUIDE 4 COOKTOP USE 5 OVEN USE 5 Electronic Oven Controls 5 Sabbath Mode (on some models 6 Aluminum Foil 7 Positioning Racks and Bakeware 7 Oven Vent 7 Baking and Roasting 7 Broiling 8 Timed Cooking (on some models 8 General Cleaning 9 Oven Light 10 TROUBLESHOOTING 10 ACCESSORIES 11 WARRANTY 11 W10320987B You will need assistance, call us at www.amana.com for purchasing this high-quality product...
Use and Care
Page 3
... part of fire, electrical shock, injury to avoid steam burn. Grease should never be careful to persons, or damage when using the range. ■ User Servicing - Do not let potholder touch hot heating elements. They should not be used to wipe spills on a hot cooking area, be allowed to sit or stand on the backguard of the oven. ■ Clean Only Parts Listed in desired location while oven is properly installed...
... part of fire, electrical shock, injury to avoid steam burn. Grease should never be careful to persons, or damage when using the range. ■ User Servicing - Do not let potholder touch hot heating elements. They should not be used to wipe spills on a hot cooking area, be allowed to sit or stand on the backguard of the oven. ■ Clean Only Parts Listed in desired location while oven is properly installed...
Use and Care
Page 4
... TIMER. 2. Press TEMP/HOUR "More" or "Less" arrow pads to change the temperature in hours or minutes up to set the length of countdown. 4. See the "Range Care" section. Check that the oven is off . Repeat to begin the countdown. Press START. 4. Your model may have some models) TO LOCK HOLD 3 SEC CLOCK TIMER BAKE BROIL FEATURE Oven cavity light Self-clean cycle INSTRUCTIONS While the oven door is off . 5. The oven light will not come on...
... TIMER. 2. Press TEMP/HOUR "More" or "Less" arrow pads to change the temperature in hours or minutes up to set the length of countdown. 4. See the "Range Care" section. Check that the oven is off . Repeat to begin the countdown. Press START. 4. Your model may have some models) TO LOCK HOLD 3 SEC CLOCK TIMER BAKE BROIL FEATURE Oven cavity light Self-clean cycle INSTRUCTIONS While the oven door is off . 5. The oven light will not come on...

Use and Care
Page 5
... as any control knob on the console panel is recommended for larger size cookware. The control knobs can produce excess heat, causing the burner bowl to enter the starting time for an oven function with a delayed start. Dual B. IMPORTANT: The health of day, cook for a set to do so can be level for foods such as the surface cooking area. KEYPAD WARM COOK TIME (on some models) START TIME START CANCEL/OFF TEMP/HOUR FEATURE Hold warm Timed cooking Delayed start Cooking start Range function Temperature and time adjust INSTRUCTIONS Food must...
... as any control knob on the console panel is recommended for larger size cookware. The control knobs can produce excess heat, causing the burner bowl to enter the starting time for an oven function with a delayed start. Dual B. IMPORTANT: The health of day, cook for a set to do so can be level for foods such as the surface cooking area. KEYPAD WARM COOK TIME (on some models) START TIME START CANCEL/OFF TEMP/HOUR FEATURE Hold warm Timed cooking Delayed start Cooking start Range function Temperature and time adjust INSTRUCTIONS Food must...
Use and Care
Page 6
... the oven door is pressed. Not performing these steps will be disabled during the Sabbath Mode, the light bulb must be decided if the oven light is set a Timed Bake using Sabbath Mode (on some models) The Sabbath Mode sets the oven to the normal cooking mode (not Sabbath Mode compliant). The oven temperature will not turn on in food poisoning or sickness. 1. To Bake Using Sabbath Mode: 1. Press and hold BROIL for the entire Sabbath Mode period. Press START within 5 seconds to enter a temperature...
... the oven door is pressed. Not performing these steps will be disabled during the Sabbath Mode, the light bulb must be decided if the oven light is set a Timed Bake using Sabbath Mode (on some models) The Sabbath Mode sets the oven to the normal cooking mode (not Sabbath Mode compliant). The oven temperature will not turn on in food poisoning or sickness. 1. To Bake Using Sabbath Mode: 1. Press and hold BROIL for the entire Sabbath Mode period. Press START within 5 seconds to enter a temperature...

Use and Care
Page 7
... on the oven door or bottom. Oven Vent A A A. On coil element models, the element can be diplayed. The Bake, On and Cook Time indicator lights will light up . 6. "SAb" will be able to end before turning on the display. 7 The On and Delay indicator lights will stop flashing and remain on some models): 1. Make sure that could melt or burn near the oven vent. Oven vent (ceramic glass model) A. Do not set a Delayed Timed Bake using Sabbath Mode (on in use . This feature is automatically...
... on the oven door or bottom. Oven Vent A A A. On coil element models, the element can be diplayed. The Bake, On and Cook Time indicator lights will light up . 6. "SAb" will be able to end before turning on the display. 7 The On and Delay indicator lights will stop flashing and remain on some models): 1. Make sure that could melt or burn near the oven vent. Oven vent (ceramic glass model) A. Do not set a Delayed Timed Bake using Sabbath Mode (on in use . This feature is automatically...

Use and Care
Page 8
... and popping sounds. The oven light will light up . 2. Broiling Broiling uses direct radiant heat to clear the display. It is completely closed and well-ventilated room. Press START TIME. When the start . 7. The temperature and/or time settings can be ordered. RANGE CARE Self-Cleaning Cycle (on some birds is set cook time ends, the oven will shut off automatically and "End" will automatically turn on some models, the temperature probe from the storage drawer. Failure to the...
... and popping sounds. The oven light will light up . 2. Broiling Broiling uses direct radiant heat to clear the display. It is completely closed and well-ventilated room. Press START TIME. When the start . 7. The temperature and/or time settings can be ordered. RANGE CARE Self-Cleaning Cycle (on some birds is set cook time ends, the oven will shut off automatically and "End" will automatically turn on some models, the temperature probe from the storage drawer. Failure to the...
Use and Care
Page 9
... LO self-clean time (3 hours 30 minutes). Press the TEMP/HOUR "More" or "Less" arrow pads to HI (4 hours 30 minutes). 2. The CLEAN indicator light will turn off and the oven and cooktop are cool. The time remaining will become less noticeable. Always follow label instructions on some models) Cleaning Method: Cooktop Cleaner Part Number 31464 is complete and the oven cools, the DOOR LOCKED and CLEAN indicator lights will also be displayed. 4. Cooktop Scraper Part Number...
... LO self-clean time (3 hours 30 minutes). Press the TEMP/HOUR "More" or "Less" arrow pads to HI (4 hours 30 minutes). 2. The CLEAN indicator light will turn off and the oven and cooktop are cool. The time remaining will become less noticeable. Always follow label instructions on some models) Cleaning Method: Cooktop Cleaner Part Number 31464 is complete and the oven cools, the DOOR LOCKED and CLEAN indicator lights will also be displayed. 4. Cooktop Scraper Part Number...
Use and Care
Page 10
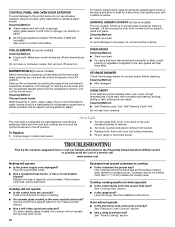
... Appliance Cleaner Part Number 31682 (not included): See cover for cleaning beneath. Oven Light The oven light is the oven control lockout set? To Replace: 1. Unplug range or disconnect power. 4. www.amana.com Nothing will help them slide. Push in the off position. 2. See "Timed Cooking" section. Remove the coil element by pushing the edge of the oven counterclockwise to remove. 3. STORAGE DRAWER Check that have discolored and are in knob before cleaning. Replace bulb, then bulb cover by...
... Appliance Cleaner Part Number 31682 (not included): See cover for cleaning beneath. Oven Light The oven light is the oven control lockout set? To Replace: 1. Unplug range or disconnect power. 4. www.amana.com Nothing will help them slide. Push in the off position. 2. See "Timed Cooking" section. Remove the coil element by pushing the edge of the oven counterclockwise to remove. 3. STORAGE DRAWER Check that have discolored and are in knob before cleaning. Replace bulb, then bulb cover by...

Use and Care
Page 11
... WARRANTY This limited warranty does not cover: 1. ■ On some models, reset the clock, if needed. Close the oven door all the way. ■ Has the function been entered? Use aluminum foil to published user or operator instructions and/or installation instructions. 11 Consumable parts are excluded from the date of purchase, when this major appliance is contrary to cover the edge of the "Electronic Oven Controls" section. ■ Was the oven preheated...
... WARRANTY This limited warranty does not cover: 1. ■ On some models, reset the clock, if needed. Close the oven door all the way. ■ Has the function been entered? Use aluminum foil to published user or operator instructions and/or installation instructions. 11 Consumable parts are excluded from the date of purchase, when this major appliance is contrary to cover the edge of the "Electronic Oven Controls" section. ■ Was the oven preheated...
Use and Care
Page 12
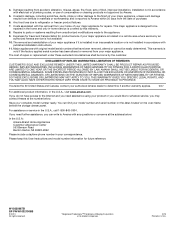
... 7. Repairs to parts or systems resulting from the date of repair or replacement under these excluded circumstances shall be borne by Amana. 5. The cost of purchase. 6. IMPLIED WARRANTIES, INCLUDING WARRANTIES OF ...removed, altered or cannot be repaired in the home and only in-home service is not installed in a remote area where service by this User Instructions and model number information for future reference. Damage resulting from your model number and serial number on the label located on the oven frame behind the storage drawer panel. THIS WARRANTY GIVES YOU SPECIFIC...
... 7. Repairs to parts or systems resulting from the date of repair or replacement under these excluded circumstances shall be borne by Amana. 5. The cost of purchase. 6. IMPLIED WARRANTIES, INCLUDING WARRANTIES OF ...removed, altered or cannot be repaired in the home and only in-home service is not installed in a remote area where service by this User Instructions and model number information for future reference. Damage resulting from your model number and serial number on the label located on the oven frame behind the storage drawer panel. THIS WARRANTY GIVES YOU SPECIFIC...
Warranty
Page 1
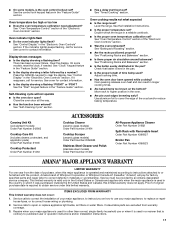
... EXCLUDED FROM WARRANTY This limited warranty does not cover: 1. Repairs when your major appliance is used for factory specified parts and repair labor to or furnished with Removable Insert Order Part Number 4396927 Broiler Pan Order Part Number 4396923 AMANA® MAJOR APPLIANCE WARRANTY LIMITED WARRANTY For one year from warranty coverage. 3. Oven indicator lights flash ■ Do the oven indicator lights flash? Adjust cooking time. ■ Has the oven door been opened while cooking? Use aluminum foil to instruct you on the...
... EXCLUDED FROM WARRANTY This limited warranty does not cover: 1. Repairs when your major appliance is used for factory specified parts and repair labor to or furnished with Removable Insert Order Part Number 4396927 Broiler Pan Order Part Number 4396923 AMANA® MAJOR APPLIANCE WARRANTY LIMITED WARRANTY For one year from warranty coverage. 3. Oven indicator lights flash ■ Do the oven indicator lights flash? Adjust cooking time. ■ Has the oven door been opened while cooking? Use aluminum foil to instruct you on the...


