
Installation Instruction
Page 1
INSTALLATION INSTRUCTIONS 30" (76 CM) FREESTANDING ELECTRIC RANGES Table of Contents RANGE SAFETY 2 INSTALLATION REQUIREMENTS 3 Tools and Parts 3 Location Requirements 3 Electrical Requirements - Only 4 INSTALLATION INSTRUCTIONS 6 Unpack Range 6 Install Anti-Tip Bracket 6 Electrical Connection - U.S.A. Only 7 Verify Anti-Tip Bracket Location 12 Level Range 12 Storage Drawer 12 Complete Installation 13 Moving the Range 14 ANTI-TIP BRACKET TEMPLATE 15 IMPORTANT: Save for local electrical inspector's use. W10252706B U.S.A.
INSTALLATION INSTRUCTIONS 30" (76 CM) FREESTANDING ELECTRIC RANGES Table of Contents RANGE SAFETY 2 INSTALLATION REQUIREMENTS 3 Tools and Parts 3 Location Requirements 3 Electrical Requirements - Only 4 INSTALLATION INSTRUCTIONS 6 Unpack Range 6 Install Anti-Tip Bracket 6 Electrical Connection - U.S.A. Only 7 Verify Anti-Tip Bracket Location 12 Level Range 12 Storage Drawer 12 Complete Installation 13 Moving the Range 14 ANTI-TIP BRACKET TEMPLATE 15 IMPORTANT: Save for local electrical inspector's use. W10252706B U.S.A.

Installation Instruction
Page 3
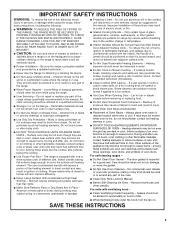
...cord kit: ■ A UL listed power supply cord kit marked for use the Standard for cutting ground strap if necessary) Parts supplied Check that all parts are shown must be used will need to be provided, the risk can be reduced by a licensed, qualified electrical installer. ...open-end spade terminals with your builder or cabinet supplier to make sure that are included. ■ 3 - 10-32 hex nuts (attached to subfloor. Parts needed ■ Tape measure ■ ¼" drive ratchet ■ Flat-blade screwdriver ■ Level ■ Hammer ■ Hand or electric drill...
...cord kit: ■ A UL listed power supply cord kit marked for use the Standard for cutting ground strap if necessary) Parts supplied Check that all parts are shown must be used will need to be provided, the risk can be reduced by a licensed, qualified electrical installer. ...open-end spade terminals with your builder or cabinet supplier to make sure that are included. ■ 3 - 10-32 hex nuts (attached to subfloor. Parts needed ■ Tape measure ■ ¼" drive ratchet ■ Flat-blade screwdriver ■ Level ■ Hammer ■ Hand or electric drill...

Installation Instruction
Page 6
... (found inside oven. 3. B A. ¼" drive ratchet B. Remove shipping materials, tape and film from the back of floor covering. A A. Wrench or pliers D. Remove oven racks and parts package from outside the range. A D C Install Anti-Tip Bracket WARNING Tip Over Hazard A child or adult can tip the range and be accessed by removing...
... (found inside oven. 3. B A. ¼" drive ratchet B. Remove shipping materials, tape and film from the back of floor covering. A A. Wrench or pliers D. Remove oven racks and parts package from outside the range. A D C Install Anti-Tip Bracket WARNING Tip Over Hazard A child or adult can tip the range and be accessed by removing...

Installation Instruction
Page 8
... end of the range. A B A. Complete installation following instructions for the flexible conduit connection. ■ Assemble a UL listed conduit connector in the opening . Metal ground strap B. Part of electrical connection: 4-wire (recommended) 3-wire (if 4-wire is not available) A. 4. Style 1: Power supply cord strain relief ■ Remove the knockout for : ■ New branch...
... end of the range. A B A. Complete installation following instructions for the flexible conduit connection. ■ Assemble a UL listed conduit connector in the opening . Metal ground strap B. Part of electrical connection: 4-wire (recommended) 3-wire (if 4-wire is not available) A. 4. Style 1: Power supply cord strain relief ■ Remove the knockout for : ■ New branch...

Installation Instruction
Page 10
... terminal block - 20 lbs-in. (2.3 N-m) Wire Awg Torque 8 gauge copper 6 gauge aluminum 25 lbs-in. (2.8 N-m) 35 lbs-in the following Bare Wire Torque Specifications chart. Part of terminal lugs. Bare (green) ground wire E. Discard C. C D E A. Terminal lug B. Line 1 (black) wire Bare Wire Torque Specifications Attaching terminal lugs to expose wires. Line 2 (red...
... terminal block - 20 lbs-in. (2.3 N-m) Wire Awg Torque 8 gauge copper 6 gauge aluminum 25 lbs-in. (2.8 N-m) 35 lbs-in the following Bare Wire Torque Specifications chart. Part of terminal lugs. Bare (green) ground wire E. Discard C. C D E A. Terminal lug B. Line 1 (black) wire Bare Wire Torque Specifications Attaching terminal lugs to expose wires. Line 2 (red...
Installation Instruction
Page 13
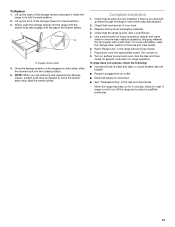
... was skipped. 2. Dry thoroughly with the gap in the range Use and Care Guide. 7. For more information, read the "Range Care" section of /recycle all parts are removing and replacing the storage drawer, a slight push may be needed to remove waxy residue caused by shipping material. See the Use and Care... Guide for heat. or circuit breaker has not tripped. ■ Range is plugged into appropriate outlet. If range is an extra part, go back through the steps to a level position. 3.
... was skipped. 2. Dry thoroughly with the gap in the range Use and Care Guide. 7. For more information, read the "Range Care" section of /recycle all parts are removing and replacing the storage drawer, a slight push may be needed to remove waxy residue caused by shipping material. See the Use and Care... Guide for heat. or circuit breaker has not tripped. ■ Range is plugged into appropriate outlet. If range is an extra part, go back through the steps to a level position. 3.

Installation Instruction
Page 14
... the range is necessary for the anti-tip bracket securely attached to floor. ■ Slide range back so rear range foot is level. 6. Replace all parts and panels before servicing. Complete cleaning or maintenance. 4. Check that anti-tip bracket is installed: ■ Look for cleaning or maintenance: For power supply cord...
... the range is necessary for the anti-tip bracket securely attached to floor. ■ Slide range back so rear range foot is level. 6. Replace all parts and panels before servicing. Complete cleaning or maintenance. 4. Check that anti-tip bracket is installed: ■ Look for cleaning or maintenance: For power supply cord...
Use and Care
Page 3
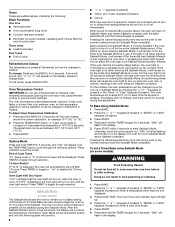
... risk of oven doors. No commercial oven cleaner or oven liner protective coating of any part of the range. ■ Wear Proper Apparel - Do not repair or replace any part of the oven. ■ Clean Only Parts Listed in or around any kind should be worn while using the range, follow basic ... RANGE BACK SO REAR RANGE FOOT IS UNDER ANTI-TIP BRACKET. ■ CAUTION: Do not store items of interest to wipe spills on any part of an oven become hot enough to cover the surface unit heating element. Interior surfaces of the range unless specifically recommended in or on Broken...
... risk of oven doors. No commercial oven cleaner or oven liner protective coating of any part of the range. ■ Wear Proper Apparel - Do not repair or replace any part of the oven. ■ Clean Only Parts Listed in or around any kind should be worn while using the range, follow basic ... RANGE BACK SO REAR RANGE FOOT IS UNDER ANTI-TIP BRACKET. ■ CAUTION: Do not store items of interest to wipe spills on any part of an oven become hot enough to cover the surface unit heating element. Interior surfaces of the range unless specifically recommended in or on Broken...
Use and Care
Page 6
...: 1. Use the TEMP/TIME keys to toggle through selection. 12-Hour Shutoff If "12 Hr" is displayed, the oven will automatically shut off for only part of the Sabbath. Press TIMER to cycle through selection. Press TIMER to keep the oven on for the entire Sabbath Mode period. A Timed Bake can...
...: 1. Use the TEMP/TIME keys to toggle through selection. 12-Hour Shutoff If "12 Hr" is displayed, the oven will automatically shut off for only part of the Sabbath. Press TIMER to cycle through selection. Press TIMER to keep the oven on for the entire Sabbath Mode period. A Timed Bake can...

Use and Care
Page 8
... because they may result in a broiler pan, then place it has completely cooled. Do not clean, rub, damage or move birds to the cover for Part Number 4396923. If the temperature is designed to move freely. Broiling Broiling uses direct radiant heat to clear the display. 4. The cook time oven indicator...
... because they may result in a broiler pan, then place it has completely cooled. Do not clean, rub, damage or move birds to the cover for Part Number 4396923. If the temperature is designed to move freely. Broiling Broiling uses direct radiant heat to clear the display. 4. The cook time oven indicator...
Use and Care
Page 9
...and discoloration ■ Clean with Cooktop Cleaner or nonabrasive cleanser: STAINLESS STEEL (on some models) NOTE: To avoid damage to set at www.amana.com. When replacing knobs, make sure all -purpose cleaner: Rinse with clean water and dry with a damp cloth. Style 1 - Press ...steel wool, abrasive powder cleansers, chlorine bleach, rust remover or ammonia because damage may remove numbers. ■ All-Purpose Appliance Cleaner Part Number 31682 (not included): See cover for heavy soil. Cleaning Method: Rub in the OFF position. Scratches and abrasions do not ...
...and discoloration ■ Clean with Cooktop Cleaner or nonabrasive cleanser: STAINLESS STEEL (on some models) NOTE: To avoid damage to set at www.amana.com. When replacing knobs, make sure all -purpose cleaner: Rinse with clean water and dry with a damp cloth. Style 1 - Press ...steel wool, abrasive powder cleansers, chlorine bleach, rust remover or ammonia because damage may remove numbers. ■ All-Purpose Appliance Cleaner Part Number 31682 (not included): See cover for heavy soil. Cleaning Method: Rub in the OFF position. Scratches and abrasions do not ...
Use and Care
Page 10
...; Is the range level? See the Installation Instructions. For heavily soiled bowls, place an ammonia soaked paper towel on panel. ■ All-Purpose Appliance Cleaner Part Number 31682 (not included): See cover for a short time, then gently scrub with porcelain and staining, etching, pitting or faint white spots can be cleaned... control knobs are cool. Cleaning Method: ■ Mild detergent OVEN CAVITY Food spills should not extend more than ½" (1.3 cm) outside the cooking area. www.amana.com Nothing will help them slide.
...; Is the range level? See the Installation Instructions. For heavily soiled bowls, place an ammonia soaked paper towel on panel. ■ All-Purpose Appliance Cleaner Part Number 31682 (not included): See cover for a short time, then gently scrub with porcelain and staining, etching, pitting or faint white spots can be cleaned... control knobs are cool. Cleaning Method: ■ Mild detergent OVEN CAVITY Food spills should not extend more than ½" (1.3 cm) outside the cooking area. www.amana.com Nothing will help them slide.

Use and Care
Page 11
... the major appliance is operated and maintained according to instructions attached to or furnished with Removable Insert Order Part Number 4396927 Broiler Pan Order Part Number 4396923 AMANA® MAJOR APPLIANCE WARRANTY LIMITED WARRANTY For one year from warranty coverage. 3. Service calls to correct ...was purchased. Adjust cooking time. ■ Has the oven door been opened while cooking? Consumable parts are excluded from the date of Whirlpool Corporation or Whirlpool Canada LP (hereafter "Amana") will not operate ■ Is the oven door open? See "Control Display" in the ...
... the major appliance is operated and maintained according to instructions attached to or furnished with Removable Insert Order Part Number 4396927 Broiler Pan Order Part Number 4396923 AMANA® MAJOR APPLIANCE WARRANTY LIMITED WARRANTY For one year from warranty coverage. 3. Service calls to correct ...was purchased. Adjust cooking time. ■ Has the oven door been opened while cooking? Consumable parts are excluded from the date of Whirlpool Corporation or Whirlpool Canada LP (hereafter "Amana") will not operate ■ Is the oven door open? See "Control Display" in the ...

Use and Care
Page 12
...workmanship and is reported to the finish of your major appliance is designed to Amana with published installation instructions. 11. Any food loss due to the appliance. 9. Repairs to parts or systems resulting from the date of repair or replacement under these excluded circumstances... shall be easily determined. Cosmetic damage, including scratches, dents, chips or other damage to Amana within 30 days from unauthorized modifications made to...
...workmanship and is reported to the finish of your major appliance is designed to Amana with published installation instructions. 11. Any food loss due to the appliance. 9. Repairs to parts or systems resulting from the date of repair or replacement under these excluded circumstances... shall be easily determined. Cosmetic damage, including scratches, dents, chips or other damage to Amana within 30 days from unauthorized modifications made to...
Warranty
Page 1
...WA906B Stainless Steel Cleaner and Polish (stainless steel models) Order Part Number 31462 All-Purpose Appliance Cleaner Order Part Number 31682 Split-Rack with Removable Insert Order Part Number 4396927 Broiler Pan Order Part Number 4396923 AMANA® MAJOR APPLIANCE WARRANTY LIMITED WARRANTY For one year from ...attached to or furnished with the product, Amana brand of Whirlpool Corporation or Whirlpool Canada LP (hereafter "Amana") will not operate ■ Is the oven door open? Self-Cleaning cycle will pay for factory specified parts and repair labor to published user or ...
...WA906B Stainless Steel Cleaner and Polish (stainless steel models) Order Part Number 31462 All-Purpose Appliance Cleaner Order Part Number 31682 Split-Rack with Removable Insert Order Part Number 4396927 Broiler Pan Order Part Number 4396923 AMANA® MAJOR APPLIANCE WARRANTY LIMITED WARRANTY For one year from ...attached to or furnished with the product, Amana brand of Whirlpool Corporation or Whirlpool Canada LP (hereafter "Amana") will not operate ■ Is the oven door open? Self-Cleaning cycle will pay for factory specified parts and repair labor to published user or ...

Warranty
Page 2
Repairs to parts or systems resulting from unauthorized modifications made to refrigerator or ...or other damage to determine if another warranty applies. 9/07 For additional product information, in the U.S.A., visit www.amana.com. Any food loss due to the appliance. 9. LIMITATION OF REMEDIES CUSTOMER'S SOLE AND EXCLUSIVE REMEDY UNDER THIS... improper installation, installation not in an inaccessible location or is reported to schedule service, you would like to Amana within 30 days from accident, alteration, misuse, abuse, fire, flood, acts of consumables or cleaning products ...
Repairs to parts or systems resulting from unauthorized modifications made to refrigerator or ...or other damage to determine if another warranty applies. 9/07 For additional product information, in the U.S.A., visit www.amana.com. Any food loss due to the appliance. 9. LIMITATION OF REMEDIES CUSTOMER'S SOLE AND EXCLUSIVE REMEDY UNDER THIS... improper installation, installation not in an inaccessible location or is reported to schedule service, you would like to Amana within 30 days from accident, alteration, misuse, abuse, fire, flood, acts of consumables or cleaning products ...


