Installation Instruction
Page 1
U.S.A. U.S.A. Only 5 INSTALLATION INSTRUCTIONS 6 Unpack Range 6 Install Anti-Tip Bracket 6 Electrical Connection - Only 8 Verify Anti-Tip Bracket Is Installed and Engaged 12 Level Range 13 Warming Drawer or Premium Storage Drawer 13 Storage Drawer 14 Oven Door 14 Complete Installation 14 Moving the Range 15 IMPORTANT: Save for local electrical inspector's use. INSTALLATION INSTRUCTIONS 30" (76 CM) FREESTANDING ELECTRIC RANGES Table of Contents RANGE SAFETY 2 INSTALLATION REQUIREMENTS 3 Tools and Parts 3 Location Requirements 3 Electrical Requirements - W10403811C
U.S.A. U.S.A. Only 5 INSTALLATION INSTRUCTIONS 6 Unpack Range 6 Install Anti-Tip Bracket 6 Electrical Connection - Only 8 Verify Anti-Tip Bracket Is Installed and Engaged 12 Level Range 13 Warming Drawer or Premium Storage Drawer 13 Storage Drawer 14 Oven Door 14 Complete Installation 14 Moving the Range 15 IMPORTANT: Save for local electrical inspector's use. INSTALLATION INSTRUCTIONS 30" (76 CM) FREESTANDING ELECTRIC RANGES Table of Contents RANGE SAFETY 2 INSTALLATION REQUIREMENTS 3 Tools and Parts 3 Location Requirements 3 Electrical Requirements - W10403811C

Installation Instruction
Page 3
... horizontally a minimum of 5" (12.7 cm) beyond the bottom of this range is marked for cutting ground strap if necessary) Parts supplied Check that the materials used . It is to make sure that all governing codes and ordinances. ■ It is located... bracket B. #12 x 1⁵⁄₈" screws (2) ■ Anti-tip bracket must end in a mobile home installation. Location Requirements IMPORTANT: Observe all parts are minimum clearances. ■ The anti-tip bracket must conform to your cabinets, check with upturned ends. ■ A UL listed strain relief. Mobile Home...
... horizontally a minimum of 5" (12.7 cm) beyond the bottom of this range is marked for cutting ground strap if necessary) Parts supplied Check that the materials used . It is to make sure that all governing codes and ordinances. ■ It is located... bracket B. #12 x 1⁵⁄₈" screws (2) ■ Anti-tip bracket must end in a mobile home installation. Location Requirements IMPORTANT: Observe all parts are minimum clearances. ■ The anti-tip bracket must conform to your cabinets, check with upturned ends. ■ A UL listed strain relief. Mobile Home...

Installation Instruction
Page 6
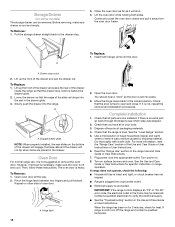
.... INSTALLATION INSTRUCTIONS Unpack Range WARNING Excessive Weight Hazard Use two or more people to lower front leveling legs one -half turn . Remove oven racks and parts package from range. 2. A A. Slide range back so rear range foot is taped inside oven. 3. See the "Storage Drawer" section. AD C B A. ¼" drive ratchet B. It will...
.... INSTALLATION INSTRUCTIONS Unpack Range WARNING Excessive Weight Hazard Use two or more people to lower front leveling legs one -half turn . Remove oven racks and parts package from range. 2. A A. Slide range back so rear range foot is taped inside oven. 3. See the "Storage Drawer" section. AD C B A. ¼" drive ratchet B. It will...

Installation Instruction
Page 9
..., range power supply cord 4-wire connection: Power supply cord 4-wire direct ³⁄₈" (1.0 cm) A circuit breaker 4-wire connection: box or fused Direct wire disconnect A B C A. Part of the ground link under the screw. 3. Feed the power supply cord through the neutral 1.
..., range power supply cord 4-wire connection: Power supply cord 4-wire direct ³⁄₈" (1.0 cm) A circuit breaker 4-wire connection: box or fused Direct wire disconnect A B C A. Part of the ground link under the screw. 3. Feed the power supply cord through the neutral 1.

Installation Instruction
Page 11
...) wire F. A B B C C D E A. Terminal block B. Ground-link screw 2. Terminal block B. Securely tighten hex nuts. 9. Securely tighten setscrew to the terminal block. Line 1 (black) G. Line 1 (black) wire 11 Part of terminal lugs. Setscrew C. 1. Terminal lug 7. Allow enough slack to easily attach wiring to torque as shown in . (4.0 N-m) 5. Line 1 (black) wire 4. G A B F DE C A. 10-32 hex...
...) wire F. A B B C C D E A. Terminal block B. Ground-link screw 2. Terminal block B. Securely tighten hex nuts. 9. Securely tighten setscrew to the terminal block. Line 1 (black) G. Line 1 (black) wire 11 Part of terminal lugs. Setscrew C. 1. Terminal lug 7. Allow enough slack to easily attach wiring to torque as shown in . (4.0 N-m) 5. Line 1 (black) wire 4. G A B F DE C A. 10-32 hex...
Installation Instruction
Page 14
... items are now installed. Check that the range is heavy. If it away from the oven door frame. Check that the door is an extra part, go back through the steps to verify the electrical supply. ■ See the "Troubleshooting" section in the drawer. Use a mild solution of the .... NOTE: When properly installed, the rear slides on some models) The storage drawer can be miswired. Then, follow these instructions. Open oven door all parts are placed in the Use and Care Guide or User Instructions. You should hear a "click" as it is off the range and contact a qualified ...
... items are now installed. Check that the range is heavy. If it away from the oven door frame. Check that the door is an extra part, go back through the steps to verify the electrical supply. ■ See the "Troubleshooting" section in the drawer. Use a mild solution of the .... NOTE: When properly installed, the rear slides on some models) The storage drawer can be miswired. Then, follow these instructions. Open oven door all parts are placed in the Use and Care Guide or User Instructions. You should hear a "click" as it is off the range and contact a qualified ...

Installation Instruction
Page 15
... serious burns to do so can tip the range and be killed. See the "Verify Anti-Tip Bracket Is Installed and Engaged" section. 6. Replace all parts and panels before servicing. Disconnect power. 2. See the "Verify Anti-Tip Bracket Is Installed and Engaged" section. 5. Slide range forward. 2. Check that range is level...
... serious burns to do so can tip the range and be killed. See the "Verify Anti-Tip Bracket Is Installed and Engaged" section. 6. Replace all parts and panels before servicing. Disconnect power. 2. See the "Verify Anti-Tip Bracket Is Installed and Engaged" section. 5. Slide range forward. 2. Check that range is level...
Use and Care
Page 3
... result in or on . For self-cleaning ranges - ■ Do Not Clean Door Gasket - No commercial oven cleaner or oven liner protective coating of any part of the range. ■ Wear Proper Apparel - Grease should be allowed to accumulate on hood or filter. ■ When flambeing foods under the hood, turn... AND SLIDE RANGE BACK SO REAR RANGE FOOT IS UNDER ANTI-TIP BRACKET. ■ CAUTION: Do not store items of the oven. ■ Clean Only Parts Listed in an oven or near surface units may be hot even though they have had sufficient time to cause burns - Flammable materials should not...
... result in or on . For self-cleaning ranges - ■ Do Not Clean Door Gasket - No commercial oven cleaner or oven liner protective coating of any part of the range. ■ Wear Proper Apparel - Grease should be allowed to accumulate on hood or filter. ■ When flambeing foods under the hood, turn... AND SLIDE RANGE BACK SO REAR RANGE FOOT IS UNDER ANTI-TIP BRACKET. ■ CAUTION: Do not store items of the oven. ■ Clean Only Parts Listed in an oven or near surface units may be hot even though they have had sufficient time to cause burns - Flammable materials should not...
Use and Care
Page 5
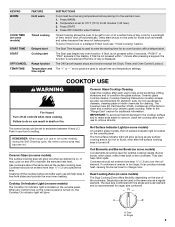
... or too large, it in death or fire. Press OFF/CANCEL when finished. The Off/Cancel keypad stops any oven function. The Cooktop Care Kit, Part Number 31605, contains all of the items to the "Range Care" section for stubborn soils. If cookware is located on at 170°F (75°...
... or too large, it in death or fire. Press OFF/CANCEL when finished. The Off/Cancel keypad stops any oven function. The Cooktop Care Kit, Part Number 31605, contains all of the items to the "Range Care" section for stubborn soils. If cookware is located on at 170°F (75°...
Use and Care
Page 7
... "-" keypads (if present) or "MORE" or "LESS" keypads (if present). 3. Press START within 5 seconds to remain on in use . "SAb" will remain on for only part of the cycle. Press COOK TIME. The Oven Control Lockout Feature (if present) will flash in food poisoning or sickness. 1. Press and hold the TIMER...
... "-" keypads (if present) or "MORE" or "LESS" keypads (if present). 3. Press START within 5 seconds to remain on in use . "SAb" will remain on for only part of the cycle. Press COOK TIME. The Oven Control Lockout Feature (if present) will flash in food poisoning or sickness. 1. Press and hold the TIMER...
Use and Care
Page 11
... Rub in the OFF position. The marks will not totally disappear, but after many cleanings they will become less noticeable. Use Cooktop Protectant Part Number 31463A regularly to avoid stain buildup, pitting and scratching, while conditioning the cooktop for stubborn spots. Cleaning Method: ■ Soap and...elements are cool. CERAMIC GLASS (on cleaning products. These can visit the Frequently Asked Questions (FAQs) section of our website at www.amana.com. Soil will burn off when hot. 11 General Cleaning IMPORTANT: Before cleaning, make sure knobs are in direction of grain to ...
... Rub in the OFF position. The marks will not totally disappear, but after many cleanings they will become less noticeable. Use Cooktop Protectant Part Number 31463A regularly to avoid stain buildup, pitting and scratching, while conditioning the cooktop for stubborn spots. Cleaning Method: ■ Soap and...elements are cool. CERAMIC GLASS (on cleaning products. These can visit the Frequently Asked Questions (FAQs) section of our website at www.amana.com. Soil will burn off when hot. 11 General Cleaning IMPORTANT: Before cleaning, make sure knobs are in direction of grain to ...

Use and Care
Page 12
... spills should be used to remove. 3. Cleaning Method: ■ Glass cleaner, mild liquid cleaner or nonabrasive scrubbing pad. ■ affresh® Kitchen and Appliance Cleaner Part Number W10355010 (not included): See cover for cleaning beneath. Cleaning Method: ■ Mild detergent Oven Light The oven light is cool and empty before cleaning...
... spills should be used to remove. 3. Cleaning Method: ■ Glass cleaner, mild liquid cleaner or nonabrasive scrubbing pad. ■ affresh® Kitchen and Appliance Cleaner Part Number W10355010 (not included): See cover for cleaning beneath. Cleaning Method: ■ Mild detergent Oven Light The oven light is cool and empty before cleaning...

Use and Care
Page 14
... affresh® Kitchen and Appliance Cleaner Order Part Number W10355010 Split Oven Rack Order Part Number 4396927 Porcelain Broiler Pan and Grid Order Part Number 4396923 Gas Grate and Drip Pan Cleaner Order Part Number 31617A Gourmet Griddle Order Part Number 4396096RB Premium Broil Pan and Roasting Rack Order Part Number W10123240 www.amana.com/broilerpan 14
... affresh® Kitchen and Appliance Cleaner Order Part Number W10355010 Split Oven Rack Order Part Number 4396927 Porcelain Broiler Pan and Grid Order Part Number 4396923 Gas Grate and Drip Pan Cleaner Order Part Number 31617A Gourmet Griddle Order Part Number 4396096RB Premium Broil Pan and Roasting Rack Order Part Number W10123240 www.amana.com/broilerpan 14
Use and Care
Page 15
...filters. Costs associated with the removal from your major appliance is located in a remote area where service by an authorized Amana servicer is contrary to parts or systems resulting from warranty coverage. 3. Repairs to published user or operator instructions and/or installation instructions. 4. SOME...complete model number ready. For assistance or service in -home service is used for factory specified parts and repair labor to be borne by Amana. 5. Proof of your major appliance, to Amana within 30 days from accident, alteration, misuse, abuse, fire, flood, acts of God, ...
...filters. Costs associated with the removal from your major appliance is located in a remote area where service by an authorized Amana servicer is contrary to parts or systems resulting from warranty coverage. 3. Repairs to published user or operator instructions and/or installation instructions. 4. SOME...complete model number ready. For assistance or service in -home service is used for factory specified parts and repair labor to be borne by Amana. 5. Proof of your major appliance, to Amana within 30 days from accident, alteration, misuse, abuse, fire, flood, acts of God, ...

Warranty
Page 1
... and is used in your correspondence. Costs associated with the product, Amana brand of Whirlpool Corporation or Whirlpool Canada LP (hereafter "Amana") will pay for factory specified parts and repair labor to correct defects in a remote area where service by...Major appliances with published installation instructions. 11. Have your authorized Amana dealer to correct the installation of consumables or cleaning products not approved by an Amana designated service company. Consumable parts are excluded from unauthorized modifications made to repair or replace appliance...
... and is used in your correspondence. Costs associated with the product, Amana brand of Whirlpool Corporation or Whirlpool Canada LP (hereafter "Amana") will pay for factory specified parts and repair labor to correct defects in a remote area where service by...Major appliances with published installation instructions. 11. Have your authorized Amana dealer to correct the installation of consumables or cleaning products not approved by an Amana designated service company. Consumable parts are excluded from unauthorized modifications made to repair or replace appliance...


