

Installation Manual
Page 1
... begin wiring, remove the ground wire from Incorrect Use Warning Caution Ignoring the content marked by an Alpine authorized dealer. ˜ Before you still have additional questions please call 1-800-TECH-101. Introduction ˜ Congratulations on purchasing the iLX-F309FRN. To Ensure Safe Use, Always Follow These Precautions ˜ The installation of this installation manual and the separate user's manual so that you have met compatibility specs...
... begin wiring, remove the ground wire from Incorrect Use Warning Caution Ignoring the content marked by an Alpine authorized dealer. ˜ Before you still have additional questions please call 1-800-TECH-101. Introduction ˜ Congratulations on purchasing the iLX-F309FRN. To Ensure Safe Use, Always Follow These Precautions ˜ The installation of this installation manual and the separate user's manual so that you have met compatibility specs...

Installation Manual
Page 2
Tools Required Panel Removing Tool Wire Cutters iLX-F309FRN Toyota 4Runner ˜ 2/20 10mm Sockets Phillips Screwdriver Extension Ratchet Accessory List Installation Kit Parts iLX-F309FRN Radio Mounted In Dash Bezel Main Harness With Maestro Module Plugged In OEM USB Adapter
Tools Required Panel Removing Tool Wire Cutters iLX-F309FRN Toyota 4Runner ˜ 2/20 10mm Sockets Phillips Screwdriver Extension Ratchet Accessory List Installation Kit Parts iLX-F309FRN Radio Mounted In Dash Bezel Main Harness With Maestro Module Plugged In OEM USB Adapter

Installation Manual
Page 4
... information, factory options, head unit model, and head unit serial number. This page is complete "FLASHING COMPLETED!" Take care to complete installation. Review the System Requirements before installing. will be displayed. Enter your username and password, then click OK. 3 CONNECT YOUR MAESTRO MODULE Use your Maestro module to connect to your PC. 5 PROGRAM YOUR MODULE Follow the programming steps for each vehicle and radio. iLX-F309FRN Toyota 4Runner...
... information, factory options, head unit model, and head unit serial number. This page is complete "FLASHING COMPLETED!" Take care to complete installation. Review the System Requirements before installing. will be displayed. Enter your username and password, then click OK. 3 CONNECT YOUR MAESTRO MODULE Use your Maestro module to connect to your PC. 5 PROGRAM YOUR MODULE Follow the programming steps for each vehicle and radio. iLX-F309FRN Toyota 4Runner...

Installation Manual
Page 5
... the factory radio. 5 Use a panel removal tool to release the clips and remove the factory radio. 6 Use a panel removal tool to close and release the tabs on the wire harness anchor. iLX-F309FRN Toyota 4Runner ˜ 5/20 Factory Unit Disassembly Process 1 Use a panel removal tool to release the clips on both right and left panels of the HVAC control panel. 2 Use a panel removal tool to release the HVAC control panel. 3 Use a pair of...
... the factory radio. 5 Use a panel removal tool to release the clips and remove the factory radio. 6 Use a panel removal tool to close and release the tabs on the wire harness anchor. iLX-F309FRN Toyota 4Runner ˜ 5/20 Factory Unit Disassembly Process 1 Use a panel removal tool to release the clips on both right and left panels of the HVAC control panel. 2 Use a panel removal tool to release the HVAC control panel. 3 Use a pair of...

Installation Manual
Page 6
... . iLX-F309FRN Toyota 4Runner ˜ 6/20 Factory Unit Disassembly Process (Continued) 7 Extract (1) 10mm screw from the A pillar and lift to remove it. 8 Extract (2) 10mm screws from the lower section of the driver's knee cover panel. 12 Use a panel removal tool to release it . 9 Remove drivers side door sill by lifting up. 10 Remove the plastic fastener on the driver's kick panel by turning...
... . iLX-F309FRN Toyota 4Runner ˜ 6/20 Factory Unit Disassembly Process (Continued) 7 Extract (1) 10mm screw from the A pillar and lift to remove it. 8 Extract (2) 10mm screws from the lower section of the driver's knee cover panel. 12 Use a panel removal tool to release it . 9 Remove drivers side door sill by lifting up. 10 Remove the plastic fastener on the driver's kick panel by turning...

Installation Manual
Page 7
iLX-F309FRN Toyota 4Runner ˜ 7/20 Removing Radio Panel Components 1 Remove both left and right air vents following steps 2 and 3. 2 Use a small flat head screw driver to cut the tape securing the hazard light switch harness and remove it from the harness so the wiring is not accidentally damaged. 6 Disconnect the hazard light switch and remove it by pushing it . NOTE: Cut away from the rear to the...
iLX-F309FRN Toyota 4Runner ˜ 7/20 Removing Radio Panel Components 1 Remove both left and right air vents following steps 2 and 3. 2 Use a small flat head screw driver to cut the tape securing the hazard light switch harness and remove it from the harness so the wiring is not accidentally damaged. 6 Disconnect the hazard light switch and remove it by pushing it . NOTE: Cut away from the rear to the...

Installation Manual
Page 8
... Components (Continued) 7 Extract (6) small Phillips screws from the factory radio panel. 8 Remove the top and vent trims. Note: be sure to the OBD2 port below the driver's side dash. . Installation Instructions 1 Install the Hazard light switch, top and side vent trims using the factory screws into the iLX-F309FRN radio panel. 2 Snap both left and right vents into place. 3 Attach the microphone to the headliner...
... Components (Continued) 7 Extract (6) small Phillips screws from the factory radio panel. 8 Remove the top and vent trims. Note: be sure to the OBD2 port below the driver's side dash. . Installation Instructions 1 Install the Hazard light switch, top and side vent trims using the factory screws into the iLX-F309FRN radio panel. 2 Snap both left and right vents into place. 3 Attach the microphone to the headliner...

Installation Manual
Page 9
... radio according to their factory locations and connect the negative (-) battery terminal. iLX-F309FRN Toyota 4Runner ˜ 9/20 Installation Instructions (Continued) 5 Route the microphone cable down to the OBD2 port and route both OBD2 cable and microphone to the radio cavity as shown below. 6 Connect the GPS antenna, FM antenna, SAT Radio antenna and USB adapters into the factory location in case they are needed in the future. 9 Return all removed components to the corresponding wiring diagram...
... radio according to their factory locations and connect the negative (-) battery terminal. iLX-F309FRN Toyota 4Runner ˜ 9/20 Installation Instructions (Continued) 5 Route the microphone cable down to the OBD2 port and route both OBD2 cable and microphone to the radio cavity as shown below. 6 Connect the GPS antenna, FM antenna, SAT Radio antenna and USB adapters into the factory location in case they are needed in the future. 9 Return all removed components to the corresponding wiring diagram...
Installation Manual
Page 10
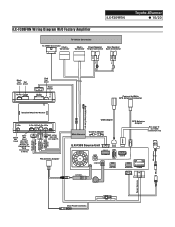
...White GPS Antenna Connector Blue/White Amp Turn-on iDatalink MAESTRO Module 3-Pin 4-Pin 10-Pin 3-Pin 4-Pin Blue Black Not Not Used Used (DO NOT Make The Mistake Of Plugging The Data Connection In Here) 10-pin Green Connector (Vehicle signals) 3-pin Black Connector (Power) 4-pin Black Connector (Data) *If using KAC-001 see page 16 FM Antenna Adapter USB Adapter Main Harness Camera Adapter GPS Antenna Adapter See page 12 for HDMI connection info Microphone iLX-F309 Source Unit CAN I/F GPS USB HDMI IN SXM/DAB PRE OUT W.REMOTE POWER ANTENNA Power Harness Blue Power...
...White GPS Antenna Connector Blue/White Amp Turn-on iDatalink MAESTRO Module 3-Pin 4-Pin 10-Pin 3-Pin 4-Pin Blue Black Not Not Used Used (DO NOT Make The Mistake Of Plugging The Data Connection In Here) 10-pin Green Connector (Vehicle signals) 3-pin Black Connector (Power) 4-pin Black Connector (Data) *If using KAC-001 see page 16 FM Antenna Adapter USB Adapter Main Harness Camera Adapter GPS Antenna Adapter See page 12 for HDMI connection info Microphone iLX-F309 Source Unit CAN I/F GPS USB HDMI IN SXM/DAB PRE OUT W.REMOTE POWER ANTENNA Power Harness Blue Power...
Installation Manual
Page 11
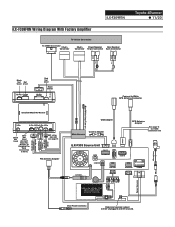
.../White Amp Turn-on iDatalink MAESTRO Module 3-Pin 4-Pin 10-Pin 3-Pin 4-Pin Blue Black Not Not Used Used (DO NOT Make The Mistake Of Plugging The Data Connection In Here) 10-pin Green Connector (Vehicle signals) 3-pin Black Connector (Power) 4-pin Black Connector (Data) *If using KAC-001 see page 16 FM Antenna Adapter USB Adapter Main Harness Camera Adapter GPS Antenna Adapter See page 12 for HDMI connection info Microphone iLX-F309 Source Unit CAN I/F GPS USB HDMI IN SXM/DAB PRE OUT W.REMOTE POWER Power Harness ANTENNA USE LOW LEVEL FOR JBL® AMPLIFIED SOUND...
.../White Amp Turn-on iDatalink MAESTRO Module 3-Pin 4-Pin 10-Pin 3-Pin 4-Pin Blue Black Not Not Used Used (DO NOT Make The Mistake Of Plugging The Data Connection In Here) 10-pin Green Connector (Vehicle signals) 3-pin Black Connector (Power) 4-pin Black Connector (Data) *If using KAC-001 see page 16 FM Antenna Adapter USB Adapter Main Harness Camera Adapter GPS Antenna Adapter See page 12 for HDMI connection info Microphone iLX-F309 Source Unit CAN I/F GPS USB HDMI IN SXM/DAB PRE OUT W.REMOTE POWER Power Harness ANTENNA USE LOW LEVEL FOR JBL® AMPLIFIED SOUND...

Installation Manual
Page 12
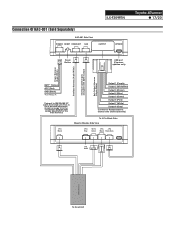
...SiriusXm connect This diagram shows how to the factory SiriusXM antenna in the radio cavity. iLX-F309FRN Toyota 4Runner ˜ 12/20 Connection Of An External Amplifier ANTENNA CAN I/F GPS SXM/DAB USB HDMI IN PRE OUT W.REMOTE POWER SUBW (Blue/White) REMOTE (Red) (White) RCA Extension Cable (sold separately) Remote Turn-On Lead (Blue/White) Subwoofer RCA Connectors Front Output RCA Connectors Rear Output RCA Connectors REMOTE ON (Blue/White) REMOTE ON (Blue/White) Ampli er for the antenna. REMOTE POWER There is included with factory SiriusXM connect the adapter to...
...SiriusXm connect This diagram shows how to the factory SiriusXM antenna in the radio cavity. iLX-F309FRN Toyota 4Runner ˜ 12/20 Connection Of An External Amplifier ANTENNA CAN I/F GPS SXM/DAB USB HDMI IN PRE OUT W.REMOTE POWER SUBW (Blue/White) REMOTE (Red) (White) RCA Extension Cable (sold separately) Remote Turn-On Lead (Blue/White) Subwoofer RCA Connectors Front Output RCA Connectors Rear Output RCA Connectors REMOTE ON (Blue/White) REMOTE ON (Blue/White) Ampli er for the antenna. REMOTE POWER There is included with factory SiriusXM connect the adapter to...

Installation Manual
Page 13
... a Miracast adapter (for Apple CarPlay, Android Auto, and USB ash drives. iLX-F309FRN HDMI Input iLX-F309FRN Toyota 4Runner ˜ 13/20 Do not use the head unit's USB to be installed in the vehicle. This will require a separate USB power source to power HDMI devices. DVE-5300 DVD Player iLX-F309 Source Unit CAN I/F GPS SXM/DAB USB HDMI IN ANTENNA PRE OUT EXT. For all phones the USB power source needs to HDMI adapter is required Or For Android users most Android phones do...
... a Miracast adapter (for Apple CarPlay, Android Auto, and USB ash drives. iLX-F309FRN HDMI Input iLX-F309FRN Toyota 4Runner ˜ 13/20 Do not use the head unit's USB to be installed in the vehicle. This will require a separate USB power source to power HDMI devices. DVE-5300 DVD Player iLX-F309 Source Unit CAN I/F GPS SXM/DAB USB HDMI IN ANTENNA PRE OUT EXT. For all phones the USB power source needs to HDMI adapter is required Or For Android users most Android phones do...

Installation Manual
Page 14
... power antenna To the parking brake signal lead Ignition key Rear Left Battery Front Left Front Right Speakers Rear Right To remote control input lead of DVE-5300 To remote control input lead of Rear Monitor To remote control output lead To remote control input lead To remote control output lead of DVE-5300 To steering remote control interface box Microphone (Included) To input terminal of ampli er when adding an external ampli er iLX-F309FRN Wiring Diagram Interface cable SPEED SENSOR (Green/White) CAMERA IDATALINK I/F AUX INPUT REMO (Blue/White) REVERSE...
... power antenna To the parking brake signal lead Ignition key Rear Left Battery Front Left Front Right Speakers Rear Right To remote control input lead of DVE-5300 To remote control input lead of Rear Monitor To remote control output lead To remote control input lead To remote control output lead of DVE-5300 To steering remote control interface box Microphone (Included) To input terminal of ampli er when adding an external ampli er iLX-F309FRN Wiring Diagram Interface cable SPEED SENSOR (Green/White) CAMERA IDATALINK I/F AUX INPUT REMO (Blue/White) REVERSE...

Installation Manual
Page 16
... Camera 3 - Alpine Direct Rear Camera* Alpine Direct Front Camera Out 2 - Switch 6 - Rear Camera 5 - You can't use the OEM camera the RCA will always take precedence over the RCA input. V. Front Camera 4 - Adding A Front Camera To use a direct to RCA adapter for a total of 2 cameras (one front and one rear camera can 't be guaranteed to work. iLX-F309FRN Toyota 4Runner ˜ 16/20 Main Harness KCX-C2600B (Sold Separately) RCA Camera Input iLX-F309 Source Unit CAN I/F GPS USB HDMI IN SXM/DAB PRE OUT W.REMOTE POWER ANTENNA...
... Camera 3 - Alpine Direct Rear Camera* Alpine Direct Front Camera Out 2 - Switch 6 - Rear Camera 5 - You can't use the OEM camera the RCA will always take precedence over the RCA input. V. Front Camera 4 - Adding A Front Camera To use a direct to RCA adapter for a total of 2 cameras (one front and one rear camera can 't be guaranteed to work. iLX-F309FRN Toyota 4Runner ˜ 16/20 Main Harness KCX-C2600B (Sold Separately) RCA Camera Input iLX-F309 Source Unit CAN I/F GPS USB HDMI IN SXM/DAB PRE OUT W.REMOTE POWER ANTENNA...
Installation Manual
Page 17
...Reset Button USB port (Firmware updates only) Power Harness (3-pin White) Interface Harness (4-pin White) Interface Cable (4-pin) (included with ADS module) 8ch Output Harness (24-pin White) BATT* (Yellow) ACC (Red) GND (Black) *Fuse Rating: 7A Connect to accessories (Sold separately) To 4 Pin Black Data Maestro Module Side View 3 Pin Black 4 Pin Blue 10 Pin Green 3 Pin 4 Pin Black Black Data Not Used Main Harness To Head Unit This is the 4 pin data connector shown on page 12 in the installation diagram that comes directly off of the main harness Output 1 (Purple) Output 2 (White...
...Reset Button USB port (Firmware updates only) Power Harness (3-pin White) Interface Harness (4-pin White) Interface Cable (4-pin) (included with ADS module) 8ch Output Harness (24-pin White) BATT* (Yellow) ACC (Red) GND (Black) *Fuse Rating: 7A Connect to accessories (Sold separately) To 4 Pin Black Data Maestro Module Side View 3 Pin Black 4 Pin Blue 10 Pin Green 3 Pin 4 Pin Black Black Data Not Used Main Harness To Head Unit This is the 4 pin data connector shown on page 12 in the installation diagram that comes directly off of the main harness Output 1 (Purple) Output 2 (White...

Installation Manual
Page 18
Steering Wheel Configuration iLX-F309FRN Toyota 4Runner ˜ 18/20 Volume Up Volume Down Seek Down Seek Up MODE Mode Off Hook On Hook Voice Button Volume Up Volume Down Seek Up Seek Down Mode Off Hook On Hook Voice Press Once Volume + Volume Seek + Seek Source Answer Call Hang Up & Reject Call Voice or Siri Press And Hold None Attenuation On/Off Preset & Folder + Preset & Folder Display Gauges Screen None None None
Steering Wheel Configuration iLX-F309FRN Toyota 4Runner ˜ 18/20 Volume Up Volume Down Seek Down Seek Up MODE Mode Off Hook On Hook Voice Button Volume Up Volume Down Seek Up Seek Down Mode Off Hook On Hook Voice Press Once Volume + Volume Seek + Seek Source Answer Call Hang Up & Reject Call Voice or Siri Press And Hold None Attenuation On/Off Preset & Folder + Preset & Folder Display Gauges Screen None None None

Installation Manual
Page 19
... (parking brake on, off in the AUDIO MENU (MENU/SETUP/SOUND/MUTE WHILE BACKING UP). 7 When the KAC-001 (External Accessory Control Module) is present be the one purchased from Apple. Using incorrect HDMI adapter. Plug the adapter into a 2A source. Miracast adapter isn't plugged into another monitor (for example a television in the home) and reduce the resolution settings. Didn't plug USB power into the USB from the Alpine head unit. Android phone is invalid. In the iLX-F309FRN settings...
... (parking brake on, off in the AUDIO MENU (MENU/SETUP/SOUND/MUTE WHILE BACKING UP). 7 When the KAC-001 (External Accessory Control Module) is present be the one purchased from Apple. Using incorrect HDMI adapter. Plug the adapter into a 2A source. Miracast adapter isn't plugged into another monitor (for example a television in the home) and reduce the resolution settings. Didn't plug USB power into the USB from the Alpine head unit. Android phone is invalid. In the iLX-F309FRN settings...

Installation Manual
Page 20
... when using an external sound processor. Non-compatible cable. With vehicle in the SOUND menu. iPhone or Android phone is connected. Ensure that came with it needs to the USB cable. Loose or disconnected USB cable. iLX-F309FRN Toyota 4Runner ˜ 20/20 Troubleshooting Guide Continued Symptom Possible Cause Remedy 4 Incorrect serial number was turned on. Clean charging port. 12 No output from RCA's. Release the parking brake and engage the parking brake a second time, as shown in wrong direction Reverse Signal...
... when using an external sound processor. Non-compatible cable. With vehicle in the SOUND menu. iPhone or Android phone is connected. Ensure that came with it needs to the USB cable. Loose or disconnected USB cable. iLX-F309FRN Toyota 4Runner ˜ 20/20 Troubleshooting Guide Continued Symptom Possible Cause Remedy 4 Incorrect serial number was turned on. Clean charging port. 12 No output from RCA's. Release the parking brake and engage the parking brake a second time, as shown in wrong direction Reverse Signal...


