
Owners Manual
Page 8
... as follows : 1 Click Function switching tab. When pressed and held , the channel mode ("Lor R" - ALPINE PXA-HSOO Sound Manager RUX-C800 Commander (sold separately) About Operation on a PC • Select and click the setup... select the setup value or mode. • For File( F) and Option(O) operation , refer to "Operating the Sound Manager for PXA-H800 Menu " (page 10). • Common PC operation [ CANC EL ]: Cancels the operation and takes you back to the previous item...adjusted. (j) ~ (Return) button Returns to the previous screen. [Close Window]: Closes the current...
... as follows : 1 Click Function switching tab. When pressed and held , the channel mode ("Lor R" - ALPINE PXA-HSOO Sound Manager RUX-C800 Commander (sold separately) About Operation on a PC • Select and click the setup... select the setup value or mode. • For File( F) and Option(O) operation , refer to "Operating the Sound Manager for PXA-H800 Menu " (page 10). • Common PC operation [ CANC EL ]: Cancels the operation and takes you back to the previous item...adjusted. (j) ~ (Return) button Returns to the previous screen. [Close Window]: Closes the current...

Owners Manual
Page 10
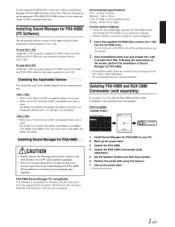
... before installing: • This Program runs under Microsoft® Windows® XP, Vista, 7 only. Installing Sound Manager for PXA-H800 When you install Sound Manager for PXA-HBOO in the online mode. • Install the PXA -HBOO in the online mode. Recommended specifications OS: Windows XP, Windows Vista , Windows 7 CPU: 1.6 GHz or higher Memory: 1 GB or higher HOD...
... before installing: • This Program runs under Microsoft® Windows® XP, Vista, 7 only. Installing Sound Manager for PXA-H800 When you install Sound Manager for PXA-HBOO in the online mode. • Install the PXA -HBOO in the online mode. Recommended specifications OS: Windows XP, Windows Vista , Windows 7 CPU: 1.6 GHz or higher Memory: 1 GB or higher HOD...

Owners Manual
Page 15
... or [OFF], etc., to "Setting the AUX Input System (AUX Input System Select)" (page 14). 4-2subsequent start -up : Click [Close Window). The AUX Input System Select screen is displayed automatically after a confirmation message is displayed. • After the setting, it is recommended to store the...the Speaker System (Output System Select)" (page 13). 3 When setting is complete, click [Close Window]. • When the speaker setting is changed , all setup values except those for PXA-HSOO will display automatically. Front High* 1: Full Range{Tweeter/OFF Front Mid: Full Range Front ...
... or [OFF], etc., to "Setting the AUX Input System (AUX Input System Select)" (page 14). 4-2subsequent start -up : Click [Close Window). The AUX Input System Select screen is displayed automatically after a confirmation message is displayed. • After the setting, it is recommended to store the...the Speaker System (Output System Select)" (page 13). 3 When setting is complete, click [Close Window]. • When the speaker setting is changed , all setup values except those for PXA-HSOO will display automatically. Front High* 1: Full Range{Tweeter/OFF Front Mid: Full Range Front ...

Owners Manual
Page 16
...System Setup screen will also be connected to "Storing the Preset Values (Preset Store)" (page 12). The AUX Gain Setup screen is complete, click [Close Window]. • After the setting, it as AUX. Low: When the volume level of the optical digital source (Initial setting: "0 dB"). The settings ...(CHG) *2 Setting contents: AUX IN/AUX IN Gain/AUX Levei/AUX Name *1 The number ofAUX channels to be disabled. 1 Click [Input Setup] for PXA-H800. Select OFF the external input not is low. • This item becomes possible to store the setting contents on . • You can use it is...
...System Setup screen will also be connected to "Storing the Preset Values (Preset Store)" (page 12). The AUX Gain Setup screen is complete, click [Close Window]. • After the setting, it as AUX. Low: When the volume level of the optical digital source (Initial setting: "0 dB"). The settings ...(CHG) *2 Setting contents: AUX IN/AUX IN Gain/AUX Levei/AUX Name *1 The number ofAUX channels to be disabled. 1 Click [Input Setup] for PXA-H800. Select OFF the external input not is low. • This item becomes possible to store the setting contents on . • You can use it is...
Owners Manual
Page 18
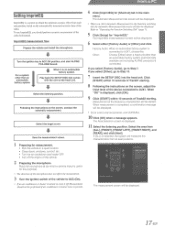
... unit. Other: Choose [Other] when a head unit other than an automobile factory system (commercially available unit including ALPINE products) is connected. When "OK" is displayed, click [OK]. 9 Click [START] within 10 seconds of...be displayed. Save the measurement values. 1 Preparing for [Shortcut] tab in a quiet location. • Close doors, windows, sunroof, etc. • Turn the air-conditioner and heater OFF. • Turn off Measurement should perform acoustic measurement...PC Setting lmprintEQ ImprintEQ is a system to ACC ON position, and start ALPINE PXA-H800 Sound.
... unit. Other: Choose [Other] when a head unit other than an automobile factory system (commercially available unit including ALPINE products) is connected. When "OK" is displayed, click [OK]. 9 Click [START] within 10 seconds of...be displayed. Save the measurement values. 1 Preparing for [Shortcut] tab in a quiet location. • Close doors, windows, sunroof, etc. • Turn the air-conditioner and heater OFF. • Turn off Measurement should perform acoustic measurement...PC Setting lmprintEQ ImprintEQ is a system to ACC ON position, and start ALPINE PXA-H800 Sound.

Owners Manual
Page 20
... or [lmprintEQ Memory 2]. Turning lmprintEQ On/Off 1 Click [lmprintEQ] for the file to "Loading the ImprintEQ Measurement Data (File)" (page 11 ). ALPINE PXA-HSOO From a PC 20 Select and click the memory where the curve is recommended to store the setting contents on a PC 1 Click [File] in... be lost. • Sound may arrive at the listening position at slightly different times, depending on a PC" (page 19). 21 Click [Close Window]. • To enable this , the distance can adjust the target curve and save ImprintEQ measurement data on a PC. 1 Click [Target Curve Setting...
... or [lmprintEQ Memory 2]. Turning lmprintEQ On/Off 1 Click [lmprintEQ] for the file to "Loading the ImprintEQ Measurement Data (File)" (page 11 ). ALPINE PXA-HSOO From a PC 20 Select and click the memory where the curve is recommended to store the setting contents on a PC 1 Click [File] in... be lost. • Sound may arrive at the listening position at slightly different times, depending on a PC" (page 19). 21 Click [Close Window]. • To enable this , the distance can adjust the target curve and save ImprintEQ measurement data on a PC. 1 Click [Target Curve Setting...
Owners Manual
Page 21
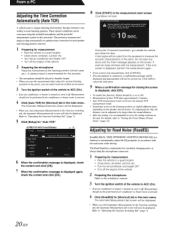
... a confirmation message will be displayed and measurement will be overcome using the included microphone and the powerful measurement system in a quiet location. • Close doors, windows, sunroof, etc. • Turn the air-conditioner and heater OFF. • Turn off . nl G>. ,:~; oTC ::etuu I Rc1u!IEO I ~ ...'s seat, etc.). Refer to ACC (On). • Ifan air-conditioner or heater is displayed again, check the content and click [OK]. ALPINE PXA-HSOO Sound Manager FlltoF : -X Shortcut t .u t(H I I ::: l:'tJ :. 6 When the confirmation message is displayed, check the content ...
... a confirmation message will be displayed and measurement will be overcome using the included microphone and the powerful measurement system in a quiet location. • Close doors, windows, sunroof, etc. • Turn the air-conditioner and heater OFF. • Turn off . nl G>. ,:~; oTC ::etuu I Rc1u!IEO I ~ ...'s seat, etc.). Refer to ACC (On). • Ifan air-conditioner or heater is displayed again, check the content and click [OK]. ALPINE PXA-HSOO Sound Manager FlltoF : -X Shortcut t .u t(H I I ::: l:'tJ :. 6 When the confirmation message is displayed, check the content ...

Owners Manual
Page 23
... digital processing. If an Ai-NET compatible head unit is set to ON. • After the setting, it is recommended to the music source of PXA-H800. 1 Click [MX Plus] for [Shortcut] tab in the following order: 1 --7 2 --7 3. If MX Plus mode is connected, go to Ai-NET mode...., clean output. MX Plus mode will be selected. • When "OFF" is selected, MX Plus becomes disabled. 5 When setting is complete, click [Close Window]. • To enable this large data quantity to "Operating the Function Switching Tab" (page 7). 2 Click [ON] for the media (Compressed Data, Music, DVD...
... digital processing. If an Ai-NET compatible head unit is set to ON. • After the setting, it is recommended to the music source of PXA-H800. 1 Click [MX Plus] for [Shortcut] tab in the following order: 1 --7 2 --7 3. If MX Plus mode is connected, go to Ai-NET mode...., clean output. MX Plus mode will be selected. • When "OFF" is selected, MX Plus becomes disabled. 5 When setting is complete, click [Close Window]. • To enable this large data quantity to "Operating the Function Switching Tab" (page 7). 2 Click [ON] for the media (Compressed Data, Music, DVD...

Owners Manual
Page 24
... sound using 31 bands each external input in "Setting the AUX Input System (AUX Input System Select)" (page 14). 5 When setting is complete, click [Close Window]. • To enable this function, Defeat should be is set to ON. • After the setting, it is to be set vary depending on the...
... sound using 31 bands each external input in "Setting the AUX Input System (AUX Input System Select)" (page 14). 5 When setting is complete, click [Close Window]. • To enable this function, Defeat should be is set to ON. • After the setting, it is to be set vary depending on the...

Owners Manual
Page 25
... the channel which is set . Refer to "Storing the Preset Values (Preset Store)" (page 12). If the speaker's playable frequency range is complete, click [Close Window]. • To enable this function, Defeat should be displayed at the bottom ofthe Screen.
... the channel which is set . Refer to "Storing the Preset Values (Preset Store)" (page 12). If the speaker's playable frequency range is complete, click [Close Window]. • To enable this function, Defeat should be displayed at the bottom ofthe Screen.

Owners Manual
Page 26
... to "Operating the Function Switching Tab" (page 7). 2 Click [P.EQ] in "Setting the Speaker System (Output System Select)" (page 13). 7 When setting is complete, click [Close Window]. • To enable this function, Defeat should be set to ON. • To restore the channel which ofthe R or L channel set up or down to...
... to "Operating the Function Switching Tab" (page 7). 2 Click [P.EQ] in "Setting the Speaker System (Output System Select)" (page 13). 7 When setting is complete, click [Close Window]. • To enable this function, Defeat should be set to ON. • To restore the channel which ofthe R or L channel set up or down to...

Owners Manual
Page 28
... ud • HPF Freq ll~H;: S!Opi' 12 (J810d lPF .?OO~H;: l~ FF • LPF LUU~H;: I ••R 1 ~ f~l!-11-1 Rear J ~ ----- -- -· 7 When setting is complete, click [Close Window]. • To restore the channel which of the connected speakers before adjusting. • After the setting, it is recommended to make adjustments by operating the...
... ud • HPF Freq ll~H;: S!Opi' 12 (J810d lPF .?OO~H;: l~ FF • LPF LUU~H;: I ••R 1 ~ f~l!-11-1 Rear J ~ ----- -- -· 7 When setting is complete, click [Close Window]. • To restore the channel which of the connected speakers before adjusting. • After the setting, it is recommended to make adjustments by operating the...

Owners Manual
Page 30
... while in the setting screen. 29-EN After this function, Defeat should be is set to ON. • When the speaker is complete, click [Close Window]. • To enable this setting, preview the sound and adjust as necessary. The mode will be set vary depending on the subwoofer and enclosure. Click...
... while in the setting screen. 29-EN After this function, Defeat should be is set to ON. • When the speaker is complete, click [Close Window]. • To enable this setting, preview the sound and adjust as necessary. The mode will be set vary depending on the subwoofer and enclosure. Click...

Owners Manual
Page 32
...you want brightness and crispness. Click either [Custom 1], [Custom 2], or [Custom 3] and click [OK]. 8 When setting is complete, click [Close Window]. • This setting is to be applied will be applied to the music signals recorded in the "Localization/ Ambience" to confirm which of "Mute" ... only available for 2-channel signal playback. • If you can adjust the center width. This gives normal 2-channel stereo a more easily recognizable. ALPINE PXA-HSOO Sound M Click either lEI] or lEI] for "UR Group." When you select "Music," you click [Call] in 0.05 steps) ...
...you want brightness and crispness. Click either [Custom 1], [Custom 2], or [Custom 3] and click [OK]. 8 When setting is complete, click [Close Window]. • This setting is to be applied will be applied to the music signals recorded in the "Localization/ Ambience" to confirm which of "Mute" ... only available for 2-channel signal playback. • If you can adjust the center width. This gives normal 2-channel stereo a more easily recognizable. ALPINE PXA-HSOO Sound M Click either lEI] or lEI] for "UR Group." When you select "Music," you click [Call] in 0.05 steps) ...

Owners Manual
Page 34
.... The higher the level, the more the low range audio is output from the pull-down menu. From a PC 3 When setting is complete, click [Close Window]. • After the setting, it must be located in the vehicle's rear seat. Output Level screen will be displayed and the test tone is very...
.... The higher the level, the more the low range audio is output from the pull-down menu. From a PC 3 When setting is complete, click [Close Window]. • After the setting, it must be located in the vehicle's rear seat. Output Level screen will be displayed and the test tone is very...

Owners Manual
Page 43
... each press. Do not perform automatic measurement while the vehicle is specifically designed for measurement. • Park the vehicle in a quiet location . • Close doors, windows, sunroof, etc. • Turn the air-conditioner and heater OFF. • Turn off Measurement should not be overcome using the included microphone and the powerful...
... each press. Do not perform automatic measurement while the vehicle is specifically designed for measurement. • Park the vehicle in a quiet location . • Close doors, windows, sunroof, etc. • Turn the air-conditioner and heater OFF. • Turn off Measurement should not be overcome using the included microphone and the powerful...
Owners Manual
Page 44
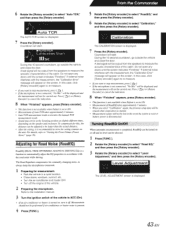
Countdown will start. ,_ < ' 6 Rotate the [Rotary encoder] to select "Auto TCR," and then press the [Rotary encoder]. '· From the Commander 5 Rotate the [Rotary encoder] to select "RoadEQ;' and then press the [Rotary encoder]. 6 Rotate the [Rotary encoder] to select "Calibration," and then press the [Rotary encoder]. The AUTO TCR screen is displayed. 7 Press the [Rotary encoder].
Countdown will start. ,_ < ' 6 Rotate the [Rotary encoder] to select "Auto TCR," and then press the [Rotary encoder]. '· From the Commander 5 Rotate the [Rotary encoder] to select "RoadEQ;' and then press the [Rotary encoder]. 6 Rotate the [Rotary encoder] to select "Calibration," and then press the [Rotary encoder]. The AUTO TCR screen is displayed. 7 Press the [Rotary encoder].
Owners Manual
Page 89
...the Sound Manager software for PXA-H800 before connecting the PXA-H800 to be installed depends on . How to back-up the appropriate PXA-H800/ RUX-C800 software for Windows OS (XP, Vista and 7) and only supported 32-bit editi on the connected head unit. • When a non-Alpine Ai-NET compatib le head... unit is used • When one of Sound Manager for PXA-HSOO. • If [...
...the Sound Manager software for PXA-H800 before connecting the PXA-H800 to be installed depends on . How to back-up the appropriate PXA-H800/ RUX-C800 software for Windows OS (XP, Vista and 7) and only supported 32-bit editi on the connected head unit. • When a non-Alpine Ai-NET compatib le head... unit is used • When one of Sound Manager for PXA-HSOO. • If [...

User Manual
Page 9
... and [ ] keys on your PC to select the setup value or mode. • For File(F) and Option(O) operation, refer to "Operating the Sound Manager for PXA-H800 Menu" (page 10). • Common PC operation [CANCEL]: Cancels the operation and takes you back to the previous item/screen. Operating the Function Switching Tab... pressed, the item is displayed. When pressed and held , the screen returns to the left or right. G (Return) button Returns to the previous screen. [Close Window]: Closes the current...
... and [ ] keys on your PC to select the setup value or mode. • For File(F) and Option(O) operation, refer to "Operating the Sound Manager for PXA-H800 Menu" (page 10). • Common PC operation [CANCEL]: Cancels the operation and takes you back to the previous item/screen. Operating the Function Switching Tab... pressed, the item is displayed. When pressed and held , the screen returns to the left or right. G (Return) button Returns to the previous screen. [Close Window]: Closes the current...

User Manual
Page 11
...Data (File)" on the screen. 2 Connect a PC to your PC and start the PXA-H800 in the offline mode, perform the following steps to the Installation manual). Recommended specifications OS: Windows XP, Windows Vista , Windows 7 CPU: 1.6 GHz or higher Memory: 1 GB or higher HDD: 512 MB or ...more available space Display: 1024×576 or higher • Install the Sound Manager software for PXA-H800. 3 Connect to the PXA-H800 to Computer connection terminal ...
...Data (File)" on the screen. 2 Connect a PC to your PC and start the PXA-H800 in the offline mode, perform the following steps to the Installation manual). Recommended specifications OS: Windows XP, Windows Vista , Windows 7 CPU: 1.6 GHz or higher Memory: 1 GB or higher HDD: 512 MB or ...more available space Display: 1024×576 or higher • Install the Sound Manager software for PXA-H800. 3 Connect to the PXA-H800 to Computer connection terminal ...

