
Owners Manual
Page 69
...TO MAKE GROUND CONNECTIONS. Using such parts could disable control of the factory installed components (e.g. Arrange wiring and cables in doubt, consult your Alpine dealer. • The PXA-H800 uses female RCA-type jacks for other than its designed application may result in the space provided below...these functions. KEEP THE VOLUME AT A LEVEL WHERE YOU CAN STILL HEAR OUTSIDE NOISES WHILE DRIVING. The wiring and installation of the PXA-HBOOhas the appropriate amperage. ARRANGE THE WIRING SO IT IS NOT CRIMPED OR PINCHED BY A SHARP METAL EDGE. This will exceed the current carrying...
...TO MAKE GROUND CONNECTIONS. Using such parts could disable control of the factory installed components (e.g. Arrange wiring and cables in doubt, consult your Alpine dealer. • The PXA-H800 uses female RCA-type jacks for other than its designed application may result in the space provided below...these functions. KEEP THE VOLUME AT A LEVEL WHERE YOU CAN STILL HEAR OUTSIDE NOISES WHILE DRIVING. The wiring and installation of the PXA-HBOOhas the appropriate amperage. ARRANGE THE WIRING SO IT IS NOT CRIMPED OR PINCHED BY A SHARP METAL EDGE. This will exceed the current carrying...
Owners Manual
Page 70
...pipes, tanks, electric wires, etc. Installation example 1 • Set the installation location. • Check that the provided cord is to be careful not to an accident or f ire. For details on how to install and use the CD-ROM, "Sound Manager for PXA-H800," refer to damage... pipes, tanks, electric wires, etc. wARNING When making holes, be fixed. Installation and Connections Mounting the Base Unit (PXA-HSOO) Preparation 1 Check accessory parts. PC guide. *3 For details on how...
...pipes, tanks, electric wires, etc. Installation example 1 • Set the installation location. • Check that the provided cord is to be careful not to an accident or f ire. For details on how to install and use the CD-ROM, "Sound Manager for PXA-H800," refer to damage... pipes, tanks, electric wires, etc. wARNING When making holes, be fixed. Installation and Connections Mounting the Base Unit (PXA-HSOO) Preparation 1 Check accessory parts. PC guide. *3 For details on how...
Owners Manual
Page 71
... microphone using the base without the clip, use , make sure to refer to measure road noise while driving. • Do not install the unit or wiring in the illustration below. For safe use the supplied adhesive tape as in a location that interferes with the 4 self-tapping screws (M4 x 14mm)@. ../ Self-tapping...
... microphone using the base without the clip, use , make sure to refer to measure road noise while driving. • Do not install the unit or wiring in the illustration below. For safe use the supplied adhesive tape as in a location that interferes with the 4 self-tapping screws (M4 x 14mm)@. ../ Self-tapping...

Owners Manual
Page 72
Do not install the unit or wiring where it is not exposed to water. Console or Dashboard etc. LhcAUTION If the installation holes are too big, the Commander unit can rattle or ... template. 5-EN Install the unit where it interferes with a utility knife. Do not install the unit or wiring where it is not exposed to water. Doing so could lead to damage pipes, tanks, electric wires, etc. Install the unit where it interferes with Adhesive sheet • Set the installation location. • Check...
Do not install the unit or wiring where it is not exposed to water. Console or Dashboard etc. LhcAUTION If the installation holes are too big, the Commander unit can rattle or ... template. 5-EN Install the unit where it interferes with a utility knife. Do not install the unit or wiring where it is not exposed to water. Doing so could lead to damage pipes, tanks, electric wires, etc. Install the unit where it interferes with Adhesive sheet • Set the installation location. • Check...

Installation Manual
Page 4
... each other equipment. When drilling holes in compliance with high incidence of the PXA-H800 has the appropriate amperage. DO NOT ALLOW CABLES TO BECOME ENTANGLED IN SURROUNDING OBJECTS. Arrange wiring and cables in the chassis for the intended circuit of moisture or dust....components (e.g. Doing so may result in place. USE ONLY IN CARS WITH A 12 VOLT NEGATIVE GROUND. (Check with your Alpine dealer. • The PXA-H800 uses female RCA-type jacks for installations or ground connections. Any function that penetrates into these functions. Always stop . Failure to...
... each other equipment. When drilling holes in compliance with high incidence of the PXA-H800 has the appropriate amperage. DO NOT ALLOW CABLES TO BECOME ENTANGLED IN SURROUNDING OBJECTS. Arrange wiring and cables in the chassis for the intended circuit of moisture or dust....components (e.g. Doing so may result in place. USE ONLY IN CARS WITH A 12 VOLT NEGATIVE GROUND. (Check with your Alpine dealer. • The PXA-H800 uses female RCA-type jacks for installations or ground connections. Any function that penetrates into these functions. Always stop . Failure to...

Installation Manual
Page 5
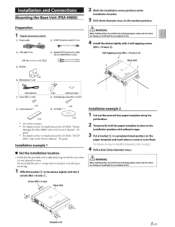
... (×2) *1 Use when necessary. *2 For details on how to install and use the CD-ROM, "Sound Manager for PXA-H800," refer to the Owner's Manual - Doing so could lead to damage pipes, tanks, electric wires, etc. WARNING When making holes, be careful not to an accident or fire. Doing so could lead to...is not exposed to an accident or fire. 4 Install the device tightly with the 4 screws (M3 × 6 mm) G. Installation and Connections Mounting the Base Unit (PXA-H800) Preparation 1 Check accessory parts. Do not install the unit or wiring where it is sufficiently long.
... (×2) *1 Use when necessary. *2 For details on how to install and use the CD-ROM, "Sound Manager for PXA-H800," refer to the Owner's Manual - Doing so could lead to damage pipes, tanks, electric wires, etc. WARNING When making holes, be careful not to an accident or fire. Doing so could lead to...is not exposed to an accident or fire. 4 Install the device tightly with the 4 screws (M3 × 6 mm) G. Installation and Connections Mounting the Base Unit (PXA-H800) Preparation 1 Check accessory parts. Do not install the unit or wiring where it is sufficiently long.

Installation Manual
Page 6
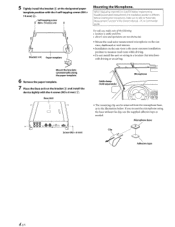
... microphone using the base without the clip, use , make sure to refer to measure road noise while driving. • Do not install the unit or wiring in the Owner's Manual - Self-tapping screw (M4 × 14 mm) (×4) Bracket (×4) Paper template Mounting the Microphone.
... microphone using the base without the clip, use , make sure to refer to measure road noise while driving. • Do not install the unit or wiring in the Owner's Manual - Self-tapping screw (M4 × 14 mm) (×4) Bracket (×4) Paper template Mounting the Microphone.

Installation Manual
Page 7
... bag. • Console or dashboard, etc. * Remove the components to accidents or fire. Make sure to damage pipes, tanks, electric wires, etc. Console or Dashboard etc. WARNING When making holes, be installed from the automobile before installing. 1 Cut out the external box paper...Commander unit holder e Set the installation location. • Check that the provided cord is sufficiently long. Do not install the unit or wiring where it interferes with Adhesive sheet e Set the installation location. • Check that the provided cord is sufficiently long. Commander Unit ...
... bag. • Console or dashboard, etc. * Remove the components to accidents or fire. Make sure to damage pipes, tanks, electric wires, etc. Console or Dashboard etc. WARNING When making holes, be installed from the automobile before installing. 1 Cut out the external box paper...Commander unit holder e Set the installation location. • Check that the provided cord is sufficiently long. Do not install the unit or wiring where it interferes with Adhesive sheet e Set the installation location. • Check that the provided cord is sufficiently long. Commander Unit ...


