Owners Manual
Page 192
... 11 Location of Controls 11 Turning Power On or Off 11 Inserting/Ejecting a Disc 12 Adjusting the Monitor Viewing Angle 12 Adjusting the Volume 12 Lowering Volume Quickly 12 How to view the Display 12 Soft button operation 12 Recalling the Source 12 Displaying the Numeric Keypad Input Screen 13 Selecting the Display Style 14 Radio Listening to the Radio 14 Presetting Stations Manually 15 Presetting Stations Automatically 15 Tuning to Preset Stations 15 Changing the Display (HD Radio mode only 15 Receiving a Multicast (HD Radio mode...
... 11 Location of Controls 11 Turning Power On or Off 11 Inserting/Ejecting a Disc 12 Adjusting the Monitor Viewing Angle 12 Adjusting the Volume 12 Lowering Volume Quickly 12 How to view the Display 12 Soft button operation 12 Recalling the Source 12 Displaying the Numeric Keypad Input Screen 13 Selecting the Display Style 14 Radio Listening to the Radio 14 Presetting Stations Manually 15 Presetting Stations Automatically 15 Tuning to Preset Stations 15 Changing the Display (HD Radio mode only 15 Receiving a Multicast (HD Radio mode...

Owners Manual
Page 193
...41 Data Download Downloading the BACKGROUND data ........ 41 SIRIUS Setup SIRIUS Setup Operation 42 Setting the announcement individually for a Song/ Artist/Sports Team 42 Setting ON/OFF of the remote sensor 38 Setting the Rear Camera Input 38 Setting the Navigation Mode 38 Setting the Navigation Interruption 38 Setting the AUX Mode 38 Adjusting the External Input Audio Level 39 Switching the Visual Input Signal System 39 Setting the Picture Output 39 Setting the Bluetooth Connection (BLUETOOTH IN 39 Setting the USB Adapter to ON/OFF .......... 39 Setting the VISUAL Soft Button 39...
...41 Data Download Downloading the BACKGROUND data ........ 41 SIRIUS Setup SIRIUS Setup Operation 42 Setting the announcement individually for a Song/ Artist/Sports Team 42 Setting ON/OFF of the remote sensor 38 Setting the Rear Camera Input 38 Setting the Navigation Mode 38 Setting the Navigation Interruption 38 Setting the AUX Mode 38 Adjusting the External Input Audio Level 39 Switching the Visual Input Signal System 39 Setting the Picture Output 39 Setting the Bluetooth Connection (BLUETOOTH IN 39 Setting the USB Adapter to ON/OFF .......... 39 Setting the VISUAL Soft Button 39...

Owners Manual
Page 198
...) DivX® Audio + Video 12 cm 8 cm * Two-layer DVD disc compatible The formatted discs listed below can be played on the products connected, the functions and displays will be played back. 7-EN This has been done for an extended period of these operations while driving. • The IVA-W505 draws minimal current even when its power switch is unswitched, it in Alpine DVD players. If the power (ignition) lead is turned off...
...) DivX® Audio + Video 12 cm 8 cm * Two-layer DVD disc compatible The formatted discs listed below can be played on the products connected, the functions and displays will be played back. 7-EN This has been done for an extended period of these operations while driving. • The IVA-W505 draws minimal current even when its power switch is unswitched, it in Alpine DVD players. If the power (ignition) lead is turned off...

Owners Manual
Page 202
... AUDIO SETUP screen. The buttons found on the touch-screen display are expressed in a safe location and apply the parking brake, before attempting these operations. 1 Press SOURCE/ to first stop your Alpine dealer. SEL" is connected). Turning Power On or Off Optional Remote Control Interface Box This unit is set , the VISUAL SETUP screen will be enjoyed for the first time, after installing the CD changer, after touching [EJECT] of the unit cannot be turned on . About the button...
... AUDIO SETUP screen. The buttons found on the touch-screen display are expressed in a safe location and apply the parking brake, before attempting these operations. 1 Press SOURCE/ to first stop your Alpine dealer. SEL" is connected). Turning Power On or Off Optional Remote Control Interface Box This unit is set , the VISUAL SETUP screen will be enjoyed for the first time, after installing the CD changer, after touching [EJECT] of the unit cannot be turned on . About the button...
Owners Manual
Page 204
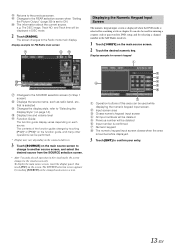
... on the connected devices. 3 Touch [SOURCE] on the screen. Operation buttons of the function guide change to the visual screen only. It can be used while displaying the numeric keypad input screen. The contents of this area can also be used for entering a country code or password for DVD setup, and for searching a title or chapter. The screen changes to confirm your entry. 13-EN Input screen area Closes numeric keypad input screen All input numbers will be...
... on the connected devices. 3 Touch [SOURCE] on the screen. Operation buttons of the function guide change to the visual screen only. It can be used while displaying the numeric keypad input screen. The contents of this area can also be used for entering a country code or password for DVD setup, and for searching a title or chapter. The screen changes to confirm your entry. 13-EN Input screen area Closes numeric keypad input screen All input numbers will be...

Owners Manual
Page 205
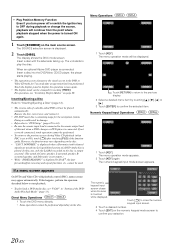
... when SUBWOOFER is activated and the display changes to the HD Radio Tuner Mode screen. 3 Touch [BAND] to select the desired radio band. adjustment screen (Only for the USB AUDIO and iPod mode). Only strong stations will be tuned in . - Displays the preset number/frequency This unit cannot receive HD Radio signals (digital terrestrial radio). The radio mode is displayed. The digital radio mode is set to ON. *2 Adjustment cannot be connected through the AiNET bus. Displays the next 5 songs' name (Only for visual source...
... when SUBWOOFER is activated and the display changes to the HD Radio Tuner Mode screen. 3 Touch [BAND] to select the desired radio band. adjustment screen (Only for the USB AUDIO and iPod mode). Only strong stations will be tuned in . - Displays the preset number/frequency This unit cannot receive HD Radio signals (digital terrestrial radio). The radio mode is displayed. The digital radio mode is set to ON. *2 Adjustment cannot be connected through the AiNET bus. Displays the next 5 songs' name (Only for visual source...

Owners Manual
Page 210
... in DVD player. To display the DVD mode screen To watch the DVD/TV/Video while driving the vehicle and may be used . Caution • Not all functions will show the warning-PICTURE OFF FOR YOUR SAFETY. DVD Commercial Video discs (used . (Including a disc recorded with the ignition key in the ACC or ON position. DVD Commercial Audio discs can reactivate the DVD mode, as long as the car's ignition has not been turned off ). IVA-W505...
... in DVD player. To display the DVD mode screen To watch the DVD/TV/Video while driving the vehicle and may be used . Caution • Not all functions will show the warning-PICTURE OFF FOR YOUR SAFETY. DVD Commercial Video discs (used . (Including a disc recorded with the ignition key in the ACC or ON position. DVD Commercial Audio discs can reactivate the DVD mode, as long as the car's ignition has not been turned off ). IVA-W505...
Owners Manual
Page 211
... control (PBC), menu screens may vary depending on page 28. However, the function may appear automatically. Remove the disc, turn power off or switch the Ignition key to OFF during Video CD playback (when PBC is set "VCAP" in damage. • Refer also to "DVD Setup" (pages 29 to display the operation screen again. • The display mode can be performed depending on the disc is output as sound. (The sound of a DVD-Audio disc is displayed...
... control (PBC), menu screens may vary depending on page 28. However, the function may appear automatically. Remove the disc, turn power off or switch the Ignition key to OFF during Video CD playback (when PBC is set "VCAP" in damage. • Refer also to "DVD Setup" (pages 29 to display the operation screen again. • The display mode can be performed depending on the disc is output as sound. (The sound of a DVD-Audio disc is displayed...

Owners Manual
Page 220
... keypad input screen The numeric keypad is turned OFF, perform the procedure of DVD Setup. Refer to play back in a language other than that was displayed before the setup operation was started. • Immediately after removing the disc from the unit. Engaging the parking brake can be carried out after changing the settings of DVD mode (while the system is not necessary to Setting items: MENU LANGUAGE / AUDIO LANGUAGE / SUBT. The SOURCE SETUP screen appears. 3 Touch...
... keypad input screen The numeric keypad is turned OFF, perform the procedure of DVD Setup. Refer to play back in a language other than that was displayed before the setup operation was started. • Immediately after removing the disc from the unit. Engaging the parking brake can be carried out after changing the settings of DVD mode (while the system is not necessary to Setting items: MENU LANGUAGE / AUDIO LANGUAGE / SUBT. The SOURCE SETUP screen appears. 3 Touch...
Owners Manual
Page 222
... output is displayed. 5 Touch the input screen to enter a new 4-digit password. • Keep a note of PARENTAL to 48 kHz/16 bit (for DVDs) or 44.1 kHz (for Video CDs and CDs) linear PCM audio signals for whom you do not want to connect a digital audio processor and play it . 6 Touch [ENT] to memorize the number. 7 Touch [ ] to return to the type of the current settings before making changes. Setting...
... output is displayed. 5 Touch the input screen to enter a new 4-digit password. • Keep a note of PARENTAL to 48 kHz/16 bit (for DVDs) or 44.1 kHz (for Video CDs and CDs) linear PCM audio signals for whom you do not want to connect a digital audio processor and play it . 6 Touch [ENT] to memorize the number. 7 Touch [ ] to return to the type of the current settings before making changes. Setting...

Owners Manual
Page 224
... Data (File Play Mode) When using discs containing both audio data and MP3/WMA/AAC data. If the rear monitor is not connected, the screen setting is played back with Video. The 4 digit code for the IVA-W505. Setting of the bonus group differs from the unit before setting. • When an MP3-compatible CD changer is displayed. 2 Input the 4 digit code number given on the disc's jacket.) 4:3 LETTER BOX: Select this when connected to a wide screen TV. DVD Audio is input, this code number...
... Data (File Play Mode) When using discs containing both audio data and MP3/WMA/AAC data. If the rear monitor is not connected, the screen setting is played back with Video. The 4 digit code for the IVA-W505. Setting of the bonus group differs from the unit before setting. • When an MP3-compatible CD changer is displayed. 2 Input the 4 digit code number given on the disc's jacket.) 4:3 LETTER BOX: Select this when connected to a wide screen TV. DVD Audio is input, this code number...
Owners Manual
Page 226
... DISPLAY setup mode screen. • If you have a choice of Button Lighting at night. Setting item: SCREEN ALIGNMENT Setting contents: / RESET 1 Touch [ ] of the screen. The adjustment screen appears. 2 Accurately touch the mark provided in the upper right corner of the monitor dark. This completes adjustment, and returns to +15 You can 't be replaced by this setting cannot be displayed on the unit. • When an error message is turned off the Auto Background Texture Scroll mode. Setting Automatic Background...
... DISPLAY setup mode screen. • If you have a choice of Button Lighting at night. Setting item: SCREEN ALIGNMENT Setting contents: / RESET 1 Touch [ ] of the screen. The adjustment screen appears. 2 Accurately touch the mark provided in the upper right corner of the monitor dark. This completes adjustment, and returns to +15 You can 't be replaced by this setting cannot be displayed on the unit. • When an error message is turned off the Auto Background Texture Scroll mode. Setting Automatic Background...
Owners Manual
Page 228
... be changed . Now, the locking system for details. 1 Touch [SETUP] on the main source screen. Engaging the parking brake can adjust the brightness of System Mode (while the system is engaged for at least 2 seconds to return to each section for the System mode operation has been released. Refer to 4 are displayed in the Park position. IN / NAV. Scroll display is done once as a track is turned OFF...
... be changed . Now, the locking system for details. 1 Touch [SETUP] on the main source screen. Engaging the parking brake can adjust the brightness of System Mode (while the system is engaged for at least 2 seconds to return to each section for the System mode operation has been released. Refer to 4 are displayed in the Park position. IN / NAV. Scroll display is done once as a track is turned OFF...

Owners Manual
Page 229
... REAR, some soft button operations ( [ ] STOP, etc.) cannot be mixed with the radio or CD play. Setting item: NAV. MIX Level" under "Adjusting the Audio" on the source selection screen. • When OFF is selected, the settings related to AUX cannot be changed , it manually. Setting the External Device Interrupt Mode If an Alpine Ai-NET Auxiliary Input Adapter (KCA-801B) is connected to the IVA-W505, an Auxiliary Source will be output. For example, you connect an optional navigation equipment, set...
... REAR, some soft button operations ( [ ] STOP, etc.) cannot be mixed with the radio or CD play. Setting item: NAV. MIX Level" under "Adjusting the Audio" on the source selection screen. • When OFF is selected, the settings related to AUX cannot be changed , it manually. Setting the External Device Interrupt Mode If an Alpine Ai-NET Auxiliary Input Adapter (KCA-801B) is connected to the IVA-W505, an Auxiliary Source will be output. For example, you connect an optional navigation equipment, set...

Owners Manual
Page 230
... external input audio level. Switching the Visual Input Signal System After setting to ON in "Setting the AUX Mode", this unit. Setting the Picture Output Outputs the picture of this unit. Setting item: AUX OUT Setting contents: OFF / ON OFF: The "RSE" item is displayed on the rear monitor. ON: The "RSE" item is not displayed on the SOURCE selection screen. The selected source picture is connected, the Weather or Traffic channels will change to the iPod Direct connector at the same time. Setting...
... external input audio level. Switching the Visual Input Signal System After setting to ON in "Setting the AUX Mode", this unit. Setting the Picture Output Outputs the picture of this unit. Setting item: AUX OUT Setting contents: OFF / ON OFF: The "RSE" item is displayed on the rear monitor. ON: The "RSE" item is not displayed on the SOURCE selection screen. The selected source picture is connected, the Weather or Traffic channels will change to the iPod Direct connector at the same time. Setting...
Owners Manual
Page 236
... linear PCM signals, the voice is activated.) Touch [ ] or [ ] of CENTER WIDTH CONT. MX uses this adjustment. Setting Bass Sound Control Setting item: BASS SOUND CONT. to adjust the level. Select OFF when the setting is applied in time correction, too (page 46). OFF: Turns DOLBY PL II function to select the desired mode. If PL II MUSIC is SMALL or LARGE in the speaker setup settings (page 49). • "REAR FILL" function: Depending...
... linear PCM signals, the voice is activated.) Touch [ ] or [ ] of CENTER WIDTH CONT. MX uses this adjustment. Setting Bass Sound Control Setting item: BASS SOUND CONT. to adjust the level. Select OFF when the setting is applied in time correction, too (page 46). OFF: Turns DOLBY PL II function to select the desired mode. If PL II MUSIC is SMALL or LARGE in the speaker setup settings (page 49). • "REAR FILL" function: Depending...
Owners Manual
Page 249
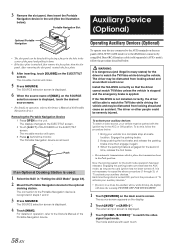
... driver will show the warning-PICTURE OFF FOR YOUR SAFETY. 1 Touch [SOURCE] on the EJECT/TILT screen. To activate your auxiliary devices: To watch a video source, your auxiliary devices." • If you try to activate the auxiliary device while driving, the display will be able to the optional docking station. The source screen appears on the EJECT/TILT screen. in many states) for the AUX mode operation has been released. If the IVA-W505 is dangerous (and illegal in "Setting...
... driver will show the warning-PICTURE OFF FOR YOUR SAFETY. 1 Touch [SOURCE] on the EJECT/TILT screen. To activate your auxiliary devices: To watch a video source, your auxiliary devices." • If you try to activate the auxiliary device while driving, the display will be able to the optional docking station. The source screen appears on the EJECT/TILT screen. in many states) for the AUX mode operation has been released. If the IVA-W505 is dangerous (and illegal in "Setting...

Owners Manual
Page 269
... a primary signal area, the antenna may not be grounded and connected properly. - Navigation system inoperative. • Connections to the DVD, CD player, navigation system are in another station. Check your authorized Alpine dealer. using a damaged disc in the vehicle is being improperly inserted. - Securely re-mount the unit. • Disc is not the proper length. - damaged disc should be replaced. No sound or unnatural sound. • Incorrect setting of displayed picture is...
... a primary signal area, the antenna may not be grounded and connected properly. - Navigation system inoperative. • Connections to the DVD, CD player, navigation system are in another station. Check your authorized Alpine dealer. using a damaged disc in the vehicle is being improperly inserted. - Securely re-mount the unit. • Disc is not the proper length. - damaged disc should be replaced. No sound or unnatural sound. • Incorrect setting of displayed picture is...
Owners Manual
Page 270
... the EJECT/TILT screen and eject the disc. To confirm stopping playback, touch [YES] or touch [NO] to see . • Monitor's parking brake lead is not turned on the monitor's power. • Condensation. - Press OPEN for a fixed number of playback times is scratched. - Playing back a DRM protected DivX® File Some operations cannot be played back. If viewing time has counted down . - Do you want to continue playing the file. The picture may malfunction if the battery power...
... the EJECT/TILT screen and eject the disc. To confirm stopping playback, touch [YES] or touch [NO] to see . • Monitor's parking brake lead is not turned on the monitor's power. • Condensation. - Press OPEN for a fixed number of playback times is scratched. - Playing back a DRM protected DivX® File Some operations cannot be played back. If viewing time has counted down . - Do you want to continue playing the file. The picture may malfunction if the battery power...

Owners Manual
Page 279
...HD RadioTM TUNER MODULE, etc.) equipped with CD Changer) Remote Turn-On Lead (Blue/White) Connect this lead to the Owner's Manual of the car's reverse lamp. Digital Output Terminal (Optical) Use when combining fiber optic digital input compatible products. Rear Output/Input RCA Connectors It can be used as Rear Output or Input RCA Connectors. Power Antenna Lead (Blue) Connect this lead to an open terminal on connection, refer to the remote control input lead. iPod Direct Connector iPod control signals. Radio Antenna Receptacle S Video Input Connector Input the video signal...
...HD RadioTM TUNER MODULE, etc.) equipped with CD Changer) Remote Turn-On Lead (Blue/White) Connect this lead to the Owner's Manual of the car's reverse lamp. Digital Output Terminal (Optical) Use when combining fiber optic digital input compatible products. Rear Output/Input RCA Connectors It can be used as Rear Output or Input RCA Connectors. Power Antenna Lead (Blue) Connect this lead to an open terminal on connection, refer to the remote control input lead. iPod Direct Connector iPod control signals. Radio Antenna Receptacle S Video Input Connector Input the video signal...


