
Quick Reference Guide
Page 4
... screen. Depending on the function, this button may cancel the operations 1131: performed on the screen. • Common onscreen buttons EJI: Returns to activate the "Setting the Balance/Fader/Subwoofer" mode. If the AudioNisual screen is connected, press and hold MUTE for at least 3 seconds to the previous screen. Owner's manual...
... screen. Depending on the function, this button may cancel the operations 1131: performed on the screen. • Common onscreen buttons EJI: Returns to activate the "Setting the Balance/Fader/Subwoofer" mode. If the AudioNisual screen is connected, press and hold MUTE for at least 3 seconds to the previous screen. Owner's manual...

Quick Reference Guide
Page 7
The My Favorites screen is displayed. 2 Touch [Start]. Configure the User 1 and User 2 settings for each user. 1 Press the* (My Favorites) button. User Registration Owner's manual User Registration You can register up to two users. s Touch [Search]. My FaY
The My Favorites screen is displayed. 2 Touch [Start]. Configure the User 1 and User 2 settings for each user. 1 Press the* (My Favorites) button. User Registration Owner's manual User Registration You can register up to two users. s Touch [Search]. My FaY
Quick Reference Guide
Page 12
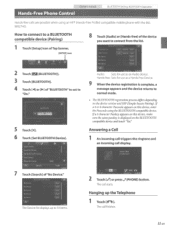
... compatible device. Answering a Call 1 An incoming call triggers the ringtone and an incoming call display. 7 Touch [Search] of "BLUETOOTH" to set to ~~on this device, make sure the same passkey is complete, a message appears and the device returns to normal mode. • The ...Telephone 1 Touch[~]. If a 4 or 6 character Passcode appears on :' S Touch [X]. 6 Touch [Set BLUETOOTH Device]. Hands-free: Sets for use as an Aud io device. The call finishes. 11-EN Audio: Sets for use as a Hands Free Device. 9 When the device registration is displayed on the device version ...
... compatible device. Answering a Call 1 An incoming call triggers the ringtone and an incoming call display. 7 Touch [Search] of "BLUETOOTH" to set to ~~on this device, make sure the same passkey is complete, a message appears and the device returns to normal mode. • The ...Telephone 1 Touch[~]. If a 4 or 6 character Passcode appears on :' S Touch [X]. 6 Touch [Set BLUETOOTH Device]. Hands-free: Sets for use as an Aud io device. The call finishes. 11-EN Audio: Sets for use as a Hands Free Device. 9 When the device registration is displayed on the device version ...
Quick Reference Guide
Page 19
This equipment complies with FCC/IC radiation exposure limits set forth for compliance could void the user's authority to comply without maximum permissive exposure evaluation (MPE). But it is desirable that it should be installed ...
This equipment complies with FCC/IC radiation exposure limits set forth for compliance could void the user's authority to comply without maximum permissive exposure evaluation (MPE). But it is desirable that it should be installed ...
Quick Reference Guide
Page 20
...WARRANTIES INCLUDING FITNESS FOR USE AND MERCHANTABILITY ARE LIMITED IN DURATION TO THE PERIOD OF THE EXPRESS WARRANTY SET FORTH ABOVE AND NO PERSON IS AUTHORIZED TO ASSUME FOR ALPINE ANY OTHER LIABILITY IN CONNECTION WITH THE SALE OF THE PRODUCT. e IN CANADA ONLY: This Warranty...into distortion or clipping). Products purchased in the Canada are pleased to these matters contained herein may also have any initial shipping charges. Alpine will pay the return shipping charges. ® You should provide a detailed description of the telephone numbers listed below. Dropped or damaged ...
...WARRANTIES INCLUDING FITNESS FOR USE AND MERCHANTABILITY ARE LIMITED IN DURATION TO THE PERIOD OF THE EXPRESS WARRANTY SET FORTH ABOVE AND NO PERSON IS AUTHORIZED TO ASSUME FOR ALPINE ANY OTHER LIABILITY IN CONNECTION WITH THE SALE OF THE PRODUCT. e IN CANADA ONLY: This Warranty...into distortion or clipping). Products purchased in the Canada are pleased to these matters contained herein may also have any initial shipping charges. Alpine will pay the return shipping charges. ® You should provide a detailed description of the telephone numbers listed below. Dropped or damaged ...

Quick Reference Guide
Page 24
...(MAP) button. Route Get route information, edit the route (set, delete, optimise waypoints, optimise route), see the Owner's Manual. ,------Next Street Name Distance to next Manoeuvre Traffic Information INE-Z928HD/INE-NAV-38 only) Trip Information------..... l -EN Navigation Menu To... access the Navigation Menu, touch [ - ] . Settings Allows you to useful add-ons like Picture Viewer, Unit Converter, Calculator...
...(MAP) button. Route Get route information, edit the route (set, delete, optimise waypoints, optimise route), see the Owner's Manual. ,------Next Street Name Distance to next Manoeuvre Traffic Information INE-Z928HD/INE-NAV-38 only) Trip Information------..... l -EN Navigation Menu To... access the Navigation Menu, touch [ - ] . Settings Allows you to useful add-ons like Picture Viewer, Unit Converter, Calculator...

Quick Reference Guide
Page 31
...WARNING Points to Observe for Safe Usage 8 WARNING 9 CAUTION 9 NOTICE 10 Discs Playable on This Unit 11 Features Auto User Setting Change 15 My Favorites 15 Easy Sound Setting by Car Type (i-Personalize 16 About Dual Screen 16 Dual Screen Display Position 17 Getting Started Accessory List 18 Location of Controls...Disc 19 Adjusting the Monitor Viewing Angle 19 Adjusting the Volume 20 Lowering Volume Quickly 20 Using My Favorites 20 User Registration 20 Setting My Favorites 21 Adding My Favorites 21 Editing My Favorites 22 Displaying the Camera Image 23 i-Personalize Setup 23...
...WARNING Points to Observe for Safe Usage 8 WARNING 9 CAUTION 9 NOTICE 10 Discs Playable on This Unit 11 Features Auto User Setting Change 15 My Favorites 15 Easy Sound Setting by Car Type (i-Personalize 16 About Dual Screen 16 Dual Screen Display Position 17 Getting Started Accessory List 18 Location of Controls...Disc 19 Adjusting the Monitor Viewing Angle 19 Adjusting the Volume 20 Lowering Volume Quickly 20 Using My Favorites 20 User Registration 20 Setting My Favorites 21 Adding My Favorites 21 Editing My Favorites 22 Displaying the Camera Image 23 i-Personalize Setup 23...
Quick Reference Guide
Page 32
... Visual EQ Mode (Factory's Setting 42 4-EN Adjusting Brightness 42 Adjusting Color of Picture 42 Adjusting Tint of Picture 42 Adjusting Image Contrast 43 Adjusting Picture Quality 43 Saving and Calling the Adjusted Picture Quality 43 About INE-W927HD 43 Displaying the Product Information ...43 Checking the DivX® Registration 43 Initializing the System 43 Installation Setup 43 Sound Setup Sound Setup Operation 44 Setting the Balance/Fader/Subwoofer 44 Adjusting the Balance/...
... Visual EQ Mode (Factory's Setting 42 4-EN Adjusting Brightness 42 Adjusting Color of Picture 42 Adjusting Tint of Picture 42 Adjusting Image Contrast 43 Adjusting Picture Quality 43 Saving and Calling the Adjusted Picture Quality 43 About INE-W927HD 43 Displaying the Product Information ...43 Checking the DivX® Registration 43 Initializing the System 43 Installation Setup 43 Sound Setup Sound Setup Operation 44 Setting the Balance/Fader/Subwoofer 44 Adjusting the Balance/...
Quick Reference Guide
Page 33
...Signal Strength Information 53 AUX Setting 53 Setting the AUX Mode 53 Setting the Primary AUX Name (AUX Setup 54 Setting the AUX3 54 Setting the AUX3 Sel. (Switching the Visual Input Signal System 54 RSE Setting 54 Setting the Rear Seat Entertainment System 54 Setting the BLUETOOTH Pandora 54 ... 57 Deleting All the Histories 57 Camera Setup Camera Setup Operation 58 Direct Camera Setting 58 Setting the Camera Input 58 AUX Camera Setting 59 Setting the Camera Input 59 Camera Interrupt Setting (Power OFF Mode 60 BLUETOOTH Operation Setup Before Using 61 About BLUETOOTH 61 About...
...Signal Strength Information 53 AUX Setting 53 Setting the AUX Mode 53 Setting the Primary AUX Name (AUX Setup 54 Setting the AUX3 54 Setting the AUX3 Sel. (Switching the Visual Input Signal System 54 RSE Setting 54 Setting the Rear Seat Entertainment System 54 Setting the BLUETOOTH Pandora 54 ... 57 Deleting All the Histories 57 Camera Setup Camera Setup Operation 58 Direct Camera Setting 58 Setting the Camera Input 58 AUX Camera Setting 59 Setting the Camera Input 59 Camera Interrupt Setting (Power OFF Mode 60 BLUETOOTH Operation Setup Before Using 61 About BLUETOOTH 61 About...

Quick Reference Guide
Page 34
... the Rear View Video while the Car is in Reverse 70 Switching the Image Pattern for the Rear Camera 70 Guide Display ON/OFF Setting 70 Adjusting the Caution Display Location ..... 70 About the Rear Camera Guide 71 Front Camera Operation 72 Displaying the Front View Video Manually...iPhone Pandora 84 BLUETOOTH Pandora 84 "Thumbs" Feedback 85 Searching for the Front Camera 72 About the Adjustment of Guide Display ON/ OFF Setting and Adjustment of Caution Display Location 73 Other Camera Operation 73 About the Adjustment of Difficulty 91 If this Message Appears 92 Specifications 94 ...
... the Rear View Video while the Car is in Reverse 70 Switching the Image Pattern for the Rear Camera 70 Guide Display ON/OFF Setting 70 Adjusting the Caution Display Location ..... 70 About the Rear Camera Guide 71 Front Camera Operation 72 Displaying the Front View Video Manually...iPhone Pandora 84 BLUETOOTH Pandora 84 "Thumbs" Feedback 85 Searching for the Front Camera 72 About the Adjustment of Guide Display ON/ OFF Setting and Adjustment of Caution Display Location 73 Other Camera Operation 73 About the Adjustment of Difficulty 91 If this Message Appears 92 Specifications 94 ...
Quick Reference Guide
Page 36
... an alternate route. • There may cause undesired operation. In these pictorial displays in order to correct the position yourself. Alpine cannot be aware that may be situations where the navigation system is the most recent map data available at the time of production... position automatically. It is necessary, pull over in a safe and legal manner and location. • Do not input destinations, change settings, or access any other factors which still allows you to provide more reasonable protection against harmful interference in a residential installation, and are ...
... an alternate route. • There may cause undesired operation. In these pictorial displays in order to correct the position yourself. Alpine cannot be aware that may be situations where the navigation system is the most recent map data available at the time of production... position automatically. It is necessary, pull over in a safe and legal manner and location. • Do not input destinations, change settings, or access any other factors which still allows you to provide more reasonable protection against harmful interference in a residential installation, and are ...
Quick Reference Guide
Page 41
.... Change SOURCE to something other than USB, then remove the USB device to prevent possible damage to its type or state. • Depending on the settings of high humidity or corrosive substances are present. • Fix the USB memory in the USB memory, it might not play back, depending on the...; It is recommended to back up important data on the connected USB memory device, the unit may not function or some form of agreement. CAUTION Alpine accepts no responsibility for the DVD, these are the largest units of division of DVD-Rs/ DVD-RWs/DVD+Rs/DVD+RWs. • Compared to...
.... Change SOURCE to something other than USB, then remove the USB device to prevent possible damage to its type or state. • Depending on the settings of high humidity or corrosive substances are present. • Fix the USB memory in the USB memory, it might not play back, depending on the...; It is recommended to back up important data on the connected USB memory device, the unit may not function or some form of agreement. CAUTION Alpine accepts no responsibility for the DVD, these are the largest units of division of DVD-Rs/ DVD-RWs/DVD+Rs/DVD+RWs. • Compared to...

Quick Reference Guide
Page 43
... Switching Users" (page 24). Each user can configure their respective BLUETOOTH devices to the unit, each registered user. Features Auto User Setting Change With the INE-W927HD, you want to switch users manually, users can be switched by pressing and holding the (My Favorites) button. • For details of how to register ...
... Switching Users" (page 24). Each user can configure their respective BLUETOOTH devices to the unit, each registered user. Features Auto User Setting Change With the INE-W927HD, you want to switch users manually, users can be switched by pressing and holding the (My Favorites) button. • For details of how to register ...

Quick Reference Guide
Page 44
...playback, [Dual Wide], [Dual Full] and [Full Screen] appear on the screen for the environment in your car. On the unit, select and set and reproduce the best audio environment for selecting the screen size. For details, refer to "Car Specific Sound Setup" (page 23). For details of how... to configure the settings, refer to "Switching the Dual Screen Display" (page 25). 16-EN Navigation Full screen Touch the Navigation screen portion. Display example when setting is completed About Dual Screen If you want to display the music playback...
...playback, [Dual Wide], [Dual Full] and [Full Screen] appear on the screen for the environment in your car. On the unit, select and set and reproduce the best audio environment for selecting the screen size. For details, refer to "Car Specific Sound Setup" (page 23). For details of how... to configure the settings, refer to "Switching the Dual Screen Display" (page 25). 16-EN Navigation Full screen Touch the Navigation screen portion. Display example when setting is completed About Dual Screen If you want to display the music playback...
Quick Reference Guide
Page 46
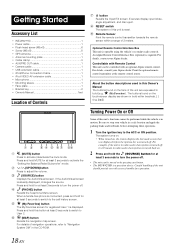
Controllable with Remote Control This unit can be turned on by pressing any button. • The INE-W927HD is in motion. For details, consult your Alpine dealer. About the button descriptions used in bold within a range of trouble-free operation. 18-EN Press and hold MUTE for at ...Remote Control Interface Box This unit is already displayed, changes the source. Point the optional remote control transmitter at least 3 seconds to activate the "Setting the Balance/Fader/Subwoofer" mode. / (UP/DOWN)button Press to activate /deactivate the mute mode. Be sure to stop your vehicle in a ...
Controllable with Remote Control This unit can be turned on by pressing any button. • The INE-W927HD is in motion. For details, consult your Alpine dealer. About the button descriptions used in bold within a range of trouble-free operation. 18-EN Press and hold MUTE for at ...Remote Control Interface Box This unit is already displayed, changes the source. Point the optional remote control transmitter at least 3 seconds to activate the "Setting the Balance/Fader/Subwoofer" mode. / (UP/DOWN)button Press to activate /deactivate the mute mode. Be sure to stop your vehicle in a ...

Quick Reference Guide
Page 47
... [ Disc]. Adjust the screen angle for at least 5 seconds. • Do not apply shock to stop at certain angles. Turning the System On With the Alpine system, when the ignition key is turned to ACC or ON, the opening or closing . Initial System Start-Up Be sure to press the RESET... unit power. 2 Press RESET switch with the label side facing up and down. 2 Touch [OK]. This is opening screen will vary when viewed at the set tilt angle when closing to become very warm under normal operating conditions. The monitor angle can also scroll through lists by touching the screen and...
... [ Disc]. Adjust the screen angle for at least 5 seconds. • Do not apply shock to stop at certain angles. Turning the System On With the Alpine system, when the ignition key is turned to ACC or ON, the opening or closing . Initial System Start-Up Be sure to press the RESET... unit power. 2 Press RESET switch with the label side facing up and down. 2 Touch [OK]. This is opening screen will vary when viewed at the set tilt angle when closing to become very warm under normal operating conditions. The monitor angle can also scroll through lists by touching the screen and...

Quick Reference Guide
Page 48
... "USER 2" and no BLUETOOTH device is displayed. • The BLUETOOTH devices registered here are used as a hands-free phone. For details, see "BLUETOOTH Setting" (page 55). • Touching [Do not Link] exits user registration without registering a user. 3 Input the user name from the keypad, refer to ..."How to edit the name. Volume decreases/increases continuously by pressing or . Configure the User 1 and User 2 settings for the selected application. Add button: Use to add (register) My Favorites icons (page 21) Edit button: Use to edit My Favorites (...
... "USER 2" and no BLUETOOTH device is displayed. • The BLUETOOTH devices registered here are used as a hands-free phone. For details, see "BLUETOOTH Setting" (page 55). • Touching [Do not Link] exits user registration without registering a user. 3 Input the user name from the keypad, refer to ..."How to edit the name. Volume decreases/increases continuously by pressing or . Configure the User 1 and User 2 settings for the selected application. Add button: Use to add (register) My Favorites icons (page 21) Edit button: Use to edit My Favorites (...

Quick Reference Guide
Page 49
... to an audio source [Radio]: HD Radio/RBDS: You can only select PHONE when a mobile phone is displayed. • Set the BLUETOOTH setting on the preregistered BLUETOOTH device side to "Adding My Favorites" (page 21). Audio/Visual : Lets you register phone numbers registered ...the destination search category or nearby place search category in My Favorites [Specific Place] : You can register presets No. 1-6 in My Favorites and set My Favorites icons, refer to "ON." 6 Touch a registered BLUETOOTH device and touch [OK]. Phone : Lets you switch directly to the original ...
... to an audio source [Radio]: HD Radio/RBDS: You can only select PHONE when a mobile phone is displayed. • Set the BLUETOOTH setting on the preregistered BLUETOOTH device side to "Adding My Favorites" (page 21). Audio/Visual : Lets you register phone numbers registered ...the destination search category or nearby place search category in My Favorites [Specific Place] : You can register presets No. 1-6 in My Favorites and set My Favorites icons, refer to "ON." 6 Touch a registered BLUETOOTH device and touch [OK]. Phone : Lets you switch directly to the original ...

Quick Reference Guide
Page 50
...]. Changing the User Name 1 Touch the [Name] of how to input characters using the keypad, refer to "How to the default settings. Touch [Setup]. The confirmation message is displayed. 2 Touch [OK]. • When a registered user is displayed. 2 Touch [OK]. For detailed...OK]. Changing a BLUETOOTH device You can change the registered phone number. The Input User Name screen (Keypad) is displayed. • The BLUETOOTH devices set by switching users are highlighted. The device is displayed. 2 Enter the name and touch [OK] The mode returns to change . The BLUETOOTH Device ...
...]. Changing the User Name 1 Touch the [Name] of how to input characters using the keypad, refer to "How to the default settings. Touch [Setup]. The confirmation message is displayed. 2 Touch [OK]. • When a registered user is displayed. 2 Touch [OK]. For detailed...OK]. Changing a BLUETOOTH device You can change the registered phone number. The Input User Name screen (Keypad) is displayed. • The BLUETOOTH devices set by switching users are highlighted. The device is displayed. 2 Enter the name and touch [OK] The mode returns to change . The BLUETOOTH Device ...

Quick Reference Guide
Page 51
... screen. 3 Touch the position of the driver's seat. 4 Touch the size of download, see ALPINE's web site. 1 Touch [Downloaded Sound Settings]. The downloaded setting values are disabled. Adjusting the Parametric Equalizer Curve (Parametric EQ) Adjusting the Time Correction (Time Correction)...be used to configure Time Correction, X-OVER and Parametric EQ settings. Downloaded Sound Settings Using a USB memory device, the sound settings downloaded from the ALPINE website can set as the Time Correction/X-OVER/Parametric EQ settings, and at the same time saved as Preset3, respectively....
... screen. 3 Touch the position of the driver's seat. 4 Touch the size of download, see ALPINE's web site. 1 Touch [Downloaded Sound Settings]. The downloaded setting values are disabled. Adjusting the Parametric Equalizer Curve (Parametric EQ) Adjusting the Time Correction (Time Correction)...be used to configure Time Correction, X-OVER and Parametric EQ settings. Downloaded Sound Settings Using a USB memory device, the sound settings downloaded from the ALPINE website can set as the Time Correction/X-OVER/Parametric EQ settings, and at the same time saved as Preset3, respectively....


