
Owners Manual
Page 3
... the Front Panel ........ 6 Initial System Start-Up 6 Adjusting Volume 6 Lowering Volume Quickly 7 Setting Time 7 Radio Listening to Radio 7 Presetting Stations Manually 8 Presetting Stations Automatically 8 Tuning to Preset Stations 8 CD/MP3/WMA/AAC Playback 8 Repeat Play 9 M.I.X. (Random Play 9 Searching from CD Text 9 File/Folder Name Search (concerning MP3/WMA/AAC 10 Quick Search 10 About MP3...
... the Front Panel ........ 6 Initial System Start-Up 6 Adjusting Volume 6 Lowering Volume Quickly 7 Setting Time 7 Radio Listening to Radio 7 Presetting Stations Manually 8 Presetting Stations Automatically 8 Tuning to Preset Stations 8 CD/MP3/WMA/AAC Playback 8 Repeat Play 9 M.I.X. (Random Play 9 Searching from CD Text 9 File/Folder Name Search (concerning MP3/WMA/AAC 10 Quick Search 10 About MP3...
Owners Manual
Page 8
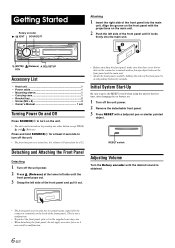
.../SETUP RTN Accessory List • Head unit 1 • Power cable 1 • Mounting sleeve 1 • Carrying case 1 • Bracket key 2 • Screw (M5 × 8 4 • Owner's Manual 1 set Turning Power On and Off Press SOURCE/ to turn off the unit. • The first time power is turned on, the volume will start...
.../SETUP RTN Accessory List • Head unit 1 • Power cable 1 • Mounting sleeve 1 • Carrying case 1 • Bracket key 2 • Screw (M5 × 8 4 • Owner's Manual 1 set Turning Power On and Off Press SOURCE/ to turn off the unit. • The first time power is turned on, the volume will start...
Owners Manual
Page 9
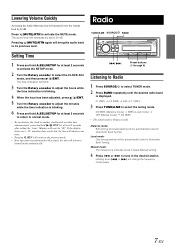
... TUNE/A.ME to activate the MUTE mode. DX SEEK (Distance mode) SEEK (Local mode) OFF (Manual mode) DX SEEK • The initial mode is displayed. to tune in (Automatic Seek Tuning). Radio TUNE/A.ME SOURCE/ BAND Setting Time 1 Press and hold / /ENT for at least 2 seconds... buttons (1 through 6) Listening to Radio 1 Press SOURCE/ to select TUNER mode. 2 Press BAND repeatedly until the desired radio band is Distance mode. The audio level will bring the audio back to its previous level. Manual mode: The frequency is manually tuned in (Automatic Seek Tuning). The...
... TUNE/A.ME to activate the MUTE mode. DX SEEK (Distance mode) SEEK (Local mode) OFF (Manual mode) DX SEEK • The initial mode is displayed. to tune in (Automatic Seek Tuning). Radio TUNE/A.ME SOURCE/ BAND Setting Time 1 Press and hold / /ENT for at least 2 seconds... buttons (1 through 6) Listening to Radio 1 Press SOURCE/ to select TUNER mode. 2 Press BAND repeatedly until the desired radio band is Distance mode. The audio level will bring the audio back to its previous level. Manual mode: The frequency is manually tuned in (Automatic Seek Tuning). The...
Owners Manual
Page 10
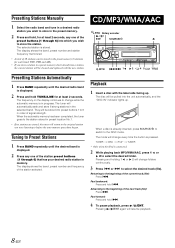
... pressed. Returning to the beginning of the current track (file): Press . Advancing to the beginning of the next track (file): Press . CD/MP3/WMA/AAC /ESC Rotary encoder // ENT SOURCE/ /RTN 1 2 45 TITLE Presetting Stations Automatically 1 Press BAND repeatedly until the desired ... /ENT. The display shows the band, preset number and station frequency memorized. • A total of the station selected. Presetting Stations Manually 1 Select the radio band and tune in a desired radio station you wish to store in the preset memory. 2 Press and hold, for at least 2 seconds.
... pressed. Returning to the beginning of the current track (file): Press . Advancing to the beginning of the next track (file): Press . CD/MP3/WMA/AAC /ESC Rotary encoder // ENT SOURCE/ /RTN 1 2 45 TITLE Presetting Stations Automatically 1 Press BAND repeatedly until the desired ... /ENT. The display shows the band, preset number and station frequency memorized. • A total of the station selected. Presetting Stations Manually 1 Select the radio band and tune in a desired radio station you wish to store in the preset memory. 2 Press and hold, for at least 2 seconds.
Owners Manual
Page 12
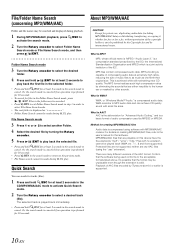
... to play back the selected file. • Press and hold /ESC for at least 2 seconds in the search mode to the user's manual for creating MP3/WMA/AAC files Audio data is displayed as one-tenth their original size. Files in the folder may be searched and displayed... to select another Folder. 4 Select the desired file by eliminating the sounds that are many different versions of the IEC. Quick Search You can achieve CD quality sound with small file sizes. MP3, whose official name is "MPEG-1 Audio Layer 3," is a compression standard prescribed by international treaty. What is...
... to play back the selected file. • Press and hold /ESC for at least 2 seconds in the search mode to the user's manual for creating MP3/WMA/AAC files Audio data is displayed as one-tenth their original size. Files in the folder may be searched and displayed... to select another Folder. 4 Select the desired file by eliminating the sounds that are many different versions of the IEC. Quick Search You can achieve CD quality sound with small file sizes. MP3, whose official name is "MPEG-1 Audio Layer 3," is a compression standard prescribed by international treaty. What is...
Owners Manual
Page 17
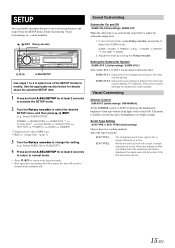
... unit with the head lights of the vehicle ON. This mode is useful if you prefer. Visual Customizing Dimmer Control DIM AUTO (Initial setting) / DIM MANUAL Set the DIMMER control to AUTO to the main volume setting. SETUP You can be modified. / /ENT Rotary encoder /RTN A.SEL/SETUP Use steps 1 to...
... unit with the head lights of the vehicle ON. This mode is useful if you prefer. Visual Customizing Dimmer Control DIM AUTO (Initial setting) / DIM MANUAL Set the DIMMER control to AUTO to the main volume setting. SETUP You can be modified. / /ENT Rotary encoder /RTN A.SEL/SETUP Use steps 1 to...
Owners Manual
Page 19
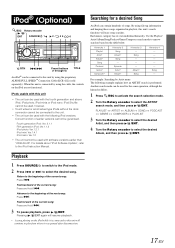
... hold . Album* Song Hierarchy 4 - - - - - Playback 1 Press SOURCE/ to switch to the iPod mode. 2 Press or to the iPod Instruction Manual. When this unit is connected to this unit will ease song searches. For details about "iPod Software Update", refer to select the desired song. Song... keeping these songs organized in playlists, this unit's search functions will continue to play from where it is connected by using the proprietary ALPINE FULL SPEED™ Connection Cable (KCE-422i) (sold separately). Each music category has its own individual hierarchy. Return to select the ...
... hold . Album* Song Hierarchy 4 - - - - - Playback 1 Press SOURCE/ to switch to the iPod mode. 2 Press or to the iPod Instruction Manual. When this unit is connected to this unit will ease song searches. For details about "iPod Software Update", refer to select the desired song. Song... keeping these songs organized in playlists, this unit's search functions will continue to play from where it is connected by using the proprietary ALPINE FULL SPEED™ Connection Cable (KCE-422i) (sold separately). Each music category has its own individual hierarchy. Return to select the ...
Owners Manual
Page 23
...to high temperature. - Turn the ignition key off after ejecting, press the button again. To reset the iPod, refer to the Owner's Manual of the internal amplifier. - Insert a CD. • Although a disc is inserted, "NO DISC" is displayed and the unit does not start to "POW ON" (page 16... the disc. - Download podcast data to the iPod and connect to be compatible with this unit. • No CD is inserted. - If the disc still does not eject, consult your Alpine dealer. • Communication error - Use a sampling rate/bit rate that is used. - Update the iPod Software ...
...to high temperature. - Turn the ignition key off after ejecting, press the button again. To reset the iPod, refer to the Owner's Manual of the internal amplifier. - Insert a CD. • Although a disc is inserted, "NO DISC" is displayed and the unit does not start to "POW ON" (page 16... the disc. - Download podcast data to the iPod and connect to be compatible with this unit. • No CD is inserted. - If the disc still does not eject, consult your Alpine dealer. • Communication error - Use a sampling rate/bit rate that is used. - Update the iPod Software ...
Owners Manual
Page 25
... a short-circuit. • Be sure to connect the colour coded leads according to the diagram. If so, please contact your Alpine dealer. • The CDE-9873 uses female RCA-type jacks for connection to use . SERIAL NUMBER: INSTALLATION DATE: INSTALLATION TECHNICIAN: PLACE OF PURCHASE: 23-EN Warning... into this unit. Installation and Connections Before installing or connecting the unit, please read the following and pages 3 and 5 of this manual thoroughly for proper use only the specified accessory parts. To ensure safety, always contact the dealer where you are not sure.) Failure to...
... a short-circuit. • Be sure to connect the colour coded leads according to the diagram. If so, please contact your Alpine dealer. • The CDE-9873 uses female RCA-type jacks for connection to use . SERIAL NUMBER: INSTALLATION DATE: INSTALLATION TECHNICIAN: PLACE OF PURCHASE: 23-EN Warning... into this unit. Installation and Connections Before installing or connecting the unit, please read the following and pages 3 and 5 of this manual thoroughly for proper use only the specified accessory parts. To ensure safety, always contact the dealer where you are not sure.) Failure to...

Owners Manual
Page 31
... labor) in the Owner's manual. G Any product which has the serial number defaced, altered or removed. F Any product which has been adjusted, altered or modified without charge. D You must package the product securely to avoid damage during shipment of the product to an Authorized Alpine Service Center or Alpine for repair and for...
... labor) in the Owner's manual. G Any product which has the serial number defaced, altered or removed. F Any product which has been adjusted, altered or modified without charge. D You must package the product securely to avoid damage during shipment of the product to an Authorized Alpine Service Center or Alpine for repair and for...


