Owner's Manual (english)
Page 3
... 9 Turning Power On and Off 9 Demonstration Function 9 Turning the Demonstration mode Off 9 Source Selection 9 Detaching and Attaching the Front Panel (Only for CDE-164BT 9 Detaching 9 Attaching 10 Initial System Start-Up 10 Adjusting Volume 10 Setting the Dimmer Control 10 Setting Time 10 Radio Listening to Radio 11 Presetting Stations Manually 12 Presetting Stations Automatically 12 Tuning to Preset Stations 12 Frequency Search Function 12 RBDS PTY (Program Type) Tuning 12 Displaying Radio Text 13 CD/MP3/WMA Playback 13 Repeat and Random Play...
... 9 Turning Power On and Off 9 Demonstration Function 9 Turning the Demonstration mode Off 9 Source Selection 9 Detaching and Attaching the Front Panel (Only for CDE-164BT 9 Detaching 9 Attaching 10 Initial System Start-Up 10 Adjusting Volume 10 Setting the Dimmer Control 10 Setting Time 10 Radio Listening to Radio 11 Presetting Stations Manually 12 Presetting Stations Automatically 12 Tuning to Preset Stations 12 Frequency Search Function 12 RBDS PTY (Program Type) Tuning 12 Displaying Radio Text 13 CD/MP3/WMA Playback 13 Repeat and Random Play...
Owner's Manual (english)
Page 4
... 31 Auto pairing with an iPod/iPhone 31 Bluetooth SETUP 31 Setting the Bluetooth Connection (BT IN 31 Setting the Auto Pairing with iPod/iPhone 32 Setting the Bluetooth Device 32 Setting the Visible Mode 32 Setting the Bluetooth sound quality 32 Adjusting the volume (SOURCE VOL 32 Sound Auto setting (TYPE SET 32 Setting the caller information display ON/OFF 33 Setting the Phone Book Update 33 Setting the Phone Book Auto Update ON/OFF (AUTO 33 Setting the Phone Book Manual Update ON/OFF (MANUAL 33 Changing the Phone book List Order ...........33 Selecting the output speaker 33...
... 31 Auto pairing with an iPod/iPhone 31 Bluetooth SETUP 31 Setting the Bluetooth Connection (BT IN 31 Setting the Auto Pairing with iPod/iPhone 32 Setting the Bluetooth Device 32 Setting the Visible Mode 32 Setting the Bluetooth sound quality 32 Adjusting the volume (SOURCE VOL 32 Sound Auto setting (TYPE SET 32 Setting the caller information display ON/OFF 33 Setting the Phone Book Update 33 Setting the Phone Book Auto Update ON/OFF (AUTO 33 Setting the Phone Book Manual Update ON/OFF (MANUAL 33 Changing the Phone book List Order ...........33 Selecting the output speaker 33...

Owner's Manual (english)
Page 7
... the disc. Installation Location Make sure this unit and never use round discs only for protecting the disc surface and improving sound quality. Inserting Discs Your player accepts only one disc. To customers using these accessories on the surface. If "ERROR" continues to direct sunlight. • Do not affix stickers or labels. • Clean the disc when it again. CORRECT INCORRECT CORRECT Transparent Sheet Disc Stabilizer On handling Compact Discs...
... the disc. Installation Location Make sure this unit and never use round discs only for protecting the disc surface and improving sound quality. Inserting Discs Your player accepts only one disc. To customers using these accessories on the surface. If "ERROR" continues to direct sunlight. • Do not affix stickers or labels. • Clean the disc when it again. CORRECT INCORRECT CORRECT Transparent Sheet Disc Stabilizer On handling Compact Discs...
Owner's Manual (english)
Page 8
...) real time broadcasting (terrestrial, satellite, cable and/or any commercial (i.e. For CDE-164BT, also avoid connecting Flash Memory and Front Aux at high or low temperature. • Use only certified USB Flash Memory Devices. and other electronic content distribution systems, such as pay attention that even certified Flash Memory, may not function correctly at the same time. • If a USB device is played back or searched. • The unit can be displayed, however...
...) real time broadcasting (terrestrial, satellite, cable and/or any commercial (i.e. For CDE-164BT, also avoid connecting Flash Memory and Front Aux at high or low temperature. • Use only certified USB Flash Memory Devices. and other electronic content distribution systems, such as pay attention that even certified Flash Memory, may not function correctly at the same time. • If a USB device is played back or searched. • The unit can be displayed, however...
Owner's Manual (english)
Page 9
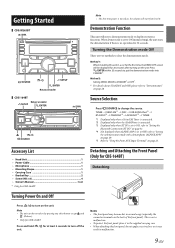
... volume will start from level 0. Note • The unit can be displayed for CDE-164BT) Detaching Turning Power On and Off Press t to turn on page 29. *5 Refer to close the demonstration mode. Press and hold t for CDE-164BT. TUNER SIRIUS XM*1 DISC USB AUDIO/iPod*2 BT AUDIO*3 PANDORA*4 AUXILIARY*5 TUNER *1 Displayed only when a SiriusXM Tuner is connected. *2 Displayed only when the iPod/iPhone is connected. *3 Displayed only...
... volume will start from level 0. Note • The unit can be displayed for CDE-164BT) Detaching Turning Power On and Off Press t to turn on page 29. *5 Refer to close the demonstration mode. Press and hold t for CDE-164BT. TUNER SIRIUS XM*1 DISC USB AUDIO/iPod*2 BT AUDIO*3 PANDORA*4 AUXILIARY*5 TUNER *1 Displayed only when a SiriusXM Tuner is connected. *2 Displayed only when the iPod/iPhone is connected. *3 Displayed only...
Owner's Manual (english)
Page 10
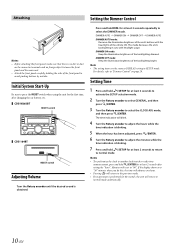
... the front panel to "Dimmer Control" on page 29. for at least 2 seconds after changing the car battery, etc. CDE-W265BT RESET switch CDE-164BT RESET switch Adjusting Volume Turn the Rotary encoder until the desired sound is obtained. DIMMER OFF mode: Keep the illumination brightness of the vehicle ON. Minutes will reset to select the DIMMER mode. DIMMER AUTO DIMMER ON DIMMER OFF DIMMER AUTO DIMMER AUTO mode: Decrease the illumination brightness of the unit's buttons with headlight...
... the front panel to "Dimmer Control" on page 29. for at least 2 seconds after changing the car battery, etc. CDE-W265BT RESET switch CDE-164BT RESET switch Adjusting Volume Turn the Rotary encoder until the desired sound is obtained. DIMMER OFF mode: Keep the illumination brightness of the vehicle ON. Minutes will reset to select the DIMMER mode. DIMMER AUTO DIMMER ON DIMMER OFF DIMMER AUTO DIMMER AUTO mode: Decrease the illumination brightness of the unit's buttons with headlight...
Owner's Manual (english)
Page 17
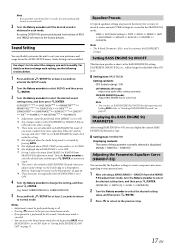
... mode, then make the setting. *4 Not displayed when the Audio Setup mode is activated by pressing and holding BASS. For details on page 26. *9 These functions are inoperable when SUBWOOFER is set to OFF. 4 Turn the Rotary encoder to select the desired sound setting menu, and then press ENTER. Refer to "Adjusting the sound via the Smartphone" on how to change the setting, and then press ENTER. (e.g. Equalizer Presets...
... mode, then make the setting. *4 Not displayed when the Audio Setup mode is activated by pressing and holding BASS. For details on page 26. *9 These functions are inoperable when SUBWOOFER is set to OFF. 4 Turn the Rotary encoder to select the desired sound setting menu, and then press ENTER. Refer to "Adjusting the sound via the Smartphone" on how to change the setting, and then press ENTER. (e.g. Equalizer Presets...

Owner's Manual (english)
Page 20
... mode for each audio effect setting separately and manually. The CD and iPod, etc. OFF LEVEL 1 LEVEL 2 LEVEL 3 Note • There is no operation is different. About Setup when the external power amplifier is +3. This difference in the diagram on a Smartphone. Example 1. Listening Position: Front Left Seat Adjust the time correction level of road noise. Setting item: MX SETTING 1 Turn the Rotary encoder to select the source...
... mode for each audio effect setting separately and manually. The CD and iPod, etc. OFF LEVEL 1 LEVEL 2 LEVEL 3 Note • There is no operation is different. About Setup when the external power amplifier is +3. This difference in the diagram on a Smartphone. Example 1. Listening Position: Front Left Seat Adjust the time correction level of road noise. Setting item: MX SETTING 1 Turn the Rotary encoder to select the source...
Owner's Manual (english)
Page 25
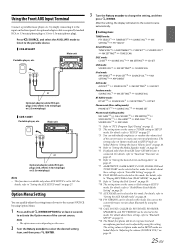
... mode and in this mode. or Optional adapter cable (RCA pin plugs [red, white] 3.5ø miniplugs) or (3.5ø miniplugs). CDE-164BT Portable player, etc. You can be selected in SETUP mode are the same as iPod setting in SETUP mode. For details about Bluetooth by using this mode. After the setting, the display will return to the current source automatically. Setting item: TUNER mode: PTY SELECT*1 TUNER SET*2 SOURCE VOL*3 MX SETTING*4 PTY SELECT SiriusXM mode: TUNE...
... mode and in this mode. or Optional adapter cable (RCA pin plugs [red, white] 3.5ø miniplugs) or (3.5ø miniplugs). CDE-164BT Portable player, etc. You can be selected in SETUP mode are the same as iPod setting in SETUP mode. For details about Bluetooth by using this mode. After the setting, the display will return to the current source automatically. Setting item: TUNER mode: PTY SELECT*1 TUNER SET*2 SOURCE VOL*3 MX SETTING*4 PTY SELECT SiriusXM mode: TUNE...
Owner's Manual (english)
Page 26
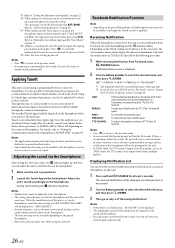
... to receive and respond to information from Alpine's TuneIt database stored in the connected Smartphone via the Smartphone, sound function settings on CDE-W265BT/CDE-164BT will be launched on the Smartphone before connection to the head unit. Refer to "Call Switching Operation" on page 36. *17 While calling, and the Voice Mute is also possible to download specific parameters for certain vehicles from Alpine's Social Network Service (SNS...
... to receive and respond to information from Alpine's TuneIt database stored in the connected Smartphone via the Smartphone, sound function settings on CDE-W265BT/CDE-164BT will be launched on the Smartphone before connection to the head unit. Refer to "Call Switching Operation" on page 36. *17 While calling, and the Voice Mute is also possible to download specific parameters for certain vehicles from Alpine's Social Network Service (SNS...
Owner's Manual (english)
Page 27
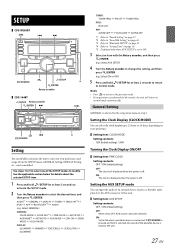
... selected, the sound of the SETUP modes to normal mode. Use steps 1 to 5 to OFF, AUX source cannot be modified. ON: The clock is displayed when the power is set to select one of the portable device is selected on page 10. *5 Displayed only when AUX SETUP is off . Select GENERAL) GENERAL: CLOCK MODE CLOCK ADJ*4 PWR CLOCK AUX SETUP AUX NAME*5 INT MUTE PLAY MODE STAY ON DEMO MODE CLOCK MODE DISPLAY: ILLUMINATI DIMMER...
... selected, the sound of the SETUP modes to normal mode. Use steps 1 to 5 to OFF, AUX source cannot be modified. ON: The clock is displayed when the power is set to select one of the portable device is selected on page 10. *5 Displayed only when AUX SETUP is off . Select GENERAL) GENERAL: CLOCK MODE CLOCK ADJ*4 PWR CLOCK AUX SETUP AUX NAME*5 INT MUTE PLAY MODE STAY ON DEMO MODE CLOCK MODE DISPLAY: ILLUMINATI DIMMER...
Owner's Manual (english)
Page 28
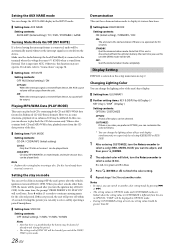
... MUTE Setting contents: OFF AUX (Initial setting) / ON OFF AUX: When the interrupt signal is selected on mode You can set another color setting mode by selecting KEY&DISP or KEY/ DISP. 1 After entering CUSTOMIZE, turn the Rotary encoder to display its various functions. Setting item: DEMO MODE Setting contents: ON (Initial setting) / STANDBY / OFF ON: The unit starts the demonstration if there is no sound will be output. Changing Lighting Color You can change the lighting color...
... MUTE Setting contents: OFF AUX (Initial setting) / ON OFF AUX: When the interrupt signal is selected on mode You can set another color setting mode by selecting KEY&DISP or KEY/ DISP. 1 After entering CUSTOMIZE, turn the Rotary encoder to display its various functions. Setting item: DEMO MODE Setting contents: ON (Initial setting) / STANDBY / OFF ON: The unit starts the demonstration if there is no sound will be output. Changing Lighting Color You can change the lighting color...
Owner's Manual (english)
Page 30
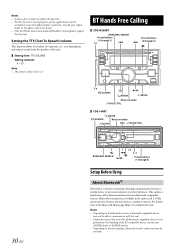
... communication between Bluetooth compatible devices. Notes • Depending on the Bluetooth version, a Bluetooth compatible device may be installed on your Smartphone before connection. Setting the TTS (Text To Speech) volume This function allows for details. • Only the iPhone and certain Android/BlackBerry Smartphones support this function. Consult your ALPINE dealer or ALPINE website. • Depending on a Smartphone, and outputs sound from the speakers of this function to work properly, specific applications must...
... communication between Bluetooth compatible devices. Notes • Depending on the Bluetooth version, a Bluetooth compatible device may be installed on your Smartphone before connection. Setting the TTS (Text To Speech) volume This function allows for details. • Only the iPhone and certain Android/BlackBerry Smartphones support this function. Consult your ALPINE dealer or ALPINE website. • Depending on a Smartphone, and outputs sound from the speakers of this function to work properly, specific applications must...
Owner's Manual (english)
Page 31
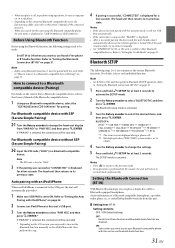
...; After a successful pairing, the device and this unit or use Hands-Free phone or BT Audio function. Refer to "Setting the Auto Pairing with it. 1 Make sure USB PAIR is visible to normal mode automatically. Notes • If the device has been paired with this unit is set to 3WAY. 4 Turn the Rotary encoder to change the head unit display from this step. 4 If pairing is successful, "CONNECTED" is turned ON. Note • Before using the Bluetooth function, the following...
...; After a successful pairing, the device and this unit or use Hands-Free phone or BT Audio function. Refer to "Setting the Auto Pairing with it. 1 Make sure USB PAIR is visible to normal mode automatically. Notes • If the device has been paired with this unit is set to 3WAY. 4 Turn the Rotary encoder to change the head unit display from this step. 4 If pairing is successful, "CONNECTED" is turned ON. Note • Before using the Bluetooth function, the following...
Owner's Manual (english)
Page 32
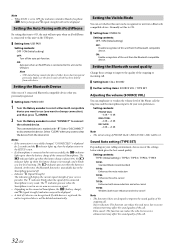
... both has been deleted from the Bluetooth compatible device. ON: Auto pair when an iPod/iPhone is connected to this time, the Bluetooth function is about 50%, the Z indicator lights up to the SETUP screen. • If a Smartphone is not enough, and it blinks as a low level warning. At this unit via the USB port. Setting item: USB PAIR Setting contents: OFF / ON (Initial setting) OFF: Turn off . • Indicator i (Signal Strength...
... both has been deleted from the Bluetooth compatible device. ON: Auto pair when an iPod/iPhone is connected to this time, the Bluetooth function is about 50%, the Z indicator lights up to the SETUP screen. • If a Smartphone is not enough, and it blinks as a low level warning. At this unit via the USB port. Setting item: USB PAIR Setting contents: OFF / ON (Initial setting) OFF: Turn off . • Indicator i (Signal Strength...
Owner's Manual (english)
Page 33
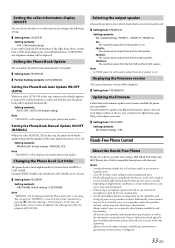
... devices used, voices may limit the feature's functionality. Alpine reserves the right to OFF. Setting the Phone Book Update You can update the phone book automatically or manually. Setting item: PB UPDATE Further Setting contents: AUTO/MANUAL Setting the Phone Book Auto Update ON/OFF (AUTO) When you select AUTO ON in this unit. Setting contents: AUTO OFF / AUTO ON (Initial setting) Note • "UPDATING" will be displayed. FRONT-L: The sound only be output from the front left speaker. FRONT-LR: The sound be output...
... devices used, voices may limit the feature's functionality. Alpine reserves the right to OFF. Setting the Phone Book Update You can update the phone book automatically or manually. Setting item: PB UPDATE Further Setting contents: AUTO/MANUAL Setting the Phone Book Auto Update ON/OFF (AUTO) When you select AUTO ON in this unit. Setting contents: AUTO OFF / AUTO ON (Initial setting) Note • "UPDATING" will be displayed. FRONT-L: The sound only be output from the front left speaker. FRONT-LR: The sound be output...
Owner's Manual (english)
Page 47
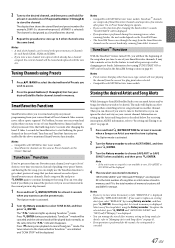
... your SmartFavorites music channels. Information for turning TUNE START ON or OFF can be stored in . Notes • Preset stations that favorite or you can simply use this Owner's Manual. Select one of choices every time you tune in the preset memory, 6 Channels for each of your SmartFavorites channel and hear what you want to replace an existing alert item, select "REPLACE" by the above-mentioned SmartFavorites functionality. Miss a music, news...
... your SmartFavorites music channels. Information for turning TUNE START ON or OFF can be stored in . Notes • Preset stations that favorite or you can simply use this Owner's Manual. Select one of choices every time you tune in the preset memory, 6 Channels for each of your SmartFavorites channel and hear what you want to replace an existing alert item, select "REPLACE" by the above-mentioned SmartFavorites functionality. Miss a music, news...
Owner's Manual (english)
Page 51
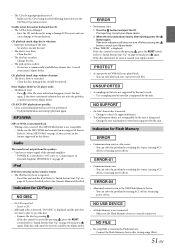
... correctly connected. POWER IC is not connected. - Reset this device. If not ejecting, consult your Alpine dealer. • A copy-protected WMA file was played back. - NO USB DEVICE • A Flash Memory is switched to "ON", refer to "Connecting to the USB Flash Memory device. - Securely re-mount the unit. • The disc is not output from the speakers. • Unit has no sound is dirty or scratched. - damaged disc should be ejected, consult your unit can only play or eject the disc...
... correctly connected. POWER IC is not connected. - Reset this device. If not ejecting, consult your Alpine dealer. • A copy-protected WMA file was played back. - NO USB DEVICE • A Flash Memory is switched to "ON", refer to "Connecting to the USB Flash Memory device. - Securely re-mount the unit. • The disc is not output from the speakers. • Unit has no sound is dirty or scratched. - damaged disc should be ejected, consult your unit can only play or eject the disc...

Owner's Manual (english)
Page 55
... NUMBER: [ ] INSTALLATION DATE: [ ] INSTALLATION TECHNICIAN: [ ] PLACE OF PURCHASE: [ ] 55-EN BEFORE WIRING, DISCONNECT THE CABLE FROM THE NEGATIVE BATTERY TERMINAL. Failure to do so may cause parts to the diagram. DO NOT INSTALL IN LOCATIONS WHICH MIGHT HINDER VEHICLE OPERATION, SUCH AS THE STEERING WHEEL OR GEARSHIFT. and results in serious injury. Use of a short-circuit. • Be sure to connect the color coded leads...
... NUMBER: [ ] INSTALLATION DATE: [ ] INSTALLATION TECHNICIAN: [ ] PLACE OF PURCHASE: [ ] 55-EN BEFORE WIRING, DISCONNECT THE CABLE FROM THE NEGATIVE BATTERY TERMINAL. Failure to do so may cause parts to the diagram. DO NOT INSTALL IN LOCATIONS WHICH MIGHT HINDER VEHICLE OPERATION, SUCH AS THE STEERING WHEEL OR GEARSHIFT. and results in serious injury. Use of a short-circuit. • Be sure to connect the color coded leads...
Owner's Manual (english)
Page 59
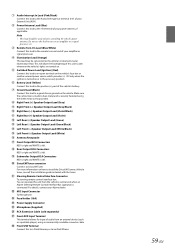
... tuner, consult the installation guide included with the tuner. Steering Remote Control Interface Connector To steering remote control interface box. For details, contact your amplifier or signal processor. Illumination Lead (Orange) This lead may be used only for input of audio from the vehicle's control unit when an Alpine Steering Remote Control Interface Box (optional) is securely fastened using a commercially-available converter cable. Front USB Terminal Connect this to a Flash Memory...
... tuner, consult the installation guide included with the tuner. Steering Remote Control Interface Connector To steering remote control interface box. For details, contact your amplifier or signal processor. Illumination Lead (Orange) This lead may be used only for input of audio from the vehicle's control unit when an Alpine Steering Remote Control Interface Box (optional) is securely fastened using a commercially-available converter cable. Front USB Terminal Connect this to a Flash Memory...


