Owners Manual
Page 26
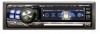
... hold MENU for at least 2 seconds. 2 Select the Crossover mode by sliding your finger on the GlideTouch bar to the left or right. SUBW → REAR → FRONT → SUBW 4 Select the desired cut -off frequency (Crossover Point) by sliding your finger on the GlideTouch bar to adjust the slope. ... Adjustable output level: -12 to 0 dB. 7 To adjust another band, repeat steps 3 to FLAT. 6 Adjust the output level by turning the Rotary encoder. With the DVA-9965, a message is displayed when the response slope for the high range speaker is selected in a 2 way system. 24-EN
... hold MENU for at least 2 seconds. 2 Select the Crossover mode by sliding your finger on the GlideTouch bar to the left or right. SUBW → REAR → FRONT → SUBW 4 Select the desired cut -off frequency (Crossover Point) by sliding your finger on the GlideTouch bar to adjust the slope. ... Adjustable output level: -12 to 0 dB. 7 To adjust another band, repeat steps 3 to FLAT. 6 Adjust the output level by turning the Rotary encoder. With the DVA-9965, a message is displayed when the response slope for the high range speaker is selected in a 2 way system. 24-EN

Owners Manual
Page 27
... at an equal distance between the left and right speakers for optimum staging. About Time Correction The distance between the front left speaker and the rear right speaker is the same as the sound of other speakers. listening position : 0.5 m (19-11/16") Calculation: L = 2.25 m - 0.5 m = 1.75 m (68-7/8") Time correction = ... required for the sound to the left or right. The adjustment will return to the left or right. Example 1. To correct this, the DVA-9965 is corrected by the speed of sound (343 m/s (765 mph) at the same time as the distance to the farthest speaker and the ...
... at an equal distance between the left and right speakers for optimum staging. About Time Correction The distance between the front left speaker and the rear right speaker is the same as the sound of other speakers. listening position : 0.5 m (19-11/16") Calculation: L = 2.25 m - 0.5 m = 1.75 m (68-7/8") Time correction = ... required for the sound to the left or right. The adjustment will return to the left or right. Example 1. To correct this, the DVA-9965 is corrected by the speed of sound (343 m/s (765 mph) at the same time as the distance to the farthest speaker and the ...

Owners Manual
Page 32
..., etc. Data that is connected and touch operation can be used. Adjust the volume on -screen instructions. http://www.alpine.com or http://www.alpine-usa.com Downloadable data Parametric equalizer or Graphic equalizer Time correction Crossover Profile Calendar message Data is set to this unit,...If you are listening to the AM radio while the rear DVD function is set to the opening display. In addition, its sound cannot be muted. • The function for external interruption of the sound of the rear monitor (from the DVA-9965. To start i-Personalize, access the URL below and ...
..., etc. Data that is connected and touch operation can be used. Adjust the volume on -screen instructions. http://www.alpine.com or http://www.alpine-usa.com Downloadable data Parametric equalizer or Graphic equalizer Time correction Crossover Profile Calendar message Data is set to this unit,...If you are listening to the AM radio while the rear DVD function is set to the opening display. In addition, its sound cannot be muted. • The function for external interruption of the sound of the rear monitor (from the DVA-9965. To start i-Personalize, access the URL below and ...
Owners Manual
Page 47
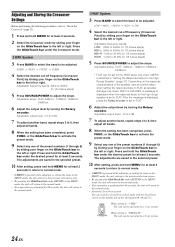
...operating instructions of the connected audio the front audio signals with even greater power, like the sound in a movie theatre) B 6 Adjusting the DVD Level (page 51) (Adjust the volume (signal level) in the Dolby Digital, Pro Logic II, DTS and PCM modes.) B Storing settings... powerful high volume sound (page 51) and the normal mode returns. (Achieving energetic sound with the rear speaker signals) processor. • The adjustments or settings performed on the DVA-9965 (not only the above settings/adjusts) in the memory) In case of combining the Automatic adjustments etc...
...operating instructions of the connected audio the front audio signals with even greater power, like the sound in a movie theatre) B 6 Adjusting the DVD Level (page 51) (Adjust the volume (signal level) in the Dolby Digital, Pro Logic II, DTS and PCM modes.) B Storing settings... powerful high volume sound (page 51) and the normal mode returns. (Achieving energetic sound with the rear speaker signals) processor. • The adjustments or settings performed on the DVA-9965 (not only the above settings/adjusts) in the memory) In case of combining the Automatic adjustments etc...
Owners Manual
Page 59
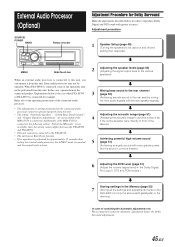
...quality than music CDs. The way in Dolby Surround. Sometimes the DVD cannot be efficiently recorded on discs. DTS is a high quality sound system, developed by censorship laws in the home, etc. The DVA-9965 has a built-in 5 channels over the entire frequency range. This... This is required to DVD. for music CDs. The theater presentation is required to 5.1-channel surround sound. Center speaker Front speakers Rear speakers Dolby Pro Logic Dolby Pro Logic is compatible with four channels of the DTS Sound System. The DVA-9965 performs Dolby Digital decoding ...
...quality than music CDs. The way in Dolby Surround. Sometimes the DVD cannot be efficiently recorded on discs. DTS is a high quality sound system, developed by censorship laws in the home, etc. The DVA-9965 has a built-in 5 channels over the entire frequency range. This... This is required to DVD. for music CDs. The theater presentation is required to 5.1-channel surround sound. Center speaker Front speakers Rear speakers Dolby Pro Logic Dolby Pro Logic is compatible with four channels of the DTS Sound System. The DVA-9965 performs Dolby Digital decoding ...
Owners Manual
Page 68
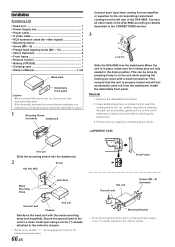
... Caution When you do not remove the detachable front panel. This can be done by pressing firmly in the CONNECTlONS section. 3 Lock Pin Slide the DVA-9965 into the dashboard. 2 Screw Hex Nut (M5) Front Frame Metal Mounting Strap *2 Bolt Stud *1 Ground Lead Chassis this unit in the down with the metal... to the "up" position (see above drawing). When the unit is properly locked and will not accidentally come out from the left rear of the unit to a clean metal spot using a screw (*3) already attached to make sure the locking pins are fully seated in your car, do so. ...
... Caution When you do not remove the detachable front panel. This can be done by pressing firmly in the CONNECTlONS section. 3 Lock Pin Slide the DVA-9965 into the dashboard. 2 Screw Hex Nut (M5) Front Frame Metal Mounting Strap *2 Bolt Stud *1 Ground Lead Chassis this unit in the down with the metal... to the "up" position (see above drawing). When the unit is properly locked and will not accidentally come out from the left rear of the unit to a clean metal spot using a screw (*3) already attached to make sure the locking pins are fully seated in your car, do so. ...