
Owners Manual
Page 4
... to the rear channel (REAR MIX 50 Adjusting the acoustic image (BI-PHANTOM 51 Achieving powerful high volume sound (LISTENING 51 Adjusting the DVD Level 51 Using the Pro Logic II Mode 52 Linear PCM Setting 52 Storing Settings in the Memory 53 Getting out the Preset Memory 53... Remote Control Controls on Remote Control 54 When Using the Remote Control 55 Battery Replacement 55 Information About DVDs 56 Terminology 57 List of Language Codes 58 List of Country Codes 59 In Case of Difficulty...
... to the rear channel (REAR MIX 50 Adjusting the acoustic image (BI-PHANTOM 51 Achieving powerful high volume sound (LISTENING 51 Adjusting the DVD Level 51 Using the Pro Logic II Mode 52 Linear PCM Setting 52 Storing Settings in the Memory 53 Getting out the Preset Memory 53... Remote Control Controls on Remote Control 54 When Using the Remote Control 55 Battery Replacement 55 Information About DVDs 56 Terminology 57 List of Language Codes 58 List of Country Codes 59 In Case of Difficulty...
Owners Manual
Page 18
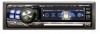
...• Do not remove a disc during playback or change every time the button is displayed on the type of a double-sided DVD will continue from both remote control and main unit operation are described. If a problem occurs, remove the disc and check for navigation purposes as they could damage... all functions will be displayed by pressing MENU. See the individual DVD's instructions for at the same time may cause erroneous operation. • If you turn power off . Clean the disc if necessary. • When using the remote control unit. • For many discs,the menu screen can ...
...• Do not remove a disc during playback or change every time the button is displayed on the type of a double-sided DVD will continue from both remote control and main unit operation are described. If a problem occurs, remove the disc and check for navigation purposes as they could damage... all functions will be displayed by pressing MENU. See the individual DVD's instructions for at the same time may cause erroneous operation. • If you turn power off . Clean the disc if necessary. • When using the remote control unit. • For many discs,the menu screen can ...

Owners Manual
Page 19
...; No sound is played during fast-forwarding/fast-reversing. • Fast-forwarding/fast-reversing of a track may not be made on the remote control unit. f: Press this to start playback from the position at which no title numbers are divisions of Chapters or Tracks During playback,...2 seconds. Refer to turn the PBC function off. Forward/reverse frame-by the remote control unit. 1 When playback stops, input the number of movies or musical selections on DVDs. The picture advances or reverses by Title Number (DVD only) Use this to "9"). 2 Press ENT. Slow Motion Playback 1 When g...
...; No sound is played during fast-forwarding/fast-reversing. • Fast-forwarding/fast-reversing of a track may not be made on the remote control unit. f: Press this to start playback from the position at which no title numbers are divisions of Chapters or Tracks During playback,...2 seconds. Refer to turn the PBC function off. Forward/reverse frame-by the remote control unit. 1 When playback stops, input the number of movies or musical selections on DVDs. The picture advances or reverses by Title Number (DVD only) Use this to "9"). 2 Press ENT. Slow Motion Playback 1 When g...

Owners Manual
Page 20
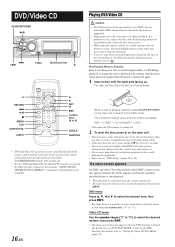
...the unit will be switched during playback. • This operation is pressed. LR → LL → RR → LR Switching the Angle (DVD only) On DVDs in the figure below, each time the button is played repeatedly. Set VCD PLAY MODE to change. • Depending on or the disc is...The chapter is played repeatedly. The angle switches between the alternate audio tracks recorded on the disc each time the button is performed by the remote control unit. The sound switches between the angles recorded on the disc. • This operation is pressed. • Some time may ...
...the unit will be switched during playback. • This operation is pressed. LR → LL → RR → LR Switching the Angle (DVD only) On DVDs in the figure below, each time the button is played repeatedly. Set VCD PLAY MODE to change. • Depending on or the disc is...The chapter is played repeatedly. The angle switches between the alternate audio tracks recorded on the disc each time the button is performed by the remote control unit. The sound switches between the angles recorded on the disc. • This operation is pressed. • Some time may ...

Owners Manual
Page 21
...be switched from the disc menu. • This operation is performed by the remote control unit. The playback status is displayed. Switching the Subtitles (subtitle language) (DVD only) With multiple subtitle language DVDs, the subtitle language can be switched during playback, or subtitles can be a...disc is not displayed. In these cases, select subtitles from the disc menu. is performed by the remote control unit. Playback disc Current chapter number Current title number DVD- During playback, press DISP/TOP M. During playback, press DISP/TOP M. REPEAT OFF) Current audio ...
...be switched from the disc menu. • This operation is performed by the remote control unit. The playback status is displayed. Switching the Subtitles (subtitle language) (DVD only) With multiple subtitle language DVDs, the subtitle language can be switched during playback, or subtitles can be a...disc is not displayed. In these cases, select subtitles from the disc menu. is performed by the remote control unit. Playback disc Current chapter number Current title number DVD- During playback, press DISP/TOP M. During playback, press DISP/TOP M. REPEAT OFF) Current audio ...
Owners Manual
Page 22
RTN C FUNC. Each press changes the mode as the unit buttons and remote control. 1 Press FUNC. Source Operation Mode L Stopping Playback (PRE-STOP) L Stopping Playback (/) Fast-forward/Fast-reverse g/f Find the Beginning of EQ will return... mode → Audio function mode 1* (;, :, ENT., etc.) → Audio function mode 2 (AUDIO, RPT, etc.) → Source operation mode (g, f , etc.) → Source select mode * DVD mode only. 2 The function guide of the selected mode is indicated. GlideTouch bar Adjusting Balance (Between Left and Right)/ Fader (Between Front and Rear)/Defeat...
RTN C FUNC. Each press changes the mode as the unit buttons and remote control. 1 Press FUNC. Source Operation Mode L Stopping Playback (PRE-STOP) L Stopping Playback (/) Fast-forward/Fast-reverse g/f Find the Beginning of EQ will return... mode → Audio function mode 1* (;, :, ENT., etc.) → Audio function mode 2 (AUDIO, RPT, etc.) → Source operation mode (g, f , etc.) → Source select mode * DVD mode only. 2 The function guide of the selected mode is indicated. GlideTouch bar Adjusting Balance (Between Left and Right)/ Fader (Between Front and Rear)/Defeat...
Owners Manual
Page 31
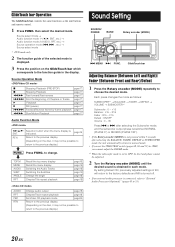
...return to the left or right. Press the GlideTouch bar under the desired preset to activate the blackout mode. The Rear DVD function setting determines which remote control sensor is displayed. for at least 2 seconds to store the adjustment. AMBER ↔ GREEN ↔ AUTO •...Press SOURCE/POWER to change the lighting color of the illuminated buttons, their color switches between AMBER and GREEN. 6 Press FUNC. When remote control operation is disabled, operation from the head unit controls is pressed while adjusting or setting the items in the USER'S presets described ...
...return to the left or right. Press the GlideTouch bar under the desired preset to activate the blackout mode. The Rear DVD function setting determines which remote control sensor is displayed. for at least 2 seconds to store the adjustment. AMBER ↔ GREEN ↔ AUTO •...Press SOURCE/POWER to change the lighting color of the illuminated buttons, their color switches between AMBER and GREEN. 6 Press FUNC. When remote control operation is disabled, operation from the head unit controls is pressed while adjusting or setting the items in the USER'S presets described ...

Owners Manual
Page 32
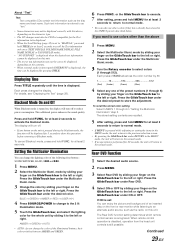
... of built-in Preset 6 of the Time Correction mode. SOURCE Built-in DISC REAR DVD ON/ OFF setting ON Remote Input is connected*1 or remote control with the unit's built-in sensor Inoperable Remote control of built-in Preset 6 of the Parametric EQ mode or Graphic EQ mode....result. • For downloading procedure details, see Alpine's website. • If the HDA-5460 model is set to DVA-9965. Data is memorized in disc mode Inoperable Remote control of Tuner mode Inoperable Remote control of download data shall be adjusted from Alpine's website) to a CD-R, and download and store...
... of built-in Preset 6 of the Time Correction mode. SOURCE Built-in DISC REAR DVD ON/ OFF setting ON Remote Input is connected*1 or remote control with the unit's built-in sensor Inoperable Remote control of built-in Preset 6 of the Parametric EQ mode or Graphic EQ mode....result. • For downloading procedure details, see Alpine's website. • If the HDA-5460 model is set to DVA-9965. Data is memorized in disc mode Inoperable Remote control of Tuner mode Inoperable Remote control of download data shall be adjusted from Alpine's website) to a CD-R, and download and store...

Owners Manual
Page 33
...is not cleared. 31-EN The wallpaper file can be stored on the remote control unit for the data. on the unit. Successfully downloaded items are stored... applied. * If the downloaded parametric EQ or graphic EQ differs from the Alpine Owner's website is written to ON, Preset 6 setting will not change the... 6 in Preset 6 of the 2WAY/3WAY switch is inserted into the DVA-9965. Press the GlideTouch bar under the desired file. PARAMETRIC EQ or GRAPHIC EQ...inserted, or while playing a CD/MP3/WMA audio, or if a DVD disc is memorized in the MENU mode, the unit will be stored...
...is not cleared. 31-EN The wallpaper file can be stored on the remote control unit for the data. on the unit. Successfully downloaded items are stored... applied. * If the downloaded parametric EQ or graphic EQ differs from the Alpine Owner's website is written to ON, Preset 6 setting will not change the... 6 in Preset 6 of the 2WAY/3WAY switch is inserted into the DVA-9965. Press the GlideTouch bar under the desired file. PARAMETRIC EQ or GRAPHIC EQ...inserted, or while playing a CD/MP3/WMA audio, or if a DVD disc is memorized in the MENU mode, the unit will be stored...

Owners Manual
Page 34
.... ∗1 AUTO: The disc is decided with a language other than one of the DVD settings. Setting items: LANGUAGES / TV SCREEN / COUNTRY CODE / PARENTAL / DIGITAL OUT... return to the specific section for the menus (title menu, etc.). Press ENT. DVD Setup ; RETURN L CLR SETUP 8 : ENT. 9 number keys (0 to change...all discs allow changing the default language. or : to 9) DVD Setup Operation • DVD Setup Operation is set. • Languages set according to listen... note of the current disc, either do so from the DVD menu or using the operation described in the section "Switching the...
.... ∗1 AUTO: The disc is decided with a language other than one of the DVD settings. Setting items: LANGUAGES / TV SCREEN / COUNTRY CODE / PARENTAL / DIGITAL OUT... return to the specific section for the menus (title menu, etc.). Press ENT. DVD Setup ; RETURN L CLR SETUP 8 : ENT. 9 number keys (0 to change...all discs allow changing the default language. or : to 9) DVD Setup Operation • DVD Setup Operation is set. • Languages set according to listen... note of the current disc, either do so from the DVD menu or using the operation described in the section "Switching the...

Owners Manual
Page 37
... choose to Dolby Digital, DTS stream sound. The initial setting at the factory is PBC ON. PBC OFF: The PBC menu is performed by the remote control unit. The initial setting at the factory is CD-DA. • If a disc has already been inserted, perform the setting after you remove the...
... choose to Dolby Digital, DTS stream sound. The initial setting at the factory is PBC ON. PBC OFF: The PBC menu is performed by the remote control unit. The initial setting at the factory is CD-DA. • If a disc has already been inserted, perform the setting after you remove the...

Owners Manual
Page 41
...alphanumeric number. Holding down g or f will change channels continuously. • When using the optional remote control (RUE-4203), an SAT Radio Channel can also be performed. Each third party XM or... input. XM1, XM2 and XM3 or SIRIUS1, SIRIUS2 and SIRIUS3). • If you nearest ALPINE dealer. * XM and its corresponding logos are trademarks of XM Satellite Radio Inc. * SIRIUS and...digits, the Channel is automatically received after the channel number is printed on a label found on the DVA-9965 are operative only when a SAT Receiver is an 8 character (for XM Radio) or 12 character (...
...alphanumeric number. Holding down g or f will change channels continuously. • When using the optional remote control (RUE-4203), an SAT Radio Channel can also be performed. Each third party XM or... input. XM1, XM2 and XM3 or SIRIUS1, SIRIUS2 and SIRIUS3). • If you nearest ALPINE dealer. * XM and its corresponding logos are trademarks of XM Satellite Radio Inc. * SIRIUS and...digits, the Channel is automatically received after the channel number is printed on a label found on the DVA-9965 are operative only when a SAT Receiver is an 8 character (for XM Radio) or 12 character (...

Owners Manual
Page 56
... DISC Select (DN) Button selects a disc in descending order. 4 VOLUME 8 / 9 Button Increase or decreases the volume level. 5 RETURN Button DVD/Video CD (PBC ON) mode: Returns to the previous display. (Does not return in the pause mode. 7 -/J Button Switches between play and .... Button Enters the selected item. MP3/WMA mode: Press the button to go back to the beginning of the current file. DVD/Video CD: • Move to the desired position on Remote Control % & 1 ( 2 ) 3 ~ 4 + 5 6 , 7 8 - 9 ! . MP3/WMA mode: Folder Select (UP) Button to selects the folder....
... DISC Select (DN) Button selects a disc in descending order. 4 VOLUME 8 / 9 Button Increase or decreases the volume level. 5 RETURN Button DVD/Video CD (PBC ON) mode: Returns to the previous display. (Does not return in the pause mode. 7 -/J Button Switches between play and .... Button Enters the selected item. MP3/WMA mode: Press the button to go back to the beginning of the current file. DVD/Video CD: • Move to the desired position on Remote Control % & 1 ( 2 ) 3 ~ 4 + 5 6 , 7 8 - 9 ! . MP3/WMA mode: Folder Select (UP) Button to selects the folder....

Owners Manual
Page 57
...To avoid damage, short battery life, operational errors and poor response, observe the following. - Controllable With Remote Control Point the optional remote control transmitter at double speed. DVD/Video CD: • Move to the desired position on the disc. • During playback, press ...your prolonged attention should only be possible to operate the remote control if the remote control sensor is connected. Keep away from the vehicle's control unit when an Alpine Remote Control Interface Box (optional) is exposed to Remote Control Interface Box You can operate this unit from ...
...To avoid damage, short battery life, operational errors and poor response, observe the following. - Controllable With Remote Control Point the optional remote control transmitter at double speed. DVD/Video CD: • Move to the desired position on the disc. • During playback, press ...your prolonged attention should only be possible to operate the remote control if the remote control sensor is connected. Keep away from the vehicle's control unit when an Alpine Remote Control Interface Box (optional) is exposed to Remote Control Interface Box You can operate this unit from ...

Owners Manual
Page 58
... picture quality with Dolby Digital 5.1-channel Surround. 56-EN The desired subtitle language can be selected from the remote control. • Multi angle function* (page 18) When the DVD contains a movie shot from the remote control. • Multi story function* With this function, a single movie includes various story lines. The data is twice...
... picture quality with Dolby Digital 5.1-channel Surround. 56-EN The desired subtitle language can be selected from the remote control. • Multi angle function* (page 18) When the DVD contains a movie shot from the remote control. • Multi story function* With this function, a single movie includes various story lines. The data is twice...
Owners Manual
Page 64
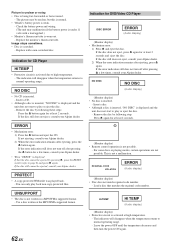
... step: Press c again for CD Player HI TEMP • Protective circuit is scratched. - If the disc still cannot be ejected, consult your Alpine dealer. Leave the power OFF until ...the temperature decreases and then turn off after ejecting, press the c button again. Indication for at least 2 seconds. (Monitor display) • Remote control... steps: Press the c button again for DVD/Video CD Player DISC ERROR ERROR (Audio display) (Monitor display) • Mechanism error. 1) Press c and ...
... step: Press c again for CD Player HI TEMP • Protective circuit is scratched. - If the disc still cannot be ejected, consult your Alpine dealer. Leave the power OFF until ...the temperature decreases and then turn off after ejecting, press the c button again. Indication for at least 2 seconds. (Monitor display) • Remote control... steps: Press the c button again for DVD/Video CD Player DISC ERROR ERROR (Audio display) (Monitor display) • Mechanism error. 1) Press c and ...
Owners Manual
Page 66
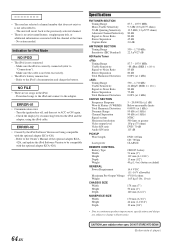
...Distortion Tuning Range Usable Sensitivity Signal-to-Noise Ratio Stereo Separation Total Harmonic Distortion CD/DVD SECTION Frequency Response Wow & Flutter (% WRMS) Total Harmonic Distortion Dynamic Range Channel...resolution Video output level Video S/N ratio Audio S/N ratio PICKUP Wave length Laser power REMOTE CONTROL Battery Type Width Height Depth Weight GENERAL Power Requirement Maximum Pre-Output Voltage Weight...64-EN CAUTION-Laser radiation when open, DO NOT STARE INTO BEAM (Bottom side of player) Turn the ignition key off, and then set to the iPod's documentation and charge the...
...Distortion Tuning Range Usable Sensitivity Signal-to-Noise Ratio Stereo Separation Total Harmonic Distortion CD/DVD SECTION Frequency Response Wow & Flutter (% WRMS) Total Harmonic Distortion Dynamic Range Channel...resolution Video output level Video S/N ratio Audio S/N ratio PICKUP Wave length Laser power REMOTE CONTROL Battery Type Width Height Depth Weight GENERAL Power Requirement Maximum Pre-Output Voltage Weight...64-EN CAUTION-Laser radiation when open, DO NOT STARE INTO BEAM (Bottom side of player) Turn the ignition key off, and then set to the iPod's documentation and charge the...
Owners Manual
Page 68
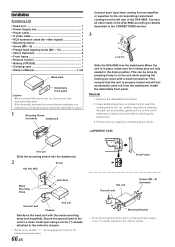
... Ground Lead Chassis this unit Ground Lead *3 Screws (M5 × 8) (Included) Mounting Bracket • Secure the ground lead of the DVA-9965 according to the "up" position (see above drawing). Connect all other leads of the unit to a clean metal spot using a screw (*3)...8226; Screw (M5 × 8 4 • Flange-head tapping screw (M4 × 14 4 • Velcro Fasteners 2 • Front frame 1 • Remote Control 1 • Battery (CR2025 1 • Carrying case 1 • Owner's Manual 1 set Metal plate Detachable Front panel Caution When you do not remove the ...
... Ground Lead Chassis this unit Ground Lead *3 Screws (M5 × 8) (Included) Mounting Bracket • Secure the ground lead of the DVA-9965 according to the "up" position (see above drawing). Connect all other leads of the unit to a clean metal spot using a screw (*3)...8226; Screw (M5 × 8 4 • Flange-head tapping screw (M4 × 14 4 • Velcro Fasteners 2 • Front frame 1 • Remote Control 1 • Battery (CR2025 1 • Carrying case 1 • Owner's Manual 1 set Metal plate Detachable Front panel Caution When you do not remove the ...

Owners Manual
Page 70
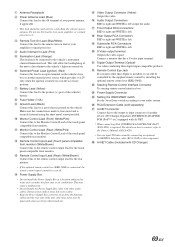
... antenna To amplifier or equalizer To vehicle phone To the instrument cluster illumination lead Ignition Key Battery To monitor control lead To remote output lead To Video Input terminal To Audio Input terminal (R, L) Amplifier Amplifier Speakers Front Left Front Right Rear Left Rear ... use a power cable that is attached on the bottom of the unit. *2 Caution about Power cable. Connections 1 Blue POWER ANT 2 Blue/White REMOTE TURN-ON 3 AUDIO Pink INTERRUPT IN 4 Orange ILLUMINATION 5 Red IGNITION 6 8 Yellow BATTERY 7 Black GND 9 M.CONT (Front) ! (White/Pink) M.CONT (...
... antenna To amplifier or equalizer To vehicle phone To the instrument cluster illumination lead Ignition Key Battery To monitor control lead To remote output lead To Video Input terminal To Audio Input terminal (R, L) Amplifier Amplifier Speakers Front Left Front Right Rear Left Rear ... use a power cable that is attached on the bottom of the unit. *2 Caution about Power cable. Connections 1 Blue POWER ANT 2 Blue/White REMOTE TURN-ON 3 AUDIO Pink INTERRUPT IN 4 Orange ILLUMINATION 5 Red IGNITION 6 8 Yellow BATTERY 7 Black GND 9 M.CONT (Front) ! (White/Pink) M.CONT (...
Owners Manual
Page 71
...KCA-420i. • You can still be controlled by the supplied remote control by connecting an optional Ai-NET/RCA Interface cable (KCA-121B) to this component. > Ai-NET Cable (Included with other than Alpine is required. Setting the 3WAY/2WAY switch Set the 3way/2way switch.... ! For details on lead of your power antenna, if applicable. • This lead should be used only for the rear monitor. • If the optional remote control eye (KRE-500E) is left. , S Video output terminal Outputs the video signal. Connect a monitor that has a S video input terminal. - " Monitor...
...KCA-420i. • You can still be controlled by the supplied remote control by connecting an optional Ai-NET/RCA Interface cable (KCA-121B) to this component. > Ai-NET Cable (Included with other than Alpine is required. Setting the 3WAY/2WAY switch Set the 3way/2way switch.... ! For details on lead of your power antenna, if applicable. • This lead should be used only for the rear monitor. • If the optional remote control eye (KRE-500E) is left. , S Video output terminal Outputs the video signal. Connect a monitor that has a S video input terminal. - " Monitor...

