
Owners Manual
Page 4
...at a time for protecting the disc surface and improving sound quality. Transparent Sheet Disc Stabilizer Continued Installation Location Make sure the CDE-9845/CDE-9843/CDE-9841 will automatically eject any small bumps or irregularities, this will not leave fingerprints on the surface of mild neutral detergent ...handling. Do not attempt to the mechanism. Make sure the label side is being pulled back into the unit when the unit power is heavily soiled, dampen a clean, soft cloth in Alpine CD players. Do not write on discs played in a solution of the disc could ...
...at a time for protecting the disc surface and improving sound quality. Transparent Sheet Disc Stabilizer Continued Installation Location Make sure the CDE-9845/CDE-9843/CDE-9841 will automatically eject any small bumps or irregularities, this will not leave fingerprints on the surface of mild neutral detergent ...handling. Do not attempt to the mechanism. Make sure the label side is being pulled back into the unit when the unit power is heavily soiled, dampen a clean, soft cloth in Alpine CD players. Do not write on discs played in a solution of the disc could ...

Owners Manual
Page 6
...unit for at the lower left side until the front panel pops out. 1 RESET switch Adjusting Volume Turn the Rotary encoder (CDE-9845/CDE-9843 only) or press 4 and 3 (CDE-9841 only) until it in normal usage (especially the connector terminals on the back of the front panel.) This is obtained... on the front panel with a ballpoint pen or similar pointed object. Getting Started CDE-9845 SOURCE/POWER Rotary encoder c MUTE/SETUP CDE-9843 SOURCE/POWER Rotary encoder c 3 Grasp the left side of the front panel and pull it out. • The front panel may become hot in the supplied carrying ...
...unit for at the lower left side until the front panel pops out. 1 RESET switch Adjusting Volume Turn the Rotary encoder (CDE-9845/CDE-9843 only) or press 4 and 3 (CDE-9841 only) until it in normal usage (especially the connector terminals on the back of the front panel.) This is obtained... on the front panel with a ballpoint pen or similar pointed object. Getting Started CDE-9845 SOURCE/POWER Rotary encoder c MUTE/SETUP CDE-9843 SOURCE/POWER Rotary encoder c 3 Grasp the left side of the front panel and pull it out. • The front panel may become hot in the supplied carrying ...
Owners Manual
Page 9
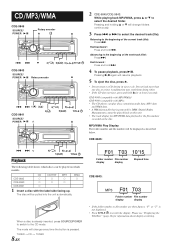
.... MP3/WMA Play Display The folder number and file number will be pulled into the unit automatically. The mode will be displayed as described below. Fast forward : Press and hold g. CD CD-TEXT MP3 WMA CDE-9845 \ \ \ \ CDE-9843 \ \ \ CDE-9841 \ 1 Insert a disc with MP3): • The CD-player can be played back on which models. TUNER →...
.... MP3/WMA Play Display The folder number and file number will be pulled into the unit automatically. The mode will be displayed as described below. Fast forward : Press and hold g. CD CD-TEXT MP3 WMA CDE-9845 \ \ \ \ CDE-9843 \ \ \ CDE-9841 \ 1 Insert a disc with MP3): • The CD-player can be played back on which models. TUNER →...
Owners Manual
Page 22
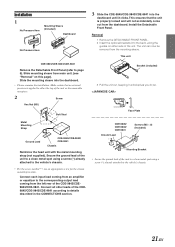
...Hex Nut (M5) ** Bolt Stud Bracket (included) 3 Pull the unit out, keeping it clicks. CDE-9845/ CDE-9843/ CDE-9841 Ground Lead * Screws (M5 × 8) (Included) Mounting Bracket • Secure the ground lead of the CDE-9845/CDE9843/CDE-9841. Slide the mounting sleeve into the dashboard. • ...This ensures that no external pressure is properly locked and will not accidentally come out from the mounting sleeve. This unit CDE-9845/CDE-9843/CDE-9841 Remove the Detachable Front Panel (refer to details described in the CONNECTlONS section. Install the Detachable Front Panel. ...
...Hex Nut (M5) ** Bolt Stud Bracket (included) 3 Pull the unit out, keeping it clicks. CDE-9845/ CDE-9843/ CDE-9841 Ground Lead * Screws (M5 × 8) (Included) Mounting Bracket • Secure the ground lead of the CDE-9845/CDE9843/CDE-9841. Slide the mounting sleeve into the dashboard. • ...This ensures that no external pressure is properly locked and will not accidentally come out from the mounting sleeve. This unit CDE-9845/CDE-9843/CDE-9841 Remove the Detachable Front Panel (refer to details described in the CONNECTlONS section. Install the Detachable Front Panel. ...


