
Manual
Page 2
TABLE OF CONTENTS ABOUT THIS GUIDE 4 INTRODUCTION 5 PACKAGE CONTENTS 6 SYSTEM REQUIREMENTS 6 GENERAL FEATURES 7 PRODUCT VIEW 8 HARDWARE INSTALLATION 10 NETWORKING APPLICATION 10 INSTALLING THE PRINT SERVER 11 USING THE UTILITIES 12 AUTO-RUN INSTALLATION 12 PS-UTILITY 14 Installing PS-Utility 14 Using PS-Utility 15 PS WIZARD 18 PRINTING IN MAC OS 21 RENDEZVOUS USES IN MAC OS 10.2 21 SETTING UP APPLE TALK/LPR PRINTING 24 For MAC OS X User 24 For MAC OS 9 User 26 For MAC OS 9 User 27 WEB CONFIGURATION 30 WEB CONFIGURATION UTILITY 30 MANAGEMENT 31 - 2 -
TABLE OF CONTENTS ABOUT THIS GUIDE 4 INTRODUCTION 5 PACKAGE CONTENTS 6 SYSTEM REQUIREMENTS 6 GENERAL FEATURES 7 PRODUCT VIEW 8 HARDWARE INSTALLATION 10 NETWORKING APPLICATION 10 INSTALLING THE PRINT SERVER 11 USING THE UTILITIES 12 AUTO-RUN INSTALLATION 12 PS-UTILITY 14 Installing PS-Utility 14 Using PS-Utility 15 PS WIZARD 18 PRINTING IN MAC OS 21 RENDEZVOUS USES IN MAC OS 10.2 21 SETTING UP APPLE TALK/LPR PRINTING 24 For MAC OS X User 24 For MAC OS 9 User 26 For MAC OS 9 User 27 WEB CONFIGURATION 30 WEB CONFIGURATION UTILITY 30 MANAGEMENT 31 - 2 -
Manual
Page 5
... print files from your network. The USB Print Server features a Web-based Configuration Utility, which allows you wish to locate USB printer services. It also includes a powerful software utility PSUtility, a user-friendly program that allows you to complete further settings for direct communication between PC/Notebook and print server anywhere you to set up the print server through an Access Point under the infrastructure mode, or can be used in ad-hoc mode for the print server. - 5 - 1 INTRODUCTION Congratulations on purchasing your USB Print Server...
... print files from your network. The USB Print Server features a Web-based Configuration Utility, which allows you wish to locate USB printer services. It also includes a powerful software utility PSUtility, a user-friendly program that allows you to complete further settings for direct communication between PC/Notebook and print server anywhere you to set up the print server through an Access Point under the infrastructure mode, or can be used in ad-hoc mode for the print server. - 5 - 1 INTRODUCTION Congratulations on purchasing your USB Print Server...
Manual
Page 6
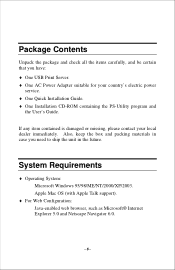
Also, keep the box and packing materials in the future. Apple Mac OS (with Apple Talk support). ♦ For Web Configuration: Java-enabled web browser, such as Microsoft® Internet Explorer 5.0 and Netscape Navigator 6.0. - 6 - If any item contained is damaged or missing, please contact your country's electric power service. ♦ One Quick Installation Guide. ♦ One Installation CD-ROM containing the PS-Utility program and the User's Guide. Package Contents Unpack the...
Also, keep the box and packing materials in the future. Apple Mac OS (with Apple Talk support). ♦ For Web Configuration: Java-enabled web browser, such as Microsoft® Internet Explorer 5.0 and Netscape Navigator 6.0. - 6 - If any item contained is damaged or missing, please contact your country's electric power service. ♦ One Quick Installation Guide. ♦ One Installation CD-ROM containing the PS-Utility program and the User's Guide. Package Contents Unpack the...

Manual
Page 7
... mixed-LAN environments ♦ Windows-based administrative program makes it possible to set up in a few minutes. ♦ Latest MIB-II (RFC 1213) for SNMP standard management ♦ Offer LPR program for Windows 95/98/Me TCP/IP printing ♦ IP assignment support for DHCP, BOOTP and RARP ♦ Support Web configuration ♦ Provide Flash memory for easy firmware upgrade ♦ Printing Access control and display ♦ E-mail notification for printer error messages ♦ Support E-Mail printing and FTP printing...
... mixed-LAN environments ♦ Windows-based administrative program makes it possible to set up in a few minutes. ♦ Latest MIB-II (RFC 1213) for SNMP standard management ♦ Offer LPR program for Windows 95/98/Me TCP/IP printing ♦ IP assignment support for DHCP, BOOTP and RARP ♦ Support Web configuration ♦ Provide Flash memory for easy firmware upgrade ♦ Printing Access control and display ♦ E-mail notification for printer error messages ♦ Support E-Mail printing and FTP printing...
Manual
Page 9
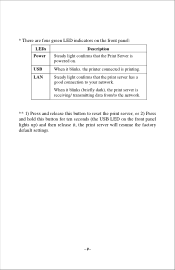
... print server will resume the factory default settings. - 9 - or 2) Press and hold this button to reset the print server; * There are four green LED indicators on the front panel: LEDs Power Description Steady light confirms that the print server has a good connection to your network. When it blinks, the printer connected is receiving/ transmitting data from/to the network. ** 1) Press and release this button for ten seconds (the USB LED on . USB When it blinks (briefly dark), the print server...
... print server will resume the factory default settings. - 9 - or 2) Press and hold this button to reset the print server; * There are four green LED indicators on the front panel: LEDs Power Description Steady light confirms that the print server has a good connection to your network. When it blinks, the printer connected is receiving/ transmitting data from/to the network. ** 1) Press and release this button for ten seconds (the USB LED on . USB When it blinks (briefly dark), the print server...
Manual
Page 11
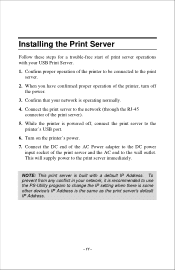
... your network, it is recommended to use the PS-Utility program to change the IP setting when there is some other device's IP Address is powered off the power. 3. Turn on the printer's power. 7. This will supply power to the printer's USB port. 6. Installing the Print Server Follow these steps for a trouble-free start of the printer to be connected to the print server. 2. Confirm proper operation of print server operations with a default IP Address. Connect the DC end of the AC Power adapter...
... your network, it is recommended to use the PS-Utility program to change the IP setting when there is some other device's IP Address is powered off the power. 3. Turn on the printer's power. 7. This will supply power to the printer's USB port. 6. Installing the Print Server Follow these steps for a trouble-free start of the printer to be connected to the print server. 2. Confirm proper operation of print server operations with a default IP Address. Connect the DC end of the AC Power adapter...

Manual
Page 13
... set up the printer configuration easily and quickly. • Browse CD - click to launch the Printer Wizard program, which is helpful to close the Auto-Run program. - 13 - click to the next section for preview. • Exit - • User's Guide - click to browse the contents of the Installation CD-ROM, click this button and the contents of the USB Print Server. • Install Utility - Please refer to install PS-Utility...
... set up the printer configuration easily and quickly. • Browse CD - click to launch the Printer Wizard program, which is helpful to close the Auto-Run program. - 13 - click to the next section for preview. • Exit - • User's Guide - click to browse the contents of the Installation CD-ROM, click this button and the contents of the USB Print Server. • Install Utility - Please refer to install PS-Utility...

Manual
Page 14
then, click Next > in your network, you can use PS-Utility to launch the InstallShield Wizard; Installing PS-Utility 1. Once executed, the Setup program will extract files to change the related settings of InstallShield Wizard. 2. Choose the destination location. Click Install Utility from the Auto-Run menu screen. PS-Utility To avoid the conflict in the welcome screen of your print server (such as the IP address) after finishing the installation. If no specific requirement, leave the default setting and click Next >. - 14 -
then, click Next > in your network, you can use PS-Utility to launch the InstallShield Wizard; Installing PS-Utility 1. Once executed, the Setup program will extract files to change the related settings of InstallShield Wizard. 2. Choose the destination location. Click Install Utility from the Auto-Run menu screen. PS-Utility To avoid the conflict in the welcome screen of your print server (such as the IP address) after finishing the installation. If no specific requirement, leave the default setting and click Next >. - 14 -

Manual
Page 17
... the factory settings of the selected print server. - Information Field: Display the basic information of PS-Utility. - Factory Reset: Click this button to exit PS-Utility. 3. - About: Click this button to search the connected print server again. - Status Bar: Display the system status. - 17 - Close: Click this button to update the firmware of the print server. - Alternately, you can double-click the print server in the Device List. 4. Show Web Setup: Click this button to bring up a window...
... the factory settings of the selected print server. - Information Field: Display the basic information of PS-Utility. - Factory Reset: Click this button to exit PS-Utility. 3. - About: Click this button to search the connected print server again. - Status Bar: Display the system status. - 17 - Close: Click this button to update the firmware of the print server. - Alternately, you can double-click the print server in the Device List. 4. Show Web Setup: Click this button to bring up a window...

Manual
Page 24
Follow the instructions below for setting up the print server: 1. Open the System Preference window and click Network. In the Network window, select the AppleTalk tab and check the Make AppleTalk Active option. The default IP Address of your Macintosh computer to your IP Address to print through the print server. Setting Up Apple Talk/LPR Printing For MAC OS X User With MAC OS X, you can use AppleTalk or LPR printers to 192.168.1.x, where...
Follow the instructions below for setting up the print server: 1. Open the System Preference window and click Network. In the Network window, select the AppleTalk tab and check the Make AppleTalk Active option. The default IP Address of your Macintosh computer to your IP Address to print through the print server. Setting Up Apple Talk/LPR Printing For MAC OS X User With MAC OS X, you can use AppleTalk or LPR printers to 192.168.1.x, where...
Manual
Page 26
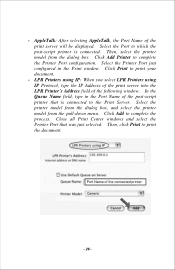
... post-script printer is connected to the Print Server. Select the Printer Port just configured in the Port Name of the following window. Click Print to complete the process. Click Add to print your document. - In the Queue Name field, type in the Print window. Then, select the printer model from the pull-down menu. LPR Printers using IP: When you select LPR Printers using IP Protocol, type the IP Address of the print server into the LPR Printer's Address field of...
... post-script printer is connected to the Print Server. Select the Printer Port just configured in the Port Name of the following window. Click Print to complete the process. Click Add to print your document. - In the Queue Name field, type in the Print window. Then, select the printer model from the pull-down menu. LPR Printers using IP: When you select LPR Printers using IP Protocol, type the IP Address of the print server into the LPR Printer's Address field of...

Manual
Page 27
..., it . To set up the print server to -EtherTalk router. Change the IP Address on one of the computers within your Ethernet network, either directly using an EtherTalk connection or indirectly through a LocalTalk-to be in the same zone as most of your AppleTalk network is any MAC OS computer connected to your network to specify which zone the Print Server should be used for network printing to the...
..., it . To set up the print server to -EtherTalk router. Change the IP Address on one of the computers within your Ethernet network, either directly using an EtherTalk connection or indirectly through a LocalTalk-to be in the same zone as most of your AppleTalk network is any MAC OS computer connected to your network to specify which zone the Print Server should be used for network printing to the...

Manual
Page 28
... the software you wish to Active. Please confirm that AppleTalk is set to use. Double-click the name of the Printer Port you are examples only. - 28 - To print from MAC OS Client Workstations: The actual settings of selecting a PostScript printer connected to your MAC OS workstation's default printer, select Chooser from the instructions provided in this option. 3. To choose a printer connected to your print server as your print server...
... the software you wish to Active. Please confirm that AppleTalk is set to use. Double-click the name of the Printer Port you are examples only. - 28 - To print from MAC OS Client Workstations: The actual settings of selecting a PostScript printer connected to your MAC OS workstation's default printer, select Chooser from the instructions provided in this option. 3. To choose a printer connected to your print server as your print server...

Manual
Page 30
... - TIP: The computer's IP address must correspond with the web browser. Web Configuration Utility First, launch your print server with the print server's IP address in the same segment for the two devices to enter the Management screen of LAN will be helpful in this manual). Extensive knowledge of the Configuration Utility. Then, type http://192.168.1.254 (the default IP address) in the Address bar and press [Enter] to communicate.
... - TIP: The computer's IP address must correspond with the web browser. Web Configuration Utility First, launch your print server with the print server's IP address in the same segment for the two devices to enter the Management screen of LAN will be helpful in this manual). Extensive knowledge of the Configuration Utility. Then, type http://192.168.1.254 (the default IP address) in the Address bar and press [Enter] to communicate.

Manual
Page 32
... - Ethernet Status You can be found in this field display the information of the printer, such as the given name for the printer, speed, printer status, and status of your printing tasks, etc. Management J System As shown above, the System displays the status of your print server, printer, and network. Clicking Refresh will update the information. Device Status The information about the print server, including the firmware version, MAC/IP address...
... - Ethernet Status You can be found in this field display the information of the printer, such as the given name for the printer, speed, printer status, and status of your printing tasks, etc. Management J System As shown above, the System displays the status of your print server, printer, and network. Clicking Refresh will update the information. Device Status The information about the print server, including the firmware version, MAC/IP address...

Manual
Page 40
... add/delete the user(s) to abandon. - 40 - The User List at the bottom of the screen displays the current defined user and related information for the print server. Define Users You can also limit the access right by setting the Allow Undefined Users Printing option to access the print server or not. Configuration J User Printing Control By configuring the Enable User Printing Control option (Yes or No), the user in the User List is not in the User List...
... add/delete the user(s) to abandon. - 40 - The User List at the bottom of the screen displays the current defined user and related information for the print server. Define Users You can also limit the access right by setting the Allow Undefined Users Printing option to access the print server or not. Configuration J User Printing Control By configuring the Enable User Printing Control option (Yes or No), the user in the User List is not in the User List...
Quick installation guide
Page 2
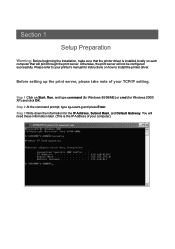
... cmd (for Windows 2000/ XP) and click OK. Step 2 At the command prompt, type ipconfig and press Enter. Please refer to your TCP/IP setting. Step 1 Click on each computer that the printer driver is the IP Address of your printer's manual for the IP Address, Subnet Mask, and Default Gateway. Section 1 Setup Preparation Warning: Before beginning the installation, make sure that will print through the print server.
... cmd (for Windows 2000/ XP) and click OK. Step 2 At the command prompt, type ipconfig and press Enter. Please refer to your TCP/IP setting. Step 1 Click on each computer that the printer driver is the IP Address of your printer's manual for the IP Address, Subnet Mask, and Default Gateway. Section 1 Setup Preparation Warning: Before beginning the installation, make sure that will print through the print server.

Quick installation guide
Page 6
... Network Connection. Note: If the print server is detected under the Device Name. If nothing still appears, use a paper clip and hold in Section 1 and make sure the Subnet Mask and Default Gateway match those displayed. Step 3 Click on Change IP Address. Section 4 Running PS Utility Note: If your TCP/IP setting from Section 1 has an IP Address of 192.168.1.x (where x is a number between...
... Network Connection. Note: If the print server is detected under the Device Name. If nothing still appears, use a paper clip and hold in Section 1 and make sure the Subnet Mask and Default Gateway match those displayed. Step 3 Click on Change IP Address. Section 4 Running PS Utility Note: If your TCP/IP setting from Section 1 has an IP Address of 192.168.1.x (where x is a number between...

Quick installation guide
Page 8
... from messages, use the PS Utility. Step 4 Once you have changed the IP Address of the print server and press Enter. After you kept the factory default IP address, type ping 192.168.1.254 You should get Request timed out or Destination host unreachable message, please double-check your network cable connection and try to the next section. For Windows 2000/XP, type cmd and click...
... from messages, use the PS Utility. Step 4 Once you have changed the IP Address of the print server and press Enter. After you kept the factory default IP address, type ping 192.168.1.254 You should get Request timed out or Destination host unreachable message, please double-check your network cable connection and try to the next section. For Windows 2000/XP, type cmd and click...

Quick installation guide
Page 9
Step 2 Click on every computer in your network. Section 6 Running PS Wizard Warning: Make sure you have installed the printer driver locally on PS Wizard. Otherwise, the PS Wizard will not run the PS Wizard on all the computers in your network before running the PS Wizard. Step 1 Insert the provided CD and wait for the setup menu to run properly. Note: If the setup menu does not appear automatically after you have inserted the CD, go to Start, Run, type D:\PS Utility\PS Wizard.exe (where D is the letter of your CD drive) and click OK. Be sure to appear.
Step 2 Click on every computer in your network. Section 6 Running PS Wizard Warning: Make sure you have installed the printer driver locally on PS Wizard. Otherwise, the PS Wizard will not run the PS Wizard on all the computers in your network before running the PS Wizard. Step 1 Insert the provided CD and wait for the setup menu to run properly. Note: If the setup menu does not appear automatically after you have inserted the CD, go to Start, Run, type D:\PS Utility\PS Wizard.exe (where D is the letter of your CD drive) and click OK. Be sure to appear.


