
Manual
Page 3
... 7 PRINT SERVER FEATURES 7 EXTERNAL FEATURES 8 Port Connectors 9 About This Guide iii CE Mark Warning This is likely to cause harmful interference in which case the user may be reproduced in any means or used in accordance with the limits for a Class B digital device, pursuant to correct the interference at his own expense. FCC Warning This equipment has been tested...
... 7 PRINT SERVER FEATURES 7 EXTERNAL FEATURES 8 Port Connectors 9 About This Guide iii CE Mark Warning This is likely to cause harmful interference in which case the user may be reproduced in any means or used in accordance with the limits for a Class B digital device, pursuant to correct the interference at his own expense. FCC Warning This equipment has been tested...
Manual
Page 4
... print server installation procedures and troubleshooting self-test results. Network Cable Connector 9 DC Power Connector 10 LED Indicators 10 2 UNPACKING AND INSTALLATION 11 UNPACKING AND INSPECTING THE PRINT SERVER 11 INSTALLING THE PRINT SERVER 12 POWER ON SELF-TEST 13 TESTING YOUR PRINT SERVER 14 3 PRODUCT SPECIFICATIONS 15 PRINTER CONNECTION 15 NETWORK CONNECTION 15 NETWORK PROTOCOLS 16 MANAGEMENT AND DIAGNOSTICS 16 ENVIRONMENTAL AND PHYSICAL 16 4 PORT PINOUTS 17 PARALLEL PORTS 17 0 ABOUT THIS GUIDE This manual describes the 2 Parallel 1 USB Port Ethernet/Fast Ethernet...
... print server installation procedures and troubleshooting self-test results. Network Cable Connector 9 DC Power Connector 10 LED Indicators 10 2 UNPACKING AND INSTALLATION 11 UNPACKING AND INSPECTING THE PRINT SERVER 11 INSTALLING THE PRINT SERVER 12 POWER ON SELF-TEST 13 TESTING YOUR PRINT SERVER 14 3 PRODUCT SPECIFICATIONS 15 PRINTER CONNECTION 15 NETWORK CONNECTION 15 NETWORK PROTOCOLS 16 MANAGEMENT AND DIAGNOSTICS 16 ENVIRONMENTAL AND PHYSICAL 16 4 PORT PINOUTS 17 PARALLEL PORTS 17 0 ABOUT THIS GUIDE This manual describes the 2 Parallel 1 USB Port Ethernet/Fast Ethernet...
Manual
Page 5
...'s parallel printer port. It manages the flow of maximum convenience to users. This provides workload relief to your file servers through the network, printers can be used for fi le access or other direct services to network users. The Print Server offers extraordinary flexibility, operating with all major network operating systems and protocols: ♦ TCP/IP UNIX lpr/lpd (HP-UX, SunOS, Solaris, SCO, UnixWare, IBM AIX) Windows NT/2000, Windows 95...
...'s parallel printer port. It manages the flow of maximum convenience to users. This provides workload relief to your file servers through the network, printers can be used for fi le access or other direct services to network users. The Print Server offers extraordinary flexibility, operating with all major network operating systems and protocols: ♦ TCP/IP UNIX lpr/lpd (HP-UX, SunOS, Solaris, SCO, UnixWare, IBM AIX) Windows NT/2000, Windows 95...
Manual
Page 6
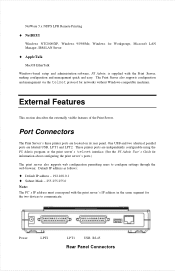
... using the PS Admin program or the print server's telnet interface. (See the PS Admin User's Guide for information about configuring the print server's ports.) The print server also supports web configuration permitting users to communicate. External Features This section describes the externally visible features of the Print Server. NetWare 5.x NDPS LPR Remote Printing ♦ NetBEUI Windows NT/2000/XP, Windows 95/98/Me, Windows for Workgroups, Microsoft LAN Manager, IBM LAN Server ♦ AppleTalk MacOS EtherTalk Windows-based setup and administration software, PS Admin, is supplied...
... using the PS Admin program or the print server's telnet interface. (See the PS Admin User's Guide for information about configuring the print server's ports.) The print server also supports web configuration permitting users to communicate. External Features This section describes the externally visible features of the Print Server. NetWare 5.x NDPS LPR Remote Printing ♦ NetBEUI Windows NT/2000/XP, Windows 95/98/Me, Windows for Workgroups, Microsoft LAN Manager, IBM LAN Server ♦ AppleTalk MacOS EtherTalk Windows-based setup and administration software, PS Admin, is supplied...
Manual
Page 7
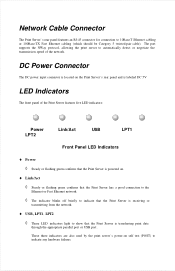
... labeled DC 5V LED Indicators The front panel of the network. These three indicators are also used by the print server's power-on . ♦ Link/Act ◊ Steady or flashing green confirms that the Print Server has a good connection to the Ethernet or Fast Ethernet network. ◊ The indicator blinks off briefly to indicate that the Print Server is transferring print data through the appropriate parallel port or USB port. Network Cable Connector The Print Server's rear panel...
... labeled DC 5V LED Indicators The front panel of the network. These three indicators are also used by the print server's power-on . ♦ Link/Act ◊ Steady or flashing green confirms that the Print Server has a good connection to the Ethernet or Fast Ethernet network. ◊ The indicator blinks off briefly to indicate that the Print Server is transferring print data through the appropriate parallel port or USB port. Network Cable Connector The Print Server's rear panel...
Manual
Page 9
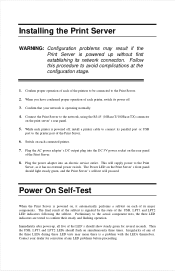
... Print Server, as it automatically performs a self-test on simultaneously three times. Then the USB, LPT1 and LPT2 LEDs should light steady green, and the Print Server's self-test will supply power to the Print Server. 2. While each connected printer. 7. Immediately after power-up without first establishing its parallel port or USB port to connect its network connection. Contact your network is powered off . 3. Plug the AC power adapter's DC output plug into an electric service outlet. Installing the Print Server WARNING: Configuration problems...
... Print Server, as it automatically performs a self-test on simultaneously three times. Then the USB, LPT1 and LPT2 LEDs should light steady green, and the Print Server's self-test will supply power to the Print Server. 2. While each connected printer. 7. Immediately after power-up without first establishing its parallel port or USB port to connect its network connection. Contact your network is powered off . 3. Plug the AC power adapter's DC output plug into an electric service outlet. Installing the Print Server WARNING: Configuration problems...
Manual
Page 10
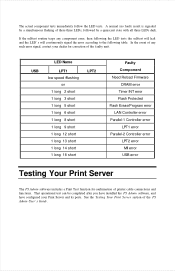
... LPT2 Faulty Component Need Reload Firmware DRAM error Timer INT error Flash Protected Flash Erase/Program error LAN Controller error Parallel-1 Controller error LPT1 error Parallel-2 Controller error LPT2 error MII error USB error Testing Your Print Server The PS Admin software includes a Print Test function for correction of these three LEDs, followed by a simultaneous flashing of the faulty unit. See the Testing Your Print Server section of printer cable connections and functions. In the event of any component error, then following the LED tests the self-test will halt and...
... LPT2 Faulty Component Need Reload Firmware DRAM error Timer INT error Flash Protected Flash Erase/Program error LAN Controller error Parallel-1 Controller error LPT1 error Parallel-2 Controller error LPT2 error MII error USB error Testing Your Print Server The PS Admin software includes a Print Test function for correction of these three LEDs, followed by a simultaneous flashing of the faulty unit. See the Testing Your Print Server section of printer cable connections and functions. In the event of any component error, then following the LED tests the self-test will halt and...

Manual
Page 13
... 16, 17, 19-30 Signal nStrobe Data 1 Data 2 Data 3 Data 4 Data 5 Data 6 Data 7 Data 8 nAck Busy PError Select nAutoFd nFault nInit nSelectIn Ground Source Host Bi-directional Bi-directional Bi-directional Bi-directional Bi-directional Bi-directional Bi-directional Bi-directional Printer Printer Printer Printer Host Printer Host Host B 4 PORT PINOUTS This appendix shows the pinouts of the print server's 25-pin parallel port connector (identical to the connector used on most personal computers), as well as...
... 16, 17, 19-30 Signal nStrobe Data 1 Data 2 Data 3 Data 4 Data 5 Data 6 Data 7 Data 8 nAck Busy PError Select nAutoFd nFault nInit nSelectIn Ground Source Host Bi-directional Bi-directional Bi-directional Bi-directional Bi-directional Bi-directional Bi-directional Bi-directional Printer Printer Printer Printer Host Printer Host Host B 4 PORT PINOUTS This appendix shows the pinouts of the print server's 25-pin parallel port connector (identical to the connector used on most personal computers), as well as...
Quick installation guide
Page 2
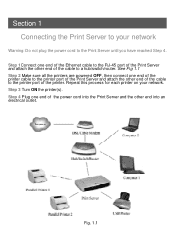
... 4. Step 3 Turn ON the printer(s). Fig. 1.1 Step 1Connect one end of the printer cable to the printer port of the Print Server and attach the other end of the cable to the RJ-45 port of the printer. See Fig 1.1 Step 2 Make sure all the printers are powered OFF, then connect one end of the Ethernet cable to the printer port of the Print Server and attach the other end into...
... 4. Step 3 Turn ON the printer(s). Fig. 1.1 Step 1Connect one end of the printer cable to the printer port of the Print Server and attach the other end of the cable to the RJ-45 port of the printer. See Fig 1.1 Step 2 Make sure all the printers are powered OFF, then connect one end of the Ethernet cable to the printer port of the Print Server and attach the other end into...

Quick installation guide
Page 3
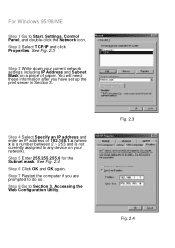
... Use the following IP address and enter an IP address of 192.168. 1.x (where x is a number between 2 ~ 253 and is not currently assigned to Section 3, Accessing the Web Configuration Utility. If your Default gateway. Step 5 Enter 255.255.255.0 for you have set up the print server in your network, right-click on My Network Places on your network). Follow the steps below to Section 3, Accessing the Web Configuration Utility. For Windows...
... Use the following IP address and enter an IP address of 192.168. 1.x (where x is a number between 2 ~ 253 and is not currently assigned to Section 3, Accessing the Web Configuration Utility. If your Default gateway. Step 5 Enter 255.255.255.0 for you have set up the print server in your network, right-click on My Network Places on your network). Follow the steps below to Section 3, Accessing the Web Configuration Utility. For Windows...
Quick installation guide
Page 4
Step 8 Go to any device on your current network settings including IP Address and Subnet Mask on a piece of 192.168.1.x (where x is a number between 2 ~ 253 and is not currently assigned to Section 3, Accessing the Web Configuration Utility. Step 4 Select Specify an IP address and enter an IP address of paper. Fig. 2.3 Fig. 2.4 Step 2 Select TCP/IP and click Properties. Step 5 Enter 255.255...
Step 8 Go to any device on your current network settings including IP Address and Subnet Mask on a piece of 192.168.1.x (where x is a number between 2 ~ 253 and is not currently assigned to Section 3, Accessing the Web Configuration Utility. Step 4 Select Specify an IP address and enter an IP address of paper. Fig. 2.3 Fig. 2.4 Step 2 Select TCP/IP and click Properties. Step 5 Enter 255.255...

Quick installation guide
Page 5
Be sure to click Save when you want to use. See Fig. 3.3 Fig. 3.2 Fig 3.3 See Fig. 3.2 Fig. 3.1 Step 3 Click on a piece of the Print Server: 192. 168.1.254 See Fig. 3.1 Step 2 The Welcome screen will appear. Step 4 Write down on Configuration. You may rename the Print Server name and Port names or leave them with the default. Section 3 Accessing the Web Configuration Utility Step 1 Open the web browser and type the default IP address of paper the Port names you are done editing the names.
Be sure to click Save when you want to use. See Fig. 3.3 Fig. 3.2 Fig 3.3 See Fig. 3.2 Fig. 3.1 Step 3 Click on a piece of the Print Server: 192. 168.1.254 See Fig. 3.1 Step 2 The Welcome screen will appear. Step 4 Write down on Configuration. You may rename the Print Server name and Port names or leave them with the default. Section 3 Accessing the Web Configuration Utility Step 1 Open the web browser and type the default IP address of paper the Port names you are done editing the names.
Quick installation guide
Page 6
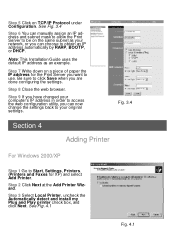
... order to access the web configuration utility, you want to obtain an IP address automatically by RARP, BOOTP, or DHCP. Be sure to Start, Settings, Printers. (Printers and Faxes for the Print Server you can choose to use. Step 2 Click Next at the Add Printer Wizard. Note: This Installation Guide uses the default IP address as your network, or you are done configuring the settings. Step 9 If you have changed your original settings. Step 3 Select...
... order to access the web configuration utility, you want to obtain an IP address automatically by RARP, BOOTP, or DHCP. Be sure to Start, Settings, Printers. (Printers and Faxes for the Print Server you can choose to use. Step 2 Click Next at the Add Printer Wizard. Note: This Installation Guide uses the default IP address as your network, or you are done configuring the settings. Step 9 If you have changed your original settings. Step 3 Select...
Quick installation guide
Page 7
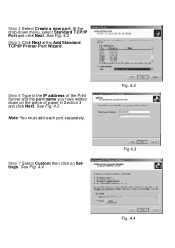
See Fig. 4.3 Note: You must add each port separately. See Fig. 4.4 Fig. 4.2 Fig 4.3 Fig. 4.4 Step 7 Select Custom then click on the piece of paper in Section 3 and click Next. See Fig. 4.2 Step 5 Click Next at the Add Standard TCP/IP Printer Port Wizard. Step 6 Type in the IP address of the Print Server and the port name you have written down menu, select Standard TCP/IP Port and click Next. Step 4 Select Create a new port. At the drop-down on Settings.
See Fig. 4.3 Note: You must add each port separately. See Fig. 4.4 Fig. 4.2 Fig 4.3 Fig. 4.4 Step 7 Select Custom then click on the piece of paper in Section 3 and click Next. See Fig. 4.2 Step 5 Click Next at the Add Standard TCP/IP Printer Port Wizard. Step 6 Type in the IP address of the Print Server and the port name you have written down menu, select Standard TCP/IP Port and click Next. Step 4 Select Create a new port. At the drop-down on Settings.

Quick installation guide
Page 10
... for the Windows 98 CD-ROM. Step 16 Click Next at the Add Printer Wizard. See Fig. 4.14 Step 20 Verify the Network path is the letter of paper in the port list. Step 12 Type in the IP address of the Print Server and the port name you have written down on the piece of your computer is restarted, go to Start, Settings, Printers, Add Printer. Step...
... for the Windows 98 CD-ROM. Step 16 Click Next at the Add Printer Wizard. See Fig. 4.14 Step 20 Verify the Network path is the letter of paper in the port list. Step 12 Type in the IP address of the Print Server and the port name you have written down on the piece of your computer is restarted, go to Start, Settings, Printers, Add Printer. Step...
Quick installation guide
Page 12
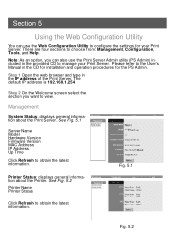
.... Management System Status: displays general information about the Printer. Step 1 Open the web browser and type in the provided CD to manage your Print Server. Please refer to the User's Manual in the CD for installation and operation procedures for your Print Server. The default IP address is 192.168.1.254 Step 2 On the Welcome screen select the section you can use the Print Server Admin utility (PS Admin) included...
.... Management System Status: displays general information about the Printer. Step 1 Open the web browser and type in the provided CD to manage your Print Server. Please refer to the User's Manual in the CD for installation and operation procedures for your Print Server. The default IP address is 192.168.1.254 Step 2 On the Welcome screen select the section you can use the Print Server Admin utility (PS Admin) included...

Quick installation guide
Page 13
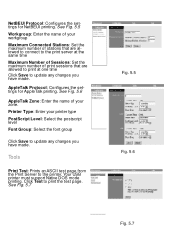
... the default. Password: Password for the USB Port. USB Port Name: Assign a name for accessing the Print Server. Subnet Mask: Assign a subnet mask to the Print Server, or automatically obtain an IP address by RARP, BOOTP, or DHCP. Speed: Select the printer port speed. Admin Contact: (optional) Indicate the administrator for bi-directional printing. Fig. 5.3 Fig. 5.4 Location: (optional) Indicate where the Print Server is located. TCP/IP Protocol: Configures the TCP/IP properties of your network. PJL Printer: This feature supports Hewlett-Packard PJL (Printer...
... the default. Password: Password for the USB Port. USB Port Name: Assign a name for accessing the Print Server. Subnet Mask: Assign a subnet mask to the Print Server, or automatically obtain an IP address by RARP, BOOTP, or DHCP. Speed: Select the printer port speed. Admin Contact: (optional) Indicate the administrator for bi-directional printing. Fig. 5.3 Fig. 5.4 Location: (optional) Indicate where the Print Server is located. TCP/IP Protocol: Configures the TCP/IP properties of your network. PJL Printer: This feature supports Hewlett-Packard PJL (Printer...
Quick installation guide
Page 14
AppleTalk Protocol: Configures the settings for NetBEUI printing. Click Test to the printer. See Fig. 5.7 Fig. 5.5 Fig. 5.6 Fig. 5.7 NetBEUI Protocol: Configures the settings for AppleTalk printing. Your USB printer must support Native DOS mode printing. Printer Type: Enter your printer type PostScript Level: Select the postscript level Font Group: Select the font group Click Save to update any changes you have made . See Fig. 5.5 Workgroup: Enter the name of print sessions...
AppleTalk Protocol: Configures the settings for NetBEUI printing. Click Test to the printer. See Fig. 5.7 Fig. 5.5 Fig. 5.6 Fig. 5.7 NetBEUI Protocol: Configures the settings for AppleTalk printing. Your USB printer must support Native DOS mode printing. Printer Type: Enter your printer type PostScript Level: Select the postscript level Font Group: Select the font group Click Save to update any changes you have made . See Fig. 5.5 Workgroup: Enter the name of print sessions...
Quick installation guide
Page 15
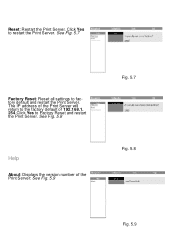
See Fig. 5.8 Help About: Displays the version number of 192.168.1. 254 Click Yes to the factory default of the Print Server: See Fig. 5.9 Fig. 5.7 Fig. 5.8 Fig. 5.9 Click Yes to factory default and restart the Print Server. The IP address of the Print Server will return to Factory Reset and restart the Print Server. Reset: Restart the Print Server. See Fig. 5.7 Factory Reset: Reset all settings to restart the Print Server.
See Fig. 5.8 Help About: Displays the version number of 192.168.1. 254 Click Yes to the factory default of the Print Server: See Fig. 5.9 Fig. 5.7 Fig. 5.8 Fig. 5.9 Click Yes to factory default and restart the Print Server. The IP address of the Print Server will return to Factory Reset and restart the Print Server. Reset: Restart the Print Server. See Fig. 5.7 Factory Reset: Reset all settings to restart the Print Server.

Quick installation guide
Page 16
... Specifications Printer Connection Printer Interface: One USB Port (ver 1.1), Two 25-pin parallel ports Network Connection Network Interface: RJ-45 connector for 10Base-T or 100Base-TX shielded Network Standards: IEEE 802.3 10Base-T Ethernet, IEEE 802.3u 100Base-TX Fast Ethernet Network Data Transfer Rate: 10/100 Mbps Network Protocols Ethernet Frame Types: 802.2, 802.3, Ethernet II, SNAP (auto-switching) Transport Protocols: TCP/IP, NetBEUI, AppleTalk TCP/IP Protocols Supported: BOOTP, SNMP, Telnet, TFTP, FTP, LPD, RARP, DHCP Management and Diagnostics Standard: SNMP MIBs: MIB...
... Specifications Printer Connection Printer Interface: One USB Port (ver 1.1), Two 25-pin parallel ports Network Connection Network Interface: RJ-45 connector for 10Base-T or 100Base-TX shielded Network Standards: IEEE 802.3 10Base-T Ethernet, IEEE 802.3u 100Base-TX Fast Ethernet Network Data Transfer Rate: 10/100 Mbps Network Protocols Ethernet Frame Types: 802.2, 802.3, Ethernet II, SNAP (auto-switching) Transport Protocols: TCP/IP, NetBEUI, AppleTalk TCP/IP Protocols Supported: BOOTP, SNMP, Telnet, TFTP, FTP, LPD, RARP, DHCP Management and Diagnostics Standard: SNMP MIBs: MIB...


