
Manual
Page 3
The software components, the procedures for installation and setup of its features, detailed installation procedures, and product specification. This 1-Port USB Print Server package also includes important software components and additional user's manuals. 0 ABOUT THIS GUIDE This manual describes the 1-Port USB Print Server, including full descriptions of the software are covered in the PS Admin User's Guide. - 3 -
The software components, the procedures for installation and setup of its features, detailed installation procedures, and product specification. This 1-Port USB Print Server package also includes important software components and additional user's manuals. 0 ABOUT THIS GUIDE This manual describes the 1-Port USB Print Server, including full descriptions of the software are covered in the PS Admin User's Guide. - 3 -

Manual
Page 4
... faster than a file server or a PC acting as a print server can connect your Ethernet network directly to your printer, wherever it is missing, or if you find any damage or mismatch, promptly contact your network. It manages the flow of print files from the package. In addition to this Hardware User's Guide, be certain that you have: ♦ One 1-Port USB Print Server ♦ One AC Power adapter suitable for...
... faster than a file server or a PC acting as a print server can connect your Ethernet network directly to your printer, wherever it is missing, or if you find any damage or mismatch, promptly contact your network. It manages the flow of print files from the package. In addition to this Hardware User's Guide, be certain that you have: ♦ One 1-Port USB Print Server ♦ One AC Power adapter suitable for...

Manual
Page 5
... LPR program for Windows 95/98/Me TCP/IP printing ♦ IP assignment support for DHCP, BOOTP and RARP ♦ Support Web configuration ♦ Provide Flash memory for attached printer's status ♦ Windows-based administrative program makes it connects - 5 - This provides workload relief to your network in three ways: ♦ It picks up in mixed-LAN environments ♦ Bi-directional communication allows collection of information for easy firmware upgrade Service Features This 1-Port USB Print Server can improve network-printing services of your file servers...
... LPR program for Windows 95/98/Me TCP/IP printing ♦ IP assignment support for DHCP, BOOTP and RARP ♦ Support Web configuration ♦ Provide Flash memory for attached printer's status ♦ Windows-based administrative program makes it connects - 5 - This provides workload relief to your network in three ways: ♦ It picks up in mixed-LAN environments ♦ Bi-directional communication allows collection of information for easy firmware upgrade Service Features This 1-Port USB Print Server can improve network-printing services of your file servers...

Manual
Page 6
... 1-Port USB Print Server offers extraordinary flexibility, operating with all console messages and management report information will be stationed at the location of your file servers through the network, the printer can be returned, via Telnet. - 6 - This print server also has a Telnet interface for print server administration, then all configuration and management commands may be issued to this print server, and all major network operating systems and protocols: ♦ TCP/IP UNIX lpr/lpd...
... 1-Port USB Print Server offers extraordinary flexibility, operating with all console messages and management report information will be stationed at the location of your file servers through the network, the printer can be returned, via Telnet. - 6 - This print server also has a Telnet interface for print server administration, then all configuration and management commands may be issued to this print server, and all major network operating systems and protocols: ♦ TCP/IP UNIX lpr/lpd...
Manual
Page 7
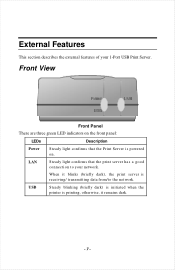
USB Steady blinking (briefly dark) is initiated when the printer is printing, otherwise, it blinks (briefly dark), the print server is powered on the front panel: LEDs Description Power Steady light confirms that the print server has a good connection to the network. Front View Front Panel There are three green LED indicators on . When it remains dark. - 7 - LAN Steady light confirms that the Print Server is receiving/ transmitting data from/to your 1-Port USB Print Server. External Features This section describes the external features of your network.
USB Steady blinking (briefly dark) is initiated when the printer is printing, otherwise, it blinks (briefly dark), the print server is powered on the front panel: LEDs Description Power Steady light confirms that the print server has a good connection to the network. Front View Front Panel There are three green LED indicators on . When it remains dark. - 7 - LAN Steady light confirms that the Print Server is receiving/ transmitting data from/to your 1-Port USB Print Server. External Features This section describes the external features of your network.
Manual
Page 8
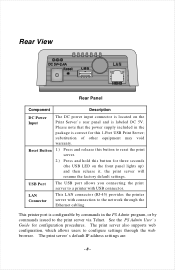
... connection to reset the print server. 2.) Press and hold this 1-Port USB Print Server; Reset Button 1.) Press and release this button to the network through the web browser. This printer port is configurable by commands in the package is labeled DC 5V. Please note that the power supply included in the PS Admin program, or by commands issued to configure settings through the Ethernet cabling. substitution of other equipment may void warranty. The print server's default IP address settings are: - 8 - The print server also supports web configuration...
... connection to reset the print server. 2.) Press and hold this 1-Port USB Print Server; Reset Button 1.) Press and release this button to the network through the web browser. This printer port is configurable by commands in the package is labeled DC 5V. Please note that the power supply included in the PS Admin program, or by commands issued to configure settings through the Ethernet cabling. substitution of other equipment may void warranty. The print server's default IP address settings are: - 8 - The print server also supports web configuration...
Manual
Page 10
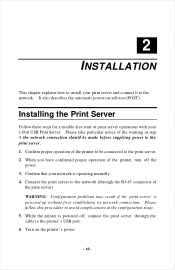
Turn on -self-test (POST). Installing the Print Server Follow these steps for a trouble-free start of the warning in step 4: the network connection should be connected to the printer's USB port. 6. Confirm that your network is powered up without first establishing its network connection. WARNING: Configuration problems may result if the print server is operating normally. 4. While the printer is powered off the power. 3. Please take particular notice of print server operations with your 1-Port USB Print Server. When you...
Turn on -self-test (POST). Installing the Print Server Follow these steps for a trouble-free start of the warning in step 4: the network connection should be connected to the printer's USB port. 6. Confirm that your network is powered up without first establishing its network connection. WARNING: Configuration problems may result if the print server is operating normally. 4. While the printer is powered off the power. 3. Please take particular notice of print server operations with your 1-Port USB Print Server. When you...

Manual
Page 11
Contact your network, it is recommended to use the PS Admin program to change the IP setting when there is some other device's IP address is a problem with the LEDs themselves. To prevent from any of the LEDs during the component test series, then the test will flash three times while the Power LED remains steady. Irregularity of any conflict in your dealer for a few seconds. Component Test Series The...
Contact your network, it is recommended to use the PS Admin program to change the IP setting when there is some other device's IP address is a problem with the LEDs themselves. To prevent from any of the LEDs during the component test series, then the test will flash three times while the Power LED remains steady. Irregularity of any conflict in your dealer for a few seconds. Component Test Series The...

Manual
Page 12
... 1 long - 11 short 1 long - 18 short Error Type Firmware reload required DRAM error Timer INT error Flash protected Flash erase/program error LAN controller error LAN memory error LAN I/O base error USB controller error In the event of the fault. - 12 - USB LED Pattern Flash slowly Steady on startup, contact your dealer for correction of a 'Firmware Reload Required' error at startup, proceed according to instructions given in the PS Admin User's Guide ("PS Admin Administration" section, under the heading "Upgrading the Print Server's Internal Firmware").
... 1 long - 11 short 1 long - 18 short Error Type Firmware reload required DRAM error Timer INT error Flash protected Flash erase/program error LAN controller error LAN memory error LAN I/O base error USB controller error In the event of the fault. - 12 - USB LED Pattern Flash slowly Steady on startup, contact your dealer for correction of a 'Firmware Reload Required' error at startup, proceed according to instructions given in the PS Admin User's Guide ("PS Admin Administration" section, under the heading "Upgrading the Print Server's Internal Firmware").

Quick installation guide
Page 2
... the Ethernet cable to the RJ-45 port of the Print Server and attach the other end of the printer. See Fig. 1.1 Step 2 Make sure the printer is powered OFF, then connect one end of the power cord into the Print Server and the other end of the cable to the USB port of the cable to the Print Server until you have reached Step 4. Section 1 Connecting the Print Server to your network...
... the Ethernet cable to the RJ-45 port of the Print Server and attach the other end of the printer. See Fig. 1.1 Step 2 Make sure the printer is powered OFF, then connect one end of the power cord into the Print Server and the other end of the cable to the USB port of the cable to the Print Server until you have reached Step 4. Section 1 Connecting the Print Server to your network...
Quick installation guide
Page 3
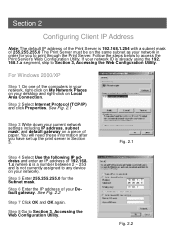
... to any device on your network). Step 6 Enter the IP address of 192.168. 1.x (where x is a number between 2 ~ 253 and is already using the 192. 168.1.x segment, skip to Section 3, Accessing the Web Configuration Utility. Fig. 2.1 Fig. 2.2 Step 2 Select Internet Protocol (TCP/IP) and click Properties. Step 8 Go to access the Print Server's Web Configuration Utility. Follow the steps below to Section 3, Accessing the Web Configuration Utility. If your Default gateway. See...
... to any device on your network). Step 6 Enter the IP address of 192.168. 1.x (where x is a number between 2 ~ 253 and is already using the 192. 168.1.x segment, skip to Section 3, Accessing the Web Configuration Utility. Fig. 2.1 Fig. 2.2 Step 2 Select Internet Protocol (TCP/IP) and click Properties. Step 8 Go to access the Print Server's Web Configuration Utility. Follow the steps below to Section 3, Accessing the Web Configuration Utility. If your Default gateway. See...
Quick installation guide
Page 4
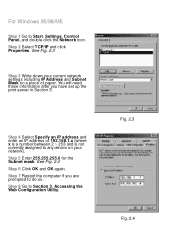
... Start, Settings, Control Panel, and double-click the Network icon. See Fig. 2.3 Step 3 Write down your current network settings including IP Address and Subnet Mask on a piece of 192.168.1.x (where x is a number between 2 ~ 253 and is not currently assigned to do so. See Fig. 2.4 Step 6 Click OK and OK again. Step 7 Restart the computer if you have set up the print server...
... Start, Settings, Control Panel, and double-click the Network icon. See Fig. 2.3 Step 3 Write down your current network settings including IP Address and Subnet Mask on a piece of 192.168.1.x (where x is a number between 2 ~ 253 and is not currently assigned to do so. See Fig. 2.4 Step 6 Click OK and OK again. Step 7 Restart the computer if you have set up the print server...

Quick installation guide
Page 5
You may rename the Print Server name and Port name or leave them with the default. Step 4 Write down on Configuration. See Fig. 3.3 Fig. 3.2 Fig 3.3 Section 3 Accessing the Web Configuration Utility Step 1 Open the web browser and type the default IP address of paper the Port name you want to click Save when you are done editing the names. See Fig. 3.2 Fig. 3.1 Step 3 Click on a piece of the Print Server: 192. 168.1.254 See Fig. 3.1 Step 2 The Welcome screen will appear. Be sure to use.
You may rename the Print Server name and Port name or leave them with the default. Step 4 Write down on Configuration. See Fig. 3.3 Fig. 3.2 Fig 3.3 Section 3 Accessing the Web Configuration Utility Step 1 Open the web browser and type the default IP address of paper the Port name you want to click Save when you are done editing the names. See Fig. 3.2 Fig. 3.1 Step 3 Click on a piece of the Print Server: 192. 168.1.254 See Fig. 3.1 Step 2 The Welcome screen will appear. Be sure to use.
Quick installation guide
Page 6
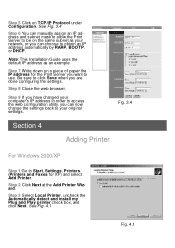
... can manually assign an IP address and subnet mask to allow the Print Server to use. Fig. 3.4 Section 4 Adding Printer For Windows 2000/XP Step 1 Go to Start, Settings, Printers. (Printers and Faxes for the Print Server you are done configuring the settings. Note: This Installation Guide uses the default IP address as your computer's IP address in order to access the web configuration utility, you can choose to obtain an IP address automatically by RARP, BOOTP, or DHCP...
... can manually assign an IP address and subnet mask to allow the Print Server to use. Fig. 3.4 Section 4 Adding Printer For Windows 2000/XP Step 1 Go to Start, Settings, Printers. (Printers and Faxes for the Print Server you are done configuring the settings. Note: This Installation Guide uses the default IP address as your computer's IP address in order to access the web configuration utility, you can choose to obtain an IP address automatically by RARP, BOOTP, or DHCP...

Quick installation guide
Page 7
Step 4 Select Create a new port. Step 6 Type in the IP address of paper in Section 3 and click Next. See Fig. 4.3 Fig. 4.2 Step 7 Select Custom then click on the piece of the Print Server and the port name you have written down menu, select Standard TCP/IP Port and click Next. See Fig. 4.2 Step 5 Click Next at the Add Standard TCP/IP Printer Port Wizard. See Fig. 4.4 Fig 4.3 Fig. 4.4 At the drop-down on Settings.
Step 4 Select Create a new port. Step 6 Type in the IP address of paper in Section 3 and click Next. See Fig. 4.3 Fig. 4.2 Step 7 Select Custom then click on the piece of the Print Server and the port name you have written down menu, select Standard TCP/IP Port and click Next. See Fig. 4.2 Step 5 Click Next at the Add Standard TCP/IP Printer Port Wizard. See Fig. 4.4 Fig 4.3 Fig. 4.4 At the drop-down on Settings.

Quick installation guide
Page 10
.... 4.14 Step 20 Verify the Network path is the letter of paper in Section 3 and click OK. Step 16 Click Next at the Add Printer Wizard. Insert the Windows 98 CD, and type in the port list. Step 19 Browse to Start, Settings, Printers, Add Printer. Click OK. Step 12 Type in the IP address of the Print Server and the port name you are prompted to...
.... 4.14 Step 20 Verify the Network path is the letter of paper in Section 3 and click OK. Step 16 Click Next at the Add Printer Wizard. Insert the Windows 98 CD, and type in the port list. Step 19 Browse to Start, Settings, Printers, Add Printer. Click OK. Step 12 Type in the IP address of the Print Server and the port name you are prompted to...
Quick installation guide
Page 12
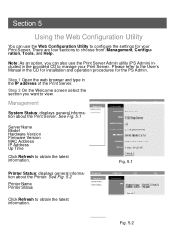
... the web browser and type in the CD for installation and operation procedures for your Print Server. Management System Status: displays general information about the Printer. Step 2 On the Welcome screen select the section you can use the Print Server Admin utility (PS Admin) included in the provided CD to view. See Fig. 5.1 Server Name Model Hardware Version Firmware Version MAC Address IP Address Up Time Click Refresh to configure the settings...
... the web browser and type in the CD for installation and operation procedures for your Print Server. Management System Status: displays general information about the Printer. Step 2 On the Welcome screen select the section you can use the Print Server Admin utility (PS Admin) included in the provided CD to view. See Fig. 5.1 Server Name Model Hardware Version Firmware Version MAC Address IP Address Up Time Click Refresh to configure the settings...
Quick installation guide
Page 13
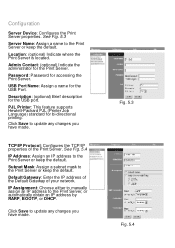
Password: Password for the USB Port. USB Port Name: Assign a name for accessing the Print Server. PJL Printer: This feature supports Hewlett-Packard PJL (Printer Job Language) standard for the Print Server. Subnet Mask: Assign a subnet mask to update any changes you have made . Click Save to the Print Server or keep the default. Configuration Server Device: Configures the Print Server properties. Admin Contact: (optional) Indicate the administrator for bi-directional printing. Fig. 5.3 Fig. 5.4 See Fig. 5.3 Server Name: Assign a name to update any changes you...
Password: Password for the USB Port. USB Port Name: Assign a name for accessing the Print Server. PJL Printer: This feature supports Hewlett-Packard PJL (Printer Job Language) standard for the Print Server. Subnet Mask: Assign a subnet mask to update any changes you have made . Click Save to the Print Server or keep the default. Configuration Server Device: Configures the Print Server properties. Admin Contact: (optional) Indicate the administrator for bi-directional printing. Fig. 5.3 Fig. 5.4 See Fig. 5.3 Server Name: Assign a name to update any changes you...

Quick installation guide
Page 14
... USB printer must support Native DOS mode printing. AppleTalk Protocol: Configures the settings for NetBEUI printing. NetBEUI Protocol: Configures the settings for AppleTalk printing. Click Save to update any changes you have made . Maximum Number of Sessions: Set the maximum number of print sessions that are allowed to the print server at one time. See Fig. 5.5 Workgroup: Enter the name of your workgroup Maximum Connected Stations: Set the maximum number of your printer type...
... USB printer must support Native DOS mode printing. AppleTalk Protocol: Configures the settings for NetBEUI printing. NetBEUI Protocol: Configures the settings for AppleTalk printing. Click Save to update any changes you have made . Maximum Number of Sessions: Set the maximum number of print sessions that are allowed to the print server at one time. See Fig. 5.5 Workgroup: Enter the name of your workgroup Maximum Connected Stations: Set the maximum number of your printer type...

Quick installation guide
Page 15
See Fig. 5.7 Factory Reset: Reset all settings to restart the Print Server. Click Yes to factory default and restart the Print Server. See Fig. 5.8 Help About: Displays the version number of 192.168.1. 254 Click Yes to the factory default of the Print Server: See Fig. 5.9 Fig. 5.7 Fig. 5.8 Fig. 5.9 Reset: Restart the Print Server. The IP address of the Print Server will return to Factory Reset and restart the Print Server.
See Fig. 5.7 Factory Reset: Reset all settings to restart the Print Server. Click Yes to factory default and restart the Print Server. See Fig. 5.8 Help About: Displays the version number of 192.168.1. 254 Click Yes to the factory default of the Print Server: See Fig. 5.9 Fig. 5.7 Fig. 5.8 Fig. 5.9 Reset: Restart the Print Server. The IP address of the Print Server will return to Factory Reset and restart the Print Server.


