
User Manual
Page 2
Specification 36 Technical Support ...37 2 Table of Contents 1 Introduction ...3 1.1 Package Contents 3 1.2 System Requirements 3 2 Multi-Functional Printer Server Installation 4 2.1 Connecting the Printer Server 4 2.2 Installing the PS Software 5 2.3 Configuring the Printer Server 8 2.4 Configuring the Computer 14 3 Web Configuration Utility 16 3.1 Connecting to the Web Configuration Utility 16 3.2 Management...17 3.2.1 Management J System 18 3.2.2 Management J Wireless 20 3.2.3 Management J Network 20 3.2.4 Management J User 21 3.3 Configuration ...22 3.3.1 Configuration J ...
Specification 36 Technical Support ...37 2 Table of Contents 1 Introduction ...3 1.1 Package Contents 3 1.2 System Requirements 3 2 Multi-Functional Printer Server Installation 4 2.1 Connecting the Printer Server 4 2.2 Installing the PS Software 5 2.3 Configuring the Printer Server 8 2.4 Configuring the Computer 14 3 Web Configuration Utility 16 3.1 Connecting to the Web Configuration Utility 16 3.2 Management...17 3.2.1 Management J System 18 3.2.2 Management J Wireless 20 3.2.3 Management J Network 20 3.2.4 Management J User 21 3.3 Configuration ...22 3.3.1 Configuration J ...
User Manual
Page 3
... -One multi-functional printer wirelessly on your local area network (LAN). It also features a Web-based Configuration Utility, which allows you have: • 1-Port USB 2.0 Wireless MFP server • Stand • AC Power Adapter • Quick Installation Guide • Installation CD • RJ-45 Ethernet Cable • Antenna If any of print files from computers to the connected printer, delivering print jobs to highperformance printer much faster than a file server or a PC acting as a print server can do printing, faxing, and...
... -One multi-functional printer wirelessly on your local area network (LAN). It also features a Web-based Configuration Utility, which allows you have: • 1-Port USB 2.0 Wireless MFP server • Stand • AC Power Adapter • Quick Installation Guide • Installation CD • RJ-45 Ethernet Cable • Antenna If any of print files from computers to the connected printer, delivering print jobs to highperformance printer much faster than a file server or a PC acting as a print server can do printing, faxing, and...
User Manual
Page 4
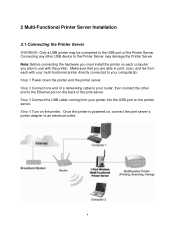
... Printer Server. Step 1 Power down the printer and the printer server. Once the printer is powered on, connect the print server's power adapter to the Ethernet port on each with the printer. Make sure that you plan to use with your multi-functional printer directly connected to your computer(s). Step 3 Connect the USB cable coming from each computer you are able to print, scan, and fax from your router, then connect the other USB device to the Printer Server...
... Printer Server. Step 1 Power down the printer and the printer server. Once the printer is powered on, connect the print server's power adapter to the Ethernet port on each with the printer. Make sure that you plan to use with your multi-functional printer directly connected to your computer(s). Step 3 Connect the USB cable coming from each computer you are able to print, scan, and fax from your router, then connect the other USB device to the Printer Server...
User Manual
Page 5
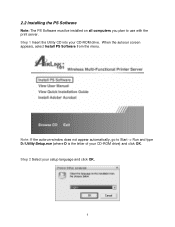
Step 2 Select your CD-ROM drive. Step 1 Insert the Utility CD into your setup language and click OK. 5 2.2 Installing the PS Software Note: The PS Software must be installed on all computers you plan to Start -> Run and type D:\Utility\Setup.exe (where D is the letter of your CD-ROM drive) and click OK. Note: If the autorun window does not appear automatically, go to use with the print server. When the autorun screen appears, select Install PS Software from the menu.
Step 2 Select your CD-ROM drive. Step 1 Insert the Utility CD into your setup language and click OK. 5 2.2 Installing the PS Software Note: The PS Software must be installed on all computers you plan to Start -> Run and type D:\Utility\Setup.exe (where D is the letter of your CD-ROM drive) and click OK. Note: If the autorun window does not appear automatically, go to use with the print server. When the autorun screen appears, select Install PS Software from the menu.
User Manual
Page 8
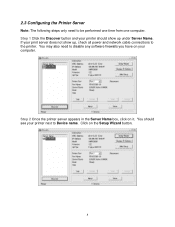
Step 2 Once the printer server appears in the Server Name box, click on your printer next to be performed one time from one computer. You should show up under Server Name. If your printer should see your computer. You may also need to Device name. Click on the Setup Wizard button. 8 2.3 Configuring the Printer Server Note: The following steps only need to the printer. Step 1 Click the Discover button and your print server does not show up , check all power and network cable connections to disable any software firewalls you have on it.
Step 2 Once the printer server appears in the Server Name box, click on your printer next to be performed one time from one computer. You should show up under Server Name. If your printer should see your computer. You may also need to Device name. Click on the Setup Wizard button. 8 2.3 Configuring the Printer Server Note: The following steps only need to the printer. Step 1 Click the Discover button and your print server does not show up , check all power and network cable connections to disable any software firewalls you have on it.
User Manual
Page 11
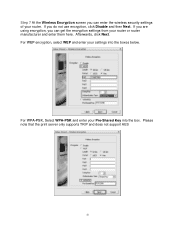
Please note that the print server only supports TKIP and does not support AES 11 For WEP encryption, select WEP and enter your router or router manufacturer and enter them here. If you are using encryption, you can enter the wireless security settings of your Pre-Shared Key into the boxes below. For WPA-PSK, Select WPA-PSK and enter your router. If you do not use encryption, click Disable and then Next. Afterwards, click Next. Step 7 At the Wireless Encryption screen you can get the encryption settings from your settings into the box.
Please note that the print server only supports TKIP and does not support AES 11 For WEP encryption, select WEP and enter your router or router manufacturer and enter them here. If you are using encryption, you can enter the wireless security settings of your Pre-Shared Key into the boxes below. For WPA-PSK, Select WPA-PSK and enter your router. If you do not use encryption, click Disable and then Next. Afterwards, click Next. Step 7 At the Wireless Encryption screen you can get the encryption settings from your settings into the box.
User Manual
Page 13
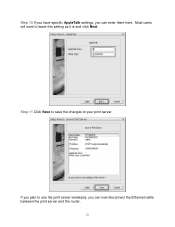
Most users will want to your print server. Step 11 Click Save to save the changes to leave this setting as it is and click Next. If you plan to use the print server wirelessly, you can now disconnect the Ethernet cable between the print server and the router. 13 Step 10 If you have specific AppleTalk settings, you can enter them here.
Most users will want to your print server. Step 11 Click Save to save the changes to leave this setting as it is and click Next. If you plan to use the print server wirelessly, you can now disconnect the Ethernet cable between the print server and the router. 13 Step 10 If you have specific AppleTalk settings, you can enter them here.
User Manual
Page 14
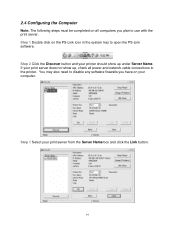
You may also need to disable any software firewalls you plan to use with the print server. Step 1 Double click on the PS-Link icon in the system tray to open the PS-Link software. If your print server does not show up , check all computers you have on your print server from the Server Name box and click the Link button. 14 Step 2 Click the Discover button and your printer should show up under Server Name. Step 1 Select your computer. 2.4 Configuring the Computer Note: The following steps must be completed on all power and network cable connections to the printer.
You may also need to disable any software firewalls you plan to use with the print server. Step 1 Double click on the PS-Link icon in the system tray to open the PS-Link software. If your print server does not show up , check all computers you have on your print server from the Server Name box and click the Link button. 14 Step 2 Click the Discover button and your printer should show up under Server Name. Step 1 Select your computer. 2.4 Configuring the Computer Note: The following steps must be completed on all power and network cable connections to the printer.

User Manual
Page 15
... use , go to Start -> Control Panel and double click on Printers and Faxes (Windows Vista Users click on Printers instead of your printer. You will see notices appearing in Section 4 on the copy and click Set as Windows configures the printer. Congratulations, the configuration is installed and ready to repeat all steps in the bottom right-hand corner of Printers and Faxes). Remember to use with the print server...
... use , go to Start -> Control Panel and double click on Printers and Faxes (Windows Vista Users click on Printers instead of your printer. You will see notices appearing in Section 4 on the copy and click Set as Windows configures the printer. Congratulations, the configuration is installed and ready to repeat all steps in the bottom right-hand corner of Printers and Faxes). Remember to use with the print server...

User Manual
Page 22
... page, which contains two fields: System Device and Port Settings. 3.3 Configuration The Configuration category allows you to set up the password, please enter the password in the New Password, and then enter the same one again in the Confirm Again. 22 Admin Contact (optional): Assign an administrator name for your MFP Server, including: - To set up the configuration of System, Network, User, Email, and SNMP. 3.3.1 Configuration J System Click System item of...
... page, which contains two fields: System Device and Port Settings. 3.3 Configuration The Configuration category allows you to set up the password, please enter the password in the New Password, and then enter the same one again in the Confirm Again. 22 Admin Contact (optional): Assign an administrator name for your MFP Server, including: - To set up the configuration of System, Network, User, Email, and SNMP. 3.3.1 Configuration J System Click System item of...

User Manual
Page 24
... compatibly configured wireless clients in a WLAN. • Ad-Hoc - it is set to select Disable, 64 bits, and 128 bits for the network in this box. Connect to configure more settings, including: - You can manually input the name or select one of data encryption. Preamble: This option allows you to -peer mode. - Wireless Interface - Connects to compatibly configured wireless AP or router in the peer-to configure the settings of the three connection modes. • Infrastructure (default...
... compatibly configured wireless clients in a WLAN. • Ad-Hoc - it is set to select Disable, 64 bits, and 128 bits for the network in this box. Connect to configure more settings, including: - You can manually input the name or select one of data encryption. Preamble: This option allows you to -peer mode. - Wireless Interface - Connects to compatibly configured wireless AP or router in the peer-to configure the settings of the three connection modes. • Infrastructure (default...

User Manual
Page 32
Factory Reset Click Yes button to reload the factory settings of the MFP Server. 3.4.5 Tool J Firmware Upgrade Firmware Upgrade When a new version of your MFP Server by clicking Browse button to point to the firmware file, and then click Upgrade button to start the upgrade or Cancel button to abandon. 32 downloading from the manufacturer's website), you can upgrade the firmware of firmware is available (e.g.
Factory Reset Click Yes button to reload the factory settings of the MFP Server. 3.4.5 Tool J Firmware Upgrade Firmware Upgrade When a new version of your MFP Server by clicking Browse button to point to the firmware file, and then click Upgrade button to start the upgrade or Cancel button to abandon. 32 downloading from the manufacturer's website), you can upgrade the firmware of firmware is available (e.g.

User Manual
Page 35
Specification Printer Port • 1 USB 2.0 Port Wireless Standard • IEEE 802.11g/b Networking • 1 auto-negotiating 10/100 Mbps RJ-45 port Supported Protocols • TCP/IP, SMB, NetBEUI, AppleTalk, BOOTP, SNMP, Telnet, TFTP, FTP, LPD, RARP, DHCP, IPP System Hardware • SDRAM: 8M Byte • Flash ROM: 2M Byte Security • WPA-PSK • WEP 64/128-bit Power • DC 5V, switching type LED • Power, USB, LAN Supported OS • Windows 2000/XP/Vista Warranty • 1- Appendix - Year Limited Warranty 35
Specification Printer Port • 1 USB 2.0 Port Wireless Standard • IEEE 802.11g/b Networking • 1 auto-negotiating 10/100 Mbps RJ-45 port Supported Protocols • TCP/IP, SMB, NetBEUI, AppleTalk, BOOTP, SNMP, Telnet, TFTP, FTP, LPD, RARP, DHCP, IPP System Hardware • SDRAM: 8M Byte • Flash ROM: 2M Byte Security • WPA-PSK • WEP 64/128-bit Power • DC 5V, switching type LED • Power, USB, LAN Supported OS • Windows 2000/XP/Vista Warranty • 1- Appendix - Year Limited Warranty 35

User Manual
Page 36
Technical Support E-mail: support@airlink101.com Toll Free: 1-888-746-3238 Web site: www.airlink101.com *Printer server may not support all printers. Actual data throughput will vary. Network conditions and environmental factors, including volume of network traffic, building materials and construction, mix of their respective owners. Copyright ©2007 AirLink101® 36 Specifications are the property of wireless products used, radio frequency interference (e.g., cordless telephones...
Technical Support E-mail: support@airlink101.com Toll Free: 1-888-746-3238 Web site: www.airlink101.com *Printer server may not support all printers. Actual data throughput will vary. Network conditions and environmental factors, including volume of network traffic, building materials and construction, mix of their respective owners. Copyright ©2007 AirLink101® 36 Specifications are the property of wireless products used, radio frequency interference (e.g., cordless telephones...
Quick Installation Guide
Page 1
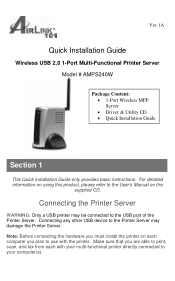
... to the USB port of the Printer Server. Ver. 1A Quick Installation Guide Wireless USB 2.0 1-Port Multi-Functional Printer Server Model # AMPS240W Package Content: • 1-Port Wireless MFP Server • Driver & Utility CD • Quick Installation Guide Section 1 This Quick Installation Guide only provides basic instructions. Connecting any other USB device to your multi-functional printer directly connected to the Printer Server may be connected to use with your computer(s). Connecting the Printer Server WARNING: Only a USB printer may damage the Printer Server. Note: Before...
... to the USB port of the Printer Server. Ver. 1A Quick Installation Guide Wireless USB 2.0 1-Port Multi-Functional Printer Server Model # AMPS240W Package Content: • 1-Port Wireless MFP Server • Driver & Utility CD • Quick Installation Guide Section 1 This Quick Installation Guide only provides basic instructions. Connecting any other USB device to your multi-functional printer directly connected to the Printer Server may be connected to use with your computer(s). Connecting the Printer Server WARNING: Only a USB printer may damage the Printer Server. Note: Before...
Quick Installation Guide
Page 2
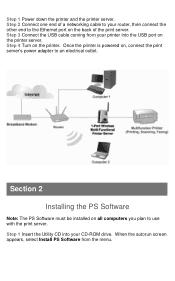
... use with the print server. Section 2 Installing the PS Software Note: The PS Software must be installed on the printer server. Step 2 Connect one end of the print server. Step 1 Insert the Utility CD into the USB port on all computers you plan to the Ethernet port on the printer. Step 4 Turn on the back of a networking cable to an electrical outlet. Once the printer is powered on, connect the print server's power adapter to your CD-ROM...
... use with the print server. Section 2 Installing the PS Software Note: The PS Software must be installed on the printer server. Step 2 Connect one end of the print server. Step 1 Insert the Utility CD into the USB port on all computers you plan to the Ethernet port on the printer. Step 4 Turn on the back of a networking cable to an electrical outlet. Once the printer is powered on, connect the print server's power adapter to your CD-ROM...

Quick Installation Guide
Page 6
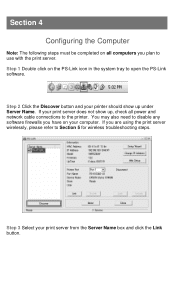
If your printer should see your computer. Step 2 Once the printer server appears in the Server Name box, click on the Setup Wizard button. Step 1 Click the Discover button and your print server does not show up , check all power and network cable connections to be performed one time from one computer. Section 3 Configuring the Printer Server Note: The following steps only need to disable any software firewalls you have on your printer next to Device name. Click on it. You may also need to the printer. You should show up under Server Name.
If your printer should see your computer. Step 2 Once the printer server appears in the Server Name box, click on the Setup Wizard button. Step 1 Click the Discover button and your print server does not show up , check all power and network cable connections to be performed one time from one computer. Section 3 Configuring the Printer Server Note: The following steps only need to disable any software firewalls you have on your printer next to Device name. Click on it. You may also need to the printer. You should show up under Server Name.
Quick Installation Guide
Page 9
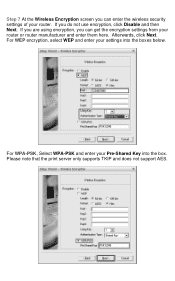
If you can enter the wireless security settings of your router or router manufacturer and enter them here. For WPA-PSK, Select WPA-PSK and enter your settings into the box. For WEP encryption, select WEP and enter your Pre-Shared Key into the boxes below. If you are using encryption, you do not use encryption, click Disable and then Next. Afterwards, click Next. Please note that the print server only supports TKIP and does not support AES. Step 7 At the Wireless Encryption screen you can get the encryption settings from your router.
If you can enter the wireless security settings of your router or router manufacturer and enter them here. For WPA-PSK, Select WPA-PSK and enter your settings into the box. For WEP encryption, select WEP and enter your Pre-Shared Key into the boxes below. If you are using encryption, you do not use encryption, click Disable and then Next. Afterwards, click Next. Please note that the print server only supports TKIP and does not support AES. Step 7 At the Wireless Encryption screen you can get the encryption settings from your router.
Quick Installation Guide
Page 12
... wireless troubleshooting steps. If you plan to use with the print server. Step 3 Select your printer should show up under Server Name. You may also need to disable any software firewalls you have on the PS-Link icon in the system tray to open the PS-Link software. Section 4 Configuring the Computer Note: The following steps must be completed on all power and network cable connections to the printer...
... wireless troubleshooting steps. If you plan to use with the print server. Step 3 Select your printer should show up under Server Name. You may also need to disable any software firewalls you have on the PS-Link icon in the system tray to open the PS-Link software. Section 4 Configuring the Computer Note: The following steps must be completed on all power and network cable connections to the printer...
Quick Installation Guide
Page 15
... check if the print server is working. Your router has 11 different channels to the documentation that came with your router's signal by changing channels on the router. If your way up , the wireless connection is connected wirelessly, disconnect the networking cable from the print server and open the PS-Link software, then click on Discover. Section 5 Wireless Troubleshooting If you are experiencing problems with the wireless connection (print server does not...
... check if the print server is working. Your router has 11 different channels to the documentation that came with your router's signal by changing channels on the router. If your way up , the wireless connection is connected wirelessly, disconnect the networking cable from the print server and open the PS-Link software, then click on Discover. Section 5 Wireless Troubleshooting If you are experiencing problems with the wireless connection (print server does not...


