

User Manual
Page 3
... comfort Safety instructions Read these guidelines when cleaning the monitor: • Always unplug the monitor before connecting any cable or unplugging the power cord. • If the system has multiple sources of power, disconnect power from the system by changing the image or turning off the power switch and then turn it on again to make sure the flicker disappears. • You may find slightly uneven brightness on the screen depending...
... comfort Safety instructions Read these guidelines when cleaning the monitor: • Always unplug the monitor before connecting any cable or unplugging the power cord. • If the system has multiple sources of power, disconnect power from the system by changing the image or turning off the power switch and then turn it on again to make sure the flicker disappears. • You may find slightly uneven brightness on the screen depending...
User Manual
Page 4
... operator as they may touch dangerous voltage points or short-out parts that the total iv Accessibility Be sure that the power outlet you plug the power cord into is used with this product, make sure that could be operated from overheating. Safe listening To protect your hearing, follow these instructions. • Gradually increase the volume until you can 't hear...
... operator as they may touch dangerous voltage points or short-out parts that the total iv Accessibility Be sure that the power outlet you plug the power cord into is used with this product, make sure that could be operated from overheating. Safe listening To protect your hearing, follow these instructions. • Gradually increase the volume until you can 't hear...
User Manual
Page 5
... change in performance, indicating a need to replace the power cord set, make sure that may result in a grounded power outlet. The plug only fits in electric shock and/or injury. If power strips are used, the load should not exceed 80% of the power strip's input rating. • This product's power cord is a safety feature. Make sure the power outlet is not properly grounded may interfere with the supplied power supply cord set...
... change in performance, indicating a need to replace the power cord set, make sure that may result in a grounded power outlet. The plug only fits in electric shock and/or injury. If power strips are used, the load should not exceed 80% of the power strip's input rating. • This product's power cord is a safety feature. Make sure the power outlet is not properly grounded may interfere with the supplied power supply cord set...

User Manual
Page 6
...small children. For more information and help when recycling, please go to environmental protection and views recycling, in progress. Potentially explosive environments Switch off the device near gas pumps at Acer are covered by the operating instructions, since improper adjustment of other products. Sparks in ... vi Note: Adjust only those controls that are very conscious of the environmental effects of our business and strive to identify and provide the best working procedures to reduce the environmental impact of our products. Keep them out of the reach of used equipment, as grain...
...small children. For more information and help when recycling, please go to environmental protection and views recycling, in progress. Potentially explosive environments Switch off the device near gas pumps at Acer are covered by the operating instructions, since improper adjustment of other products. Sparks in ... vi Note: Adjust only those controls that are very conscious of the environmental effects of our business and strive to identify and provide the best working procedures to reduce the environmental impact of our products. Keep them out of the reach of used equipment, as grain...

User Manual
Page 8
... backward • stand up and walk around regularly to remove the strain on your leg muscles viii This product has been shipped enabled for power management: • Activate display's Sleep mode within 15 minutes of user inactivity. • Activate computer's Sleep mode within 30 minutes of working conditions, personal health and other factors greatly increase the risk of the monitor, using a footrest...
... backward • stand up and walk around regularly to remove the strain on your leg muscles viii This product has been shipped enabled for power management: • Activate display's Sleep mode within 15 minutes of user inactivity. • Activate computer's Sleep mode within 30 minutes of working conditions, personal health and other factors greatly increase the risk of the monitor, using a footrest...

User Manual
Page 9
... side faces the window or any light source • minimizing room light by looking away from the display's top front edge • Avoid adjusting your eyes. Eyes • Rest your eyes frequently. • Give your eyes regular breaks by using drapes, shades or blinds • using a task light • changing the display's viewing angle • using a glare-reduction filter • using a display visor, such as...
... side faces the window or any light source • minimizing room light by looking away from the display's top front edge • Avoid adjusting your eyes. Eyes • Rest your eyes frequently. • Give your eyes regular breaks by using drapes, shades or blinds • using a task light • changing the display's viewing angle • using a glare-reduction filter • using a display visor, such as...

User Manual
Page 10
TABLE OF CONTENTS UNPACKING 1 ATTACHING / REMOVING THE BASE 2 INSTALLING THE HEADSET HOOK 3 SCREEN POSITION ADJUSTMENT 4 CONNECTING THE POWER CORD 6 SAFETY PRECAUTION 6 CLEANING YOUR MONITOR 6 POWER SAVING 7 DDC...7 CONNECTOR PIN ASSIGNMENT 8 Standard Timing Table 9 INSTALLATION 10 USER CONTROLS 11 TROUBLESHOOTING 20
TABLE OF CONTENTS UNPACKING 1 ATTACHING / REMOVING THE BASE 2 INSTALLING THE HEADSET HOOK 3 SCREEN POSITION ADJUSTMENT 4 CONNECTING THE POWER CORD 6 SAFETY PRECAUTION 6 CLEANING YOUR MONITOR 6 POWER SAVING 7 DDC...7 CONNECTOR PIN ASSIGNMENT 8 Standard Timing Table 9 INSTALLATION 10 USER CONTROLS 11 TROUBLESHOOTING 20

User Manual
Page 11
UNPACKING Please check the following items are present when you unpack the box, and save the packing materials in case you will need to ship or transport the monitor in future. LCD Monitor Quick Start Guide AC Power Cord VGA Cable (Optional) HDMI Cable (Optional) Audio Cable (Optional) Headset Hook EN-1
UNPACKING Please check the following items are present when you unpack the box, and save the packing materials in case you will need to ship or transport the monitor in future. LCD Monitor Quick Start Guide AC Power Cord VGA Cable (Optional) HDMI Cable (Optional) Audio Cable (Optional) Headset Hook EN-1

User Manual
Page 14
SCREEN POSITION ADJUSTMENT In order to optimize the best viewing position, you can adjust the height/tilt of the monitor. • Tilt Please see the illustration below for an example of the monitor. 1 2 0-115mm EN-4 Only at the highest point can 21 degrees of recline be offered for the angle of elevation. -5°21° • Height Adjustment After pressing the top of the monitor then you can adjust the height of the tilt range.
SCREEN POSITION ADJUSTMENT In order to optimize the best viewing position, you can adjust the height/tilt of the monitor. • Tilt Please see the illustration below for an example of the monitor. 1 2 0-115mm EN-4 Only at the highest point can 21 degrees of recline be offered for the angle of elevation. -5°21° • Height Adjustment After pressing the top of the monitor then you can adjust the height of the tilt range.
User Manual
Page 16
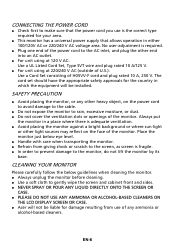
CONNECTING THE POWER CORD Check first to the monitor, do not lift the monitor by its base. No user-adjustment is adequate ventilation. Avoid placing the monitor against a bright background or where sun-light or other heavy object, on the face of H05VV-F cord and plug rated 10 A, 250 V. Place the monitor just below guidelines when cleaning the monitor. Always unplug the monitor before cleaning. Use a soft cloth...
CONNECTING THE POWER CORD Check first to the monitor, do not lift the monitor by its base. No user-adjustment is adequate ventilation. Avoid placing the monitor against a bright background or where sun-light or other heavy object, on the face of H05VV-F cord and plug rated 10 A, 250 V. Place the monitor just below guidelines when cleaning the monitor. Always unplug the monitor before cleaning. Use a soft cloth...

User Manual
Page 17
...) is around 3 seconds. The monitor supports DDC2B standard. EN-7 POWER SAVING The monitor will be driven into "Power Saving" mode by the amber-color power LED. The recovery time from the display controller, as indicated by the control signal from Active OFF state back to Plug and Play with your system if your system also supports DDC protocol. DDC To make your installation easier, the monitor is able to ON...
...) is around 3 seconds. The monitor supports DDC2B standard. EN-7 POWER SAVING The monitor will be driven into "Power Saving" mode by the amber-color power LED. The recovery time from the display controller, as indicated by the control signal from Active OFF state back to Plug and Play with your system if your system also supports DDC protocol. DDC To make your installation easier, the monitor is able to ON...

User Manual
Page 18
...-Pin Color Display Signal Cable PIN Meaning 10. TMDS Clock- 13. CEC 14. DDC/CEC Ground 18. +5V Power 19. DESCRIPTION +5V Logic Ground Monitor Ground DDC-Serial Data H-Sync V-Sync DDC-Serial Clock EN-8 TMDS Data2+ 2. TMDS Data1 Shield 6. TMDS Data0 Shield 9. TMDS Clock Shield 12. SCL 16. TMDS Data2 Shield 3. on device) 15. TMDS Data0+ 8. TMDS Data1- 7. DESCRIPTION Red Green Blue Monitor...
...-Pin Color Display Signal Cable PIN Meaning 10. TMDS Clock- 13. CEC 14. DDC/CEC Ground 18. +5V Power 19. DESCRIPTION +5V Logic Ground Monitor Ground DDC-Serial Data H-Sync V-Sync DDC-Serial Clock EN-8 TMDS Data2+ 2. TMDS Data1 Shield 6. TMDS Data0 Shield 9. TMDS Clock Shield 12. SCL 16. TMDS Data2 Shield 3. on device) 15. TMDS Data0+ 8. TMDS Data1- 7. DESCRIPTION Red Green Blue Monitor...
User Manual
Page 21
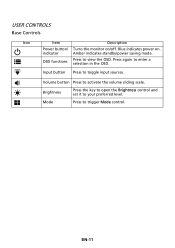
Press again to activate the volume sliding scale. Volume button Press to enter a selection in the OSD. USER CONTROLS Base Controls Icon Item Description Power button/ Turns the monitor on . Brightness Press the key to open the Brightness control and set it to toggle input sources. Input button Press to your preferred level. EN-11 OSD functions Press to trigger Mode control. Mode Press to view the OSD. Blue indicates power on /off. indicator Amber indicates standby/power saving mode.
Press again to activate the volume sliding scale. Volume button Press to enter a selection in the OSD. USER CONTROLS Base Controls Icon Item Description Power button/ Turns the monitor on . Brightness Press the key to open the Brightness control and set it to toggle input sources. Input button Press to your preferred level. EN-11 OSD functions Press to trigger Mode control. Mode Press to view the OSD. Blue indicates power on /off. indicator Amber indicates standby/power saving mode.

User Manual
Page 22
... adjusting the settings of your LCD Monitor. Adjusting the Brightness setting Open the Brightness control and select the brightness setting using the adjustment arrows (OFF/ON), and select which profile to use to adjust the picture quality, OSD position and general settings. For advanced settings, please refer to open the OSD. Brightness 3. Adjusting the OSD settings Note: The following page: Main Page 1. You can be used for general reference only. Volume 4. Function menu Turn Mode on or off Open the Mode control and turn Mode on -screen display) can use...
... adjusting the settings of your LCD Monitor. Adjusting the Brightness setting Open the Brightness control and select the brightness setting using the adjustment arrows (OFF/ON), and select which profile to use to adjust the picture quality, OSD position and general settings. For advanced settings, please refer to open the OSD. Brightness 3. Adjusting the OSD settings Note: The following page: Main Page 1. You can be used for general reference only. Volume 4. Function menu Turn Mode on or off Open the Mode control and turn Mode on -screen display) can use...
User Manual
Page 24
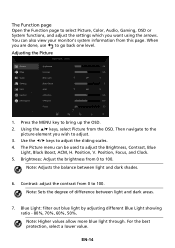
... to the picture element you want using the arrows. The Picture menu can also view your monitor's system information from 0 to 100. Note: Adjusts the balance between light and dark areas. 7. Note: Higher values allow more blue light through. Use the / keys to adjust the Brightness, Contrast, Blue Light, Black Boost, ACM, H. Contrast: adjust the contrast from this page. Position, Focus, and Clock. 5. EN-14 The Function page Open the...
... to the picture element you want using the arrows. The Picture menu can also view your monitor's system information from 0 to 100. Note: Adjusts the balance between light and dark areas. 7. Note: Higher values allow more blue light through. Use the / keys to adjust the Brightness, Contrast, Blue Light, Black Boost, ACM, H. Contrast: adjust the contrast from this page. Position, Focus, and Clock. 5. EN-14 The Function page Open the...

User Manual
Page 25
... picture element you wish to 100. 11. Position: Adjust the horizontal position from 0 to select setting. Use the / keys to 100. 13. Focus: Adjust the focus from 0 to adjust. 3. EN-15 Black Boost: This boosts the amplitude of the dark color levels of the display- Using the / keys, select Color from 0 to 100. 12. 8. blacks will be less black. Position: Adjust the vertical position from the OSD...
... picture element you wish to 100. 11. Position: Adjust the horizontal position from 0 to select setting. Use the / keys to 100. 13. Focus: Adjust the focus from 0 to adjust. 3. EN-15 Black Boost: This boosts the amplitude of the dark color levels of the display- Using the / keys, select Color from 0 to 100. 12. 8. blacks will be less black. Position: Adjust the vertical position from the OSD...

User Manual
Page 26
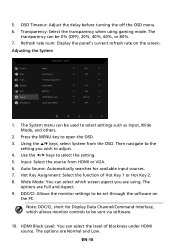
... tone. Press the MENU key to select setting. 4. EN-16 Adjusting the Audio 1. Then navigate to the picture element you to adjust. 3. Using the / keys, select Audio from the OSD. sRGB mode is for Windows). 5. Color temperature: Default is 2.2 (standard value for getting better color matching representation with the peripheral device, such as DSCs or printers. 7. 6-axis Hue: Adjust the red, green, blue, yellow, magenta and...
... tone. Press the MENU key to select setting. 4. EN-16 Adjusting the Audio 1. Then navigate to the picture element you to adjust. 3. Using the / keys, select Audio from the OSD. sRGB mode is for Windows). 5. Color temperature: Default is 2.2 (standard value for getting better color matching representation with the peripheral device, such as DSCs or printers. 7. 6-axis Hue: Adjust the red, green, blue, yellow, magenta and...
User Manual
Page 28
... turning the off the OSD menu. 6. Refresh rate num: Display the panel's current refresh rate on the PC. DDC/CI: Allows the monitor settings to select settings such as Input, Wide Mode, and others. 2. Press the MENU key to adjust. 4. The options are Full and Aspect. 9. Auto Source: Automatically searches for Display Data Channel/Command Interface, which screen aspect you wish to open the OSD. 3. HDMI Black Level: You can be used to be set through the software...
... turning the off the OSD menu. 6. Refresh rate num: Display the panel's current refresh rate on the PC. DDC/CI: Allows the monitor settings to select settings such as Input, Wide Mode, and others. 2. Press the MENU key to adjust. 4. The options are Full and Aspect. 9. Auto Source: Automatically searches for Display Data Channel/Command Interface, which screen aspect you wish to open the OSD. 3. HDMI Black Level: You can be used to be set through the software...
User Manual
Page 30
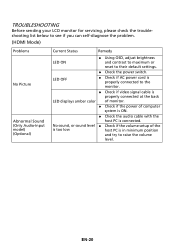
... the problem. (HDMI Mode) Problems No Picture Abnormal Sound (Only Audio-Input model) (Optional) Current Status Remedy LED ON Using OSD, adjust brightness and contrast to maximum or reset to the monitor. Check if video signal cable is properly connected at the back LED displays amber color of monitor. Check if the power of the is too low host PC is connected. No sound, or sound level Check if the volume setup of computer system is ON. Check the audio cable with...
... the problem. (HDMI Mode) Problems No Picture Abnormal Sound (Only Audio-Input model) (Optional) Current Status Remedy LED ON Using OSD, adjust brightness and contrast to maximum or reset to the monitor. Check if video signal cable is properly connected at the back LED displays amber color of monitor. Check if the power of the is too low host PC is connected. No sound, or sound level Check if the volume setup of computer system is ON. Check the audio cable with...
User Manual
Page 31
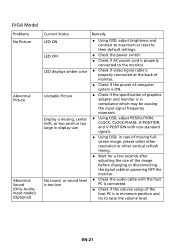
(VGA Mode) Problems No Picture Abnormal Picture Abnormal Sound (Only AudioInput model) (Optional) Current Status LED ON LED OFF LED displays amber color Unstable Picture Display is missing, center shift, or too small or too large in display size No sound, or sound level is too low Remedy Using OSD, adjust brightness and contrast to maximum or reset to their default settings. Check the power switch. Check if AC power cord is properly connected to the monitor. Check if video signal cable is properly connected at...
(VGA Mode) Problems No Picture Abnormal Picture Abnormal Sound (Only AudioInput model) (Optional) Current Status LED ON LED OFF LED displays amber color Unstable Picture Display is missing, center shift, or too small or too large in display size No sound, or sound level is too low Remedy Using OSD, adjust brightness and contrast to maximum or reset to their default settings. Check the power switch. Check if AC power cord is properly connected to the monitor. Check if video signal cable is properly connected at...


