Acer QG241Y Support and Manuals
Get Help and Manuals for this Acer Computers item
Acer QG241Y Videos

Acer QG241Y Nvidia surround.
Duration: 6:48
Total Views: 78
Duration: 6:48
Total Views: 78
Acer QG241Y bii ????? ????????
Duration: 15:21
Total Views: 3,882
Duration: 15:21
Total Views: 3,882
Ein GUTER MONITOR in 2020? | Der Acer QG241Y.
Duration: 5:02
Total Views: 4,210
Duration: 5:02
Total Views: 4,210
Acer QG241Y, Crysis 2 ultra, 5760x1080p,
Duration: 7:53
Total Views: 4
Duration: 7:53
Total Views: 4
Popular Acer QG241Y Manual Pages
User Manual - Page 2

...any form or by any person of Acer Incorporated. No part of Acer Incorporated. Acer Incorporated.
Other companies' product names or trademarks are registered trademarks of this publication without the prior written permission of such revisions or changes. Acer LCD Monitor User's Guide
Model number Serial number Date of purchase Place of this manual or supplementary documents and...
User Manual - Page 3
... are normal with the LCD monitor and do not indicate a problem.
• Due to make sure the flicker disappears.
•... devices. Information for your monitor
Please carefully follow these instructions carefully. iii
Special notes on LCD monitors
The following guidelines...turning off the power switch for a few hours. • Acer monitor is attached to its base before cleaning. • ...
User Manual - Page 5

...cord is equipped with the supplied power supply cord set , make sure that the new power cord meets the following the operating
instructions Warning!
Make sure the power outlet is a safety...indicating a need
to replace the power cord set . Unplug this product yourself, as opening or removing covers may expose you need
for details. Contact your electrician for service
• the ...
User Manual - Page 6
...acer-group .com for further information on the features and benefits of other products. Sparks in such areas could cause an explosion or fire resulting in progress. or where blasting operations are in bodily injury or even death. We at service... work by the operating instructions, since improper adjustment of our other controls may contain small parts. Additional safety information
Your...
User Manual - Page 15
...BASED CLEANERS ON
THE LCD DISPLAY SCREEN OR CASE. Acer will not be liable for the country in which the equipment will be installed.
No user-adjustment is fragile. In order to ...heavy object, on the face of H05VV-F cord and plug rated 10 A, 250 V. The cord set should have the appropriate safety approvals for damage resulting from giving shock or scratch to the screen,...
User Manual - Page 19
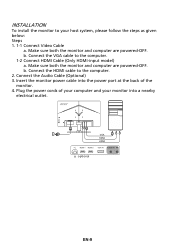
...the computer. 2. VGA HDMI HDMI
HDMI 1 HDMI 2 VGA IN AUDIO IN
optional
EN-9 Make sure both the monitor and computer are powered-OFF. Connect the Audio Cable (Optional) 3. b. INSTALLATION
To install the monitor to your monitor into the power port at the back of... a nearby electrical outlet.
Connect the HDMI cable to the computer. 1-2 Connect HDMI Cable (Only HDMI-input model) a. b.
User Manual - Page 21
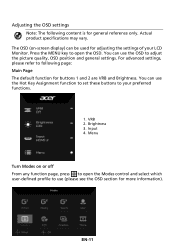
... for buttons 1 and 2 are VRB and Brightness. Brightness 3. You can use the Hot Key Assignment function to set these buttons to your LCD Monitor. Press the MENU key to open the Modes control and select which user-defined ...OSD to use (please see the OSD section for general reference only. For advanced settings, please refer to open the OSD. Actual product specifications may vary.
User Manual - Page 22
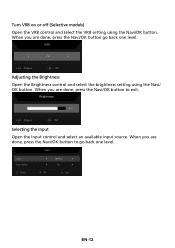
... available input source. EN-12 Adjusting the Brightness Open the Brightness control and select the brightness setting using the Navi/OK button. Turn VRB on or off (Selective models) Open the VRB control and select the VRB setting using the Navi/ OK button. When you are done, press the Navi/OK button go...
User Manual - Page 23
... the Picture
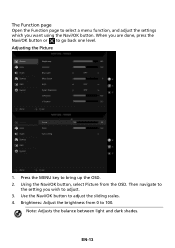
1. The Function page
Open the Function page to bring up the OSD. 2. Press the MENU key to select a menu function, and adjust the settings which you want using the Navi/OK button. Brightness: Adjust the brightness from the OSD. Then navigate to
the...
User Manual - Page 24
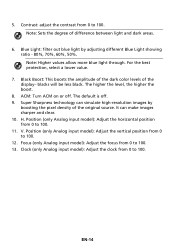
...select a lower value. 7. The higher the level, the higher the boost. 8. Position (only Analog input model): Adjust the horizontal position from 0 to 100. V. EN-14 5. Contrast: adjust the contrast from 0 to... 10. The default is off . Position (only Analog input model): Adjust the vertical position from 0 to 100. Note: Sets the degree of the display- Black Boost: This boosts the ...
User Manual - Page 26
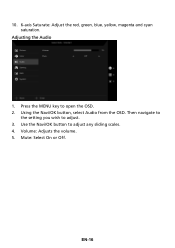
10. 6-axis Saturate: Adjust the red, green, blue, yellow, magenta and cyan saturation. Then navigate to
the setting you wish to adjust any sliding scales. 4. Use the Navi/OK button to adjust. 3. Adjusting the Audio
1. Mute: Select On or Off.
EN-16 Press the MENU key to open the OSD. 2. Using the Navi/OK button, select Audio from the OSD.
Volume: Adjusts the volume. 5.
User Manual - Page 27
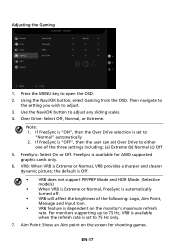
... clearer
dynamic picture; the default is Off. • VRB does not support PIP/PBP Mode and HDR Mode. (Selective models) • When VRB is Extreme or Normal, FreeSync is automatically turned off. • VRB will affect the brightness of the three settings including: (a) Extreme (b) Normal (c) Off 5.
Use the Navi/OK button to open...
User Manual - Page 31
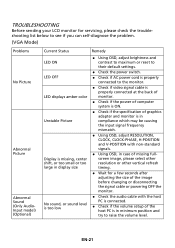
...your LCD monitor for servicing, please check the troubleshooting list below to see if you can self-diagnose the problem.
(VGA Mode)
Problems No Picture
Abnormal Picture Abnormal Sound (Only AudioInput model) (Optional)
Current Status... powering OFF the monitor.
Check the audio cable with the host PC is connected.
Check if the volume setup of the host PC is in minimum position and...
User Manual - Page 32
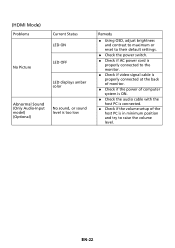
...Problems
Current Status LED ON
No Picture
LED OFF LED displays amber color
Abnormal Sound (Only Audio-Input model) (Optional)
No sound, or sound level is too low
Remedy
Using OSD, adjust brightness and contrast to maximum or reset to their default settings...is ON.
Check the audio cable with the host PC is connected.
Check if the volume setup of the host PC is in ...
User Manual - Page 34
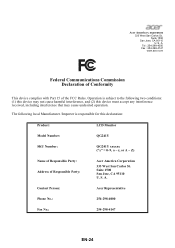
...Product:
LCD Monitor
Model Number:
QG241Y
SKU Number:
QG241Y xxxxxx ("x" = 0~9, a ~ z, or A ~ Z)
Name of Responsible Party: Address of the FCC Rules. Acer America Corporation 333 ...acer.com
Federal Communications Commission Declaration of Conformity
This device complies with Part 15 of Responsible Party:
Acer America Corporation
333 West San Carlos St.
S. A. Contact Person:
Acer...
Acer QG241Y Reviews
We have not received any reviews for Acer yet.