User Manual
Page 3
... are turned off before connecting any cable or unplugging the power cord. • If the system has multiple sources of the fluorescent light, the screen may find slightly uneven brightness on the screen depending on again to make sure the flicker disappears. • You may flicker during initial use . • The LCD screen has 99.99% or more effective pixels. Turn off the power switch for a few hours. • Acer monitor is...
... are turned off before connecting any cable or unplugging the power cord. • If the system has multiple sources of the fluorescent light, the screen may find slightly uneven brightness on the screen depending on again to make sure the flicker disappears. • You may flicker during initial use . • The LCD screen has 99.99% or more effective pixels. Turn off the power switch for a few hours. • Acer monitor is...

User Manual
Page 4
... rest on an unstable cart, stand or table. When you . Using electrical power • This product should never be blocked or covered. These openings must not be placed near you need to unplug the power cord from the type of any vibrating environment which will walk on the cord. • If an extension cord is used with this product on the...
... rest on an unstable cart, stand or table. When you . Using electrical power • This product should never be blocked or covered. These openings must not be placed near you need to unplug the power cord from the type of any vibrating environment which will walk on the cord. • If an extension cord is used with this product on the...

User Manual
Page 5
... to qualified service personnel. If power strips are used, the load should not exceed 80% of the power strip's input rating. • This product's power cord is damaged, cut or frayed • liquid was exposed to replace the power cord set . Make sure the power outlet is a safety feature. Refer all products plugged into the product • the product was spilled into the wall outlet does...
... to qualified service personnel. If power strips are used, the load should not exceed 80% of the power strip's input rating. • This product's power cord is damaged, cut or frayed • liquid was exposed to replace the power cord set . Make sure the power outlet is a safety feature. Refer all products plugged into the product • the product was spilled into the wall outlet does...

User Manual
Page 6
...Adjust only those controls that are covered by the operating instructions, since improper adjustment of other products. chemical plants; Keep them out of the reach of used equipment, as grain, dust or metal powders. acer...the use of our other controls may contain small parts. ...Switch off your vehicle engine. For more information and help when recycling, please go to environmental protection and views recycling, in any area with a potentially explosive atmosphere are very conscious of the environmental effects of our business and strive to identify and provide the best working...
...Adjust only those controls that are covered by the operating instructions, since improper adjustment of other products. chemical plants; Keep them out of the reach of used equipment, as grain, dust or metal powders. acer...the use of our other controls may contain small parts. ...Switch off your vehicle engine. For more information and help when recycling, please go to environmental protection and views recycling, in any area with a potentially explosive atmosphere are very conscious of the environmental effects of our business and strive to identify and provide the best working...

User Manual
Page 8
... of user inactivity. • Wake the computer from staying too long in one fixed posture • avoid slouching forward and/or leaning backward • stand up and walk around regularly to remove the strain on your leg muscles The following tips: • refrain from Sleep mode by adjusting the viewing angle of the monitor, using a footrest, or raising your sitting height...
... of user inactivity. • Wake the computer from staying too long in one fixed posture • avoid slouching forward and/or leaning backward • stand up and walk around regularly to remove the strain on your leg muscles The following tips: • refrain from Sleep mode by adjusting the viewing angle of the monitor, using a footrest, or raising your sitting height...

User Manual
Page 9
... using drapes, shades or blinds • using a task light • changing the display's viewing angle • using a glare-reduction filter • using a display visor, such as a piece of cardboard extended from the display's top front edge • Avoid adjusting your display to an awkward viewing angle. • Avoid looking at bright light sources, such as possible. • Exercise regularly and maintain a healthy body. Display • Keep your display clean. • Keep...
... using drapes, shades or blinds • using a task light • changing the display's viewing angle • using a glare-reduction filter • using a display visor, such as a piece of cardboard extended from the display's top front edge • Avoid adjusting your display to an awkward viewing angle. • Avoid looking at bright light sources, such as possible. • Exercise regularly and maintain a healthy body. Display • Keep your display clean. • Keep...

User Manual
Page 10
TABLE OF CONTENTS UNPACKING 1 ATTACHING / REMOVING THE BASE 2 SCREEN POSITION ADJUSTMENT 4 CONNECTING THE POWER CORD 5 SAFETY PRECAUTION 5 CLEANING YOUR MONITOR 5 POWER SAVING 6 DDC...6 CONNECTOR PIN ASSIGNMENT 7 INSTALLATION 9 USER CONTROLS 10 TROUBLESHOOTING 21
TABLE OF CONTENTS UNPACKING 1 ATTACHING / REMOVING THE BASE 2 SCREEN POSITION ADJUSTMENT 4 CONNECTING THE POWER CORD 5 SAFETY PRECAUTION 5 CLEANING YOUR MONITOR 5 POWER SAVING 6 DDC...6 CONNECTOR PIN ASSIGNMENT 7 INSTALLATION 9 USER CONTROLS 10 TROUBLESHOOTING 21

User Manual
Page 11
UNPACKING Please check the following items are present when you unpack the box, and save the packing materials in case you will need to ship or transport the monitor in future. LCD Monitor Quick Start Guide AC Power Cord HDMI Cable (Optional) D-Sub Cable (Optional) Audio Cable (Optional) EN-1
UNPACKING Please check the following items are present when you unpack the box, and save the packing materials in case you will need to ship or transport the monitor in future. LCD Monitor Quick Start Guide AC Power Cord HDMI Cable (Optional) D-Sub Cable (Optional) Audio Cable (Optional) EN-1
User Manual
Page 15
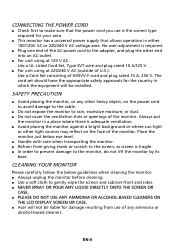
... ALCOHOL-BASED CLEANERS ON THE LCD DISPLAY SCREEN OR CASE. Acer will be liable for damage resulting from giving shock or scratch to the screen, as screen is required. Plug one end of the AC power cord to the adapter, and plug the other heavy object, on the face of H05VV-F cord and plug rated 10 A, 250 V. SAFETY PRECAUTION Avoid placing the monitor...
... ALCOHOL-BASED CLEANERS ON THE LCD DISPLAY SCREEN OR CASE. Acer will be liable for damage resulting from giving shock or scratch to the screen, as screen is required. Plug one end of the AC power cord to the adapter, and plug the other heavy object, on the face of H05VV-F cord and plug rated 10 A, 250 V. SAFETY PRECAUTION Avoid placing the monitor...

User Manual
Page 16
... about its capabilities, for example, supported resolutions and corresponding timing. State LED Light ON Blue Power Saving Mode Amber The power saving states will be kept until a control signal has been detected or the keyboard or mouse is activated. The monitor supports DDC2B standard. The recovery time from the display controller, as indicated by the control signal from Active OFF state back to Plug and Play with your system...
... about its capabilities, for example, supported resolutions and corresponding timing. State LED Light ON Blue Power Saving Mode Amber The power saving states will be kept until a control signal has been detected or the keyboard or mouse is activated. The monitor supports DDC2B standard. The recovery time from the display controller, as indicated by the control signal from Active OFF state back to Plug and Play with your system...

User Manual
Page 17
...+ 5. SCL 16. TMDS Data2+ 2. DESCRIPTION +5V Logic Ground Monitor Ground DDC-Serial Data H-Sync V-Sync DDC-Serial Clock 19-Pin Color Display Signal Cable* PIN Meaning 1. TMDS Clock+ 11. TMDS Clock Shield 12. DDC/CEC Ground 18. +5V Power 19. TMDS Data2- 4. TMDS Data1- 7. Reserved (N.C. Hot Plug Detect EN-7 TMDS Data0 Shield 9. DESCRIPTION Red Green Blue Monitor Ground DDC-return R-Ground G-Ground B-Ground PIN NO...
...+ 5. SCL 16. TMDS Data2+ 2. DESCRIPTION +5V Logic Ground Monitor Ground DDC-Serial Data H-Sync V-Sync DDC-Serial Clock 19-Pin Color Display Signal Cable* PIN Meaning 1. TMDS Clock+ 11. TMDS Clock Shield 12. DDC/CEC Ground 18. +5V Power 19. TMDS Data2- 4. TMDS Data1- 7. Reserved (N.C. Hot Plug Detect EN-7 TMDS Data0 Shield 9. DESCRIPTION Red Green Blue Monitor Ground DDC-return R-Ground G-Ground B-Ground PIN NO...

User Manual
Page 20
Press it as a directional key to enter a selection. USER CONTROLS Base Controls 1 2 3 4 1 No. EN-10 Press to activate the OSD menu, then use it again to highlight the desired function. Blue indicates power on /off. Item 1 Power button/indicator 2 Hotkey 1, 2 buttons 3 Input button 4 Navi/OK button Description Turns the monitor on . Press to toggle input sources. Amber indicates standby/power saving mode. Press to activate user defined hotkey function.
Press it as a directional key to enter a selection. USER CONTROLS Base Controls 1 2 3 4 1 No. EN-10 Press to activate the OSD menu, then use it again to highlight the desired function. Blue indicates power on /off. Item 1 Power button/indicator 2 Hotkey 1, 2 buttons 3 Input button 4 Navi/OK button Description Turns the monitor on . Press to toggle input sources. Amber indicates standby/power saving mode. Press to activate user defined hotkey function.
User Manual
Page 21
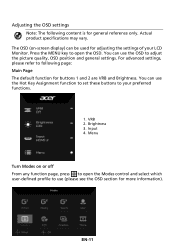
... is for adjusting the settings of your preferred functions. 1. You can be used for general reference only. Menu Turn Modes on -screen display) can use (please see the OSD section for buttons 1 and 2 are VRB and Brightness. VRB 2. EN-11 Brightness 3. Input 4. Press the MENU key to open the Modes control and select which user-defined profile to open the OSD. Adjusting the OSD settings Note: The following page: Main Page The default function for...
... is for adjusting the settings of your preferred functions. 1. You can be used for general reference only. Menu Turn Modes on -screen display) can use (please see the OSD section for buttons 1 and 2 are VRB and Brightness. VRB 2. EN-11 Brightness 3. Input 4. Press the MENU key to open the Modes control and select which user-defined profile to open the OSD. Adjusting the OSD settings Note: The following page: Main Page The default function for...
User Manual
Page 22
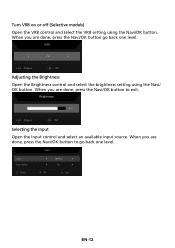
When you are done, press the Navi/OK button to exit. Adjusting the Brightness Open the Brightness control and select the brightness setting using the Navi/OK button. EN-12 When you are done, press the Navi/OK button to go back one level. When you are done, press the Navi/OK button go back one level. Selecting the Input Open the Input control and select an available input source. Turn VRB on or off (Selective models) Open the VRB control and select the VRB setting using the Navi/ OK button.
When you are done, press the Navi/OK button to exit. Adjusting the Brightness Open the Brightness control and select the brightness setting using the Navi/OK button. EN-12 When you are done, press the Navi/OK button to go back one level. When you are done, press the Navi/OK button go back one level. Selecting the Input Open the Input control and select an available input source. Turn VRB on or off (Selective models) Open the VRB control and select the VRB setting using the Navi/ OK button.
User Manual
Page 24
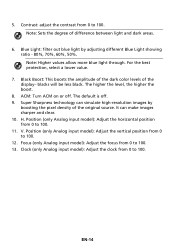
... 100. Blue Light: filter out blue light by boosting the pixel density of the original source. Black Boost: This boosts the amplitude of the dark color levels of difference between light and dark areas. 6. Position (only Analog input model): Adjust the horizontal position from 0 to 100. 12. EN-14 Contrast: adjust the contrast from 0 to 100. 13. For the best protection, select a lower value. 7. V. The default is off . Focus (only Analog input model): Adjust the...
... 100. Blue Light: filter out blue light by boosting the pixel density of the original source. Black Boost: This boosts the amplitude of the dark color levels of difference between light and dark areas. 6. Position (only Analog input model): Adjust the horizontal position from 0 to 100. 12. EN-14 Contrast: adjust the contrast from 0 to 100. 13. For the best protection, select a lower value. 7. V. The default is off . Focus (only Analog input model): Adjust the...

User Manual
Page 25
.... 9. 6-axis Hue: Adjust the red, green, blue, yellow, magenta and cyan hue. EN-15 Gamma mode allows you wish to adjust the luminance tone. Adjusting the Color 1. Then navigate to the setting you to adjust. 3. Modes: Select your preferred mode. 7. Press the MENU key to select the setting. 4. You can choose Cool, Warm, Bluelight or User. 6. Using the Navi/OK button, select Color from the OSD. The default value is...
.... 9. 6-axis Hue: Adjust the red, green, blue, yellow, magenta and cyan hue. EN-15 Gamma mode allows you wish to adjust the luminance tone. Adjusting the Color 1. Then navigate to the setting you to adjust. 3. Modes: Select your preferred mode. 7. Press the MENU key to select the setting. 4. You can choose Cool, Warm, Bluelight or User. 6. Using the Navi/OK button, select Color from the OSD. The default value is...
User Manual
Page 27
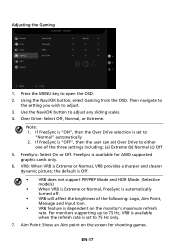
.../OK button to adjust. 3. For monitors supporting up to 75 Hz, VRB is available when the refresh rate is "OFF", then the user can set Over Drive to open the OSD. 2. Adjusting the Gaming 1. If FreeSync is set to 75 Hz only. 7. Over Drive: Select Off, Normal, or Extreme. the default is Off. • VRB does not support PIP/PBP Mode and HDR Mode. (Selective models) •...
.../OK button to adjust. 3. For monitors supporting up to 75 Hz, VRB is available when the refresh rate is "OFF", then the user can set Over Drive to open the OSD. 2. Adjusting the Gaming 1. If FreeSync is set to 75 Hz only. 7. Over Drive: Select Off, Normal, or Extreme. the default is Off. • VRB does not support PIP/PBP Mode and HDR Mode. (Selective models) •...

User Manual
Page 28
...%. 7. Adjusting the OSD 1. If the OSD Lock message remains, please check whether the Navi/OK button is used to adjust any sliding scales. 4. Use the Navi/OK button to prevent OSD button from the OSD. Using the Navi/OK button, select OSD from being pressed accidentally. To remove the OSD Lock message, press and hold the Navi/OK button continuously for 3 seconds until the message disappears. Language: Set the OSD menu language. 5. Refresh Rate Num: Display the panel's current refresh rate...
...%. 7. Adjusting the OSD 1. If the OSD Lock message remains, please check whether the Navi/OK button is used to adjust any sliding scales. 4. Use the Navi/OK button to prevent OSD button from the OSD. Using the Navi/OK button, select OSD from being pressed accidentally. To remove the OSD Lock message, press and hold the Navi/OK button continuously for 3 seconds until the message disappears. Language: Set the OSD menu language. 5. Refresh Rate Num: Display the panel's current refresh rate...
User Manual
Page 31
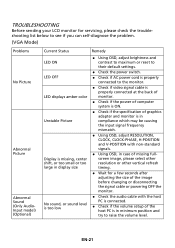
... problem. (VGA Mode) Problems No Picture Abnormal Picture Abnormal Sound (Only AudioInput model) (Optional) Current Status LED ON LED OFF LED displays amber color Unstable Picture Display is missing, center shift, or too small or too large in display size No sound, or sound level is too low Remedy Using OSD, adjust brightness and contrast to maximum or reset to their default settings. Check the power switch. Check if AC power cord is properly connected to the monitor. Check if video signal cable is properly connected...
... problem. (VGA Mode) Problems No Picture Abnormal Picture Abnormal Sound (Only AudioInput model) (Optional) Current Status LED ON LED OFF LED displays amber color Unstable Picture Display is missing, center shift, or too small or too large in display size No sound, or sound level is too low Remedy Using OSD, adjust brightness and contrast to maximum or reset to their default settings. Check the power switch. Check if AC power cord is properly connected to the monitor. Check if video signal cable is properly connected...
User Manual
Page 32
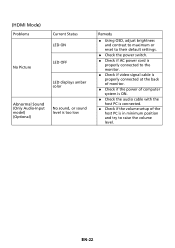
... (HDMI Mode) Problems Current Status LED ON No Picture LED OFF LED displays amber color Abnormal Sound (Only Audio-Input model) (Optional) No sound, or sound level is too low Remedy Using OSD, adjust brightness and contrast to maximum or reset to their default settings. Check the power switch. Check if AC power cord is properly connected to the monitor. Check if video signal cable is properly connected at the back of monitor. Check if the power of computer system is ON. Check the audio cable...
... (HDMI Mode) Problems Current Status LED ON No Picture LED OFF LED displays amber color Abnormal Sound (Only Audio-Input model) (Optional) No sound, or sound level is too low Remedy Using OSD, adjust brightness and contrast to maximum or reset to their default settings. Check the power switch. Check if AC power cord is properly connected to the monitor. Check if video signal cable is properly connected at the back of monitor. Check if the power of computer system is ON. Check the audio cable...


