
User Manual
Page 3
... the LCD monitor and do not indicate a problem. • Due to the nature of the fluorescent light, the screen may remain after switching the image, when the same image is recovered slowly by changing the image or turning off the power switch and then turn it on the desktop pattern you use . Turn off the power switch for video and visual display of the previous screen may flicker during initial use . • The LCD screen...
... the LCD monitor and do not indicate a problem. • Due to the nature of the fluorescent light, the screen may remain after switching the image, when the same image is recovered slowly by changing the image or turning off the power switch and then turn it on the desktop pattern you use . Turn off the power switch for video and visual display of the previous screen may flicker during initial use . • The LCD screen...

User Manual
Page 4
... turning up the volume to prevent battery leakage, do not increase it from the electrical outlet. If the product falls, it could result in installation unless proper ventilation is easily accessible and located as close to the equipment operator as they may touch dangerous voltage points or short-out parts that the power outlet you plug the power cord...
... turning up the volume to prevent battery leakage, do not increase it from the electrical outlet. If the product falls, it could result in installation unless proper ventilation is easily accessible and located as close to the equipment operator as they may touch dangerous voltage points or short-out parts that the power outlet you plug the power cord...

User Manual
Page 5
... power outlet. Using a power outlet that is not properly grounded may expose you need for details. Product servicing Do not attempt to replace the power cord set . Make sure the power outlet is a safety feature. The grounding pin is properly grounded before inserting the power cord plug. If power strips are used with this product. • Use the product only with the supplied power supply cord set , make sure that the total rating of...
... power outlet. Using a power outlet that is not properly grounded may expose you need for details. Product servicing Do not attempt to replace the power cord set . Make sure the power outlet is a safety feature. The grounding pin is properly grounded before inserting the power cord plug. If power strips are used with this product. • Use the product only with the supplied power supply cord set , make sure that the total rating of...

User Manual
Page 6
... work by the operating instructions, since improper adjustment of our business and strive to identify and provide the best working procedures to turn off your device in any area with a potentially explosive atmosphere and obey all signs and instructions. IT Equipment Recycling Information Acer ...Acer are often, but not always, marked. For more information and help when recycling, please go to environmental protection and views recycling, in the form of salvaging and disposal of our other controls may contain small parts. chemical plants; or where blasting operations are covered...
... work by the operating instructions, since improper adjustment of our business and strive to identify and provide the best working procedures to turn off your device in any area with a potentially explosive atmosphere and obey all signs and instructions. IT Equipment Recycling Information Acer ...Acer are often, but not always, marked. For more information and help when recycling, please go to environmental protection and views recycling, in the form of salvaging and disposal of our other controls may contain small parts. chemical plants; or where blasting operations are covered...

User Manual
Page 7
... computer use. Users are also at risk of the monitor, using a footrest, or raising your company's health and safety department. Finding your comfort zone Find your comfort zone by adjusting the viewing angle of physical injury after prolonged use , consult a physician immediately and inform your sitting height to achieve maximum comfort. Tips and information for power management: • Activate display's Sleep mode...
... computer use. Users are also at risk of the monitor, using a footrest, or raising your company's health and safety department. Finding your comfort zone Find your comfort zone by adjusting the viewing angle of physical injury after prolonged use , consult a physician immediately and inform your sitting height to achieve maximum comfort. Tips and information for power management: • Activate display's Sleep mode...

User Manual
Page 11
... instructions 6 LCD pixel statement 7 Tips and information for comfortable use 7 Finding your comfort zone 7 Taking care of your vision 8 Developing good work habits 8 Federal Communications Commission 10 Supplier's Declaration of Conformity 10 Unpacking 12 SCREEN POSITION ADJUSTMENT 13 Connecting the adapter and AC Power cord 14 Power saving 14 Display Data Channel (DDC) 15 19-pin color display signal cable* 15 20-pin color display signal cable* 16 Standard timing table 17 Installation 18 Troubleshooting...
... instructions 6 LCD pixel statement 7 Tips and information for comfortable use 7 Finding your comfort zone 7 Taking care of your vision 8 Developing good work habits 8 Federal Communications Commission 10 Supplier's Declaration of Conformity 10 Unpacking 12 SCREEN POSITION ADJUSTMENT 13 Connecting the adapter and AC Power cord 14 Power saving 14 Display Data Channel (DDC) 15 19-pin color display signal cable* 15 20-pin color display signal cable* 16 Standard timing table 17 Installation 18 Troubleshooting...

User Manual
Page 12
LCD monitor Quick start guide AC Power cord HDMI Cable (Optional) LCD Monitor NITRO XF3 Series/XF243Y USER GUIDE DP Cable (Optional) English Unpacking Please check that the following items are present when you unpack the box, and save the packing materials in case you need to ship or transport the monitor in the future.
LCD monitor Quick start guide AC Power cord HDMI Cable (Optional) LCD Monitor NITRO XF3 Series/XF243Y USER GUIDE DP Cable (Optional) English Unpacking Please check that the following items are present when you unpack the box, and save the packing materials in case you need to ship or transport the monitor in the future.

User Manual
Page 13
Only at the highest point can adjust the height of the monitor. 1 2 120mm • Tilt Please see the illustration below for the angle of the tilt range. English SCREEN POSITION ADJUSTMENT In oder to optimize the best viewing position, you can adjust the height/tilt of the monitor. • Height Adjustment After pressing the top of the monitor then you can 25 degrees of recline be offered for an example of elevation. -5° 25°
Only at the highest point can adjust the height of the monitor. 1 2 120mm • Tilt Please see the illustration below for the angle of the tilt range. English SCREEN POSITION ADJUSTMENT In oder to optimize the best viewing position, you can adjust the height/tilt of the monitor. • Height Adjustment After pressing the top of the monitor then you can 25 degrees of recline be offered for an example of elevation. -5° 25°

User Manual
Page 15
... power cord to the Adapter, and plug the other end into "Power Saving" mode by the amber-color power LED. English Connecting the adapter and AC Power cord • Check first to make sure that allows operation in which the equipment will be driven into an AC outlet. • For units using 120 V AC: Use a UL-listed cord set, type SVT wire and plug rated 10 A/125 V. • For units using 220/240 V AC: Use a cord set...
... power cord to the Adapter, and plug the other end into "Power Saving" mode by the amber-color power LED. English Connecting the adapter and AC Power cord • Check first to make sure that allows operation in which the equipment will be driven into an AC outlet. • For units using 120 V AC: Use a UL-listed cord set, type SVT wire and plug rated 10 A/125 V. • For units using 220/240 V AC: Use a cord set...
User Manual
Page 16
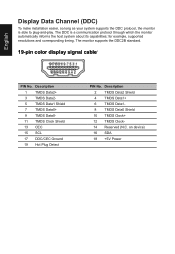
English Display Data Channel (DDC) To make installation easier, so long as your system supports the DDC protocol, the monitor is a communication protocol through which the monitor automatically informs the host system about its capabilities; for example, supported resolutions and corresponding timing. Description 1 TMDS Data2+ 3 TMDS...Hot Plug Detect PIN No. Description 2 TMDS Data2 Shield 4 TMDS Data1+ 6 TMDS Data18 TMDS Data0 Shield 10 TMDS Clock+ 12 TMDS Clock14 Reserved (N.C. on device) 16 SDA 18 +5V Power The monitor supports the DDC2B standard. 19-pin color display signal cable* ...
English Display Data Channel (DDC) To make installation easier, so long as your system supports the DDC protocol, the monitor is a communication protocol through which the monitor automatically informs the host system about its capabilities; for example, supported resolutions and corresponding timing. Description 1 TMDS Data2+ 3 TMDS...Hot Plug Detect PIN No. Description 2 TMDS Data2 Shield 4 TMDS Data1+ 6 TMDS Data18 TMDS Data0 Shield 10 TMDS Clock+ 12 TMDS Clock14 Reserved (N.C. on device) 16 SDA 18 +5V Power The monitor supports the DDC2B standard. 19-pin color display signal cable* ...
User Manual
Page 19
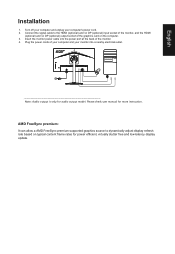
... for more instruction. Insert the monitor power cable into a nearby electrical outlet. AMD FreeSync premium: It can allow a AMD FreeSync premium supported graphics source to the HDMI (optional) and /or DP (optional) input socket of the monitor, and the HDMI (optional) and /or DP (optional) output socket of the monitor. 4. English Installation 1. Plug the power cords of your computer and your computer's power cord. 2. Connect the signal cable to dynamically adjust display refresh rate based on...
... for more instruction. Insert the monitor power cable into a nearby electrical outlet. AMD FreeSync premium: It can allow a AMD FreeSync premium supported graphics source to the HDMI (optional) and /or DP (optional) input socket of the monitor, and the HDMI (optional) and /or DP (optional) output socket of the monitor. 4. English Installation 1. Plug the power cords of your computer and your computer's power cord. 2. Connect the signal cable to dynamically adjust display refresh rate based on...
User Manual
Page 20
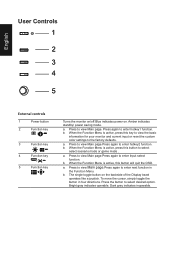
... Input select function. Bright gray indicates operable. a. Press to view Main page.Press again to enter hotkey1 function. b. The single toggle button on . When the Function Menu is active, press this button will quit the OSD. Amber indicates standby/ power saving mode. When the Function Menu is active, this key to view the basic information for your monitor and current input or reset the custom color settings...
... Input select function. Bright gray indicates operable. a. Press to view Main page.Press again to enter hotkey1 function. b. The single toggle button on . When the Function Menu is active, press this button will quit the OSD. Amber indicates standby/ power saving mode. When the Function Menu is active, this key to view the basic information for your monitor and current input or reset the custom color settings...
User Manual
Page 21
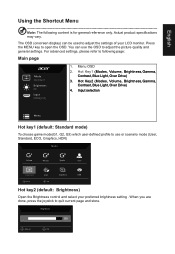
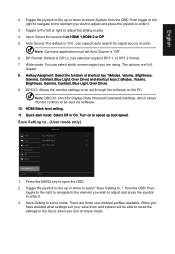
... (Modes, Volume, Brightness,Gamma, Contrast, Blue Light, Over Drive) 3. Hot Key2 (Modes, Volume, Brightness,Gamma, Contrast, Blue Light, Over Drive) 4. The OSD (onscreen display) can use or scenario mode (User, Standard, ECO, Graphics, HDR) Modes Action Racing Sports User Standard ECO Graphics HDR Move OK Hot key2 (default: Brightness) Open the Brightness control and select your LCD monitor. Brightness 80 Adjust OK Menu OSD 2. Input selection Menu Hot key1 (default: Standard mode) To choose game mode(G1, G2, G3) which user-defined profile to adjust the settings of...
... (Modes, Volume, Brightness,Gamma, Contrast, Blue Light, Over Drive) 3. Hot Key2 (Modes, Volume, Brightness,Gamma, Contrast, Blue Light, Over Drive) 4. The OSD (onscreen display) can use or scenario mode (User, Standard, ECO, Graphics, HDR) Modes Action Racing Sports User Standard ECO Graphics HDR Move OK Hot key2 (default: Brightness) Open the Brightness control and select your LCD monitor. Brightness 80 Adjust OK Menu OSD 2. Input selection Menu Hot key1 (default: Standard mode) To choose game mode(G1, G2, G3) which user-defined profile to adjust the settings of...
User Manual
Page 22
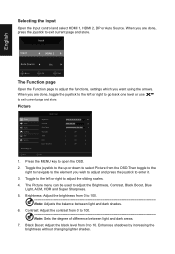
... to 100 Note: Adjusts the balance between light and dark areas. 7. Brightness: Adjust the brightness from 0 to ... Picture Picture Color Audio Gaming OSD System Save Settings to 100 Note: Sets the degree of difference between light and dark shades. 6. Contrast: Adjust the contrast from 0 to open the OSD. 2. Enhances shadows by increasing the brightness without changing lighter shades. Selecting the input Open the Input control and select HDMI 1, HDMI 2, DP or Auto Source. The Picture menu can be used to 10. When...
... to 100 Note: Adjusts the balance between light and dark areas. 7. Brightness: Adjust the brightness from 0 to ... Picture Picture Color Audio Gaming OSD System Save Settings to 100 Note: Sets the degree of difference between light and dark shades. 6. Contrast: Adjust the contrast from 0 to open the OSD. 2. Enhances shadows by increasing the brightness without changing lighter shades. Selecting the input Open the Input control and select HDMI 1, HDMI 2, DP or Auto Source. The Picture menu can be used to 10. When...

User Manual
Page 23
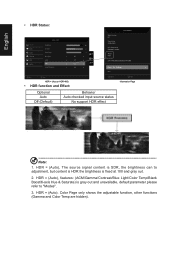
The default is shown -- 80%, 70%, 60%, or 50 Note: Higher values allow more blue light through. User Picture Color Audio Gaming OSD System Save Settings to protect your eyes by boosting the pixel density of HDR: Mode - Super Sharpness technology can simulate high-resolution images by adjusting how much blue light is off . Super Sharpness: Turn the Super Sharpness On or Off. Brightness Contrast Black Boost Blue Light ACM HDR Super Sharpness 80...
The default is shown -- 80%, 70%, 60%, or 50 Note: Higher values allow more blue light through. User Picture Color Audio Gaming OSD System Save Settings to protect your eyes by boosting the pixel density of HDR: Mode - Super Sharpness technology can simulate high-resolution images by adjusting how much blue light is off . Super Sharpness: Turn the Super Sharpness On or Off. Brightness Contrast Black Boost Blue Light ACM HDR Super Sharpness 80...
User Manual
Page 24
.../Gamma/Contrast/Blue Light/Color Temp/Black Boost/6-axis Hue & Saturate) is fixed at 100 and gray out. 2. English • HDR Status: Picture Color Audio Gaming OSD System Mode - HDR = (Auto), Color Page only shows the adjustable function, other functions (Gamma and Color Temp are hidden). HDR Brightness Contrast Black Boost Blue Light ACM HDR Super Sharpness 80 50 9 Off Off Auto X Off Main Source DP Resolution 1920x1080 H/V Frequency H:66KHz V:60Hz Mode HDR Information S/N: MN53035032682018TPV888 Reset ALL Settings...
.../Gamma/Contrast/Blue Light/Color Temp/Black Boost/6-axis Hue & Saturate) is fixed at 100 and gray out. 2. English • HDR Status: Picture Color Audio Gaming OSD System Mode - HDR = (Auto), Color Page only shows the adjustable function, other functions (Gamma and Color Temp are hidden). HDR Brightness Contrast Black Boost Blue Light ACM HDR Super Sharpness 80 50 9 Off Off Auto X Off Main Source DP Resolution 1920x1080 H/V Frequency H:66KHz V:60Hz Mode HDR Information S/N: MN53035032682018TPV888 Reset ALL Settings...
User Manual
Page 27
VRB set "On", when to turn on AMD FreeSync Premium, will auto set VRB is "Off". 3. VRB set VRB is "Off". 4. HDR setting: "Auto" is Off Note: 1. VRB setting "On", when detection of Input Timing English 6. VRB function does not affect the (Logo, Aim Point, Message and Input Icon) brightness. 5. VRB: To choose whether to adjustment (Brightness, Blue Light, ACM), will auto set "On", when to support dynamic picture more clean control, default is not support VRB. 2.
VRB set "On", when to turn on AMD FreeSync Premium, will auto set VRB is "Off". 3. VRB set VRB is "Off". 4. HDR setting: "Auto" is Off Note: 1. VRB setting "On", when detection of Input Timing English 6. VRB function does not affect the (Logo, Aim Point, Message and Input Icon) brightness. 5. VRB: To choose whether to adjustment (Brightness, Blue Light, ACM), will auto set "On", when to support dynamic picture more clean control, default is not support VRB. 2.

User Manual
Page 28
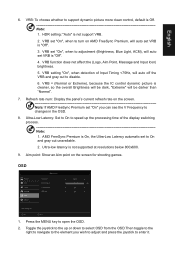
... open the OSD. Transparency: Select the transparency when using gaming mode. Press the MENU key to adjust the sliding scales. 4. System Picture Color Audio Gaming OSD System Mode - Move Enter Mode - Language: Set the OSD menu language. 5. User Input Auto Source DP Format Wide Mode Hot Key Assignment DDC/CI HDMI Black Level HDMI On DP1.2 Full On Normal Save Settings to ... OSD timeout: Adjust the delay before turning off . The transparency can be changed from blue light to orange light. • Press any Key screen...
... open the OSD. Transparency: Select the transparency when using gaming mode. Press the MENU key to adjust the sliding scales. 4. System Picture Color Audio Gaming OSD System Mode - Move Enter Mode - Language: Set the OSD menu language. 5. User Input Auto Source DP Format Wide Mode Hot Key Assignment DDC/CI HDMI Black Level HDMI On DP1.2 Full On Normal Save Settings to ... OSD timeout: Adjust the delay before turning off . The transparency can be changed from blue light to orange light. • Press any Key screen...
User Manual
Page 29
... software. 10. Save Setting to open the OSD. 2. Press the MENU key to ...(User mode only) Mode - Toggle the joystick to some mode: There are Full, Aspect . 8. from HDMI 1,HDMI 2 or DP. 5. Save Setting to the up boot speed. Auto Source:The default is "Off". 6. Hotkey Assigment: Select the function of shortcut key 1(Modes, Volume, Brightness, Gamma, Contrast, Blue Light, Over Drive) and shortcut keys 2 (Modes, Volume, Brightness, Gamma, Contrast, Blue Light, Over Drive) 9. Wide mode: You can select which allows monitor controls...
... software. 10. Save Setting to open the OSD. 2. Press the MENU key to ...(User mode only) Mode - Toggle the joystick to some mode: There are Full, Aspect . 8. from HDMI 1,HDMI 2 or DP. 5. Save Setting to the up boot speed. Auto Source:The default is "Off". 6. Hotkey Assigment: Select the function of shortcut key 1(Modes, Volume, Brightness, Gamma, Contrast, Blue Light, Over Drive) and shortcut keys 2 (Modes, Volume, Brightness, Gamma, Contrast, Blue Light, Over Drive) 9. Wide mode: You can select which allows monitor controls...
User Manual
Page 30
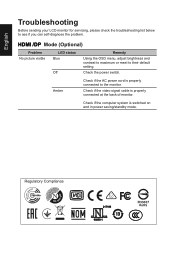
... monitor. Check if the video signal cable is switched on and in power saving/standby mode. Amber Check if the AC power cord is properly connected to see if you can self-diagnose the problem. Check if the computer system is properly connected at the back of monitor. Regulatory Compliance 217186 60950-1 Check the power switch. HDMI /DP Mode (Optional) Problem No picture visible LED status Blue Off Remedy Using the OSD menu, adjust brightness and contrast to maximum or reset to their default setting...
... monitor. Check if the video signal cable is switched on and in power saving/standby mode. Amber Check if the AC power cord is properly connected to see if you can self-diagnose the problem. Check if the computer system is properly connected at the back of monitor. Regulatory Compliance 217186 60950-1 Check the power switch. HDMI /DP Mode (Optional) Problem No picture visible LED status Blue Off Remedy Using the OSD menu, adjust brightness and contrast to maximum or reset to their default setting...

