

XD1150 Service Guide
Page 6
... Alignment Procedure 4-1 Product / Test Equipment / Test Condition 4-1 Inspection Procecdure 4-2 Guide to Entering Service Mode and Factory Reset (PD100) 4-5 Chapter 5 Firware Upgrade 5-1 Equipment Needed 5-1 Installation Procedure 5-2 USB Driver Upgrade Procedure 5-4 Firmware Upgrade Procedure 5-6 Chapter 6 EDID Upgrade 6-1 Equipment Needed 6-1 Setup Procedure 6-2 EDID Key-in Procedure 6-2 Appendix A Exploded Overview Appendix B Serial Number Definition System
... Alignment Procedure 4-1 Product / Test Equipment / Test Condition 4-1 Inspection Procecdure 4-2 Guide to Entering Service Mode and Factory Reset (PD100) 4-5 Chapter 5 Firware Upgrade 5-1 Equipment Needed 5-1 Installation Procedure 5-2 USB Driver Upgrade Procedure 5-4 Firmware Upgrade Procedure 5-6 Chapter 6 EDID Upgrade 6-1 Equipment Needed 6-1 Setup Procedure 6-2 EDID Key-in Procedure 6-2 Appendix A Exploded Overview Appendix B Serial Number Definition System

XD1150 Service Guide
Page 11
... Connector (for PD100/PD100D/PD120/PD120D/XD1170D/XD1270D only) S-Video Input Connector Monitor Loop-through Output Connector (for PD100/PD100D/PD120/PD120D/XD1170D/XD1270D only) USB Connector Remote Control IR Receiver (for PD100/PD100D/PD120/PD120D only) Composite Video Input Connector KensingtonTM Lock Port 5V DC Output Jack (dfor attached dongle...
... Connector (for PD100/PD100D/PD120/PD120D/XD1170D/XD1270D only) S-Video Input Connector Monitor Loop-through Output Connector (for PD100/PD100D/PD120/PD120D/XD1170D/XD1270D only) USB Connector Remote Control IR Receiver (for PD100/PD100D/PD120/PD120D only) Composite Video Input Connector KensingtonTM Lock Port 5V DC Output Jack (dfor attached dongle...

XD1150 Service Guide
Page 12
Connecting the Projector Item 1 2 3 4 5 6 7 8 9 Description Power Cord VGA Cable Composite Video Cable USB Cable VGA to Component / HDTV Adapter S-Video Cable Audio Cable Jack / Jack (for PD100/PD100D/PD120/PD120D/XD1170D/XD1270D only) DVI Cable (Optional Accessory) (for PD100D/PD120D/XD1170D/XD1270D only) 5V DC Output Jack for attached Dongle Device (for PD100/PD120 only) Confidential 6
Connecting the Projector Item 1 2 3 4 5 6 7 8 9 Description Power Cord VGA Cable Composite Video Cable USB Cable VGA to Component / HDTV Adapter S-Video Cable Audio Cable Jack / Jack (for PD100/PD100D/PD120/PD120D/XD1170D/XD1270D only) DVI Cable (Optional Accessory) (for PD100D/PD120D/XD1170D/XD1270D only) 5V DC Output Jack for attached Dongle Device (for PD100/PD120 only) Confidential 6

XD1150 Service Guide
Page 48
Firmware (PD100 / PD100D / PD120 / PD120D / XD1170D / XD1270D / XD1150 / XD1250) Hardware : Item Photo Item Photo Projector (PD100 / PD100D) Projector (PD120 / PD120D) Power Cord Projector (XD1170D /XD1270D) USB Cable PC or Laptop Projector (XD1150/ XD1250) Confidential 1 DLP Composer - Chapter 5 Firmware Upgrade Equipment Needed Software : (DDP 2000- USB) -
Firmware (PD100 / PD100D / PD120 / PD120D / XD1170D / XD1270D / XD1150 / XD1250) Hardware : Item Photo Item Photo Projector (PD100 / PD100D) Projector (PD120 / PD120D) Power Cord Projector (XD1170D /XD1270D) USB Cable PC or Laptop Projector (XD1150/ XD1250) Confidential 1 DLP Composer - Chapter 5 Firmware Upgrade Equipment Needed Software : (DDP 2000- USB) -
XD1150 Service Guide
Page 51
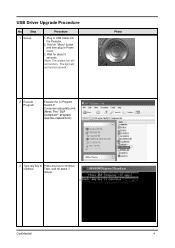
The light will not function. continue Then, wait for about 1 minute. USB Driver Upgrade Procedure No Step 1 Set-up Procedure 1. Hold on "Menu" button and then plug in USB Cable into the Projector. 2. Plug in Power Cord. 3. Confidential 4 Wait for about 5 seconds. (Note: The system fan will not function as well.) 2 Execute Program Execute the C:\Program files\DLP Composer\usbupdata.cmd. (Note: The "DLP Composer" program must be closed first.) Photo 3 Type any key to Press any key to continue.
The light will not function. continue Then, wait for about 1 minute. USB Driver Upgrade Procedure No Step 1 Set-up Procedure 1. Hold on "Menu" button and then plug in USB Cable into the Projector. 2. Plug in Power Cord. 3. Confidential 4 Wait for about 5 seconds. (Note: The system fan will not function as well.) 2 Execute Program Execute the C:\Program files\DLP Composer\usbupdata.cmd. (Note: The "DLP Composer" program must be closed first.) Photo 3 Type any key to Press any key to continue.

XD1150 Service Guide
Page 52
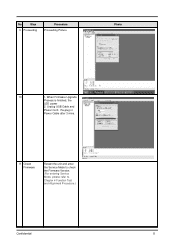
If not, repeart installed Step 1~5. Choose "Hardware" and then click "Device Manager". 6 Ensure Click "Jungo" to launch the "System Properties" window. 3. Device Manager Confidential 5 Photo 5 Device Manager 1. Select "Properties" on the desktop. 2. Right click "My computer" on the popup menu to ensure "DDP2000" & "DDP2000" and "WinDriver" are "Windriver" are properly properly installed. No Step 4 Update Successfully Procedure Click "OK". The USB driver is updated successfully.
If not, repeart installed Step 1~5. Choose "Hardware" and then click "Device Manager". 6 Ensure Click "Jungo" to launch the "System Properties" window. 3. Device Manager Confidential 5 Photo 5 Device Manager 1. Select "Properties" on the desktop. 2. Right click "My computer" on the popup menu to ensure "DDP2000" & "DDP2000" and "WinDriver" are "Windriver" are properly properly installed. No Step 4 Update Successfully Procedure Click "OK". The USB driver is updated successfully.

XD1150 Service Guide
Page 53
... then plug in the default installation directory is: C:\Program Files\DLP Composer. The library path located in Power Cord. 3. Select "Edit\Preferences\ Communications" and choose "USB". 2. Click "OK". Firmware Upgrade Procedure No Step Procedure 1 Set-up 2 Set-up 3 1. Wait for about 5 seconds. (Note: The system fan will... not function as well.) Link PC COM1 and projector Execute the "DLP ComposeTM" file. . 4 Click "Edit" and "Preferences". 1 Photo 2 5 1. Plug in USB Cable into the Projector. 2. If not, press "Browse" to select the right path. 6 1. Confidential...
... then plug in the default installation directory is: C:\Program Files\DLP Composer. The library path located in Power Cord. 3. Select "Edit\Preferences\ Communications" and choose "USB". 2. Click "OK". Firmware Upgrade Procedure No Step Procedure 1 Set-up 2 Set-up 3 1. Wait for about 5 seconds. (Note: The system fan will... not function as well.) Link PC COM1 and projector Execute the "DLP ComposeTM" file. . 4 Click "Edit" and "Preferences". 1 Photo 2 5 1. Plug in USB Cable into the Projector. 2. If not, press "Browse" to select the right path. 6 1. Confidential...

XD1150 Service Guide
Page 54
... ready, click "Start Download" to erase the flash memory. Confidential 1 2 7 Click "Reset Bus" to erase the flash memory. (Note: If the error message "cannot open USB driver No projectors found" appears, please unplug the...
... ready, click "Start Download" to erase the flash memory. Confidential 1 2 7 Click "Reset Bus" to erase the flash memory. (Note: If the error message "cannot open USB driver No projectors found" appears, please unplug the...
XD1150 Service Guide
Page 55
When Firmware Upgrade Process is finished, the LED power 2. Re-plug in Power Cable after 3 mins. 11 Check Firmware Restart the unit and enter the Service Mode to check the Firmware Version. (For entering Service Mode, please refer to Chapter 4 Function Test and Alignment Procedure.) Confidential 8 No Step 9 Proceeding Procedure Proceeding Picture Photo 10 1. Unplug USB Cable and Power Cord.
When Firmware Upgrade Process is finished, the LED power 2. Re-plug in Power Cable after 3 mins. 11 Check Firmware Restart the unit and enter the Service Mode to check the Firmware Version. (For entering Service Mode, please refer to Chapter 4 Function Test and Alignment Procedure.) Confidential 8 No Step 9 Proceeding Procedure Proceeding Picture Photo 10 1. Unplug USB Cable and Power Cord.
XD1150 Service Guide
Page 62
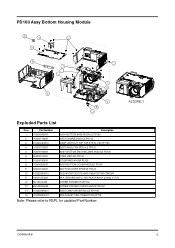
....1A626G050 SCREW PAN MECH M3*5 Ni SCREW PAN MECH M2.6*5 BLACK NYLOK 14 70.82G19G001 ASSY LAMP DRIVER MDULE EP7190 15 41.82G03G001 EMI GASKET USB CONNECTOR EP719 Note: Please refer to RSPL for updated Part Number. Confidential 3
....1A626G050 SCREW PAN MECH M3*5 Ni SCREW PAN MECH M2.6*5 BLACK NYLOK 14 70.82G19G001 ASSY LAMP DRIVER MDULE EP7190 15 41.82G03G001 EMI GASKET USB CONNECTOR EP719 Note: Please refer to RSPL for updated Part Number. Confidential 3
XD1150 Service Guide
Page 63
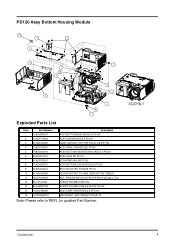
....1A626G050 SCREW PAN MECH M3*5 Ni SCREW PAN MECH M2.6*5 BLACK NYLOK 14 70.82G19G001 ASSY LAMP DRIVER MDULE EP7190 15 41.82G03G001 EMI GASKET USB CONNECTOR EP719 Note: Please refer to RSPL for updated Part Number.
....1A626G050 SCREW PAN MECH M3*5 Ni SCREW PAN MECH M2.6*5 BLACK NYLOK 14 70.82G19G001 ASSY LAMP DRIVER MDULE EP7190 15 41.82G03G001 EMI GASKET USB CONNECTOR EP719 Note: Please refer to RSPL for updated Part Number.
XD1150 User's Guide EN
Page 7
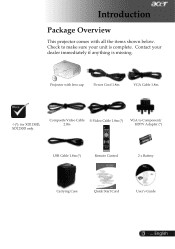
Contact your unit is missing. Composite Video Cable S-Video Cable 1.8m (*) 2.0m VGA to make sure your dealer immediately if anything is complete. Projector with all the items shown below. English Introduction Package Overview This projector comes with lens cap Power Cord 1.8m VGA Cable 1.8m (*): for XD1150D, XD1250D only. Check to Component/ HDTV Adapter (*) USB Cable 1.8m (*) Remote Control 2 x Battery Carrying Case Quick Start Card User's Guide 5 ...
Contact your unit is missing. Composite Video Cable S-Video Cable 1.8m (*) 2.0m VGA to make sure your dealer immediately if anything is complete. Projector with all the items shown below. English Introduction Package Overview This projector comes with lens cap Power Cord 1.8m VGA Cable 1.8m (*): for XD1150D, XD1250D only. Check to Component/ HDTV Adapter (*) USB Cable 1.8m (*) Remote Control 2 x Battery Carrying Case Quick Start Card User's Guide 5 ...
XD1150 User's Guide EN
Page 10
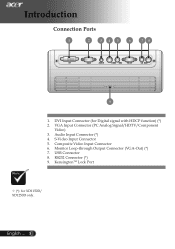
DVI Input Connector (for XD1150D/ XD1250D only. Monitor Loop-through Output Connector (VGA-Out) (*) 7. KensingtonTM Lock Port (*): for Digital signal with HDCP function) (*) 2. S-Video Input Connector 5. Composite Video Input Connector 6. USB Connector 8. English ... 8 Introduction Connection Ports 1 2 345 6 7 8 DVI VGA IN AUDIO IN S-VIDEO VIDEO VGA OUT USB RS232 9 1. RS232 Connector (*) 9. VGA Input Connector (PC Analog Signal/HDTV/Component Video) 3. Audio Input Connector (*) 4.
DVI Input Connector (for XD1150D/ XD1250D only. Monitor Loop-through Output Connector (VGA-Out) (*) 7. KensingtonTM Lock Port (*): for Digital signal with HDCP function) (*) 2. S-Video Input Connector 5. Composite Video Input Connector 6. USB Connector 8. English ... 8 Introduction Connection Ports 1 2 345 6 7 8 DVI VGA IN AUDIO IN S-VIDEO VIDEO VGA OUT USB RS232 9 1. RS232 Connector (*) 9. VGA Input Connector (PC Analog Signal/HDTV/Component Video) 3. Audio Input Connector (*) 4.
XD1150 User's Guide EN
Page 12
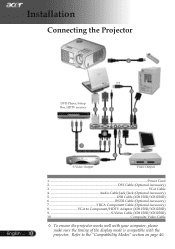
... projector works well with your computer, please make sure the timing of the display mode is compatible with the projector. Installation Connecting the Projector 1 RGB USB 5 DVD Player, Settop Box, HDTV receiver 2 34 6 English ... 10 7 S-Video Output 8 10 9 Video Output 1...Power Cord 2 DVI Cable (Optional Accessory) 3...VGA Cable 4 Audio Cable Jack...
... projector works well with your computer, please make sure the timing of the display mode is compatible with the projector. Installation Connecting the Projector 1 RGB USB 5 DVD Player, Settop Box, HDTV receiver 2 34 6 English ... 10 7 S-Video Output 8 10 9 Video Output 1...Power Cord 2 DVI Cable (Optional Accessory) 3...VGA Cable 4 Audio Cable Jack...

XD1150 User's Guide EN
Page 19
... function. This function is for presentation time control. User Controls Empowering Key Acer Empowering Key provides three Acer unique functions, they are "Acer eView Management", "Acer eTimer Management" and "Acer eOpening Management" respectively. "Acer eView Management" is only available when connected to a computer via an USB cable. English Press "e" key for more than one second to launch...
... function. This function is for presentation time control. User Controls Empowering Key Acer Empowering Key provides three Acer unique functions, they are "Acer eView Management", "Acer eTimer Management" and "Acer eOpening Management" respectively. "Acer eView Management" is only available when connected to a computer via an USB cable. English Press "e" key for more than one second to launch...

XD1150 User's Guide EN
Page 26
... Choose the Menu location on remote control for other signals if the current input signal is down loaded from PC to projector via the USB cable and Acer eOpening Management utility (refer to the description of below section). If you change the setting from one to select your desired startup screen.... Source Lock When source lock is turned off, the projector will take effect. Acer : The default startup screen of Acer projector. User : The user customized startup screen, which is lost. English ... 24
... Choose the Menu location on remote control for other signals if the current input signal is down loaded from PC to projector via the USB cable and Acer eOpening Management utility (refer to the description of below section). If you change the setting from one to select your desired startup screen.... Source Lock When source lock is turned off, the projector will take effect. Acer : The default startup screen of Acer projector. User : The user customized startup screen, which is lost. English ... 24

XD1150 User's Guide EN
Page 27
... both buttons, projector enters download mode. 5. Before the download starts, the projector must enter "Download Mode" first. Please make sure the USB cable has been connected to the projector from the projector. 3. If the projector was turned on, press power button twice to hide warning message... elapsed operating time (in hours). Lamp Reminding Choose this function to show up 30 hours before end of Acer projector to their desired image. You can install Acer eOpening Management from your desired image from the bundled CD. Connect the projector to your PC with the bundled...
... both buttons, projector enters download mode. 5. Before the download starts, the projector must enter "Download Mode" first. Please make sure the USB cable has been connected to the projector from the projector. 3. If the projector was turned on, press power button twice to hide warning message... elapsed operating time (in hours). Lamp Reminding Choose this function to show up 30 hours before end of Acer projector to their desired image. You can install Acer eOpening Management from your desired image from the bundled CD. Connect the projector to your PC with the bundled...

XD1150 User's Guide EN
Page 41
...D) Environmental Safety Regulation - Universal AC input 100-240V ; Video Input: One Composite video RCA input One S-Video input - RS232: One RS232 connector (for XD1150/XD1150D - 16.7M colors - 2100:1 (Full On/Full Off) - 90% - 31dB(A) - Operating Temperature: 41~95 F (5~ 35 C) Humidity: 80% maximum (Non-... USB connector - 4.78 lbs (2.17kg) - 9.1 x 9.4 x 4.8 inches (230 x 238 x 122.8 mm) o o - Appendices Specifications The specs specified below are subject to Acer announced marketing specs. Regarding the final specs, please refer to change ...
...D) Environmental Safety Regulation - Universal AC input 100-240V ; Video Input: One Composite video RCA input One S-Video input - RS232: One RS232 connector (for XD1150/XD1150D - 16.7M colors - 2100:1 (Full On/Full Off) - 90% - 31dB(A) - Operating Temperature: 41~95 F (5~ 35 C) Humidity: 80% maximum (Non-... USB connector - 4.78 lbs (2.17kg) - 9.1 x 9.4 x 4.8 inches (230 x 238 x 122.8 mm) o o - Appendices Specifications The specs specified below are subject to Acer announced marketing specs. Regarding the final specs, please refer to change ...


