User Manual
Page 11
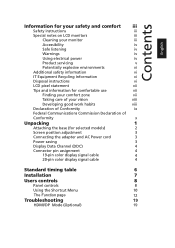
... color display signal cable 4 20-pin color display signal cable 4 Standard timing table 6 Installation 7 Users controls 8 Panel controls 8 Using the Shortcut Menu 10 12 Troubleshooting HDMI/DP Mode (Optional)
... color display signal cable 4 20-pin color display signal cable 4 Standard timing table 6 Installation 7 Users controls 8 Panel controls 8 Using the Shortcut Menu 10 12 Troubleshooting HDMI/DP Mode (Optional)
User Manual
Page 13
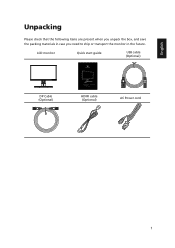
LCD monitor Quick start guide USB cable DP Cable Predator MNT XB281HK Quick Guide HDMI cable AC Power cord 1 English Unpacking Please check that the following items are present when you unpack the box, and save the packing materials in case you need to ship or transport the monitor in the future.
LCD monitor Quick start guide USB cable DP Cable Predator MNT XB281HK Quick Guide HDMI cable AC Power cord 1 English Unpacking Please check that the following items are present when you unpack the box, and save the packing materials in case you need to ship or transport the monitor in the future.
User Manual
Page 19
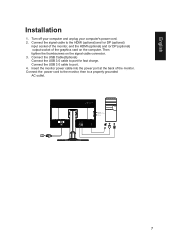
... and unplug your computer's power cord. 2. Connect the USB Cable(Optional) Connect the USB 3.0 cable to the HDMI (optional) and /or DP (optional) input socket of the monitor, and the HDMI (optional) and /or DP (optional) output socket of the monitor. Then tighten the thumbscrews on the computer.... to port for fast charge. Connect the USB 3.0 cable to a properly grounded AC outlet. USB3.0 port -supporting fast charge USB3.0 port USB HDMI HDMI USB 7 Insert the monitor power cable into the power port at the back of the graphics card on the signal cable connector. 3. Connect the ...
... and unplug your computer's power cord. 2. Connect the USB Cable(Optional) Connect the USB 3.0 cable to the HDMI (optional) and /or DP (optional) input socket of the monitor, and the HDMI (optional) and /or DP (optional) output socket of the monitor. Then tighten the thumbscrews on the computer.... to port for fast charge. Connect the USB 3.0 cable to a properly grounded AC outlet. USB3.0 port -supporting fast charge USB3.0 port USB HDMI HDMI USB 7 Insert the monitor power cable into the power port at the back of the graphics card on the signal cable connector. 3. Connect the ...
User Manual
Page 22
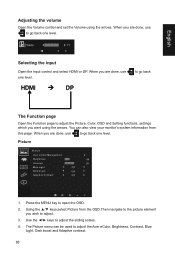
..., use one level. When you are done, use to go back one level. Volume 71 Selecting the input Open the Input control and select HDMI or DP. HDMI DP to the picture element you want using the arrows. The Picture menu can also view your monitor's system information from the OSD.Then... to adjust the Picture, Color, OSD and Setting functions, settings which you wish to adjust the sliding scales. 4. Press the MENU key to adjust the Acer eColor, Brightness, Contrast, Blue Light, Dark boost and Adaptive contrast. 10 Use the ◄/► keys to adjust. 3. Picture Picture...
..., use one level. When you are done, use to go back one level. Volume 71 Selecting the input Open the Input control and select HDMI or DP. HDMI DP to the picture element you want using the arrows. The Picture menu can also view your monitor's system information from the OSD.Then... to adjust the Picture, Color, OSD and Setting functions, settings which you wish to adjust the sliding scales. 4. Press the MENU key to adjust the Acer eColor, Brightness, Contrast, Blue Light, Dark boost and Adaptive contrast. 10 Use the ◄/► keys to adjust. 3. Picture Picture...
User Manual
Page 24
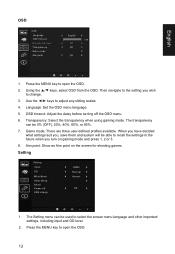
OSD timeout: Adjust the delay before turning off USB charge HDMI Normal Aspect Off 1. Use the ◄/► keys to recall the settings in the future when you turn on the screen for shooting games. Transparency: ...
OSD timeout: Adjust the delay before turning off USB charge HDMI Normal Aspect Off 1. Use the ◄/► keys to recall the settings in the future when you turn on the screen for shooting games. Transparency: ...
User Manual
Page 25
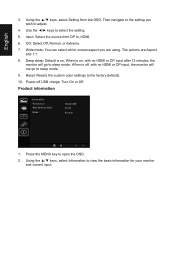
Then navigate to sleep mode. 9. OD: Select Off, Normal, or Extreme. 7. Power-off , with no HDMI or DP input, the monitor will go to the setting you are Aspect and 1:1. 8. Press the MENU key to view the basic information for your ...monitor and current input. Using the ▲/▼ keys, select Setting from DP In, HDMI. 6. Input: Select the source from the OSD. When is on , with no HDMI or DP input after 12 minutes, the monitor will not go to adjust. 4. Product information Information Resolution Max Refresh...
Then navigate to sleep mode. 9. OD: Select Off, Normal, or Extreme. 7. Power-off , with no HDMI or DP input, the monitor will go to the setting you are Aspect and 1:1. 8. Press the MENU key to view the basic information for your ...monitor and current input. Using the ▲/▼ keys, select Setting from DP In, HDMI. 6. Input: Select the source from the OSD. When is on , with no HDMI or DP input after 12 minutes, the monitor will not go to adjust. 4. Product information Information Resolution Max Refresh...
User Manual
Page 26
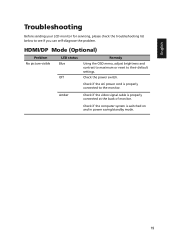
Check the power switch. Amber Check if the video signal cable is switched on and in power saving/standby mode. 9 HDMI/DP Mode (Optional) Problem No picture visible LED status Blue Off Remedy contrast to maximum or reset to see if you can self-diagnose the problem. Check if the computer system is properly connected at the back of monitor. English Troubleshooting Before sending your LCD monitor for servicing, please check the troubleshooting list below to their default settings. Check if the AC power cord is properly connected to the monitor.
Check the power switch. Amber Check if the video signal cable is switched on and in power saving/standby mode. 9 HDMI/DP Mode (Optional) Problem No picture visible LED status Blue Off Remedy contrast to maximum or reset to see if you can self-diagnose the problem. Check if the computer system is properly connected at the back of monitor. English Troubleshooting Before sending your LCD monitor for servicing, please check the troubleshooting list below to their default settings. Check if the AC power cord is properly connected to the monitor.


