

User Manual
Page 4
... To protect your hearing, follow these instructions. • Gradually increase the volume until you can hear it clearly and comfortably and without distortion. • After setting the volume level, do not place the product on a vibrating surface. • Never use this product near water. • Do not place this product, make...
... To protect your hearing, follow these instructions. • Gradually increase the volume until you can hear it clearly and comfortably and without distortion. • After setting the volume level, do not place the product on a vibrating surface. • Never use this product near water. • Do not place this product, make...
User Manual
Page 5
v ampere rating of this product. • Use the product only with the supplied power supply cord set , make sure that the new power cord meets the following the operating instructions Make sure the power outlet is a safety feature. Warning! The grounding pin ... that the total rating of the branch circuit rating. The overall system load must not exceed 80% of all servicing to replace the power cord set . If power strips are used, the load should not exceed 80% of the power strip's input rating. • This product's power cord is equipped with...
v ampere rating of this product. • Use the product only with the supplied power supply cord set , make sure that the new power cord meets the following the operating instructions Make sure the power outlet is a safety feature. Warning! The grounding pin ... that the total rating of the branch circuit rating. The overall system load must not exceed 80% of all servicing to replace the power cord set . If power strips are used, the load should not exceed 80% of the power strip's input rating. • This product's power cord is equipped with...
User Manual
Page 15
...DIRECTLY ONTO THE SCREEN OR CASE. PLEASE DO NOT USE ANY AMMONIA OR ALCOHOL-BASED CLEANERS ON THE LCD DISPLAY SCREEN OR CASE. Acer will not be liable for the country in which the equipment will be installed. Always put the monitor in either 100/120V AC or 220.../240 V AC voltage area. The cord set should have the appropriate safety approvals for damage resulting from giving shock or scratch to the screen, as screen is adequate ventilation. Avoid placing...
...DIRECTLY ONTO THE SCREEN OR CASE. PLEASE DO NOT USE ANY AMMONIA OR ALCOHOL-BASED CLEANERS ON THE LCD DISPLAY SCREEN OR CASE. Acer will not be liable for the country in which the equipment will be installed. Always put the monitor in either 100/120V AC or 220.../240 V AC voltage area. The cord set should have the appropriate safety approvals for damage resulting from giving shock or scratch to the screen, as screen is adequate ventilation. Avoid placing...
User Manual
Page 19
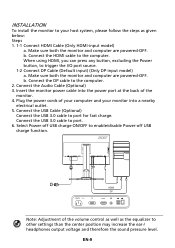
... the computer. 2. POWER HDMI DP DP HDMI Note: Adjustment of your computer and your host system, please follow the steps as the equalizer to other settings than the center position may increase the ear-/ headphones output voltage and therefore the sound pressure level. Connect the Audio Cable (Optional) 3. b. Connect the USB...
... the computer. 2. POWER HDMI DP DP HDMI Note: Adjustment of your computer and your host system, please follow the steps as the equalizer to other settings than the center position may increase the ear-/ headphones output voltage and therefore the sound pressure level. Connect the Audio Cable (Optional) 3. b. Connect the USB...
User Manual
Page 20
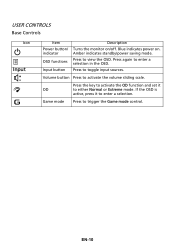
Amber indicates standby/power saving mode. Game mode Press to enter a selection in the OSD. Press again to trigger the Game mode control. Volume button Press to either Normal or Extreme mode. Press the key to activate the OD function and set it to enter a selection. Press to view the OSD. Press to toggle input sources. If the OSD is active, press it OD to activate the volume sliding scale. Blue indicates power on /off. EN-10 USER CONTROLS Base Controls Icon Input Item Power button/ indicator OSD functions Input button Description Turns the monitor on .
Amber indicates standby/power saving mode. Game mode Press to enter a selection in the OSD. Press again to trigger the Game mode control. Volume button Press to either Normal or Extreme mode. Press the key to activate the OD function and set it to enter a selection. Press to view the OSD. Press to toggle input sources. If the OSD is active, press it OD to activate the volume sliding scale. Blue indicates power on /off. EN-10 USER CONTROLS Base Controls Icon Input Item Power button/ indicator OSD functions Input button Description Turns the monitor on .
User Manual
Page 21
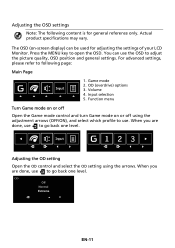
Press the MENU key to following content is for adjusting the settings of your LCD Monitor. Input selection 5. Adjusting the OD setting Open the OD control and select the OD setting using the adjustment arrows (OFF/ON), and select which profile to use the OSD to adjust the picture ...overdrive) options 3. Volume 4. Function menu Turn Game mode on or off using the arrows. For advanced settings, please refer to open the OSD. PE Off Normal Extreme EN-11 Adjusting the OSD settings Note: The following page: Main Page 1. When you are done, use to go back one level. ...
Press the MENU key to following content is for adjusting the settings of your LCD Monitor. Input selection 5. Adjusting the OD setting Open the OD control and select the OD setting using the adjustment arrows (OFF/ON), and select which profile to use the OSD to adjust the picture ...overdrive) options 3. Volume 4. Function menu Turn Game mode on or off using the arrows. For advanced settings, please refer to open the OSD. PE Off Normal Extreme EN-11 Adjusting the OSD settings Note: The following page: Main Page 1. When you are done, use to go back one level. ...
User Manual
Page 22
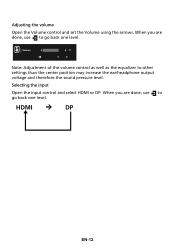
When you are done, use to go back one level. When you are done, use to other settings than the center position may increase the ear/headphone output voltage and therefore the sound pressure level. EN-12 Volume 71 Note: Adjustment of the volume control as well as the equalizer to go back one level. Selecting the input Open the input control and select HDMI or DP. Adjusting the volume Open the Volume control and set the Volume using the arrows.
When you are done, use to go back one level. When you are done, use to other settings than the center position may increase the ear/headphone output voltage and therefore the sound pressure level. EN-12 Volume 71 Note: Adjustment of the volume control as well as the equalizer to go back one level. Selecting the input Open the input control and select HDMI or DP. Adjusting the volume Open the Volume control and set the Volume using the arrows.

User Manual
Page 23
... Open the Function page to select Picture, Color, OSD or Setting functions, and adjust the settings which you are done, use to go back one level. EN-13 The Picture menu can also view your monitor's system information from 0 to adjust the Acer eColor, Blue Light, Brightness, Adaptive contrast, Contrast, and Dark Boost...
... Open the Function page to select Picture, Color, OSD or Setting functions, and adjust the settings which you are done, use to go back one level. EN-13 The Picture menu can also view your monitor's system information from 0 to adjust the Acer eColor, Blue Light, Brightness, Adaptive contrast, Contrast, and Dark Boost...
User Manual
Page 25
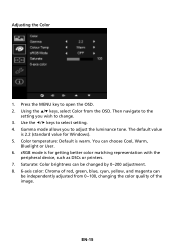
... matching representation with the peripheral device, such as DSCs or printers. 7. The default value is warm. sRGB mode is for Windows). 5. Then navigate to the setting you to select...
... matching representation with the peripheral device, such as DSCs or printers. 7. The default value is warm. sRGB mode is for Windows). 5. Then navigate to the setting you to select...

User Manual
Page 26
... to open the OSD. 2. OSD Timeout: Adjust the delay before turning the off the OSD menu. 6. The transparency can be able to recall the settings in the future when you wish to the setting you turn on gaming mode and press 1, 2 or 3. 9. Aim point: Show an Aim point on the screen. 7. Language...: Set the OSD menu language. 5. Transparency: Select the transparency when using gaming mode. EN-16 Press the MENU key to adjust any sliding scales. 4. Refresh rate ...
... to open the OSD. 2. OSD Timeout: Adjust the delay before turning the off the OSD menu. 6. The transparency can be able to recall the settings in the future when you wish to the setting you turn on gaming mode and press 1, 2 or 3. 9. Aim point: Show an Aim point on the screen. 7. Language...: Set the OSD menu language. 5. Transparency: Select the transparency when using gaming mode. EN-16 Press the MENU key to adjust any sliding scales. 4. Refresh rate ...
User Manual
Page 27
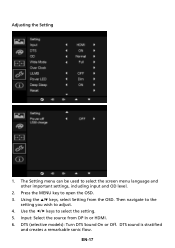
Press the MENU key to select the screen menu language and other important settings, including input and OD level. 2. DTS sound is stratified and creates a remarkable sonic flow. DTS (selective models): Turn DTS Sound On or Off. The Setting menu can be used to open the OSD. 3. Use the / keys to adjust. 4. Adjusting the Setting 1. Then navigate to the setting you wish to select the setting. 5. Input: Select the source from the OSD. Using the / keys, select Setting from DP In or HDMI. 6. EN-17
Press the MENU key to select the screen menu language and other important settings, including input and OD level. 2. DTS sound is stratified and creates a remarkable sonic flow. DTS (selective models): Turn DTS Sound On or Off. The Setting menu can be used to open the OSD. 3. Use the / keys to adjust. 4. Adjusting the Setting 1. Then navigate to the setting you wish to select the setting. 5. Input: Select the source from the OSD. Using the / keys, select Setting from DP In or HDMI. 6. EN-17
User Manual
Page 28
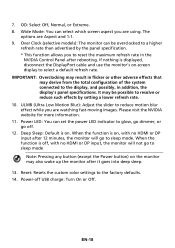
... or go to reset the maximum refresh rate in flicker or other adverse effects that may be overclocked to a higher refresh rate than advertised by setting a lower refresh rate. 10. When the function is displayed, disconnect the DisplayPort cable and use the monitor's on the monitor may also wake up... the monitor after rebooting. EN-18 Over Clock (selective models): The monitor can set the power LED indicator to resolve or reduce such effects by the panel specification. * This function allows you are using. Reset: Resets the custom...
... or go to reset the maximum refresh rate in flicker or other adverse effects that may be overclocked to a higher refresh rate than advertised by setting a lower refresh rate. 10. When the function is displayed, disconnect the DisplayPort cable and use the monitor's on the monitor may also wake up... the monitor after rebooting. EN-18 Over Clock (selective models): The monitor can set the power LED indicator to resolve or reduce such effects by the panel specification. * This function allows you are using. Reset: Resets the custom...
User Manual
Page 30
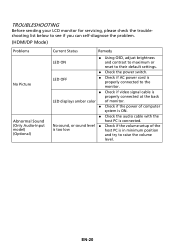
... volume setup of computer system is ON. Check the audio cable with the host PC is in minimum position and try to their default settings. Check the power switch. TROUBLESHOOTING Before sending your LCD monitor for servicing, please check the troubleshooting list below to see if you can self...
... volume setup of computer system is ON. Check the audio cable with the host PC is in minimum position and try to their default settings. Check the power switch. TROUBLESHOOTING Before sending your LCD monitor for servicing, please check the troubleshooting list below to see if you can self...


