

User Manual
Page 3
... pixel or a pixel lit all power cords from electronic devices. Keep this case, the screen is displayed for future reference. Turn off the power switch for a few hours. • Acer monitor is purposed for video and visual display of information obtained from the power supplies. Connecting/disconnecting the device Observe the following are turned off before connecting any cable or unplugging the power cord. • If the system has multiple sources of power, disconnect power...
... pixel or a pixel lit all power cords from electronic devices. Keep this case, the screen is displayed for future reference. Turn off the power switch for a few hours. • Acer monitor is purposed for video and visual display of information obtained from the power supplies. Connecting/disconnecting the device Observe the following are turned off before connecting any cable or unplugging the power cord. • If the system has multiple sources of power, disconnect power...

User Manual
Page 4
.... • Turn the volume down if you can't hear people speaking near or over a radiator or heat register, or in a built-in a fire or electric shock. iv Accessibility Be sure that the power outlet you plug the power cord into this product through cabinet slots as possible. When you need to rest on an unstable cart, stand or...
.... • Turn the volume down if you can't hear people speaking near or over a radiator or heat register, or in a built-in a fire or electric shock. iv Accessibility Be sure that the power outlet you plug the power cord into this product through cabinet slots as possible. When you need to rest on an unstable cart, stand or...
User Manual
Page 5
.../or injury. Do not insert the plug into the extension cord does not exceed the extension cord ampere rating. Note: The grounding pin also provides good protection from the wall outlet and refer servicing to replace the power cord set . If you to qualified service personnel. Unplug this product. • Use the product only with the supplied power supply cord set , make sure that is equipped with the...
.../or injury. Do not insert the plug into the extension cord does not exceed the extension cord ampere rating. Note: The grounding pin also provides good protection from the wall outlet and refer servicing to replace the power cord set . If you to qualified service personnel. Unplug this product. • Use the product only with the supplied power supply cord set , make sure that is equipped with the...

User Manual
Page 6
...best working procedures to environmental protection and views recycling, in fuel depots, storage and distribution areas; We at service stations. For more information and help when recycling, please go to turn off your device in damage and will often require extensive work by the operating instructions, since improper adjustment...small children. Switch off your vehicle engine. Keep them out of the reach of our other controls may contain small parts. chemical plants; They include below deck on the environment. IT Equipment Recycling Information Acer is strongly ...
...best working procedures to environmental protection and views recycling, in fuel depots, storage and distribution areas; We at service stations. For more information and help when recycling, please go to turn off your device in damage and will often require extensive work by the operating instructions, since improper adjustment...small children. Switch off your vehicle engine. Keep them out of the reach of our other controls may contain small parts. chemical plants; They include below deck on the environment. IT Equipment Recycling Information Acer is strongly ...

User Manual
Page 8
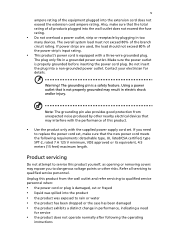
...use Computer users may complain of eyestrain and headaches after long hours of the monitor, using a footrest, or raising your leg muscles Incorrect computer usage may appear in one fixed posture • avoid slouching forward and/or leaning backward • stand up and walk around regularly to remove the strain on your sitting height to computer use... the risk of user inactivity. viii This product has been shipped enabled for power management: • Activate display's Sleep mode within 15 minutes of user inactivity. • Activate computer's Sleep mode within 30 minutes of...
...use Computer users may complain of eyestrain and headaches after long hours of the monitor, using a footrest, or raising your leg muscles Incorrect computer usage may appear in one fixed posture • avoid slouching forward and/or leaning backward • stand up and walk around regularly to remove the strain on your sitting height to computer use... the risk of user inactivity. viii This product has been shipped enabled for power management: • Activate display's Sleep mode within 15 minutes of user inactivity. • Activate computer's Sleep mode within 30 minutes of...

User Manual
Page 9
... as often as open windows, for extended periods of the display. • Adjust the display brightness and/or contrast to a comfortable level for enhanced text readability and graphics clarity. • Eliminate glare and reflections by: • placing your display in such a way that the side faces the window or any light source • minimizing room light by looking at bright light sources, such as possible...
... as often as open windows, for extended periods of the display. • Adjust the display brightness and/or contrast to a comfortable level for enhanced text readability and graphics clarity. • Eliminate glare and reflections by: • placing your display in such a way that the side faces the window or any light source • minimizing room light by looking at bright light sources, such as possible...

User Manual
Page 10
TABLE OF CONTENTS UNPACKING 1 ATTACHING / REMOVING THE BASE 2 SCREEN POSITION ADJUSTMENT 3 CONNECTING THE POWER CORD 5 SAFETY PRECAUTION 5 CLEANING YOUR MONITOR 5 POWER SAVING 6 DDC...6 CONNECTOR PIN ASSIGNMENT 7 Standard Timing Table 8 INSTALLATION 9 USER CONTROLS 10 TROUBLESHOOTING 20
TABLE OF CONTENTS UNPACKING 1 ATTACHING / REMOVING THE BASE 2 SCREEN POSITION ADJUSTMENT 3 CONNECTING THE POWER CORD 5 SAFETY PRECAUTION 5 CLEANING YOUR MONITOR 5 POWER SAVING 6 DDC...6 CONNECTOR PIN ASSIGNMENT 7 Standard Timing Table 8 INSTALLATION 9 USER CONTROLS 10 TROUBLESHOOTING 20

User Manual
Page 11
UNPACKING Please check the following items are present when you unpack the box, and save the packing materials in case you will need to ship or transport the monitor in future. LCD Monitor Quick Start Guide AC Power Cord HDMI Cable (Optional) DP Cable (Optional) USB Cable (Optional) EN-1
UNPACKING Please check the following items are present when you unpack the box, and save the packing materials in case you will need to ship or transport the monitor in future. LCD Monitor Quick Start Guide AC Power Cord HDMI Cable (Optional) DP Cable (Optional) USB Cable (Optional) EN-1

User Manual
Page 13
Only at the highest point can 35 degrees of recline be offered for the angle of elevation. -5° 35° • Height Adjustment After pressing the top of the monitor then you can adjust the height of the monitor. 1 1 2 150mm 2 130mm (for an example of the monitor. • Tilt Please see the illustration below for eye-tracking models) EN-3 SCREEN POSITION ADJUSTMENT In order to optimize the best viewing position, you can adjust the height/tilt of the tilt range.
Only at the highest point can 35 degrees of recline be offered for the angle of elevation. -5° 35° • Height Adjustment After pressing the top of the monitor then you can adjust the height of the monitor. 1 1 2 150mm 2 130mm (for an example of the monitor. • Tilt Please see the illustration below for eye-tracking models) EN-3 SCREEN POSITION ADJUSTMENT In order to optimize the best viewing position, you can adjust the height/tilt of the tilt range.
User Manual
Page 15
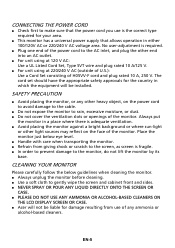
... LIQUID DIRECTLY ONTO THE SCREEN OR CASE. PLEASE DO NOT USE ANY AMMONIA OR ALCOHOL-BASED CLEANERS ON THE LCD DISPLAY SCREEN OR CASE. Acer will be liable for your area. This monitor has a universal power supply that the power cord you use of the power cord to the monitor, do not lift the monitor by its base. No user-adjustment is required. Plug one end of...
... LIQUID DIRECTLY ONTO THE SCREEN OR CASE. PLEASE DO NOT USE ANY AMMONIA OR ALCOHOL-BASED CLEANERS ON THE LCD DISPLAY SCREEN OR CASE. Acer will be liable for your area. This monitor has a universal power supply that the power cord you use of the power cord to the monitor, do not lift the monitor by its base. No user-adjustment is required. Plug one end of...

User Manual
Page 16
... its capabilities, for example, supported resolutions and corresponding timing. The recovery time from the display controller, as indicated by the control signal from Active OFF state back to Plug and Play with your system if your system also supports DDC protocol. The monitor supports DDC2B standard. State LED Light ON Blue Power Saving Mode Amber The power saving states will be kept until a control signal has been detected or the...
... its capabilities, for example, supported resolutions and corresponding timing. The recovery time from the display controller, as indicated by the control signal from Active OFF state back to Plug and Play with your system if your system also supports DDC protocol. The monitor supports DDC2B standard. State LED Light ON Blue Power Saving Mode Amber The power saving states will be kept until a control signal has been detected or the...

User Manual
Page 17
... TMDS Clock Shield TMDS Clock- CONNECTOR PIN ASSIGNMENT 19-Pin Color Display Signal Cable* PIN Meaning PIN 1. TMDS Data0 Shield 17. 9. Lane0(n) 4. Lane3(n) 10. CEC Reserved (N.C. Lane1(p) 5. Lane2(p) 8. on device) SCL SDA DDC/CEC Ground +5V Power Hot Plug Detect Description GND Lane3(n) Config1 ...Config2 AUX_CH (n) GND AUX_CH (p) Hot Plug Detect DP Power_Return DP Power TMDS Data1- 15. 7. TMDS Data2 Shield 11. 3. TMDS Data0- 18. 19. * only for certain models PIN 11. 12. 13...
... TMDS Clock Shield TMDS Clock- CONNECTOR PIN ASSIGNMENT 19-Pin Color Display Signal Cable* PIN Meaning PIN 1. TMDS Data0 Shield 17. 9. Lane0(n) 4. Lane3(n) 10. CEC Reserved (N.C. Lane1(p) 5. Lane2(p) 8. on device) SCL SDA DDC/CEC Ground +5V Power Hot Plug Detect Description GND Lane3(n) Config1 ...Config2 AUX_CH (n) GND AUX_CH (p) Hot Plug Detect DP Power_Return DP Power TMDS Data1- 15. 7. TMDS Data2 Shield 11. 3. TMDS Data0- 18. 19. * only for certain models PIN 11. 12. 13...
User Manual
Page 19
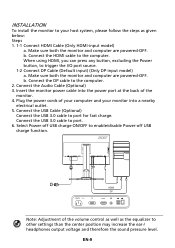
b. Connect the HDMI cable to trigger the I/O port source. 1-2 Connect DP Cable (Default input) (Only DP-input model) a. When using HDMI, you can press any button, excluding the Power button, to the computer. b. POWER HDMI DP DP HDMI Note: Adjustment of the monitor. 4. INSTALLATION To install the monitor to your monitor into the power port at the back of the volume control as well as given below: Steps 1. 1-1 Connect HDMI Cable (Only HDMI-input model) a. Connect the DP cable to port for fast charge. Connect the USB Cable (Optional) Connect the USB 3.0 cable to the...
b. Connect the HDMI cable to trigger the I/O port source. 1-2 Connect DP Cable (Default input) (Only DP-input model) a. When using HDMI, you can press any button, excluding the Power button, to the computer. b. POWER HDMI DP DP HDMI Note: Adjustment of the monitor. 4. INSTALLATION To install the monitor to your monitor into the power port at the back of the volume control as well as given below: Steps 1. 1-1 Connect HDMI Cable (Only HDMI-input model) a. Connect the DP cable to port for fast charge. Connect the USB Cable (Optional) Connect the USB 3.0 cable to the...
User Manual
Page 20
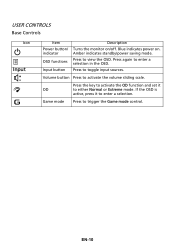
If the OSD is active, press it OD to either Normal or Extreme mode. EN-10 Press the key to activate the OD function and set it to view the OSD. Game mode Press to activate the volume sliding scale. Volume button Press to trigger the Game mode control. Press to enter a selection in the OSD. Amber indicates standby/power saving mode. Press again to toggle input sources. Blue indicates power on /off. USER CONTROLS Base Controls Icon Input Item Power button/ indicator OSD functions Input button Description Turns the monitor on . Press to enter a selection.
If the OSD is active, press it OD to either Normal or Extreme mode. EN-10 Press the key to activate the OD function and set it to view the OSD. Game mode Press to activate the volume sliding scale. Volume button Press to trigger the Game mode control. Press to enter a selection in the OSD. Amber indicates standby/power saving mode. Press again to toggle input sources. Blue indicates power on /off. USER CONTROLS Base Controls Icon Input Item Power button/ indicator OSD functions Input button Description Turns the monitor on . Press to enter a selection.
User Manual
Page 21
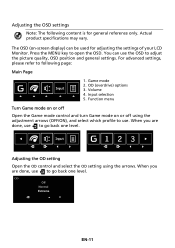
.... The OSD (on or off using the arrows. Input selection 5. Press the MENU key to following content is for adjusting the settings of your LCD Monitor. PE Off Normal Extreme EN-11 Function menu Turn Game mode on or off Open the Game mode control and turn Game mode on -screen display) can use to adjust the picture quality, OSD position and general settings. For advanced settings, please refer to open the OSD. Volume 4. When you are done, use .
.... The OSD (on or off using the arrows. Input selection 5. Press the MENU key to following content is for adjusting the settings of your LCD Monitor. PE Off Normal Extreme EN-11 Function menu Turn Game mode on or off Open the Game mode control and turn Game mode on -screen display) can use to adjust the picture quality, OSD position and general settings. For advanced settings, please refer to open the OSD. Volume 4. When you are done, use .

User Manual
Page 24
... of the dark color levels of lower local contrast to better detail in x-ray images, and to gain a higher contrast. This allows for areas of the display- EN-14 Blue Light: filter out blue light by close contrast values. The method is represented by adjusting different Blue Light showing ratio - 80%, 70%, 60%, 50%. 7. For the best protection, select a lower value. 8. Adaptive Contrast: This method usually...
... of the dark color levels of lower local contrast to better detail in x-ray images, and to gain a higher contrast. This allows for areas of the display- EN-14 Blue Light: filter out blue light by close contrast values. The method is represented by adjusting different Blue Light showing ratio - 80%, 70%, 60%, 50%. 7. For the best protection, select a lower value. 8. Adaptive Contrast: This method usually...

User Manual
Page 26
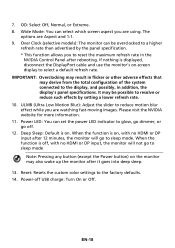
... the setting you wish to open the OSD. 2. OSD Timeout: Adjust the delay before turning the off the OSD menu. 6. When you have decided what settings suit you turn on gaming mode and press 1, 2 or 3. 9. Press the MENU key to change. 3. Using the / keys, select OSD from the OSD. The transparency can be able to adjust any sliding scales. 4. Refresh rate num: Display the panel's current refresh rate on the screen for...
... the setting you wish to open the OSD. 2. OSD Timeout: Adjust the delay before turning the off the OSD menu. 6. When you have decided what settings suit you turn on gaming mode and press 1, 2 or 3. 9. Press the MENU key to change. 3. Using the / keys, select OSD from the OSD. The transparency can be able to adjust any sliding scales. 4. Refresh rate num: Display the panel's current refresh rate on the screen for...
User Manual
Page 27
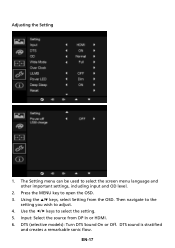
Then navigate to the setting you wish to select the screen menu language and other important settings, including input and OD level. 2. Adjusting the Setting 1. Input: Select the source from the OSD. The Setting menu can be used to adjust. 4. EN-17 Using the / keys, select Setting from DP In or HDMI. 6. DTS sound is stratified and creates a remarkable sonic flow. DTS (selective models): Turn DTS Sound On or Off. Press the MENU key to select the setting. 5. Use the / keys to open the OSD. 3.
Then navigate to the setting you wish to select the screen menu language and other important settings, including input and OD level. 2. Adjusting the Setting 1. Input: Select the source from the OSD. The Setting menu can be used to adjust. 4. EN-17 Using the / keys, select Setting from DP In or HDMI. 6. DTS sound is stratified and creates a remarkable sonic flow. DTS (selective models): Turn DTS Sound On or Off. Press the MENU key to select the setting. 5. Use the / keys to open the OSD. 3.
User Manual
Page 28
... Low Motion Blur): Adjust the slider to select a default refresh rate. When the function is displayed, disconnect the DisplayPort cable and use the monitor's on , with no HDMI or DP input after it goes into deep sleep. 13. Power-off , with no HDMI or DP input, the monitor will go to reset the maximum refresh rate in addition, the display's panel specifications. The options are using. Over Clock (selective models): The monitor can be possible...
... Low Motion Blur): Adjust the slider to select a default refresh rate. When the function is displayed, disconnect the DisplayPort cable and use the monitor's on , with no HDMI or DP input after it goes into deep sleep. 13. Power-off , with no HDMI or DP input, the monitor will go to reset the maximum refresh rate in addition, the display's panel specifications. The options are using. Over Clock (selective models): The monitor can be possible...
User Manual
Page 30
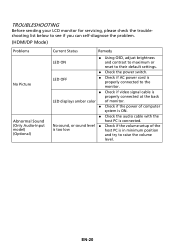
... LCD monitor for servicing, please check the troubleshooting list below to see if you can self-diagnose the problem. (HDMI/DP Mode) Problems No Picture Abnormal Sound (Only Audio-Input model) (Optional) Current Status Remedy LED ON Using OSD, adjust brightness and contrast to maximum or reset to raise the volume level. EN-20 LED OFF Check if AC power cord is properly connected to the monitor. Check if video signal cable is properly connected at the back LED displays amber color of monitor...
... LCD monitor for servicing, please check the troubleshooting list below to see if you can self-diagnose the problem. (HDMI/DP Mode) Problems No Picture Abnormal Sound (Only Audio-Input model) (Optional) Current Status Remedy LED ON Using OSD, adjust brightness and contrast to maximum or reset to raise the volume level. EN-20 LED OFF Check if AC power cord is properly connected to the monitor. Check if video signal cable is properly connected at the back LED displays amber color of monitor...


