User Manual
Page 4
... increase it after your dealer or local power company. • Do not allow anything to protect it clearly and comfortably and without distortion. • After setting the volume level, do not place the product on the power cord. The openings should be sure to block out noisy surroundings. • Turn the...
... increase it after your dealer or local power company. • Do not allow anything to protect it clearly and comfortably and without distortion. • After setting the volume level, do not place the product on the power cord. The openings should be sure to block out noisy surroundings. • Turn the...
User Manual
Page 5
... rating. • This product's power cord is equipped with the performance of the branch circuit rating. If you to replace the power cord set . Make sure the power outlet is a safety feature. Refer all products plugged into the extension cord does not exceed the extension cord ampere ...8226; liquid was spilled into a non-grounded power outlet. Unplug this product. • Use the product only with the supplied power supply cord set , make sure that may result in a grounded power outlet. The overall system load must not exceed 80% of this product from unexpected noise ...
... rating. • This product's power cord is equipped with the performance of the branch circuit rating. If you to replace the power cord set . Make sure the power outlet is a safety feature. Refer all products plugged into the extension cord does not exceed the extension cord ampere ...8226; liquid was spilled into a non-grounded power outlet. Unplug this product. • Use the product only with the supplied power supply cord set , make sure that may result in a grounded power outlet. The overall system load must not exceed 80% of this product from unexpected noise ...
User Manual
Page 10
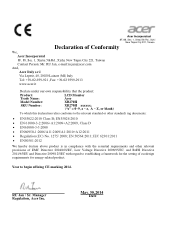
...Lainate (MI) Italy Tel: +39-02-939-921 ,Fax: +39-02 9399-2913 www.acer.it Declare under our own responsibility that the product: Product: LCD Monitor Trade Name: Acer Model Number: XB270H SKU Number: XB270H xxxxxx; ("x" = 0~9, a ~ z, A ~ Z, or blank) To which this declaration... refers conforms to the relevant standard or other relevant provisions of ecodesign requirements for the setting of EMC Directive 2004/108/EC, ...
...Lainate (MI) Italy Tel: +39-02-939-921 ,Fax: +39-02 9399-2913 www.acer.it Declare under our own responsibility that the product: Product: LCD Monitor Trade Name: Acer Model Number: XB270H SKU Number: XB270H xxxxxx; ("x" = 0~9, a ~ z, A ~ Z, or blank) To which this declaration... refers conforms to the relevant standard or other relevant provisions of ecodesign requirements for the setting of EMC Directive 2004/108/EC, ...
User Manual
Page 12
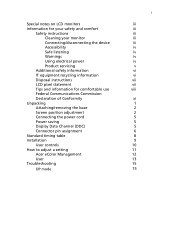
... Screen position adjustment Connecting the power cord Power saving Display Data Channel (DDC) Connector pin assignment Standard timing table Installation User controls How to adjust a setting Acer eColor Management User Troubleshooting DP mode 1 iii iii iii iii iii iv iv iv iv v vi vi vii vii viii xi 1 2 2 5 5 5 6 8 9 10 11 12 13...
... Screen position adjustment Connecting the power cord Power saving Display Data Channel (DDC) Connector pin assignment Standard timing table Installation User controls How to adjust a setting Acer eColor Management User Troubleshooting DP mode 1 iii iii iii iii iii iv iv iv iv v vi vi vii vii viii xi 1 2 2 5 5 5 6 8 9 10 11 12 13...
User Manual
Page 17
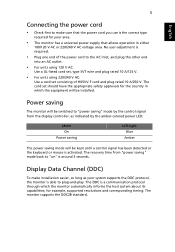
... saving" mode by the control signal from "power saving" mode back to "on" is a communication protocol through which the equipment will be installed. The cord set consisting of the power cord to the AC inlet, and plug the other end into an AC outlet. • For units using 120 V AC: Use... a UL-listed cord set, type SVT wire and plug rated 10 A/125 V. • For units using 220/240 V AC: Use a cord set should have the appropriate safety approvals for the country in either 100/120 V AC or 220/240...
... saving" mode by the control signal from "power saving" mode back to "on" is a communication protocol through which the equipment will be installed. The cord set consisting of the power cord to the AC inlet, and plug the other end into an AC outlet. • For units using 120 V AC: Use... a UL-listed cord set, type SVT wire and plug rated 10 A/125 V. • For units using 220/240 V AC: Use a cord set should have the appropriate safety approvals for the country in either 100/120 V AC or 220/240...
User Manual
Page 21
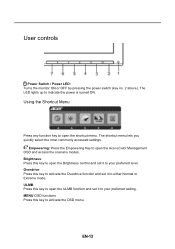
.... 2 above). Overdrive: Press this key to open the Brightness control and set it to either Normal or Extreme mode. MENU OSD functions Press this key to open the ULMB function and set it to open the Acer eColor Management OSD and access the scenario modes. Using the Shortcut Menu Press any... function key to your preferred setting. ULMB: Press this key to activate the Overdrive function and set it to open the shortcut menu. EN...
.... 2 above). Overdrive: Press this key to open the Brightness control and set it to either Normal or Extreme mode. MENU OSD functions Press this key to open the ULMB function and set it to open the Acer eColor Management OSD and access the scenario modes. Using the Shortcut Menu Press any... function key to your preferred setting. ULMB: Press this key to activate the Overdrive function and set it to open the shortcut menu. EN...

User Manual
Page 22
... • Operation instructions 1 Press the " " Key to open the Acer eColor Management OSD and access the scenario modes. 2 Press " " or " " to select a mode. 3 Press the "Auto" Key to suit any situation. Settings can be fine-tuned to confirm the mode and exit the eColor menu. • Features and benefits Main menu icon... great visuals, even in vibrant colors with sharp detail. Reflects native display capability Enhances colors and emphasizes fine detail. EN-14 N/A ECO mode Adjusts the settings to reduce power consumption. N/A Standard mode Default...
... • Operation instructions 1 Press the " " Key to open the Acer eColor Management OSD and access the scenario modes. 2 Press " " or " " to select a mode. 3 Press the "Auto" Key to suit any situation. Settings can be fine-tuned to confirm the mode and exit the eColor menu. • Features and benefits Main menu icon... great visuals, even in vibrant colors with sharp detail. Reflects native display capability Enhances colors and emphasizes fine detail. EN-14 N/A ECO mode Adjusts the settings to reduce power consumption. N/A Standard mode Default...

User Manual
Page 23
...refer to go back one level. Adjusting the Overdrive setting Open the Overdrive control and select the overdrive setting using the adjustment arrows. When you are done, use the OSD to adjust picture quality, OSD position and general settings. Actual product specifications may vary. Press any MENU key... to go back one level. EN-15 When you are done, use Exit to open the OSD. Adjusting the OSD settings Note: The following pages: Adjusting Brightness Open the Brightness control and adjust the brightness level using the adjustment arrows. The on-screen display ...
...refer to go back one level. Adjusting the Overdrive setting Open the Overdrive control and select the overdrive setting using the adjustment arrows. When you are done, use the OSD to adjust picture quality, OSD position and general settings. Actual product specifications may vary. Press any MENU key... to go back one level. EN-15 When you are done, use Exit to open the OSD. Adjusting the OSD settings Note: The following pages: Adjusting Brightness Open the Brightness control and adjust the brightness level using the adjustment arrows. The on-screen display ...

User Manual
Page 24
Adjusting picture quality 1 Press any MENU key to bring up the OSD. 2 Using the / keys, select setting you want to adjust Color settings, Brightness, Contrast, the Gamma setting and Color Temperature. EN-16 Picture from the OSD then navigate to the 3 Use the / keys to adjust the setting. 4 You can use the Picture menu to adjust.
Adjusting picture quality 1 Press any MENU key to bring up the OSD. 2 Using the / keys, select setting you want to adjust Color settings, Brightness, Contrast, the Gamma setting and Color Temperature. EN-16 Picture from the OSD then navigate to the 3 Use the / keys to adjust the setting. 4 You can use the Picture menu to adjust.

User Manual
Page 25
Adjusting OSD settings 1 Press any MENU key to bring up the OSD. 2 Using the directional keys, select want to the setting you EN-17 OSD then navigate to adjust.
Adjusting OSD settings 1 Press any MENU key to bring up the OSD. 2 Using the directional keys, select want to the setting you EN-17 OSD then navigate to adjust.

User Manual
Page 26
EN-18 Adjusting miscellaneous settings 1 Press any MENU key to bring up the OSD. 2 Using the / keys, select setting you want to enable or disable the Power-off USB charging function. Setting from the OSD, then navigate to the 3 The Setting menu can be used to adjust the screen Menu Language and other important settings including Input, Overdrive level, ULMB and Refresh Rate. 4 Select Power-off USB charge ON/OFF to adjust.
EN-18 Adjusting miscellaneous settings 1 Press any MENU key to bring up the OSD. 2 Using the / keys, select setting you want to enable or disable the Power-off USB charging function. Setting from the OSD, then navigate to the 3 The Setting menu can be used to adjust the screen Menu Language and other important settings including Input, Overdrive level, ULMB and Refresh Rate. 4 Select Power-off USB charge ON/OFF to adjust.
User Manual
Page 28
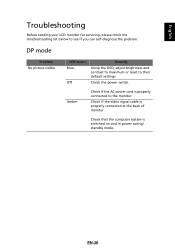
Check if the video signal cable is properly connected to the monitor. Amber Check if the AC power cord is properly connected at the back of monitor. Check that the computer system is switched on and in power saving/ standby mode. EN-20 DP mode Problem No picture visible LED status Blue Off Remedy Using the OSD, adjust brightness and contrast to maximum or reset to see if you can self-diagnose the problem. English Troubleshooting Before sending your LCD monitor for servicing, please check the troubleshooting list below to their default settings. Check the power switch.
Check if the video signal cable is properly connected to the monitor. Amber Check if the AC power cord is properly connected at the back of monitor. Check that the computer system is switched on and in power saving/ standby mode. EN-20 DP mode Problem No picture visible LED status Blue Off Remedy Using the OSD, adjust brightness and contrast to maximum or reset to see if you can self-diagnose the problem. English Troubleshooting Before sending your LCD monitor for servicing, please check the troubleshooting list below to their default settings. Check the power switch.


