User Manual
Page 2
... company makes no representations or warranties, either expressed or implied, with respect to the contents hereof and specifically disclaims the implied warranties of merchantability or fitness for identification purposes only and belong to notify any person of Acer Incorporated. Acer LCD Monitor User's Guide Original Issue: 04 /2014 Changes may be incorporated in the space provided below. Record the model number, serial number...
... company makes no representations or warranties, either expressed or implied, with respect to the contents hereof and specifically disclaims the implied warranties of merchantability or fitness for identification purposes only and belong to notify any person of Acer Incorporated. Acer LCD Monitor User's Guide Original Issue: 04 /2014 Changes may be incorporated in the space provided below. Record the model number, serial number...
User Manual
Page 3
... use . Cleaning your monitor Please carefully follow these guidelines when cleaning the monitor: • Always unplug the monitor before connecting any cable or unplugging the power cord. • If the system has multiple sources of power, disconnect power from the system by changing the image or turning off the power switch for your safety and comfort Safety instructions Read these instructions carefully. Information for a few hours. Keep this case, the screen is displayed...
... use . Cleaning your monitor Please carefully follow these guidelines when cleaning the monitor: • Always unplug the monitor before connecting any cable or unplugging the power cord. • If the system has multiple sources of power, disconnect power from the system by changing the image or turning off the power switch for your safety and comfort Safety instructions Read these instructions carefully. Information for a few hours. Keep this case, the screen is displayed...
User Manual
Page 4
... on an unstable cart, stand or table. Using electrical power • This product should be blocked or covered. If you plug the power cord into this product through cabinet slots as possible. Safe listening To protect your dealer or local power company. • Do not allow anything to block out noisy surroundings. • Turn the volume down if you can...
... on an unstable cart, stand or table. Using electrical power • This product should be blocked or covered. If you plug the power cord into this product through cabinet slots as possible. Safe listening To protect your dealer or local power company. • Do not allow anything to block out noisy surroundings. • Turn the volume down if you can...
User Manual
Page 5
... load should not exceed 80% of the power strip's input rating. • This product's power cord is damaged, cut or frayed • liquid was exposed to qualified service personnel when: • the power cord or plug is equipped with the supplied power supply cord set , make sure that the new power cord meets the following the operating instructions Using a power outlet that may interfere with the performance of this product...
... load should not exceed 80% of the power strip's input rating. • This product's power cord is damaged, cut or frayed • liquid was exposed to qualified service personnel when: • the power cord or plug is equipped with the supplied power supply cord set , make sure that the new power cord meets the following the operating instructions Using a power outlet that may interfere with the performance of this product...

User Manual
Page 6
...help when recycling, please go to environmental protection and views recycling, in the form of salvaging and disposal of used equipment, as grain, dust or metal powders. Potentially explosive atmospheres include areas where you would normally be advised to turn off your device in damage and will often require extensive work...distribution areas; acer-group .com for further information on the use of radio equipment in minimizing the burden placed on the environment. vi Note: Adjust only those controls that are covered by the operating instructions, since improper adjustment of other ...
...help when recycling, please go to environmental protection and views recycling, in the form of salvaging and disposal of used equipment, as grain, dust or metal powders. Potentially explosive atmospheres include areas where you would normally be advised to turn off your device in damage and will often require extensive work...distribution areas; acer-group .com for further information on the use of radio equipment in minimizing the burden placed on the environment. vi Note: Adjust only those controls that are covered by the operating instructions, since improper adjustment of other ...

User Manual
Page 7
... http://www.acer‐group.com/public/Sustainability LCD pixel statement The LCD unit is produced with glossy bezels the user should consider the placement of the global environment, please recycle. To minimize pollution and ensure utmost protection of the display as the bezel may occasionally misfire or appear as black or red dots. For displays with high-precision...
... http://www.acer‐group.com/public/Sustainability LCD pixel statement The LCD unit is produced with glossy bezels the user should consider the placement of the global environment, please recycle. To minimize pollution and ensure utmost protection of the display as the bezel may occasionally misfire or appear as black or red dots. For displays with high-precision...

User Manual
Page 8
... from Sleep mode by adjusting the viewing angle of the monitor, using a footrest, or raising your company's health and safety department. Long work periods, bad posture, poor work habits, stress, inadequate working in front of physical injury. Finding your comfort zone Find your comfort zone by pushing the power button. viii This product has been shipped enabled for power management: • Activate display's Sleep mode...
... from Sleep mode by adjusting the viewing angle of the monitor, using a footrest, or raising your company's health and safety department. Long work periods, bad posture, poor work habits, stress, inadequate working in front of physical injury. Finding your comfort zone Find your comfort zone by pushing the power button. viii This product has been shipped enabled for power management: • Activate display's Sleep mode...

User Manual
Page 9
...; using a task light • changing the display's viewing angle • using a glare-reduction filter • using a display visor, such as a piece of cardboard extended from the display's top front edge • Avoid adjusting your eyes from the monitor and focusing on how to make your eyes. The following work habits Develop the following sections provide suggestions on a distant point. • Blink frequently to keep your display...
...; using a task light • changing the display's viewing angle • using a glare-reduction filter • using a display visor, such as a piece of cardboard extended from the display's top front edge • Avoid adjusting your eyes from the monitor and focusing on how to make your eyes. The following work habits Develop the following sections provide suggestions on a distant point. • Blink frequently to keep your display...
User Manual
Page 12
... Safety instructions Cleaning your monitor Connecting/disconnecting the device Accessibility Safe listening Warnings Using electrical power Product servicing Additional safety information IT equipment recycling information Disposal instructions LCD pixel statement Tips and information for comfortable use Federal Communications Commission Declaration of Conformity Unpacking Attaching/removing the base Screen position adjustment Connecting the power cord Power saving Display Data Channel (DDC) Connector pin assignment Standard timing table Installation User controls How to adjust a setting Acer...
... Safety instructions Cleaning your monitor Connecting/disconnecting the device Accessibility Safe listening Warnings Using electrical power Product servicing Additional safety information IT equipment recycling information Disposal instructions LCD pixel statement Tips and information for comfortable use Federal Communications Commission Declaration of Conformity Unpacking Attaching/removing the base Screen position adjustment Connecting the power cord Power saving Display Data Channel (DDC) Connector pin assignment Standard timing table Installation User controls How to adjust a setting Acer...

User Manual
Page 13
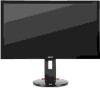
LCD monitor Quick start guide DP cable (Option) USB cable (Option) AC power cord English 1 Unpacking Please check that the following items are present when you unpack the box, and save the packing materials in case you need to ship or transport the monitor in the future.
LCD monitor Quick start guide DP cable (Option) USB cable (Option) AC power cord English 1 Unpacking Please check that the following items are present when you unpack the box, and save the packing materials in case you need to ship or transport the monitor in the future.

User Manual
Page 14
Remove: Reverse the steps to remove the base. English 2 ATTACHING/REMOVING THE BASE Install: Align the base with the stand and push the base towards the top of the monitor, and then rotate the base clockwise. Tighten the screw clockwise.
Remove: Reverse the steps to remove the base. English 2 ATTACHING/REMOVING THE BASE Install: Align the base with the stand and push the base towards the top of the monitor, and then rotate the base clockwise. Tighten the screw clockwise.

User Manual
Page 15
English 3 SCREEN POSITION ADJUSTMENT In oder to optimize the best viewing position, you can adjust the height/tilt/ swivel/pivot of the monitor. • Height Adjustment After pressing the top of the monitor then you can 35 degrees of recline be offered for an example of elevation. 5o 35o Only at the highest point can adjust the height of the monitor. 1 2 150mm • Tilt Please see the illustration below for the angle of the tilt range.
English 3 SCREEN POSITION ADJUSTMENT In oder to optimize the best viewing position, you can adjust the height/tilt/ swivel/pivot of the monitor. • Height Adjustment After pressing the top of the monitor then you can 35 degrees of recline be offered for an example of elevation. 5o 35o Only at the highest point can adjust the height of the monitor. 1 2 150mm • Tilt Please see the illustration below for the angle of the tilt range.
User Manual
Page 17
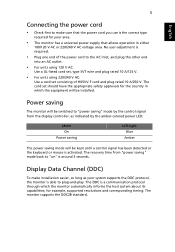
... "power saving" mode by the amber-colored power LED. 5 English Connecting the power cord • Check first to make installation easier, so long as indicated by the control signal from the display controller, as your area. • The monitor has a universal power supply that allows operation in which the monitor automatically informs the host system about its capabilities; The DDC is activated. for example, supported resolutions and corresponding timing. No user-adjustment is required. • Plug...
... "power saving" mode by the amber-colored power LED. 5 English Connecting the power cord • Check first to make installation easier, so long as indicated by the control signal from the display controller, as your area. • The monitor has a universal power supply that allows operation in which the monitor automatically informs the host system about its capabilities; The DDC is activated. for example, supported resolutions and corresponding timing. No user-adjustment is required. • Plug...
User Manual
Page 20
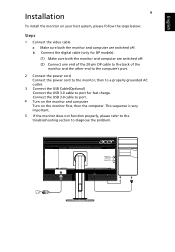
... the other end to the computer's port. 2 Connect the power cord Connect the power cord to the monitor, then to a properly grounded AC outlet. 3 Connect the USB Cable(Optional) Connect the USB 3.0 cable to diagnose the problem. USB3.0 port -supporting fast charge USB3.0 port USB USB English Installation 9 To install the monitor on the monitor first, then the computer. b Connect the digital cable (only for DP models). (1) Make sure both the monitor and computer are switched off . This sequence is very important...
... the other end to the computer's port. 2 Connect the power cord Connect the power cord to the monitor, then to a properly grounded AC outlet. 3 Connect the USB Cable(Optional) Connect the USB 3.0 cable to diagnose the problem. USB3.0 port -supporting fast charge USB3.0 port USB USB English Installation 9 To install the monitor on the monitor first, then the computer. b Connect the digital cable (only for DP models). (1) Make sure both the monitor and computer are switched off . This sequence is very important...
User Manual
Page 21
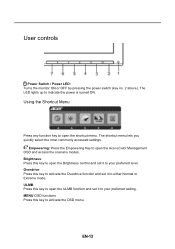
... scenario modes. EN-13 Brightness: Press this key to open the Brightness control and set it to your preferred level. MENU OSD functions Press this key to activate the Overdrive function and set it to either Normal or Extreme mode. User controls Power Switch / Power LED: Turns the monitor ON or OFF by pressing the power switch (key no. 2 above). The LED lights up to activate the OSD menu. The shortcut menu lets you quickly select...
... scenario modes. EN-13 Brightness: Press this key to open the Brightness control and set it to your preferred level. MENU OSD functions Press this key to activate the Overdrive function and set it to either Normal or Extreme mode. User controls Power Switch / Power LED: Turns the monitor ON or OFF by pressing the power switch (key no. 2 above). The LED lights up to activate the OSD menu. The shortcut menu lets you quickly select...

User Manual
Page 22
... settings to suit any situation. Settings can be fine-tuned to reduce power consumption. EN-14 N/A Graphic mode Pictures and photographs appear in vibrant colors with sharp detail. Reflects native display capability Enhances colors and emphasizes fine detail. Acer eColor Management • Operation instructions 1 Press the " " Key to open the Acer eColor Management OSD and access the scenario modes. 2 Press " " or " " to select a mode. 3 Press the "Auto...
... settings to suit any situation. Settings can be fine-tuned to reduce power consumption. EN-14 N/A Graphic mode Pictures and photographs appear in vibrant colors with sharp detail. Reflects native display capability Enhances colors and emphasizes fine detail. Acer eColor Management • Operation instructions 1 Press the " " Key to open the Acer eColor Management OSD and access the scenario modes. 2 Press " " or " " to select a mode. 3 Press the "Auto...

User Manual
Page 23
... MENU key to go back one level. Adjusting the OSD settings Note: The following pages: Adjusting Brightness Open the Brightness control and adjust the brightness level using the adjustment arrows. Actual product specifications may vary. Adjusting the Overdrive setting Open the Overdrive control and select the overdrive setting using the adjustment arrows. For advanced settings, please refer to following content is for adjusting the settings of your LCD Monitor. When you are done, use Exit to adjust picture quality, OSD position...
... MENU key to go back one level. Adjusting the OSD settings Note: The following pages: Adjusting Brightness Open the Brightness control and adjust the brightness level using the adjustment arrows. Actual product specifications may vary. Adjusting the Overdrive setting Open the Overdrive control and select the overdrive setting using the adjustment arrows. For advanced settings, please refer to following content is for adjusting the settings of your LCD Monitor. When you are done, use Exit to adjust picture quality, OSD position...

User Manual
Page 24
Picture from the OSD then navigate to the 3 Use the / keys to adjust the setting. 4 You can use the Picture menu to adjust. EN-16 Adjusting picture quality 1 Press any MENU key to bring up the OSD. 2 Using the / keys, select setting you want to adjust Color settings, Brightness, Contrast, the Gamma setting and Color Temperature.
Picture from the OSD then navigate to the 3 Use the / keys to adjust the setting. 4 You can use the Picture menu to adjust. EN-16 Adjusting picture quality 1 Press any MENU key to bring up the OSD. 2 Using the / keys, select setting you want to adjust Color settings, Brightness, Contrast, the Gamma setting and Color Temperature.

User Manual
Page 26
Adjusting miscellaneous settings 1 Press any MENU key to bring up the OSD. 2 Using the / keys, select setting you want to enable or disable the Power-off USB charging function. EN-18 Setting from the OSD, then navigate to the 3 The Setting menu can be used to adjust the screen Menu Language and other important settings including Input, Overdrive level, ULMB and Refresh Rate. 4 Select Power-off USB charge ON/OFF to adjust.
Adjusting miscellaneous settings 1 Press any MENU key to bring up the OSD. 2 Using the / keys, select setting you want to enable or disable the Power-off USB charging function. EN-18 Setting from the OSD, then navigate to the 3 The Setting menu can be used to adjust the screen Menu Language and other important settings including Input, Overdrive level, ULMB and Refresh Rate. 4 Select Power-off USB charge ON/OFF to adjust.
User Manual
Page 28
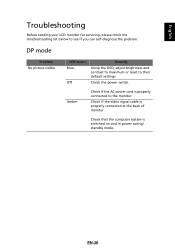
Check that the computer system is properly connected at the back of monitor. Check the power switch. Check if the video signal cable is switched on and in power saving/ standby mode. Amber Check if the AC power cord is properly connected to their default settings. DP mode Problem No picture visible LED status Blue Off Remedy Using the OSD, adjust brightness and contrast to maximum or reset to the monitor. EN-20 English Troubleshooting Before sending your LCD monitor for servicing, please check the troubleshooting list below to see if you can self-diagnose the problem.
Check that the computer system is properly connected at the back of monitor. Check the power switch. Check if the video signal cable is switched on and in power saving/ standby mode. Amber Check if the AC power cord is properly connected to their default settings. DP mode Problem No picture visible LED status Blue Off Remedy Using the OSD, adjust brightness and contrast to maximum or reset to the monitor. EN-20 English Troubleshooting Before sending your LCD monitor for servicing, please check the troubleshooting list below to see if you can self-diagnose the problem.

