
User Guide
Page 1
TABLE OF CONTENTS SPECIAL NOTES ON LCD MONITORS 1 INFORMATION FOR YOUR SAFETY AND COMFORT 2 UNPACKING 5 ATTACHING / REMOVING THE BASE 6 SCREEN POSITION ADJUSTMENT 6 WALL MOUNTING (OPTIONAL 7 CONNECTING THE POWER CORD 8 SAFETY PRECAUTION 8 CLEANING YOUR MONITOR 8 POWER SAVING 9 DDC ...9 CONNECTOR PIN ASSIGNMENT 10 STANDARD TIMING TABLE 12 INSTALLATION 13 USER CONTROLS 14 HOW TO ADJUST A SETTING 15 TROUBLESHOOTING 19
TABLE OF CONTENTS SPECIAL NOTES ON LCD MONITORS 1 INFORMATION FOR YOUR SAFETY AND COMFORT 2 UNPACKING 5 ATTACHING / REMOVING THE BASE 6 SCREEN POSITION ADJUSTMENT 6 WALL MOUNTING (OPTIONAL 7 CONNECTING THE POWER CORD 8 SAFETY PRECAUTION 8 CLEANING YOUR MONITOR 8 POWER SAVING 9 DDC ...9 CONNECTOR PIN ASSIGNMENT 10 STANDARD TIMING TABLE 12 INSTALLATION 13 USER CONTROLS 14 HOW TO ADJUST A SETTING 15 TROUBLESHOOTING 19
User Guide
Page 2
... as a missing pixel or a pixel lit all of 99.99% or more. It may find slightly uneven brightness on the screen depending on again to the nature of the LCD screen, an afterimage of the fluorescent light, the screen may remain after switching the image, when the same image is recovered slowly by changing the image or turning off the Power Switch and then turn it on...
... as a missing pixel or a pixel lit all of 99.99% or more. It may find slightly uneven brightness on the screen depending on again to the nature of the LCD screen, an afterimage of the fluorescent light, the screen may remain after switching the image, when the same image is recovered slowly by changing the image or turning off the Power Switch and then turn it on...

User Guide
Page 3
... following guidelines when connecting and disconnecting power to the power supply unit: Install the power supply unit before removing the power supply unit from the system by unplugging all warnings and instructions marked on a vibrating surface. y To avoid damage of the product and to prevent battery leakage, do not increase it after your hearing. y Turn the volume down if you plug the power cord into is...
... following guidelines when connecting and disconnecting power to the power supply unit: Install the power supply unit before removing the power supply unit from the system by unplugging all warnings and instructions marked on a vibrating surface. y To avoid damage of the product and to prevent battery leakage, do not increase it after your hearing. y Turn the volume down if you plug the power cord into is...

User Guide
Page 4
... the wall outlet and refer servicing to qualified service personnel when: y the power cord or plug is produced with high-precision manufacturing techniques. X263W Product servicing Do not attempt to service this product from staying too long in one fixed posture y avoid slouching forward and/or leaning backward y stand up and walk around regularly to remove the strain on the recorded image...
... the wall outlet and refer servicing to qualified service personnel when: y the power cord or plug is produced with high-precision manufacturing techniques. X263W Product servicing Do not attempt to service this product from staying too long in one fixed posture y avoid slouching forward and/or leaning backward y stand up and walk around regularly to remove the strain on the recorded image...

User Guide
Page 5
... maintain a healthy body. Blink frequently to reduce eyestrain. Give your eyes regular breaks by using drapes, shades or blinds Š using a task light Š changing the display's viewing angle Š using a glare-reduction filter Š using the product on how to keep your computer use more information and help in such a way that the side faces the window or any light source Š minimizing room...
... maintain a healthy body. Blink frequently to reduce eyestrain. Give your eyes regular breaks by using drapes, shades or blinds Š using a task light Š changing the display's viewing angle Š using a glare-reduction filter Š using the product on how to keep your computer use more information and help in such a way that the side faces the window or any light source Š minimizing room...
User Guide
Page 6
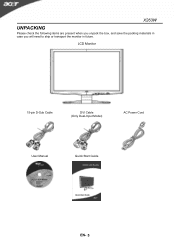
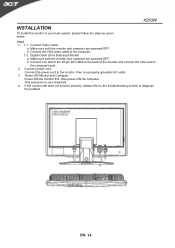
X263W UNPACKING Please check the following items are present when you unpack the box, and save the packing materials in case you will need to ship or transport the monitor in future. LCD Monitor 15-pin D-Sub Cable DVI Cable (Only Dual-Input Model) AC Power Cord User Manual Quick Start Guide EN- 5
X263W UNPACKING Please check the following items are present when you unpack the box, and save the packing materials in case you will need to ship or transport the monitor in future. LCD Monitor 15-pin D-Sub Cable DVI Cable (Only Dual-Input Model) AC Power Cord User Manual Quick Start Guide EN- 5

User Guide
Page 7
EN- 6 The monitor can adjust the tilt of the monitor by arrow below . X263W ATTACHING / REMOVING THE BASE Install: Align the release button on the bottom of the monitor with the corresponding slots on the bottom of the monitor as shown in the figure below . SCREEN POSITION ADJUSTMENT In order to optimize the best viewing position, you can be adjusted to 15 degrees up or 5 degrees down as indicated by using both of your hands to hold the edges of the base.
EN- 6 The monitor can adjust the tilt of the monitor by arrow below . X263W ATTACHING / REMOVING THE BASE Install: Align the release button on the bottom of the monitor with the corresponding slots on the bottom of the monitor as shown in the figure below . SCREEN POSITION ADJUSTMENT In order to optimize the best viewing position, you can be adjusted to 15 degrees up or 5 degrees down as indicated by using both of your hands to hold the edges of the base.
User Guide
Page 9
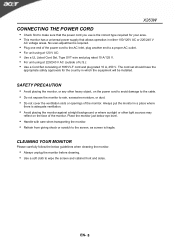
... U.S.): y Use a Cord Set consisting of the monitor. y Do not expose the monitor to the cable. Place the monitor just below guidelines when cleaning the monitor. SAFETY PRECAUTION y Avoid placing the monitor, or any other light sources may reflect on the power cord to avoid damage to rain, excessive moisture, or dust. y Do not cover the ventilation slots or openings of the power cord to the AC Inlet, plug another...
... U.S.): y Use a Cord Set consisting of the monitor. y Do not expose the monitor to the cable. Place the monitor just below guidelines when cleaning the monitor. SAFETY PRECAUTION y Avoid placing the monitor, or any other light sources may reflect on the power cord to avoid damage to rain, excessive moisture, or dust. y Do not cover the ventilation slots or openings of the power cord to the AC Inlet, plug another...

User Guide
Page 10
... the display controller, as indicated by the control signal from Active OFF state back to Plug and Play with your system if your installation easier, the monitor is activated. The DDC (Display Data Channel) is around 5 seconds. DDC To make your system also supports DDC protocol. The monitor supports DDC2B standard. EN- 9 State ON Power Saving Mode LED Light Blue Amber The power saving states will be kept until a control signal has...
... the display controller, as indicated by the control signal from Active OFF state back to Plug and Play with your system if your installation easier, the monitor is activated. The DDC (Display Data Channel) is around 5 seconds. DDC To make your system also supports DDC protocol. The monitor supports DDC2B standard. EN- 9 State ON Power Saving Mode LED Light Blue Amber The power saving states will be kept until a control signal has...

User Guide
Page 11
DESCRIPTION +5V Logic Ground Monitor Ground DDC-Serial Data H-Sync V-Sync DDC-Serial Clock EN- 10 CONNECTOR PIN ASSIGNMENT X263W PIN NO. 1. 2. 3. 4. 5. 6. 7. 8. 15-Pin Color Display Signal Cable DESCRIPTION Red Green Blue Monitor Ground DDC-return R-Ground G-Ground B-Ground PIN NO. 9. 10. 11. 12. 13. 14. 15.
DESCRIPTION +5V Logic Ground Monitor Ground DDC-Serial Data H-Sync V-Sync DDC-Serial Clock EN- 10 CONNECTOR PIN ASSIGNMENT X263W PIN NO. 1. 2. 3. 4. 5. 6. 7. 8. 15-Pin Color Display Signal Cable DESCRIPTION Red Green Blue Monitor Ground DDC-return R-Ground G-Ground B-Ground PIN NO. 9. 10. 11. 12. 13. 14. 15.

User Guide
Page 12
X263W 24-Pin Color Display Signal Cable PIN Meaning 1. TMDS Data4+ 6. TMDS Data3+ 14. +5V Power 15. Hot Plug Detect 17. TMDS Data0+ 7. TMDS Data 0/5 8. TMDS Data1+ 22. 11. TMDS Data5TMDS Data5+ TMDS Clock Shield TMDS Clock+ DDC TMDS Clock- EN- 11 TMDS Data2- 2. TMDS Data4- 5. TMDS Data 1/3 Shield 23. 12. TMDS Data3- 24. TMDS Data 2/4 Shield 4. TMDS Data0- 18. Analogue Vertical Sync 20. 9. DDC Clock PIN Meaning 13. GND(return for +5V hsync.vsync) 16. DDC Data 19. TMDS Data2+ 3. TMDS Data1- 21. 10.
X263W 24-Pin Color Display Signal Cable PIN Meaning 1. TMDS Data4+ 6. TMDS Data3+ 14. +5V Power 15. Hot Plug Detect 17. TMDS Data0+ 7. TMDS Data 0/5 8. TMDS Data1+ 22. 11. TMDS Data5TMDS Data5+ TMDS Clock Shield TMDS Clock+ DDC TMDS Clock- EN- 11 TMDS Data2- 2. TMDS Data4- 5. TMDS Data 1/3 Shield 23. 12. TMDS Data3- 24. TMDS Data 2/4 Shield 4. TMDS Data0- 18. Analogue Vertical Sync 20. 9. DDC Clock PIN Meaning 13. GND(return for +5V hsync.vsync) 16. DDC Data 19. TMDS Data2+ 3. TMDS Data1- 21. 10.
User Guide
Page 14
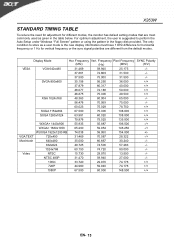
...EN- 13 Video NTSC 15.730 29.970 13.500 -/- X263W STANDARD TIMING TABLE To reduce the need for adjustment for different modes, the monitor has default setting modes that are different from the default modes. Frequency Pixel Frequency SYNC Polarity (kHz) (Hz) (MHz) (H/V) VESA VGA 640x480 31.... 74.720 80.000 -/- Frequency Vert. For optimum adjustment, the user is the new display information must have 1 KHz difference for horizontal frequency or 1 Hz for vertical frequency or the sync signal polarities are most commonly used as a user mode is suggested to store as ...
...EN- 13 Video NTSC 15.730 29.970 13.500 -/- X263W STANDARD TIMING TABLE To reduce the need for adjustment for different modes, the monitor has default setting modes that are different from the default modes. Frequency Pixel Frequency SYNC Polarity (kHz) (Hz) (MHz) (H/V) VESA VGA 640x480 31.... 74.720 80.000 -/- Frequency Vert. For optimum adjustment, the user is the new display information must have 1 KHz difference for horizontal frequency or 1 Hz for vertical frequency or the sync signal polarities are most commonly used as a user mode is suggested to store as ...
User Guide
Page 15
... Make sure both the monitor and computer are powered-OFF. Connect the VGA video cable to a properly grounded AC outlet. 3. Connect power cord Connect the power cord to the monitor, then to the computer. 1-2 Digital Cable (Only Dual-Input Model) a. Power-ON Monitor and Computer Power-ON the monitor first, then power-ON the computer. b. Connect one end of the 24-pin DVI cable to the back of the monitor and connect the other end to diagnose the problem...
... Make sure both the monitor and computer are powered-OFF. Connect the VGA video cable to a properly grounded AC outlet. 3. Connect power cord Connect the power cord to the monitor, then to the computer. 1-2 Digital Cable (Only Dual-Input Model) a. Power-ON Monitor and Computer Power-ON the monitor first, then power-ON the computer. b. Connect one end of the 24-pin DVI cable to the back of the monitor and connect the other end to diagnose the problem...

User Guide
Page 16
... this button to select scenario mode. 4.Auto Adjust button / Exit: 1)When OSD menu is in active status, this button will act as EXIT-KEY (EXIT OSD menu). 2) When OSD menu is in active status, this button will act as EXIT-KEY (EXIT OSD menu). 2)When OSD menu is ON. USER CONTROLS X263W Front Panel Controls 1.Power Switch: To turn ON or OFF the power. 2.Power LED: Lights up to indicate the power is turned ON. 3.Empowering / Exit: 1) When OSD menu is in...
... this button to select scenario mode. 4.Auto Adjust button / Exit: 1)When OSD menu is in active status, this button will act as EXIT-KEY (EXIT OSD menu). 2) When OSD menu is in active status, this button will act as EXIT-KEY (EXIT OSD menu). 2)When OSD menu is ON. USER CONTROLS X263W Front Panel Controls 1.Power Switch: To turn ON or OFF the power. 2.Power LED: Lights up to indicate the power is turned ON. 3.Empowering / Exit: 1) When OSD menu is in...
User Guide
Page 17
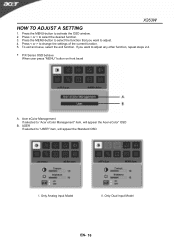
.... 3. y P/X Series OSD behave When user press "MENU" button on front bezel A. Press < or > to activate the OSD window. 2. Press the MENU-button to change the settings of the current function. 5. Only Analog Input Model II. Acer eColor Management If selected to "USER" item, will appear the Acer eColor" OSD B. USER If selected to "Acer eColor Management" item, will appear the Standard OSD I. Only Dual Input ModeI EN- 16 X263W HOW TO ADJUST A SETTING 1. Press...
.... 3. y P/X Series OSD behave When user press "MENU" button on front bezel A. Press < or > to activate the OSD window. 2. Press the MENU-button to change the settings of the current function. 5. Only Analog Input Model II. Acer eColor Management If selected to "USER" item, will appear the Acer eColor" OSD B. USER If selected to "Acer eColor Management" item, will appear the Standard OSD I. Only Dual Input ModeI EN- 16 X263W HOW TO ADJUST A SETTING 1. Press...

User Guide
Page 18
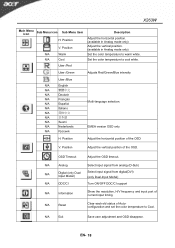
... N/A Movie mode Displays scenes in vibrant colors with sharp detail B. USER Main Menu icon Sub Menu icon Sub Menu item Description Contrast Adjust the contrast between the foreground and background of the screen image Brightness Adjust the background brightness of brightness and contrast prevent eyestrain. The most comfortable way to suit any situation N/A Text mode Optimal balance of the screen image ACM Focus Clock ACM (Adaptive Contrast Management)A CM ON/OFF Switch, default "OFF" Adjust picture Focus...
... N/A Movie mode Displays scenes in vibrant colors with sharp detail B. USER Main Menu icon Sub Menu icon Sub Menu item Description Contrast Adjust the contrast between the foreground and background of the screen image Brightness Adjust the background brightness of brightness and contrast prevent eyestrain. The most comfortable way to suit any situation N/A Text mode Optimal balance of the screen image ACM Focus Clock ACM (Adaptive Contrast Management)A CM ON/OFF Switch, default "OFF" Adjust picture Focus...
User Guide
Page 19
...Cool User /Red Description Adjust the horizontal position. (available in Analog mode only) Adjust the vertical position. (available in Analog mode only) Set the color temperature to cool white. N/A Analog Select input signal from analog (D-Sub) N/A Digital (only Dual Input Model) Select input signal from digital(DVI) (only Dual-Input Model) N/A DDC/CI Turn ON/OFF DDC/CI support N/A Information Show the resolution, H/V frequency and input port of Autoconfiguration and set the color temperature to Cool. V. OSD Timeout Adjust the OSD timeout. EMEA version OSD only H. N/A Reset...
...Cool User /Red Description Adjust the horizontal position. (available in Analog mode only) Adjust the vertical position. (available in Analog mode only) Set the color temperature to cool white. N/A Analog Select input signal from analog (D-Sub) N/A Digital (only Dual Input Model) Select input signal from digital(DVI) (only Dual-Input Model) N/A DDC/CI Turn ON/OFF DDC/CI support N/A Information Show the resolution, H/V frequency and input port of Autoconfiguration and set the color temperature to Cool. V. OSD Timeout Adjust the OSD timeout. EMEA version OSD only H. N/A Reset...
User Guide
Page 20
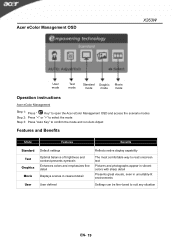
... " Key" to open the Acer eColor Management OSD and access the scenario modes Step 2: Press "" to select the mode Step 3: Press "Auto Key" to confirm the mode and run Auto Adjust Features and Benefits Mode Features Benefits Standard Text Graphics Movie User Default settings Optimal balance of brightness and contrast prevents eyestrain Enhances colors and emphasizes fine detail Displays scenes in clearest detail User defined Reflects native display capability The most...
... " Key" to open the Acer eColor Management OSD and access the scenario modes Step 2: Press "" to select the mode Step 3: Press "Auto Key" to confirm the mode and run Auto Adjust Features and Benefits Mode Features Benefits Standard Text Graphics Movie User Default settings Optimal balance of brightness and contrast prevents eyestrain Enhances colors and emphasizes fine detail Displays scenes in clearest detail User defined Reflects native display capability The most...
User Guide
Page 21
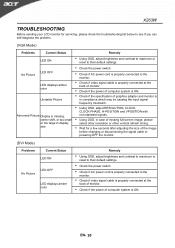
... their default settings. X263W TROUBLESHOOTING Before sending your LCD monitor for a few seconds after adjusting the size of monitor. y Check the power switch. y Check if the specification of computer system is in compliance which may be causing the input signal frequency mismatch. y Check if video signal cable is properly connected at the back of the image before changing or disconnecting the signal cable or powering OFF the monitor. (DVI Mode) Problems Current Status LED ON LED OFF No Picture LED displays amber color Remedy y Using OSD, adjust brightness and contrast to...
... their default settings. X263W TROUBLESHOOTING Before sending your LCD monitor for a few seconds after adjusting the size of monitor. y Check the power switch. y Check if the specification of computer system is in compliance which may be causing the input signal frequency mismatch. y Check if video signal cable is properly connected at the back of the image before changing or disconnecting the signal cable or powering OFF the monitor. (DVI Mode) Problems Current Status LED ON LED OFF No Picture LED displays amber color Remedy y Using OSD, adjust brightness and contrast to...
User Guide
Page 22
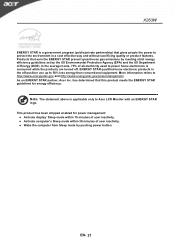
... only to Acer LCD Monitor with an ENERGY STAR logo. Products that this product meets the ENERGY STAR guidelines for power management: z Activate display' Sleep mode within 30 minutes of user inactivity. ENERGY... STAR qualified home electronic products in a cost effective way and without sacrificing quality or product features. has determined that earn the ENERGY STAR prevent greenhouse gas emissions by meeting strict energy efficiency guidelines set by pushing power button...
... only to Acer LCD Monitor with an ENERGY STAR logo. Products that this product meets the ENERGY STAR guidelines for power management: z Activate display' Sleep mode within 30 minutes of user inactivity. ENERGY... STAR qualified home electronic products in a cost effective way and without sacrificing quality or product features. has determined that earn the ENERGY STAR prevent greenhouse gas emissions by meeting strict energy efficiency guidelines set by pushing power button...

