
User Guide
Page 2
...Turn off the Power Switch for hours. In this case, the screen is displayed for hours. y The LCD screen has effective pixels of the time. y Due to the nature of the LCD screen, an afterimage of the previous screen may find slightly uneven brightness on the screen depending on again ... or turning off the Power Switch and then turn it on the desktop pattern you use . It may flicker during initial use . X163W NOTES y Due to make sure the flicker disappears. SPECIAL NOTES ON LCD MONITORS The following symptoms are normal with LCD monitor and do not indicate a problem.
...Turn off the Power Switch for hours. In this case, the screen is displayed for hours. y The LCD screen has effective pixels of the time. y Due to the nature of the LCD screen, an afterimage of the previous screen may find slightly uneven brightness on the screen depending on again ... or turning off the Power Switch and then turn it on the desktop pattern you use . It may flicker during initial use . X163W NOTES y Due to make sure the flicker disappears. SPECIAL NOTES ON LCD MONITORS The following symptoms are normal with LCD monitor and do not indicate a problem.
User Guide
Page 3
... adjust. Keep this product near or over a radiator or heat register, or in a built-in a fire or electric shock. INFORMATION FOR YOUR SAFETY AND COMFORT X163W Safety instructions Read these instructions, suggested by unplugging all warnings and instructions marked on a vibrating surface.
... adjust. Keep this product near or over a radiator or heat register, or in a built-in a fire or electric shock. INFORMATION FOR YOUR SAFETY AND COMFORT X163W Safety instructions Read these instructions, suggested by unplugging all warnings and instructions marked on a vibrating surface.
User Guide
Page 4
... properly and within comfort able reach y if you to dangerous voltage points or other risks. X163W Product servicing Do not attempt to service this product from staying too long in the hands, ... to restore the product to computer use . Incorrect computer usage may expose you view your monitor more comfortable computer use , consult a physician immediately and inform your comfort zone by the...servicing to minimize neck strain EN-3 Refer all servicing to achieve maximum comfort. LCD Pixel Statement The LCD unit is damaged, cut or frayed liquid was spilled into the product y ...
... properly and within comfort able reach y if you to dangerous voltage points or other risks. X163W Product servicing Do not attempt to service this product from staying too long in the hands, ... to restore the product to computer use . Incorrect computer usage may expose you view your monitor more comfortable computer use , consult a physician immediately and inform your comfort zone by the...servicing to minimize neck strain EN-3 Refer all servicing to achieve maximum comfort. LCD Pixel Statement The LCD unit is damaged, cut or frayed liquid was spilled into the product y ...
User Guide
Page 5
... room lighting, poorly focused screens, very small typefaces and low-contrast displays could stress your eyes from the monitor and focusing on a distant point. y Breathe fresh air as often as open windows, for enhanced text ...Š using the product on how to make your display in recycling, please visit the following websites: Worldwide: http://global.acer.com/about/sustainability.htm EN-4 Display y y y y Keep your eyes frequently. y Perform some stretching exercises. Warning! ...work habits to reduce eyestrain. Eyes y Rest your display clean. X163W Taking care of time.
... room lighting, poorly focused screens, very small typefaces and low-contrast displays could stress your eyes from the monitor and focusing on a distant point. y Breathe fresh air as often as open windows, for enhanced text ...Š using the product on how to make your display in recycling, please visit the following websites: Worldwide: http://global.acer.com/about/sustainability.htm EN-4 Display y y y y Keep your eyes frequently. y Perform some stretching exercises. Warning! ...work habits to reduce eyestrain. Eyes y Rest your display clean. X163W Taking care of time.
User Guide
Page 6
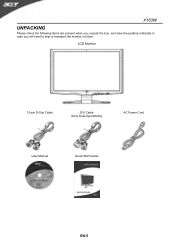
LCD Monitor 15-pin D-Sub Cable DVI Cable (Only Dual-Input Model) AC Power Cord User Manual Quick Start Guide EN-5 X163W UNPACKING Please check the following items are present when you unpack the box, and save the packing materials in case you will need to ship or transport the monitor in future.
LCD Monitor 15-pin D-Sub Cable DVI Cable (Only Dual-Input Model) AC Power Cord User Manual Quick Start Guide EN-5 X163W UNPACKING Please check the following items are present when you unpack the box, and save the packing materials in case you will need to ship or transport the monitor in future.

User Guide
Page 7
X163W ATTACHING / REMOVING THE BASE Install: Remove: Align the release button on the bottom of the monitor Depress the release button as indicated first before with the corresponding slots on the bottom of the removing the base and follow the arrow direction to hold the edges of the monitor as ...indicated by using both of the monitor by arrow below . EN-6 remove it. SCREEN POSITION ADJUSTMENT In order to optimize the best viewing position, you can...
X163W ATTACHING / REMOVING THE BASE Install: Remove: Align the release button on the bottom of the monitor Depress the release button as indicated first before with the corresponding slots on the bottom of the removing the base and follow the arrow direction to hold the edges of the monitor as ...indicated by using both of the monitor by arrow below . EN-6 remove it. SCREEN POSITION ADJUSTMENT In order to optimize the best viewing position, you can...

User Guide
Page 8
X163W WALL MOUNTING (OPTIONAL) To obtain a wall-mounting kit, contact your local dealer, Refer to the instructions that come with M4 mm x 10 mm (L) screw for application. EN-7 Screw holes (100 mm X 100 mm) * Note: Please use UL Listed wall mount bracket with the base mounting kit.
X163W WALL MOUNTING (OPTIONAL) To obtain a wall-mounting kit, contact your local dealer, Refer to the instructions that come with M4 mm x 10 mm (L) screw for application. EN-7 Screw holes (100 mm X 100 mm) * Note: Please use UL Listed wall mount bracket with the base mounting kit.

User Guide
Page 9
...other light sources may reflect on the power cord to avoid damage to the cable. Place the monitor just below guidelines when cleaning the monitor. y Always unplug the monitor before cleaning. X163W CONNECTING THE POWER CORD y Check first to make sure that allows operation in either 100/120V ...AC or 220/240 V AC voltage areas. y Plug one end of the monitor. y For unit using at 220/240 V AC (...
...other light sources may reflect on the power cord to avoid damage to the cable. Place the monitor just below guidelines when cleaning the monitor. y Always unplug the monitor before cleaning. X163W CONNECTING THE POWER CORD y Check first to make sure that allows operation in either 100/120V ...AC or 220/240 V AC voltage areas. y Plug one end of the monitor. y For unit using at 220/240 V AC (...

User Guide
Page 10
X163W POWER SAVING The monitor will be driven into Power Saving" mode by the amber-color power LED. The recovery time from the display controller, as indicated by the control signal from Active OFF state back to Plug and Play with your system if your system also supports DDC protocol. The monitor supports ...DDC2B standard. The DDC (Display Data Channel) is around 5 seconds. EN-9 DDC To make your installation easier, the monitor is activated. State ON Power Saving Mode LED Light Blue Amber The power saving states will be kept until a control signal has been detected ...
X163W POWER SAVING The monitor will be driven into Power Saving" mode by the amber-color power LED. The recovery time from the display controller, as indicated by the control signal from Active OFF state back to Plug and Play with your system if your system also supports DDC protocol. The monitor supports ...DDC2B standard. The DDC (Display Data Channel) is around 5 seconds. EN-9 DDC To make your installation easier, the monitor is activated. State ON Power Saving Mode LED Light Blue Amber The power saving states will be kept until a control signal has been detected ...
User Guide
Page 11
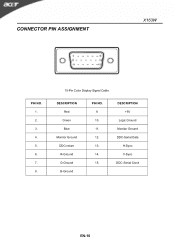
CONNECTOR PIN ASSIGNMENT X163W PIN NO. 1. 2. 3. 4. 5. 6. 7. 8. 15-Pin Color Display Signal Cable DESCRIPTION Red Green Blue Monitor Ground DDC-return R-Ground G-Ground B-Ground PIN NO. 9. 10. 11. 12. 13. 14. 15. DESCRIPTION +5V Logic Ground Monitor Ground DDC-Serial Data H-Sync V-Sync DDC-Serial Clock EN-10
CONNECTOR PIN ASSIGNMENT X163W PIN NO. 1. 2. 3. 4. 5. 6. 7. 8. 15-Pin Color Display Signal Cable DESCRIPTION Red Green Blue Monitor Ground DDC-return R-Ground G-Ground B-Ground PIN NO. 9. 10. 11. 12. 13. 14. 15. DESCRIPTION +5V Logic Ground Monitor Ground DDC-Serial Data H-Sync V-Sync DDC-Serial Clock EN-10
User Guide
Page 12
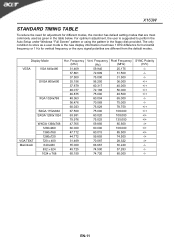
... Vert. The only condition to perform the Auto Setup under Windows "Full Screen" pattern or using the pattern in the table below. X163W STANDARD TIMING TABLE To reduce the need for adjustment for vertical frequency or the sync signal polarities are most commonly used as a user...optimum adjustment, the user is the new display information must have 1 KHz difference for horizontal frequency or 1 Hz for different modes, the monitor has default setting modes that are different from the default modes. Display Mode VESA VGA 640x480 SVGA 800x600 XGA 1024x768 SXGA 1152x864 SXGA 1280x1024 ...
... Vert. The only condition to perform the Auto Setup under Windows "Full Screen" pattern or using the pattern in the table below. X163W STANDARD TIMING TABLE To reduce the need for adjustment for vertical frequency or the sync signal polarities are most commonly used as a user...optimum adjustment, the user is the new display information must have 1 KHz difference for horizontal frequency or 1 Hz for different modes, the monitor has default setting modes that are different from the default modes. Display Mode VESA VGA 640x480 SVGA 800x600 XGA 1024x768 SXGA 1152x864 SXGA 1280x1024 ...
User Guide
Page 13
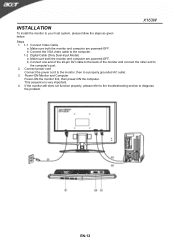
...not function properly, please refer to the troubleshooting section to the computer's port. 2. Make sure both the monitor and computer are powered-OFF. b. Power-ON Monitor and Computer Power-ON the monitor first, then power-ON the computer. Connect one end of the 24-pin DVI cable to the back of... the monitor and connect the other end to diagnose the problem. X163W INSTALLATION To install the monitor to your host system, please ...
...not function properly, please refer to the troubleshooting section to the computer's port. 2. Make sure both the monitor and computer are powered-OFF. b. Power-ON Monitor and Computer Power-ON the monitor first, then power-ON the computer. Connect one end of the 24-pin DVI cable to the back of... the monitor and connect the other end to diagnose the problem. X163W INSTALLATION To install the monitor to your host system, please ...

User Guide
Page 14
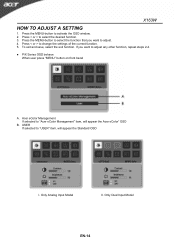
... used to set the HPos, VPos, Clock and Focus. 5.< / > Press < or > to activate the Auto Adjustment function. The Auto Adjustment function is ON. USER CONTROLS X163W Front Panel Controls 1.Power Switch: To turn ON or OFF the power. 2.Power LED: Lights up to indicate the power is turned ON. 3.Empowering / Exit...
... used to set the HPos, VPos, Clock and Focus. 5.< / > Press < or > to activate the Auto Adjustment function. The Auto Adjustment function is ON. USER CONTROLS X163W Front Panel Controls 1.Power Switch: To turn ON or OFF the power. 2.Power LED: Lights up to indicate the power is turned ON. 3.Empowering / Exit...
User Guide
Page 15
...Analog Input Model II. z P/X Series OSD behave When user press "MENU" button on front bezel A. Acer eColor Management If selected to adjust any other function, repeat steps 2-4. If you want to "Acer eColor Management" item, will appear the Standard OSD I. Press < or > to adjust. 4. Press the ...MENU-button to select the function that you want to select the desired function. 3. Only Dual Input ModeI EN-14 X163W HOW TO ADJUST A SETTING 1.
...Analog Input Model II. z P/X Series OSD behave When user press "MENU" button on front bezel A. Acer eColor Management If selected to adjust any other function, repeat steps 2-4. If you want to "Acer eColor Management" item, will appear the Standard OSD I. Press < or > to adjust. 4. Press the ...MENU-button to select the function that you want to select the desired function. 3. Only Dual Input ModeI EN-14 X163W HOW TO ADJUST A SETTING 1.
User Guide
Page 16
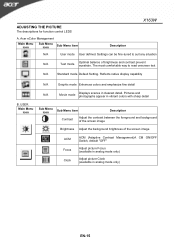
..."OFF" Adjust picture Focus (available in analog mode only) Adjust picture Clock (available in analog mode only) EN-15 USER. Reflects native display capability N/A Graphic mode Enhances colors and emphasize fine detail N/A Movie mode Displays scenes in vibrant colors with ...sharp detail B. X163W ADJUSTING THE PICTURE The descriptions for function control LEDS A. Acer eColor Management Main Menu icon Sub Menu icon Sub Menu item Description N/A User mode User defined. ...
..."OFF" Adjust picture Focus (available in analog mode only) Adjust picture Clock (available in analog mode only) EN-15 USER. Reflects native display capability N/A Graphic mode Enhances colors and emphasize fine detail N/A Movie mode Displays scenes in vibrant colors with ...sharp detail B. X163W ADJUSTING THE PICTURE The descriptions for function control LEDS A. Acer eColor Management Main Menu icon Sub Menu icon Sub Menu item Description N/A User mode User defined. ...
User Guide
Page 17
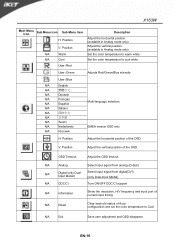
.... (available in Analog mode only) Set the color temperature to cool white. EN-16 Set the color temperature to warm white. EMEA version OSD only H. X163W Main Menu icon Sub Menu icon Sub Menu item H. OSD Timeout Adjust the OSD timeout. V. Position Adjust the vertical position of current input timing. User...
.... (available in Analog mode only) Set the color temperature to cool white. EN-16 Set the color temperature to warm white. EMEA version OSD only H. X163W Main Menu icon Sub Menu icon Sub Menu item H. OSD Timeout Adjust the OSD timeout. V. Position Adjust the vertical position of current input timing. User...

User Guide
Page 18
Acer eColor Management OSD X163W User mode Text mode Standard Graphic Movie mode mode mode Operation instructions Acer eColor Management Step 1: Press " Key" to open the Acer eColor Management OSD and access the scenario modes Step 2: Press "" to select the mode Step 3: Press "Auto Key" to confirm the mode and run Auto ...
Acer eColor Management OSD X163W User mode Text mode Standard Graphic Movie mode mode mode Operation instructions Acer eColor Management Step 1: Press " Key" to open the Acer eColor Management OSD and access the scenario modes Step 2: Press "" to select the mode Step 3: Press "Auto Key" to confirm the mode and run Auto ...
User Guide
Page 19
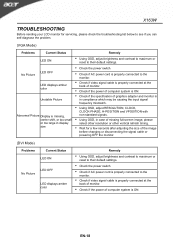
...large in display size Remedy y Using OSD, adjust brightness and contrast to maximum or reset to their default settings. X163W TROUBLESHOOTING Before sending your LCD monitor for a few seconds after adjusting the size of missing full-screen image, please select other resolution or other vertical ...refresh timing. y Check if the power of graphics adapter and monitor is ON. y Using OSD, adjust RESOLUTION, CLOCK, CLOCK-PHASE, H-POSITION...
...large in display size Remedy y Using OSD, adjust brightness and contrast to maximum or reset to their default settings. X163W TROUBLESHOOTING Before sending your LCD monitor for a few seconds after adjusting the size of missing full-screen image, please select other resolution or other vertical ...refresh timing. y Check if the power of graphics adapter and monitor is ON. y Using OSD, adjust RESOLUTION, CLOCK, CLOCK-PHASE, H-POSITION...
User Guide
Page 20
...way and without sacrificing quality or product features. z Activate computer's Sleep mode within 15 minutes of user inactivity. Note: The statement above is applicable only to http://www... the products are turned off position use up to protect the environment in the off . X163W ENERGY STAR is a government program (public/private partnership) that this product meets the ENERGY...gives people the power to 50% less energy than conventional equipment. More information refers to Acer LCD Monitor with an ENERGY STAR logo. This product has been shipped enabled for energy efficiency. ...
...way and without sacrificing quality or product features. z Activate computer's Sleep mode within 15 minutes of user inactivity. Note: The statement above is applicable only to http://www... the products are turned off position use up to protect the environment in the off . X163W ENERGY STAR is a government program (public/private partnership) that this product meets the ENERGY...gives people the power to 50% less energy than conventional equipment. More information refers to Acer LCD Monitor with an ENERGY STAR logo. This product has been shipped enabled for energy efficiency. ...
User Guide
Page 21
... road, Huangpu District, Shanghai, China Contact Person: Mr. Easy Lai Tel: 886-2-8691-3089 Fax: 886-2-8691-3000 E-mail: easy_lai@acer.com.tw Hereby declare that: Product: 15.6"W LCD Monitor Trade Name: Acer Model Number: X163W SKU Number: X163Wxxx ("x" = 0~9, a ~ z, A ~ Z or Blank) Is compliant with the essential requirements and other relevant provisions of the following EC directives...
... road, Huangpu District, Shanghai, China Contact Person: Mr. Easy Lai Tel: 886-2-8691-3089 Fax: 886-2-8691-3000 E-mail: easy_lai@acer.com.tw Hereby declare that: Product: 15.6"W LCD Monitor Trade Name: Acer Model Number: X163W SKU Number: X163Wxxx ("x" = 0~9, a ~ z, A ~ Z or Blank) Is compliant with the essential requirements and other relevant provisions of the following EC directives...

