User Manual (3D)
Page 5
Select the 3D section (the sixth menu option) on the projector remote control to 100/120 Hz (from the appropriate dropdown menu). Make sure the refresh rate of the display has been set automatically. 6 Press the menu button on the left-hand side of the window. list, select Change Resolution. If you are viewing Blu-ray 3D content over an HDMI 1.4a or later connection, this will be set to open the OSD. English 5 4 Check the Enable Stereoscopic 3D option and select the correct display type. 5 In the Select a task...
Select the 3D section (the sixth menu option) on the projector remote control to 100/120 Hz (from the appropriate dropdown menu). Make sure the refresh rate of the display has been set automatically. 6 Press the menu button on the left-hand side of the window. list, select Change Resolution. If you are viewing Blu-ray 3D content over an HDMI 1.4a or later connection, this will be set to open the OSD. English 5 4 Check the Enable Stereoscopic 3D option and select the correct display type. 5 In the Select a task...
User Manual (3D)
Page 8
... on your graphics card for frame/field sequential 3D formats. Others, please set automatically. 2 Press the menu button on the projector remote control to open Acer e3D Management. English 8 Note: You may need to purchase additional software. 4 Ensure you have installed the drivers, you will need to set up a ...3D environment Once you are viewing Blu-ray 3D content over an HDMI 1.4a or later connection, this will be set refresh rate which the 3D content requires. Setting up the environment. 1 Set the refresh rate to...
... on your graphics card for frame/field sequential 3D formats. Others, please set automatically. 2 Press the menu button on the projector remote control to open Acer e3D Management. English 8 Note: You may need to purchase additional software. 4 Ensure you have installed the drivers, you will need to set up a ...3D environment Once you are viewing Blu-ray 3D content over an HDMI 1.4a or later connection, this will be set refresh rate which the 3D content requires. Setting up the environment. 1 Set the refresh rate to...
User Manual (3D)
Page 9
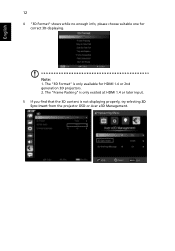
...3D Format to disable the English 9 5 "3D Format" shows while no enough info, please choose suitable one for HDMI 1.4 or 2nd generation 3D projectors. 2. The "Frame Packing" is only existed at HDMI 1.4 or later input. 6 If you may need to match the 3D signal. Note: 1. Otherwise, try selecting ...3D Sync Invert from the projector OSD or Acer e3D Management for frame / field sequential 3D format. Important: If you have...
...3D Format to disable the English 9 5 "3D Format" shows while no enough info, please choose suitable one for HDMI 1.4 or 2nd generation 3D projectors. 2. The "Frame Packing" is only existed at HDMI 1.4 or later input. 6 If you may need to match the 3D signal. Note: 1. Otherwise, try selecting ...3D Sync Invert from the projector OSD or Acer e3D Management for frame / field sequential 3D format. Important: If you have...
User Manual (3D)
Page 11
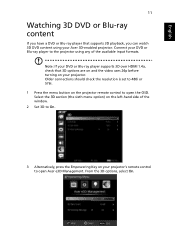
... the resolution is set to 480i or 576i. 1 Press the menu button on the projector remote control to open Acer e3D Management. Note: If your DVD or Blu-ray player supports 3D over HDMI 1.4a, check that supports 3D playback, you have a DVD or Blu-ray player that 3D options are on... any of the window. 2 Set 3D to On. 3 Alternatively, press the Empowering Key on your DVD or Blu-ray player to the projector using your Acer 3D-enabled projector.
... the resolution is set to 480i or 576i. 1 Press the menu button on the projector remote control to open Acer e3D Management. Note: If your DVD or Blu-ray player supports 3D over HDMI 1.4a, check that supports 3D playback, you have a DVD or Blu-ray player that 3D options are on... any of the window. 2 Set 3D to On. 3 Alternatively, press the Empowering Key on your DVD or Blu-ray player to the projector using your Acer 3D-enabled projector.
User Manual (3D)
Page 12
English 12 4 "3D Format" shows while no enough info, please choose suitable one for HDMI 1.4 or 2nd generation 3D projectors. 2. Note: 1. The "Frame Packing" is only existed at HDMI 1.4 or later input. 5 If you find that the 3D content is only available for correct 3D displaying. The "3D Format" is not displaying properly, try selecting 3D Sync Invert from the projector OSD or Acer e3D Management.
English 12 4 "3D Format" shows while no enough info, please choose suitable one for HDMI 1.4 or 2nd generation 3D projectors. 2. Note: 1. The "Frame Packing" is only existed at HDMI 1.4 or later input. 5 If you find that the 3D content is only available for correct 3D displaying. The "3D Format" is not displaying properly, try selecting 3D Sync Invert from the projector OSD or Acer e3D Management.
User Manual (3D)
Page 13
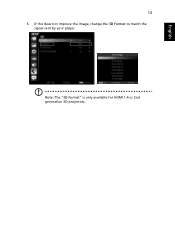
English 13 6 If this does not improve the image, change the 3D Format to match the signal sent by your player. Note: The "3D Format" is only available for HDMI 1.4 or 2nd generation 3D projectors.
English 13 6 If this does not improve the image, change the 3D Format to match the signal sent by your player. Note: The "3D Format" is only available for HDMI 1.4 or 2nd generation 3D projectors.

User Manual
Page 2
...publication without the prior written permission of HDMI Licensing LLC." Acer Projector Model number Serial number Date of purchase Place of purchase Acer and the Acer logo are trademarks or registered trademarks of Acer Incorporated. Acer Projector User's Guide Original Issue: ...provided below. All Rights Reserved. All correspondence concerning your projector. "HDMITM, the HDMI logo and High-Definition Multimedia Interface are registered trademarks of such revisions or changes. Acer Incorporated. The serial number and model number are used herein for a particular ...
...publication without the prior written permission of HDMI Licensing LLC." Acer Projector Model number Serial number Date of purchase Place of purchase Acer and the Acer logo are trademarks or registered trademarks of Acer Incorporated. Acer Projector User's Guide Original Issue: ...provided below. All Rights Reserved. All correspondence concerning your projector. "HDMITM, the HDMI logo and High-Definition Multimedia Interface are registered trademarks of such revisions or changes. Acer Incorporated. The serial number and model number are used herein for a particular ...
User Manual
Page 13
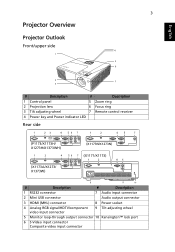
... 7 Remote control receiver 4 Power key and Power indicator LED Rear side (P1173/X1173H/ X1273H/X1373WH) (X1173A/X1273/ X1373W) -1 -2 (X1173N/X1273N) (X1171/X1173) -1 -2 # Description # Description 1 RS232 connector 7 Audio input connector 2 Mini USB connector Audio output connector 3 HDMI (MHL) connector 8 Power socket 4 Analog RGB signal/HDTV/component video input connector 9 Tilt adjusting wheel 5 Monitor...
... 7 Remote control receiver 4 Power key and Power indicator LED Rear side (P1173/X1173H/ X1273H/X1373WH) (X1173A/X1273/ X1373W) -1 -2 (X1173N/X1273N) (X1171/X1173) -1 -2 # Description # Description 1 RS232 connector 7 Audio input connector 2 Mini USB connector Audio output connector 3 HDMI (MHL) connector 8 Power socket 4 Analog RGB signal/HDTV/component video input connector 9 Tilt adjusting wheel 5 Monitor...

User Manual
Page 14
... OSD menu. 6 Power key Refer to the "Turning the Projector On/Off" section. 7 TEMP Temp Indicator LED. 8 SOURCE Chooses RGB, component video, S-Video, composite video, HDMI or HDTV source. 9 Four directional Selects items or makes adjustments to the "Turning the Projector On/Off" section.
... OSD menu. 6 Power key Refer to the "Turning the Projector On/Off" section. 7 TEMP Temp Indicator LED. 8 SOURCE Chooses RGB, component video, S-Video, composite video, HDMI or HDTV source. 9 Four directional Selects items or makes adjustments to the "Turning the Projector On/Off" section.
User Manual
Page 15
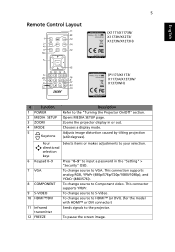
... connection supports analog RGB, YPbPr (480p/576p/720p/1080i/1080p), and YCbCr (480i/576i). 8 COMPONENT To change source to HDMI™ (or DVI). (for the model with HDMI™ or DVI connector) 11 Infrared transmitter Sends signals to VGA. Zooms the projector display in the "Setting" > "Security... projector. 12 FREEZE To pause the screen image. This connector supports YPbPr. 9 S-VIDEO To change source to S-Video. 10 HDMI™/DVI To change source to the "Turning the Projector On/Off" section. English 5 Remote Control Layout Model No:E-26171 (X1171/X1173N/ X1173H...
... connection supports analog RGB, YPbPr (480p/576p/720p/1080i/1080p), and YCbCr (480i/576i). 8 COMPONENT To change source to HDMI™ (or DVI). (for the model with HDMI™ or DVI connector) 11 Infrared transmitter Sends signals to VGA. Zooms the projector display in the "Setting" > "Security... projector. 12 FREEZE To pause the screen image. This connector supports YPbPr. 9 S-VIDEO To change source to S-Video. 10 HDMI™/DVI To change source to the "Turning the Projector On/Off" section. English 5 Remote Control Layout Model No:E-26171 (X1171/X1173N/ X1173H...
User Manual
Page 16
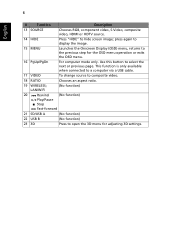
... this button to composite video. 18 RATIO Chooses an aspect ratio. 19 WIRELESS; 6 English # Function Description 13 SOURCE Chooses RGB, component video, S-Video, composite video, HDMI or HDTV source. 14 HIDE Press "HIDE" to the previous step for adjusting 3D settings. press again to display the image. 15 MENU Launches the...
... this button to composite video. 18 RATIO Chooses an aspect ratio. 19 WIRELESS; 6 English # Function Description 13 SOURCE Chooses RGB, component video, S-Video, composite video, HDMI or HDTV source. 14 HIDE Press "HIDE" to the previous step for adjusting 3D settings. press again to display the image. 15 MENU Launches the...
User Manual
Page 18
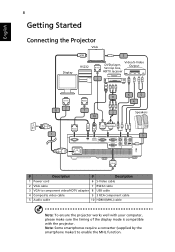
...: Some smartphones require a converter (supplied by the smartphone maker) to component video/HDTV adapter 8 USB cable 4 Composite video cable 9 3 RCA component cable 5 Audio cable 10 HDMI (MHL) cable Note: To ensure the projector works well with your computer, please make sure the timing of the display mode is compatible with the...
...: Some smartphones require a converter (supplied by the smartphone maker) to component video/HDTV adapter 8 USB cable 4 Composite video cable 9 3 RCA component cable 5 Audio cable 10 HDMI (MHL) cable Note: To ensure the projector works well with your computer, please make sure the timing of the display mode is compatible with the...
User Manual
Page 31
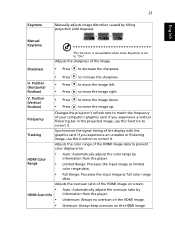
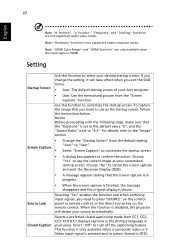
... tilting projection (±40 degrees). Adjusts the overscan ratio of the image. Underscan: Always no overscan on the HDMI image. • Overscan: Always keep overscan on screen. • HDMI Scan Info • Auto: Automatically adjusts the overscan ratio by information from the player. • Limited Range:... as full color range data. Sharpness • Press to "On". to prevent color display error. Synchronizes the signal timing of the HDMI image data to move the image down. Adjusts the color range of the display with the graphics card. Manual Keystone This function is ...
... tilting projection (±40 degrees). Adjusts the overscan ratio of the image. Underscan: Always no overscan on the HDMI image. • Overscan: Always keep overscan on screen. • HDMI Scan Info • Auto: Automatically adjusts the overscan ratio by information from the player. • Limited Range:... as full color range data. Sharpness • Press to "On". to prevent color display error. Synchronizes the signal timing of the HDMI image data to move the image down. Adjusts the color range of the display with the graphics card. Manual Keystone This function is ...
User Manual
Page 32
...Position", "Frequency" and "Tracking" functions are only available when the input signal is not supported under video mode. Note: "Sharpness" function is HDMI. Use this function is set to the default value "0", and the "Aspect Ratio" is disabled, the projector will take effect when you want ... Range" and "HDMI Scan Info" are not supported under computer mode. If you need to cancel the screen capture and exist the Onscreen Display (OSD). • A message appears stating that you exit the OSD menu. • Acer: The default startup screen of your customized startup screen. ...
...Position", "Frequency" and "Tracking" functions are only available when the input signal is not supported under video mode. Note: "Sharpness" function is HDMI. Use this function is set to the default value "0", and the "Aspect Ratio" is disabled, the projector will take effect when you want ... Range" and "HDMI Scan Info" are not supported under computer mode. If you need to cancel the screen capture and exist the Onscreen Display (OSD). • A message appears stating that you exit the OSD menu. • Acer: The default startup screen of your customized startup screen. ...

User Manual
Page 36
...). Choose "On" to display the 3D warning message. 3D Warning Message Note: Supported 3D signal timings: Signal source type Video/S-Video/Component video VGA/HDMI (PC mode) HDMI (Video mode) Supported timing HQFS 3D (480i@60Hz), 576i@50Hz 640 x 480@50/60/100/120Hz 800 x 600@50/60/100/120Hz 1024 x 768...
...). Choose "On" to display the 3D warning message. 3D Warning Message Note: Supported 3D signal timings: Signal source type Video/S-Video/Component video VGA/HDMI (PC mode) HDMI (Video mode) Supported timing HQFS 3D (480i@60Hz), 576i@50Hz 640 x 480@50/60/100/120Hz 800 x 600@50/60/100/120Hz 1024 x 768...

User Manual
Page 48
... 1 X1173N/X1273N: • Power socket x 1 • USB x 1 (Type mini B) • VGA input x 2 • VGA output x 1 • RS232 x 1 • 3.5 mm audio jack input x 1 X1173A/X1273/X1373W: • Power socket x 1 • USB x 1 (Type mini B) • VGA input x 2 • VGA output x 1 • Composite video x 1 • S-Video x 1 • RS232 x 1 &#... 1 • USB x 1 (Type mini B) • VGA input x 2 • VGA output x 1 • Composite video x 1 • S-Video x 1 • RS232 x 1 • HDMI (MHL) x 1 • 3.5 mm audio jack input x 2 • 3.5 mm audio jack output x 1
... 1 X1173N/X1273N: • Power socket x 1 • USB x 1 (Type mini B) • VGA input x 2 • VGA output x 1 • RS232 x 1 • 3.5 mm audio jack input x 1 X1173A/X1273/X1373W: • Power socket x 1 • USB x 1 (Type mini B) • VGA input x 2 • VGA output x 1 • Composite video x 1 • S-Video x 1 • RS232 x 1 &#... 1 • USB x 1 (Type mini B) • VGA input x 2 • VGA output x 1 • Composite video x 1 • S-Video x 1 • RS232 x 1 • HDMI (MHL) x 1 • 3.5 mm audio jack input x 2 • 3.5 mm audio jack output x 1


