User Manual
Page 5
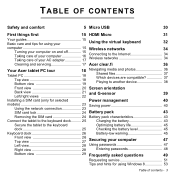
... of your AC adapter 17 Connecting to the Internet 34 Wireless networks 34 Cleaning and servicing 17 Acer clear.fi 36 Your Acer tablet PC tour 18 Navigating media and photos 36 Tablet PC 18 Top view 18 Bottom view 19 Shared files 37 Which devices are compatible 37 Playing ...connection 23 SIM card lock 24 Battery pack 43 Removing the SIM card 24 Battery pack characteristics 43 Connect the tablet to the keyboard dock.......... 25 Secure the tablet to the keyboard Charging the battery 43 Optimizing battery life 45 dock 25 Checking the battery level 45 Keyboard dock...
... of your AC adapter 17 Connecting to the Internet 34 Wireless networks 34 Cleaning and servicing 17 Acer clear.fi 36 Your Acer tablet PC tour 18 Navigating media and photos 36 Tablet PC 18 Top view 18 Bottom view 19 Shared files 37 Which devices are compatible 37 Playing ...connection 23 SIM card lock 24 Battery pack 43 Removing the SIM card 24 Battery pack characteristics 43 Connect the tablet to the keyboard dock.......... 25 Secure the tablet to the keyboard Charging the battery 43 Optimizing battery life 45 dock 25 Checking the battery level 45 Keyboard dock...

User Manual
Page 20
... to audio devices (e.g., speakers, headphones) or a headset with the touchscreen. Tablet PC Your tablet computer has two components: the tablet and an optional keyboard dock. Top view 1 23 No. YOUR ACER TABLET PC TOUR After setting up your new Acer computer. press again to place the tablet in the setup poster, let us show you new computer...
... to audio devices (e.g., speakers, headphones) or a headset with the touchscreen. Tablet PC Your tablet computer has two components: the tablet and an optional keyboard dock. Top view 1 23 No. YOUR ACER TABLET PC TOUR After setting up your new Acer computer. press again to place the tablet in the setup poster, let us show you new computer...
User Manual
Page 21
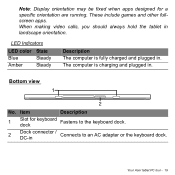
The computer is fully charged and plugged in. When making video calls, you should always hold the tablet in . LED Indicators LED color State Blue Steady Amber Steady Description The computer is charging and plugged in landscape orientation. Bottom view 1 2 No. These include ... when apps designed for keyboard dock Fastens to the keyboard dock. 2 Dock connector / DC-in Connects to an AC adapter or the keyboard dock. Your Acer tablet PC tour - 19 Item Description 1 Slot for a specific orientation are running.
The computer is fully charged and plugged in. When making video calls, you should always hold the tablet in . LED Indicators LED color State Blue Steady Amber Steady Description The computer is charging and plugged in landscape orientation. Bottom view 1 2 No. These include ... when apps designed for keyboard dock Fastens to the keyboard dock. 2 Dock connector / DC-in Connects to an AC adapter or the keyboard dock. Your Acer tablet PC tour - 19 Item Description 1 Slot for a specific orientation are running.
User Manual
Page 22
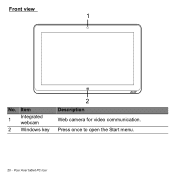
Your Acer tablet PC tour Press once to open the Start menu. 20 - Front view 1 No. Item 1 Integrated webcam 2 Windows key 2 Description Web camera for video communication.
Your Acer tablet PC tour Press once to open the Start menu. 20 - Front view 1 No. Item 1 Integrated webcam 2 Windows key 2 Description Web camera for video communication.
User Manual
Page 23
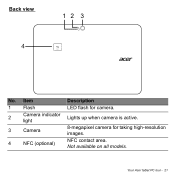
Not available on all models. Your Acer tablet PC tour - 21 Back view 4 12 3 No. Item Description 1 Flash LED flash for camera. 2 Camera indicator light Lights up when camera is active. 3 Camera 8-megapixel camera for taking high-resolution images. 4 NFC (optional) NFC contact area.
Not available on all models. Your Acer tablet PC tour - 21 Back view 4 12 3 No. Item Description 1 Flash LED flash for camera. 2 Camera indicator light Lights up when camera is active. 3 Camera 8-megapixel camera for taking high-resolution images. 4 NFC (optional) NFC contact area.
User Manual
Page 24
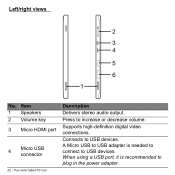
Your Acer tablet PC tour Description Delivers stereo audio output. Connects to increase or decrease volume. Item 1 Speakers 2 Volume key 3 Micro HDMI port 4 Micro USB connector 22 - Press to USB devices. Supports high-definition digital video connections. A Micro USB to USB adapter is recommended to USB devices. When using a USB port, it is needed to connect to plug in the power adapter. Left/right views 2 3 4 5 6 1 No.
Your Acer tablet PC tour Description Delivers stereo audio output. Connects to increase or decrease volume. Item 1 Speakers 2 Volume key 3 Micro HDMI port 4 Micro USB connector 22 - Press to USB devices. Supports high-definition digital video connections. A Micro USB to USB adapter is recommended to USB devices. When using a USB port, it is needed to connect to plug in the power adapter. Left/right views 2 3 4 5 6 1 No.

User Manual
Page 25
... your computer before turning on . Note: Ensure that the SIM card is turned off your computer. 1. You may damage the card or your computer. Your Acer tablet PC tour - 23 To take full advantage of your computer's Internet capabilities, you should install a SIM card with data subscription before installing or removing a SIM...
... your computer before turning on . Note: Ensure that the SIM card is turned off your computer. 1. You may damage the card or your computer. Your Acer tablet PC tour - 23 To take full advantage of your computer's Internet capabilities, you should install a SIM card with data subscription before installing or removing a SIM...
User Manual
Page 26
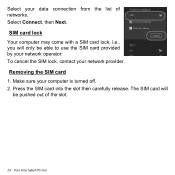
The SIM card will only be pushed out of networks. To cancel the SIM lock, contact your computer is turned off. 2. Select Connect, then Next. Removing the SIM card 1. Your Acer tablet PC tour Select your data connection from the list of the slot. 24 - Make sure your network provider. Press the SIM card into the slot then carefully release. SIM card lock Your computer may come with a SIM card lock, i.e., you will be able to use the SIM card provided by your network operator.
The SIM card will only be pushed out of networks. To cancel the SIM lock, contact your computer is turned off. 2. Select Connect, then Next. Removing the SIM card 1. Your Acer tablet PC tour Select your data connection from the list of the slot. 24 - Make sure your network provider. Press the SIM card into the slot then carefully release. SIM card lock Your computer may come with a SIM card lock, i.e., you will be able to use the SIM card provided by your network operator.

User Manual
Page 27
Connect the tablet to the keyboard dock Place the tablet on the keyboard dock. Secure the tablet to the keyboard dock The keyboard dock is optional. Note: Push the release latch to the left and lift the tablet to remove it clicks into place. Align the tablet with the dock connector and two pins on the dock, ensuring it from the keyboard dock. Your Acer tablet PC tour - 25 Press the tablet down until the release latch clicks into place.
Connect the tablet to the keyboard dock Place the tablet on the keyboard dock. Secure the tablet to the keyboard dock The keyboard dock is optional. Note: Push the release latch to the left and lift the tablet to remove it clicks into place. Align the tablet with the dock connector and two pins on the dock, ensuring it from the keyboard dock. Your Acer tablet PC tour - 25 Press the tablet down until the release latch clicks into place.
User Manual
Page 28
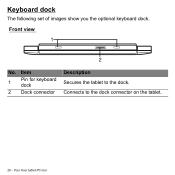
Connects to the dock. Keyboard dock The following set of images show you the optional keyboard dock. Item 1 Pin for keyboard dock 2 Dock connector Description Secures the tablet to the dock connector on the tablet. 26 - Your Acer tablet PC tour Front view 1 2 No.
Connects to the dock. Keyboard dock The following set of images show you the optional keyboard dock. Item 1 Pin for keyboard dock 2 Dock connector Description Secures the tablet to the dock connector on the tablet. 26 - Your Acer tablet PC tour Front view 1 2 No.
User Manual
Page 29
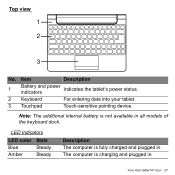
Top view 1 2 3 No. Item Description 1 Battery and power indicators Indicates the tablet's power status. 2 Keyboard For entering data into your tablet. 3 Touchpad Touch-sensitive pointing device. Note: The additional internal battery is not available in . LED Indicators LED color State Blue Steady Amber Steady Description The computer is charging and plugged in. The computer is fully charged and plugged in all models of the keyboard dock. Your Acer tablet PC tour - 27
Top view 1 2 3 No. Item Description 1 Battery and power indicators Indicates the tablet's power status. 2 Keyboard For entering data into your tablet. 3 Touchpad Touch-sensitive pointing device. Note: The additional internal battery is not available in . LED Indicators LED color State Blue Steady Amber Steady Description The computer is charging and plugged in. The computer is fully charged and plugged in all models of the keyboard dock. Your Acer tablet PC tour - 27
User Manual
Page 30
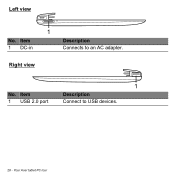
Your Acer tablet PC tour Right view 1 No. Item Description 1 USB 2.0 port Connect to an AC adapter. Item 1 DC-in 1 Description Connects to USB devices. 28 - Left view No.
Your Acer tablet PC tour Right view 1 No. Item Description 1 USB 2.0 port Connect to an AC adapter. Item 1 DC-in 1 Description Connects to USB devices. 28 - Left view No.
User Manual
Page 31
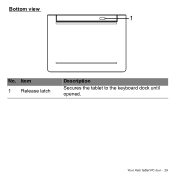
Your Acer tablet PC tour - 29 Item 1 Release latch Description Secures the tablet to the keyboard dock until opened. Bottom view 1 No.
Your Acer tablet PC tour - 29 Item 1 Release latch Description Secures the tablet to the keyboard dock until opened. Bottom view 1 No.

User Manual
Page 41
... HDMI cable is attached to suit the orientation. Please rotate your display to the landscape orientation and use the lock switch to keep your tablet in . • When programs designed for a specific orientation are running. The screen orientation lock status will be locked at other times..., including: • When the tablet is plugged in landscape orientation with the webcam above the screen while you are advised to set the orientation before starting a video call ....
... HDMI cable is attached to suit the orientation. Please rotate your display to the landscape orientation and use the lock switch to keep your tablet in . • When programs designed for a specific orientation are running. The screen orientation lock status will be locked at other times..., including: • When the tablet is plugged in landscape orientation with the webcam above the screen while you are advised to set the orientation before starting a video call ....


