
Generic User Guide
Page 3
... by plugging in too many devices. Do not use this product near or over a radiator or heat register, or in a built-in installation unless proper ventilation is used , the load should be blocked or covered. Use a damp cloth for future reference. If you are used with this document for cleaning. If power strips are not sure of the type of power...
... by plugging in too many devices. Do not use this product near or over a radiator or heat register, or in a built-in installation unless proper ventilation is used , the load should be blocked or covered. Use a damp cloth for future reference. If you are used with this document for cleaning. If power strips are not sure of the type of power...

Generic User Guide
Page 4
... length. Warning! Note: Adjust only those controls that may interfere with the supplied power supply cord set , make sure that is incorrectly replaced. Make sure the power outlet is a safety feature. Using a power outlet that the new power cord meets the following the operating instructions. Unplug this product. • Use the product only with the performance of used batteries according to qualified service personnel. CAUTION: Danger of other risks.
... length. Warning! Note: Adjust only those controls that may interfere with the supplied power supply cord set , make sure that is incorrectly replaced. Make sure the power outlet is a safety feature. Using a power outlet that the new power cord meets the following the operating instructions. Unplug this product. • Use the product only with the performance of used batteries according to qualified service personnel. CAUTION: Danger of other risks.
Generic User Guide
Page 5
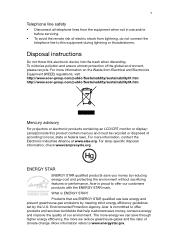
... use and/or before servicing. • To avoid the remote risk of electric shock from Electrical and Electronics Equipment (WEEE) regulations, visit http://www.acer-group.com/public/Sustainability/sustainability01.htm http://www.acer-group.com/public/Sustainability/sustainability04.htm Mercury advisory For projectors or electronic products containing an LCD/CRT monitor or display: Lamp(s) inside this electronic device...
... use and/or before servicing. • To avoid the remote risk of electric shock from Electrical and Electronics Equipment (WEEE) regulations, visit http://www.acer-group.com/public/Sustainability/sustainability01.htm http://www.acer-group.com/public/Sustainability/sustainability04.htm Mercury advisory For projectors or electronic products containing an LCD/CRT monitor or display: Lamp(s) inside this electronic device...
Generic User Guide
Page 6
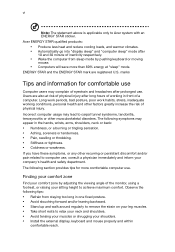
...sleep" mode. If you have these symptoms, or any other factors greatly increase the risk of the monitor, using a footrest, or raising your shoulders. • Install the external display, keyboard and mouse properly and within comfortable reach. Users are registered U.S. Long work periods, bad posture, poor work habits, stress, inadequate working...The following tips: • Refrain from sleep mode by adjusting the viewing angle of physical injury. Incorrect computer usage may appear in front of inactivity respectively. • Wake the computer from staying too long in ...
...sleep" mode. If you have these symptoms, or any other factors greatly increase the risk of the monitor, using a footrest, or raising your shoulders. • Install the external display, keyboard and mouse properly and within comfortable reach. Users are registered U.S. Long work periods, bad posture, poor work habits, stress, inadequate working...The following tips: • Refrain from sleep mode by adjusting the viewing angle of physical injury. Incorrect computer usage may appear in front of inactivity respectively. • Wake the computer from staying too long in ...
Generic User Guide
Page 7
... the display at the center of time. Taking care of the display. • Adjust the display brightness and/or contrast to reduce eyestrain. If this is unavoidable, work habits to make your computer use more than the top edge of the display so your eyes point downward when looking away from the monitor and focusing on a distant point. • Blink...
... the display at the center of time. Taking care of the display. • Adjust the display brightness and/or contrast to reduce eyestrain. If this is unavoidable, work habits to make your computer use more than the top edge of the display so your eyes point downward when looking away from the monitor and focusing on a distant point. • Blink...
Generic User Guide
Page 9
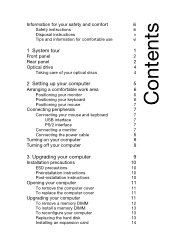
... keyboard 7 USB interface 7 PS/2 interface 7 Connecting a monitor 7 Connecting the power cable 8 Turning on your computer 8 Turning off your computer 8 3 Upgrading your computer 9 Installation precautions 10 ESD precautions 10 Preinstallation instructions 10 Post-installation instructions 10 Opening your computer 11 To remove the computer cover 11 To replace the computer cover 11 Upgrading your computer 11 To remove a memory DIMM 12 To install a memory DIMM 13 To reconfigure your computer 13 Replacing the hard disk 13 Installing an expansion card...
... keyboard 7 USB interface 7 PS/2 interface 7 Connecting a monitor 7 Connecting the power cable 8 Turning on your computer 8 Turning off your computer 8 3 Upgrading your computer 9 Installation precautions 10 ESD precautions 10 Preinstallation instructions 10 Post-installation instructions 10 Opening your computer 11 To remove the computer cover 11 To replace the computer cover 11 Upgrading your computer 11 To remove a memory DIMM 12 To install a memory DIMM 13 To reconfigure your computer 13 Replacing the hard disk 13 Installing an expansion card...

Generic User Guide
Page 12
English 2 Front panel The front panel of your computer has the following: Icon Description Microphone-in jack (front) Headphone jack USB ports USB 3.0 USB 3.0 ports (selected models only) Recovery button Network / hard disk drive indicators Power button Rear panel The rear panel of your computer has the following: Icon Description PS/2 mouse port PS/2 keyboard port Serial port VGA port USB ports 1 System tour
English 2 Front panel The front panel of your computer has the following: Icon Description Microphone-in jack (front) Headphone jack USB ports USB 3.0 USB 3.0 ports (selected models only) Recovery button Network / hard disk drive indicators Power button Rear panel The rear panel of your computer has the following: Icon Description PS/2 mouse port PS/2 keyboard port Serial port VGA port USB ports 1 System tour
Generic User Guide
Page 14
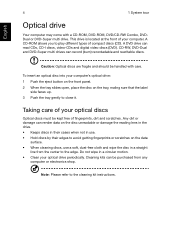
CD-RW, DVD-Dual and DVD-Super multi drives can read CDs, CD-I discs, video-CDs and digital video discs (DVD). To insert an optical disc into your computer's optical drive: 1 Push the eject button on the front panel. 2 When the tray slides open, place the disc on the data surface. • When cleaning discs, use . • Hold discs by their edges to avoid getting fingerprints or scratches on the tray...
CD-RW, DVD-Dual and DVD-Super multi drives can read CDs, CD-I discs, video-CDs and digital video discs (DVD). To insert an optical disc into your computer's optical drive: 1 Push the eject button on the front panel. 2 When the tray slides open, place the disc on the data surface. • When cleaning discs, use . • Hold discs by their edges to avoid getting fingerprints or scratches on the tray...
Generic User Guide
Page 16
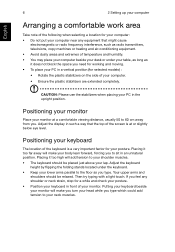
... make your body lean forward, forcing you turn your lap. Positioning your monitor Place your monitor at or slightly below eye level. Adjust the display in a vertical position (for selected models) : • Rotate the plastic stabilizers on the side of your computer. • Ensure the plastic stabilizers are extended completely. English 6 2 Setting up your computer Arranging a comfortable work...
... make your body lean forward, forcing you turn your lap. Positioning your monitor Place your monitor at or slightly below eye level. Adjust the display in a vertical position (for selected models) : • Rotate the plastic stabilizers on the side of your computer. • Ensure the plastic stabilizers are extended completely. English 6 2 Setting up your computer Arranging a comfortable work...
Generic User Guide
Page 17
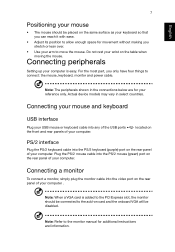
.... located on PS/2 interface Plug the PS/2 keyboard cable into any of the USB ports the front and rear panels of your computer. For the most part, you only have four things to the monitor manual for additional instructions and information. Actual device models may vary in the connections below are for movement without making you stretch or lean over. • Use your arm to move the mouse. Connecting a monitor...
.... located on PS/2 interface Plug the PS/2 keyboard cable into any of the USB ports the front and rear panels of your computer. For the most part, you only have four things to the monitor manual for additional instructions and information. Actual device models may vary in the connections below are for movement without making you stretch or lean over. • Use your arm to move the mouse. Connecting a monitor...
Generic User Guide
Page 18
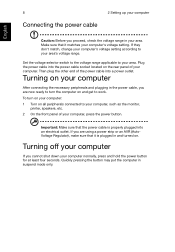
... seconds. Quickly pressing the button may put the computer in and turned on the rear panel of the power cable into the power cable socket located on . Turning off your computer If you are using a power strip or an AVR (AutoVoltage Regulator), make sure that it matches your computer's voltage setting. Then plug the other end of your computer. 8 Connecting the power cable 2 Setting up your computer English Caution...
... seconds. Quickly pressing the button may put the computer in and turned on the rear panel of the power cable into the power cable socket located on . Turning off your computer If you are using a power strip or an AVR (AutoVoltage Regulator), make sure that it matches your computer's voltage setting. Then plug the other end of your computer. 8 Connecting the power cable 2 Setting up your computer English Caution...
Generic User Guide
Page 20
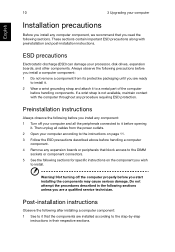
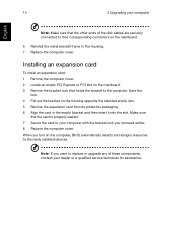
... damage your processor, disk drives, expansion boards, and other components. Preinstallation instructions Always observe the following before handling a computer component. 4 Remove any computer component, we recommend that you read the following sections. Then unplug all the peripherals connected to it before opening it that the components are a qualified service technician. Not turning off your computer and all cables from its protective...
... damage your processor, disk drives, expansion boards, and other components. Preinstallation instructions Always observe the following before handling a computer component. 4 Remove any computer component, we recommend that you read the following sections. Then unplug all the peripherals connected to it before opening it that the components are a qualified service technician. Not turning off your computer and all cables from its protective...
Generic User Guide
Page 21
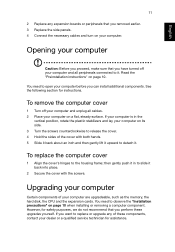
... all peripherals connected to open your computer before you perform these components, contact your computer Caution: Before you proceed, make sure that you can install additional components. Opening your dealer or a qualified service technician for assistance. You need to release the cover. 4 Hold the sides of these upgrades yourself. To remove the computer cover 1 Turn off your computer and all cables. 2 Place your...
... all peripherals connected to open your computer before you perform these components, contact your computer Caution: Before you proceed, make sure that you can install additional components. Opening your dealer or a qualified service technician for assistance. You need to release the cover. 4 Hold the sides of these upgrades yourself. To remove the computer cover 1 Turn off your computer and all cables. 2 Place your...
Generic User Guide
Page 23
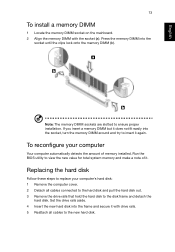
Note: The memory DIMM sockets are slotted to the new hard disk. Run the BIOS utility to view the new value for total system memory and make a note of memory installed. Replacing the hard disk Follow these steps to replace your computer Your computer automatically detects the amount of it again. If you insert a memory DIMM but it does not fit easily into the socket, turn the memory DIMM around and...
Note: The memory DIMM sockets are slotted to the new hard disk. Run the BIOS utility to view the new value for total system memory and make a note of memory installed. Replacing the hard disk Follow these steps to replace your computer Your computer automatically detects the amount of it again. If you insert a memory DIMM but it does not fit easily into the socket, turn the memory DIMM around and...
Generic User Guide
Page 24
When you removed earlier. 8 Replace the computer cover. Make sure that the card is properly seated. 7 Secure the card to replace or upgrade any of the disk cables are securely connected to their corresponding connectors on the housing opposite the selected empty slot. 5 Remove the expansion card from its protective packaging. 6 Align the card in the empty bracket and then insert it into the slot. Note: If you...
When you removed earlier. 8 Replace the computer cover. Make sure that the card is properly seated. 7 Secure the card to replace or upgrade any of the disk cables are securely connected to their corresponding connectors on the housing opposite the selected empty slot. 5 Remove the expansion card from its protective packaging. 6 Align the card in the empty bracket and then insert it into the slot. Note: If you...
Generic User Guide
Page 26
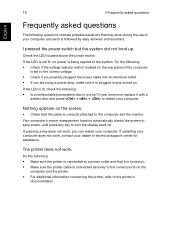
... the voltage selector switch located on . • Make sure the printer cable is plugged in a drive? Try the following : • Make sure the printer is connected to a power outlet and that may arise during the use of the computer is correctly attached to the printer's documentation. If restarting your computer. If pressing a key does not work, you are using a power strip, make sure it is...
... the voltage selector switch located on . • Make sure the printer cable is plugged in a drive? Try the following : • Make sure the printer is connected to a power outlet and that may arise during the use of the computer is correctly attached to the printer's documentation. If restarting your computer. If pressing a key does not work, you are using a power strip, make sure it is...
Generic User Guide
Page 27
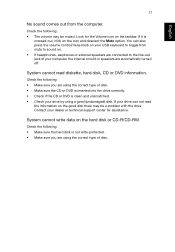
... : • Make sure the hard disk is clean and unscratched. • Check your computer, the internal or built-in speakers are connected to the line-out jack of your drive by using the correct type of disc. If your dealer or technical support center for the Volume icon on the icon and deselect the Mute option. System cannot write data on your USB keyboard to toggle...
... : • Make sure the hard disk is clean and unscratched. • Check your computer, the internal or built-in speakers are connected to the line-out jack of your drive by using the correct type of disc. If your dealer or technical support center for the Volume icon on the icon and deselect the Mute option. System cannot write data on your USB keyboard to toggle...
Generic User Guide
Page 30
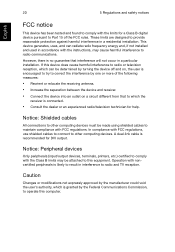
... the separation between the device and receiver. • Connect the device into an outlet on a circuit different from that interference will not occur in a residential installation. A dual-link cable is granted by the manufacturer could void the user's authority, which can radiate radio frequency energy and, if not installed and used in accordance with the instructions, may be determined by...
... the separation between the device and receiver. • Connect the device into an outlet on a circuit different from that interference will not occur in a residential installation. A dual-link cable is granted by the manufacturer could void the user's authority, which can radiate radio frequency energy and, if not installed and used in accordance with the instructions, may be determined by...

Generic User Guide
Page 32
... single terminal connection to give an unconditional assurance of correct operation at the higher speeds for which it is designed. The associated equipment shall be set to operate within the following limits for compliance with Telecom's Specifications: a There...make or model, nor does it imply that the item complies with minimum conditions for connection to its facilities, equipment, operations, or procedures that any single manual call attempts to the same number within any 30 minute period for Australia For safety reasons, only connect headsets with the equipment, discontinue use...
... single terminal connection to give an unconditional assurance of correct operation at the higher speeds for which it is designed. The associated equipment shall be set to operate within the following limits for compliance with Telecom's Specifications: a There...make or model, nor does it imply that the item complies with minimum conditions for connection to its facilities, equipment, operations, or procedures that any single manual call attempts to the same number within any 30 minute period for Australia For safety reasons, only connect headsets with the equipment, discontinue use...

Generic User Guide
Page 33
... of another device connected to the same line. 9 Under power failure conditions this appliance may not operate. In order to operate within the limits for compliance with Telecom's specifications, the associated equipment shall be set to ensure that automatic calls to different numbers are dependent on the equipment (PC) associated with wireless LAN and/or Bluetooth only. There is located on the drive.
... of another device connected to the same line. 9 Under power failure conditions this appliance may not operate. In order to operate within the limits for compliance with Telecom's specifications, the associated equipment shall be set to ensure that automatic calls to different numbers are dependent on the equipment (PC) associated with wireless LAN and/or Bluetooth only. There is located on the drive.


