
Acer Veriton Z2610G and Z2621G Desktop Service Guide
Page 7
System Disassembly 23 Disassembly Tools 23 Pre-disassembly Procedure 23 Disassembly Procedures 24 Removing the DIMM Cover and Module 24 Removing the Computer Stand 25 Removing the Left and Right Foot Stands 26... 50 Reinstalling the Mainboard 50 Reinstalling the Processor 51 Reinstalling the Thermal Module 52 Reinstalling the Speakers 54 Reinstalling the Power Switch LED 56 vii Veriton Z2610G/Z2611G/Z2620G/Z2621G AIO Computer Service Guide Features and Specifications 1 System Features 1 Physical Specifications 2 Environmental Requirements 2 System Tour 3 Front and Right Side ...
System Disassembly 23 Disassembly Tools 23 Pre-disassembly Procedure 23 Disassembly Procedures 24 Removing the DIMM Cover and Module 24 Removing the Computer Stand 25 Removing the Left and Right Foot Stands 26... 50 Reinstalling the Mainboard 50 Reinstalling the Processor 51 Reinstalling the Thermal Module 52 Reinstalling the Speakers 54 Reinstalling the Power Switch LED 56 vii Veriton Z2610G/Z2611G/Z2620G/Z2621G AIO Computer Service Guide Features and Specifications 1 System Features 1 Physical Specifications 2 Environmental Requirements 2 System Tour 3 Front and Right Side ...

Acer Veriton Z2610G and Z2621G Desktop Service Guide
Page 31
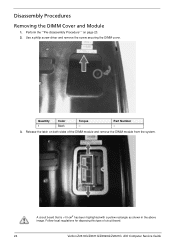
... Before proceeding with their corresponding components to avoid mismatches when putting back the components. Veriton Z2610G/Z2611G/Z2620G/Z2621G AIO Computer Service Guide 23 Disassembly Tools In performing the disassembly process, you will need the following tools: • Wrist-grounding strap and conductive mat for preventing ... disc drive and the card reader slot are empty. 2. Unplug the network cable and all peripherals. 3. System Disassembly and Reassembly Chapter 3 This chapter provides step-by-step instructions on a flat, steady surface with the rear cover facing upward.
... Before proceeding with their corresponding components to avoid mismatches when putting back the components. Veriton Z2610G/Z2611G/Z2620G/Z2621G AIO Computer Service Guide 23 Disassembly Tools In performing the disassembly process, you will need the following tools: • Wrist-grounding strap and conductive mat for preventing ... disc drive and the card reader slot are empty. 2. Unplug the network cable and all peripherals. 3. System Disassembly and Reassembly Chapter 3 This chapter provides step-by-step instructions on a flat, steady surface with the rear cover facing upward.
Acer Veriton Z2610G and Z2621G Desktop Service Guide
Page 32
Perform the ""Pre-disassembly Procedure" " on both sides of circuit board. 24 Veriton Z2610G/Z2611G/Z2620G/Z2621G AIO Computer Service Guide Release the latch on page 23. 2. Follow local regulations for disposing this type of the DIMM module and remove the DIMM module from the system. A circuit board that is >10 cm2 has been highlighted with a yellow rectangle as shown in the above image. Use a philip screw driver and remove the screw securing the DIMM cover. Quantity 1 Color Black Torque - Part Number - 3. Disassembly Procedures Removing the DIMM Cover and Module 1.
Perform the ""Pre-disassembly Procedure" " on both sides of circuit board. 24 Veriton Z2610G/Z2611G/Z2620G/Z2621G AIO Computer Service Guide Release the latch on page 23. 2. Follow local regulations for disposing this type of the DIMM module and remove the DIMM module from the system. A circuit board that is >10 cm2 has been highlighted with a yellow rectangle as shown in the above image. Use a philip screw driver and remove the screw securing the DIMM cover. Quantity 1 Color Black Torque - Part Number - 3. Disassembly Procedures Removing the DIMM Cover and Module 1.

Acer Veriton Z2610G and Z2621G Desktop Service Guide
Page 33
Quantity 2 Color Silver Torque 8.0 ± 0.5 kgf-cm Part Number 86.00J97.668 Veriton Z2610G/Z2611G/Z2620G/Z2621G AIO Computer Service Guide 25 Perform the ""Pre-disassembly Procedure" " on page 23. 2. Lift to remove the plastic shell covering the computer stand screws. 3. Removing the Computer Stand 1. Remove the screws securing the computer stand.
Quantity 2 Color Silver Torque 8.0 ± 0.5 kgf-cm Part Number 86.00J97.668 Veriton Z2610G/Z2611G/Z2620G/Z2621G AIO Computer Service Guide 25 Perform the ""Pre-disassembly Procedure" " on page 23. 2. Lift to remove the plastic shell covering the computer stand screws. 3. Removing the Computer Stand 1. Remove the screws securing the computer stand.

Acer Veriton Z2610G and Z2621G Desktop Service Guide
Page 34
Perform the ""Pre-disassembly Procedure" " on page 23. 2. 4. Remove the computer stand. Quantity 2 Color Black Torque 3.0 ± 0.5 kgf-cm Part Number 86.ZA324.8R0 26 Veriton Z2610G/Z2611G/Z2620G/Z2621G AIO Computer Service Guide Remove the screws securing the left and right foot stands. Removing the Left and Right Foot Stands 1.
Perform the ""Pre-disassembly Procedure" " on page 23. 2. 4. Remove the computer stand. Quantity 2 Color Black Torque 3.0 ± 0.5 kgf-cm Part Number 86.ZA324.8R0 26 Veriton Z2610G/Z2611G/Z2620G/Z2621G AIO Computer Service Guide Remove the screws securing the left and right foot stands. Removing the Left and Right Foot Stands 1.
Acer Veriton Z2610G and Z2621G Desktop Service Guide
Page 84
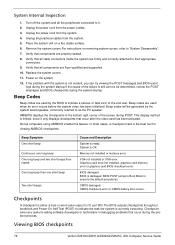
... cables from the power outlets. 3. Verify that components are Acer-qualified and supported. 10. Beep codes are used by the... evident, you can not be generated by the BIOS to indicate a serious or fatal error to "System Disassembly". 7. Turn off the system and all components are properly seated. 8. Verify that occur after the video.../not installed, graphics card memory error or graphics card BIOS checksum error. Viewing BIOS checkpoints 76 Veriton Z2610G/Z2611G/Z2620G/Z2621G AIO Computer Service Guide System Internal Inspection 1. Verify that occur during the system ...
... cables from the power outlets. 3. Verify that components are Acer-qualified and supported. 10. Beep codes are used by the... evident, you can not be generated by the BIOS to indicate a serious or fatal error to "System Disassembly". 7. Turn off the system and all components are properly seated. 8. Verify that occur after the video.../not installed, graphics card memory error or graphics card BIOS checksum error. Viewing BIOS checkpoints 76 Veriton Z2610G/Z2611G/Z2620G/Z2621G AIO Computer Service Guide System Internal Inspection 1. Verify that occur during the system ...
Acer Veriton Z2610G and Z2621G Desktop Service Guide
Page 131
...menu 12 Miscellaneous submenu 14 navigation keys 11 overview 9 PC Health Status submenu 17 Power menu 18 computer stand remove 25 connectivity Ethernet 6 WLAN 7 D disassembly procedures computer stand 25 guidelines 91 mainboard 48 preparatory steps 23 processor 46 speakers 43 tools 23 display display by model 1 E environmental requirements 2 Ethernet ... 16 K keyboard port 4 L LAN port location 4 specifications 6 M Main menu 12 mainboard component identification 86 remove 48 specifications 2 media storage 1 memory check size 12 Veriton Z2610G/Z2611G/Z2620G/Z2621G AIO Computer Service Guide 123
...menu 12 Miscellaneous submenu 14 navigation keys 11 overview 9 PC Health Status submenu 17 Power menu 18 computer stand remove 25 connectivity Ethernet 6 WLAN 7 D disassembly procedures computer stand 25 guidelines 91 mainboard 48 preparatory steps 23 processor 46 speakers 43 tools 23 display display by model 1 E environmental requirements 2 Ethernet ... 16 K keyboard port 4 L LAN port location 4 specifications 6 M Main menu 12 mainboard component identification 86 remove 48 specifications 2 media storage 1 memory check size 12 Veriton Z2610G/Z2611G/Z2620G/Z2621G AIO Computer Service Guide 123


