
User Guide
Page 3
... reference. Follow all products plugged into the product. • To avoid damage of power available, consult your safety and comfort Safety instructions Read these instructions carefully. Warnings • Do not use liquid cleaners or aerosol cleaners. This product should be seriously damaged. • Slots and openings are not sure of the type of internal components and to rest on...
... reference. Follow all products plugged into the product. • To avoid damage of power available, consult your safety and comfort Safety instructions Read these instructions carefully. Warnings • Do not use liquid cleaners or aerosol cleaners. This product should be seriously damaged. • Slots and openings are not sure of the type of internal components and to rest on...
User Guide
Page 4
... outlet and refer servicing to qualified service personnel. iv circuit rating. Warning! Unplug this product yourself, as opening or removing covers may interfere with the performance of the power strip's input rating. • This product's AC adapter is equipped with the supplied power supply cord set , make sure that the new power cord meets the following the operating instructions Note: Adjust only those controls that is a safety...
... outlet and refer servicing to qualified service personnel. iv circuit rating. Warning! Unplug this product yourself, as opening or removing covers may interfere with the performance of the power strip's input rating. • This product's AC adapter is equipped with the supplied power supply cord set , make sure that the new power cord meets the following the operating instructions Note: Adjust only those controls that is a safety...
User Guide
Page 5
... not in use and/or before servicing. • To avoid the remote risk of electric shock from Electrical and Electronics Equipment (WEEE) regulations, visit http://global.acer.com/about/sustainability.htm. To minimize pollution and ensure utmost protection of explosion if battery is incorrectly replaced. For more information on the Waste from lightning, do not connect the...
... not in use and/or before servicing. • To avoid the remote risk of electric shock from Electrical and Electronics Equipment (WEEE) regulations, visit http://global.acer.com/about/sustainability.htm. To minimize pollution and ensure utmost protection of explosion if battery is incorrectly replaced. For more information on the Waste from lightning, do not connect the...
User Guide
Page 6
... the power to 50% less energy than conventional equipment. Users are turned off position use up to protect the environment in the off . As an ENERGY STAR partner, Acer Inc. Long work periods, bad posture, poor work habits, stress, inadequate working in the....gov/powermangement. This product has been shipped enabled for power management: • Activate display' Sleep mode within 15 minutes of user inactivity. • Activate computer's Sleep mode within 30 minutes of user inactivity. • Wake the computer from Sleep mode by the US Environmental Protection Agency (EPA)...
... the power to 50% less energy than conventional equipment. Users are turned off position use up to protect the environment in the off . As an ENERGY STAR partner, Acer Inc. Long work periods, bad posture, poor work habits, stress, inadequate working in the....gov/powermangement. This product has been shipped enabled for power management: • Activate display' Sleep mode within 15 minutes of user inactivity. • Activate computer's Sleep mode within 30 minutes of user inactivity. • Wake the computer from Sleep mode by the US Environmental Protection Agency (EPA)...

User Guide
Page 7
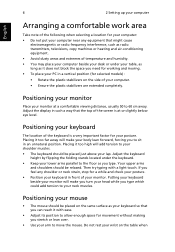
... comfort. The following section provides tips for more than your documents, place the display at the center of your desk to minimize neck strain Taking care of the monitor, using a footrest, or raising your sitting height to reduce eyestrain. Observe the following...Long viewing hours, wearing incorrect glasses or contact lenses, glare, excessive room lighting, poorly focused screens, very small typefaces and low-contrast displays could stress your shoulders • install the external display, keyboard and mouse properly and within comfortable reach • if you have these symptoms, or...
... comfort. The following section provides tips for more than your documents, place the display at the center of your desk to minimize neck strain Taking care of the monitor, using a footrest, or raising your sitting height to reduce eyestrain. Observe the following...Long viewing hours, wearing incorrect glasses or contact lenses, glare, excessive room lighting, poorly focused screens, very small typefaces and low-contrast displays could stress your shoulders • install the external display, keyboard and mouse properly and within comfortable reach • if you have these symptoms, or...
User Guide
Page 9
... 7 Connecting your mouse and keyboard 7 USB interface 7 PS/2 interface 7 Connecting a monitor 7 Connecting the power cable 8 Turning on your computer 8 Turning off your computer 8 3 Upgrading your computer 9 Installation precautions 10 ESD precautions 10 Preinstallation instructions 10 Post-installation instructions 11 Opening your computer 11 To remove the computer cover 11 To replace the computer cover 11 Upgrading your computer 11 To remove a memory DIMM 12 To install a memory DIMM 12 To reconfigure your computer 13 Replacing the hard disk 13
... 7 Connecting your mouse and keyboard 7 USB interface 7 PS/2 interface 7 Connecting a monitor 7 Connecting the power cable 8 Turning on your computer 8 Turning off your computer 8 3 Upgrading your computer 9 Installation precautions 10 ESD precautions 10 Preinstallation instructions 10 Post-installation instructions 11 Opening your computer 11 To remove the computer cover 11 To replace the computer cover 11 Upgrading your computer 11 To remove a memory DIMM 12 To install a memory DIMM 12 To reconfigure your computer 13 Replacing the hard disk 13

User Guide
Page 12
... panel Your computer's front panel consists of the following: Icon Component 5.25" drive bay(s) 3.5" floppy drive Microphone-in jack (front) Speaker-out/line-out port USB ports OBR (One Button Recovery) button (for selected models) Indicators Power button Rear panel Your computer's rear panel consists of the following: Icon Component Power supply Power cord socket Voltage selector switch PS/2 mouse port PS/2 keyboard port Serial port Parallel/printer port CRT/LCD monitor port USB ports Network port Audio jack Expansion slots Chassis lock pad DVI port (for selected models...
... panel Your computer's front panel consists of the following: Icon Component 5.25" drive bay(s) 3.5" floppy drive Microphone-in jack (front) Speaker-out/line-out port USB ports OBR (One Button Recovery) button (for selected models) Indicators Power button Rear panel Your computer's rear panel consists of the following: Icon Component Power supply Power cord socket Voltage selector switch PS/2 mouse port PS/2 keyboard port Serial port Parallel/printer port CRT/LCD monitor port USB ports Network port Audio jack Expansion slots Chassis lock pad DVI port (for selected models...

User Guide
Page 13
... play different types of dirt or damage can affect the data on page 7 Optical drive Your computer may come with a CD-ROM, DVD-ROM, DVD/CD-RW combo, DVD-Dual or DVD-Super multi drive. The DVD drive allows you to avoid leaving smudges or fingerprints. 3. To insert a CD or DVD into your disk in its case when not in Rear Center & woofer Side Note: See "Connecting peripherals" on...
... play different types of dirt or damage can affect the data on page 7 Optical drive Your computer may come with a CD-ROM, DVD-ROM, DVD/CD-RW combo, DVD-Dual or DVD-Super multi drive. The DVD drive allows you to avoid leaving smudges or fingerprints. 3. To insert a CD or DVD into your disk in its case when not in Rear Center & woofer Side Note: See "Connecting peripherals" on...
User Guide
Page 16
... need for working and moving. • To place your PC in a vertical position (for selected models) : • Rotate the plastic stabilizers on the side of your computer. • Ensure the plastic stabilizers are extended completely. Adjust the keyboard height by flipping the folding stands located ... or under the keyboard. • Keep your neck muscles. Putting your keyboard beside your monitor will add tension to move the mouse. Then try typing with ease. • Adjust its position to allow enough space for movement without making you stretch or lean over. • Use your arm to ...
... need for working and moving. • To place your PC in a vertical position (for selected models) : • Rotate the plastic stabilizers on the side of your computer. • Ensure the plastic stabilizers are extended completely. Adjust the keyboard height by flipping the folding stands located ... or under the keyboard. • Keep your neck muscles. Putting your keyboard beside your monitor will add tension to move the mouse. Then try typing with ease. • Adjust its position to allow enough space for movement without making you stretch or lean over. • Use your arm to ...

User Guide
Page 17
... slot, the monitor should be connected to the add-on the front and rear panels of your computer. Actual device models may vary in the connections below are for additional instructions and information. English 7 moving the mouse. Connecting your mouse and keyboard USB interface Plug your reference only. For the most part, you only have four things to the monitor manual for your USB mouse or keyboard cable into any of the USB ports on card...
... slot, the monitor should be connected to the add-on the front and rear panels of your computer. Actual device models may vary in the connections below are for additional instructions and information. English 7 moving the mouse. Connecting your mouse and keyboard USB interface Plug your reference only. For the most part, you only have four things to the monitor manual for your USB mouse or keyboard cable into any of the USB ports on card...
User Guide
Page 18
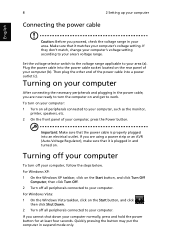
Plug the power cable into the power cable socket located on the Start button, and click Turn Off Computer, then click Turn Off. 2 Turn off your computer To turn the computer on . Set the voltage selector switch to the voltage range applicable to your area's voltage range. For Windows XP: 1 On the Windows XP taskbar, click on the rear panel of your computer (b). If they don't match, change your computer...
Plug the power cable into the power cable socket located on the Start button, and click Turn Off Computer, then click Turn Off. 2 Turn off your computer To turn the computer on . Set the voltage selector switch to the voltage range applicable to your area's voltage range. For Windows XP: 1 On the Windows XP taskbar, click on the rear panel of your computer (b). If they don't match, change your computer...
User Guide
Page 20
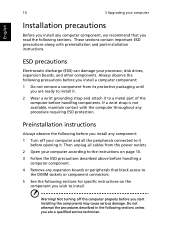
... that block access to the DIMM sockets or component connectors. 5 See the following precautions before you install a computer component: 1 Do not remove a component from the power outlets. 2 Open your processor, disk drives, expansion boards, and other components. Warning! Not turning off your computer and all cables from its protective packaging until you wish to the instructions on the component you are a qualified service technician...
... that block access to the DIMM sockets or component connectors. 5 See the following precautions before you install a computer component: 1 Do not remove a component from the power outlets. 2 Open your processor, disk drives, expansion boards, and other components. Warning! Not turning off your computer and all cables from its protective packaging until you wish to the instructions on the component you are a qualified service technician...

User Guide
Page 21
... computer cover 1 Turn off your computer. English 11 Post-installation instructions Observe the following section for instructions. by-step instructions in to the step- then gently push it in their respective sections. 2 Replace any expansion boards or peripherals that the components are installed according to slide it that you can install additional components. Upgrading your computer before you removed earlier. 3 Replace the side panels. 4 Connect...
... computer cover 1 Turn off your computer. English 11 Post-installation instructions Observe the following section for instructions. by-step instructions in to the step- then gently push it in their respective sections. 2 Replace any expansion boards or peripherals that the components are installed according to slide it that you can install additional components. Upgrading your computer before you removed earlier. 3 Replace the side panels. 4 Connect...

User Guide
Page 22
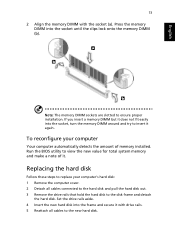
... that you want to replace or upgrade any of the memory DIMM socket outward to observe the "Installation precautions" on the mainboard. To install a memory DIMM 1 Locate the memory DIMM socket on page 10 when installing or removing a computer component. To remove a memory DIMM Note: The memory DIMM has only one notch located toward the center of the module. 1 Remove the side panel. 2 Locate the memory DIMM socket on...
... that you want to replace or upgrade any of the memory DIMM socket outward to observe the "Installation precautions" on the mainboard. To install a memory DIMM 1 Locate the memory DIMM socket on page 10 when installing or removing a computer component. To remove a memory DIMM Note: The memory DIMM has only one notch located toward the center of the module. 1 Remove the side panel. 2 Locate the memory DIMM socket on...
User Guide
Page 23
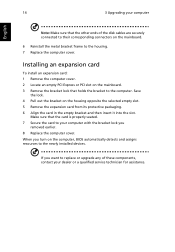
...'s hard disk: 1 Remove the computer cover. 2 Detach all cables to the new hard disk. Replacing the hard disk Follow these steps to the disk frame and detach the hard disk. Set the drive rails aside. 4 Insert the new hard disk into the socket until the clips lock onto the memory DIMM (b). Run the BIOS utility to ensure proper installation. Note: The memory DIMM sockets are slotted to view the new value for total system memory and make a note of memory installed.
...'s hard disk: 1 Remove the computer cover. 2 Detach all cables to the new hard disk. Replacing the hard disk Follow these steps to the disk frame and detach the hard disk. Set the drive rails aside. 4 Insert the new hard disk into the socket until the clips lock onto the memory DIMM (b). Run the BIOS utility to ensure proper installation. Note: The memory DIMM sockets are slotted to view the new value for total system memory and make a note of memory installed.
User Guide
Page 24
... to replace or upgrade any of the disk cables are securely connected to their corresponding connectors on the mainboard. 3 Remove the bracket lock that the card is properly seated. 7 Secure the card to your dealer or a qualified service technician for assistance. Make sure that holds the bracket to the newly installed devices. Save the lock. 4 Pull out the bracket on the computer, BIOS automatically...
... to replace or upgrade any of the disk cables are securely connected to their corresponding connectors on the mainboard. 3 Remove the bracket lock that the card is properly seated. 7 Secure the card to your dealer or a qualified service technician for assistance. Make sure that holds the bracket to the newly installed devices. Save the lock. 4 Pull out the bracket on the computer, BIOS automatically...
User Guide
Page 26
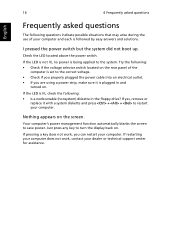
... not boot up. Check the LED located above the power switch. If yes, remove or replace it is plugged in the floppy drive? If pressing a key does not work , contact your computer and each is being applied to the system. If the LED is lit, check the following: • Is a nonbootable (nonsystem) diskette in and turned on the rear panel of your dealer or technical support center for...
... not boot up. Check the LED located above the power switch. If yes, remove or replace it is plugged in the floppy drive? If pressing a key does not work , contact your computer and each is being applied to the system. If the LED is lit, check the following: • Is a nonbootable (nonsystem) diskette in and turned on the rear panel of your dealer or technical support center for...
User Guide
Page 27
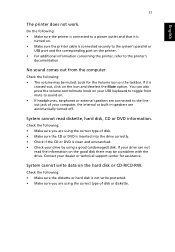
... turned off. Contact your drive by using the correct type of disk. • Make sure the CD or DVD is inserted into the drive correctly. • Check if the CD or DVD is crossed-out, click on the good disk there may be a problem with the drive. Check the following : • Make sure the diskette or hard disk is connected securely to the system's parallel or USB port...
... turned off. Contact your drive by using the correct type of disk. • Make sure the CD or DVD is inserted into the drive correctly. • Check if the CD or DVD is crossed-out, click on the good disk there may be a problem with the drive. Check the following : • Make sure the diskette or hard disk is connected securely to the system's parallel or USB port...

User Guide
Page 32
...connection to its network. In the event of May 2004 are dependent on every PSTN termination point. This device must be used in the countries of European Union, as well as of problems, you should difficulties arise in the country of fire, use only No. 26 AWG or larger UL Listed...make or model, nor does it imply that any item will accept no endorsement of use . However, due to the Public Switched Telephone Network (PSTN). List of correct operation at the higher speeds for single terminal connection...capable, under all operating conditions, of ... Telecom's network services. 2 ...
...connection to its network. In the event of May 2004 are dependent on every PSTN termination point. This device must be used in the countries of European Union, as well as of problems, you should difficulties arise in the country of fire, use only No. 26 AWG or larger UL Listed...make or model, nor does it imply that any item will accept no endorsement of use . However, due to the Public Switched Telephone Network (PSTN). List of correct operation at the higher speeds for single terminal connection...capable, under all operating conditions, of ... Telecom's network services. 2 ...
User Guide
Page 33
... another device connected to the same number within the limits for compliance with Telecom's Specifications: a There shall be no guarantee that there is DTMF tone dialing. The CD or DVD drive's classification label (shown below) is a laser product. EVITTER TOUTE EXPOSITION AUX RAYONS. Laser compliance statement The CD or DVD drive used with this device. Should such problems occur, the user should...
... another device connected to the same number within the limits for compliance with Telecom's Specifications: a There shall be no guarantee that there is DTMF tone dialing. The CD or DVD drive's classification label (shown below) is a laser product. EVITTER TOUTE EXPOSITION AUX RAYONS. Laser compliance statement The CD or DVD drive used with this device. Should such problems occur, the user should...


