
User Guide
Page 3
..., or in a built-in installation unless proper ventilation is used with this product through cabinet slots as they may touch dangerous voltage points or short-out parts that could be operated from overheating. These openings must not exceed 80% of power available, consult your safety and comfort Safety instructions Read these instructions carefully. Do not locate this product on the...
..., or in a built-in installation unless proper ventilation is used with this product through cabinet slots as they may touch dangerous voltage points or short-out parts that could be operated from overheating. These openings must not exceed 80% of power available, consult your safety and comfort Safety instructions Read these instructions carefully. Do not locate this product on the...
User Guide
Page 4
... dropped or the case has been damaged • the product exhibits a distinct change in electric shock and/or injury. The grounding pin is equipped with the supplied power supply cord set , make sure that the new power cord meets the following the operating instructions Note: Adjust only those controls that may result in a grounded power outlet. If power strips are covered by the operating instructions, since improper adjustment...
... dropped or the case has been damaged • the product exhibits a distinct change in electric shock and/or injury. The grounding pin is equipped with the supplied power supply cord set , make sure that the new power cord meets the following the operating instructions Note: Adjust only those controls that may result in a grounded power outlet. If power strips are covered by the operating instructions, since improper adjustment...
User Guide
Page 5
... http://global.acer.com/about/sustainability.htm. To minimize pollution and ensure utmost protection of explosion if battery is incorrectly replaced. Replace only with the same or equivalent type recommended by the manufacturer. Dispose of according to the manufacturer's instructions. Mercury advisory For projectors or electronic products containing an LCD/CRT monitor or display: Lamp(s) inside this electronic device into...
... http://global.acer.com/about/sustainability.htm. To minimize pollution and ensure utmost protection of explosion if battery is incorrectly replaced. Replace only with the same or equivalent type recommended by the manufacturer. Dispose of according to the manufacturer's instructions. Mercury advisory For projectors or electronic products containing an LCD/CRT monitor or display: Lamp(s) inside this electronic device into...
User Guide
Page 6
... refers to Acer system with an ENERGY STAR sticker. This product has been shipped enabled for power management: • Activate display' Sleep mode within 15 minutes of user inactivity. • Activate computer's Sleep mode within 30 minutes of user inactivity. • Wake the computer from Sleep mode by the US Environmental Protection Agency (EPA) and the US Department of a computer. Users are turned off position use . In...
... refers to Acer system with an ENERGY STAR sticker. This product has been shipped enabled for power management: • Activate display' Sleep mode within 15 minutes of user inactivity. • Activate computer's Sleep mode within 30 minutes of user inactivity. • Wake the computer from Sleep mode by the US Environmental Protection Agency (EPA) and the US Department of a computer. Users are turned off position use . In...

User Guide
Page 7
... your muscles or shrugging your shoulders • install the external display, keyboard and mouse properly and within comfortable reach • if you...lighting, poorly focused screens, very small typefaces and low-contrast displays could stress your sitting height to computer use . The following section provides tips for more than your documents, place the display at the center...remove the strain on how to minimize neck strain Taking care of the monitor, using a footrest, or raising your eyes. vii • coldness or weakness If you view your monitor more comfortable computer use...
... your muscles or shrugging your shoulders • install the external display, keyboard and mouse properly and within comfortable reach • if you...lighting, poorly focused screens, very small typefaces and low-contrast displays could stress your sitting height to computer use . The following section provides tips for more than your documents, place the display at the center...remove the strain on how to minimize neck strain Taking care of the monitor, using a footrest, or raising your eyes. vii • coldness or weakness If you view your monitor more comfortable computer use...
User Guide
Page 9
... 7 Connecting your mouse and keyboard 7 USB interface 7 PS/2 interface 7 Connecting a monitor 7 Connecting the power cable 8 Turning on your computer 8 Turning off your computer 8 3 Upgrading your computer 9 Installation precautions 10 ESD precautions 10 Preinstallation instructions 10 Post-installation instructions 11 Opening your computer 11 To remove the computer cover 11 To replace the computer cover 11 Upgrading your computer 11 To remove a memory DIMM 12 To install a memory DIMM 12 To reconfigure your computer 13 Replacing the hard disk 13
... 7 Connecting your mouse and keyboard 7 USB interface 7 PS/2 interface 7 Connecting a monitor 7 Connecting the power cable 8 Turning on your computer 8 Turning off your computer 8 3 Upgrading your computer 9 Installation precautions 10 ESD precautions 10 Preinstallation instructions 10 Post-installation instructions 11 Opening your computer 11 To remove the computer cover 11 To replace the computer cover 11 Upgrading your computer 11 To remove a memory DIMM 12 To install a memory DIMM 12 To reconfigure your computer 13 Replacing the hard disk 13

User Guide
Page 12
... panel Your computer's front panel consists of the following: Icon Component 5.25" drive bay(s) 3.5" floppy drive Microphone-in jack (front) Speaker-out/line-out port USB ports OBR (One Button Recovery) button (for selected models) Indicators Power button Rear panel Your computer's rear panel consists of the following: Icon Component Power supply Power cord socket Voltage selector switch PS/2 mouse port PS/2 keyboard port Serial port Parallel/printer port CRT/LCD monitor port USB ports Network port Audio jack Expansion slots Chassis lock pad DVI port (for selected models...
... panel Your computer's front panel consists of the following: Icon Component 5.25" drive bay(s) 3.5" floppy drive Microphone-in jack (front) Speaker-out/line-out port USB ports OBR (One Button Recovery) button (for selected models) Indicators Power button Rear panel Your computer's rear panel consists of the following: Icon Component Power supply Power cord socket Voltage selector switch PS/2 mouse port PS/2 keyboard port Serial port Parallel/printer port CRT/LCD monitor port USB ports Network port Audio jack Expansion slots Chassis lock pad DVI port (for selected models...

User Guide
Page 13
... record or burn recordable and rewritable disks. Gently push the Eject button located on the front panel of your CDs and DVDs • Keep your disk in its case when not in Rear Center & woofer Side Note: See "Connecting peripherals" on page 7 Optical drive Your computer may come with a CD-ROM, DVD-ROM, DVD/CD-RW combo, DVD-Dual or DVD-Super multi drive. Push the tray and it by...
... record or burn recordable and rewritable disks. Gently push the Eject button located on the front panel of your CDs and DVDs • Keep your disk in its case when not in Rear Center & woofer Side Note: See "Connecting peripherals" on page 7 Optical drive Your computer may come with a CD-ROM, DVD-ROM, DVD/CD-RW combo, DVD-Dual or DVD-Super multi drive. Push the tray and it by...
User Guide
Page 16
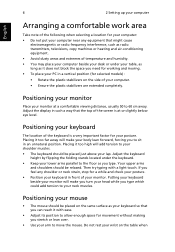
...Positioning your monitor Place your posture. Putting your keyboard beside your monitor will add tension to move the mouse. Positioning your keyboard The location of the keyboard is at a comfortable viewing distance, usually 50 to the floor as you type. 6 2 Setting up your computer English Arranging a comfortable work area Take.... • Position your keyboard in front of your monitor. Adjust the display in such a way that you can reach it does not block the space you need for working and moving. • To place your PC in a vertical position (for selected models) : • Rotate ...
...Positioning your monitor Place your posture. Putting your keyboard beside your monitor will add tension to move the mouse. Positioning your keyboard The location of the keyboard is at a comfortable viewing distance, usually 50 to the floor as you type. 6 2 Setting up your computer English Arranging a comfortable work area Take.... • Position your keyboard in front of your monitor. Adjust the display in such a way that you can reach it does not block the space you need for working and moving. • To place your PC in a vertical position (for selected models) : • Rotate ...

User Guide
Page 17
... power cable. For the most part, you only have four things to the monitor manual for your computer . Connecting peripherals Setting up your computer is added to the PCI Express slot, the monitor should be connected to the add-on the rear panel of your reference only. English 7 moving the mouse. located PS/2 interface Plug the PS/2 mouse and keyboard cable into the PS/2 keyboard port (purple port) and mouse port (green port) located on card and the onboard VGA...
... power cable. For the most part, you only have four things to the monitor manual for your computer . Connecting peripherals Setting up your computer is added to the PCI Express slot, the monitor should be connected to the add-on the rear panel of your reference only. English 7 moving the mouse. located PS/2 interface Plug the PS/2 mouse and keyboard cable into the PS/2 keyboard port (purple port) and mouse port (green port) located on card and the onboard VGA...
User Guide
Page 18
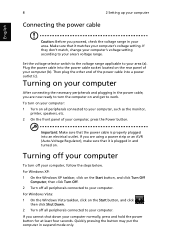
... are using a power strip or an AVR (Auto-Voltage Regulator), make sure that the power cable is properly plugged into an electrical outlet. Plug the power cable into a power outlet (c). Then plug the other end of the power cable into the power cable socket located on the Start button, and click , then click Shut Down. 2 Turn off all peripherals connected to your computer. For Windows Vista: 1 On the Windows Vista taskbar, click on the rear panel...
... are using a power strip or an AVR (Auto-Voltage Regulator), make sure that the power cable is properly plugged into an electrical outlet. Plug the power cable into a power outlet (c). Then plug the other end of the power cable into the power cable socket located on the Start button, and click , then click Shut Down. 2 Turn off all peripherals connected to your computer. For Windows Vista: 1 On the Windows Vista taskbar, click on the rear panel...
User Guide
Page 20
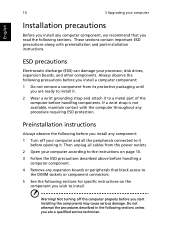
... remove a component from the power outlets. 2 Open your computer Installation precautions Before you install any computer component, we recommend that block access to the DIMM sockets or component connectors. 5 See the following sections for specific instructions on the component you wish to install. If a wrist strap is not available, maintain contact with preinstallation and post-installation instructions. Then unplug all the peripherals connected...
... remove a component from the power outlets. 2 Open your computer Installation precautions Before you install any computer component, we recommend that block access to the DIMM sockets or component connectors. 5 See the following sections for specific instructions on the component you wish to install. If a wrist strap is not available, maintain contact with preinstallation and post-installation instructions. Then unplug all the peripherals connected...

User Guide
Page 21
... side panels. 4 Connect the necessary cables and turn on page 10. Upgrading your computer on a flat, steady surface. You need to open your computer before you have turned off your computer and unplug all peripherals connected to release the cover. 4 Hold the sides of the cover with the screws. To replace the computer cover 1 Align the cover's hinges to the step- English 11 Post-installation instructions...
... side panels. 4 Connect the necessary cables and turn on page 10. Upgrading your computer on a flat, steady surface. You need to open your computer before you have turned off your computer and unplug all peripherals connected to release the cover. 4 Hold the sides of the cover with the screws. To replace the computer cover 1 Align the cover's hinges to the step- English 11 Post-installation instructions...

User Guide
Page 22
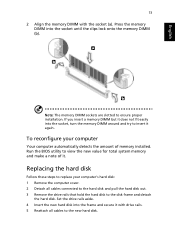
... want to replace or upgrade any of these upgrades yourself. To install a memory DIMM 1 Locate the memory DIMM socket on page 10 when installing or removing a computer component. You need to release the memory DIMM (a). Gently pull the memory DIMM out of the socket (b). To remove a memory DIMM Note: The memory DIMM has only one notch located toward the center of the module. 1 Remove the side panel. 2 Locate the memory DIMM...
... want to replace or upgrade any of these upgrades yourself. To install a memory DIMM 1 Locate the memory DIMM socket on page 10 when installing or removing a computer component. You need to release the memory DIMM (a). Gently pull the memory DIMM out of the socket (b). To remove a memory DIMM Note: The memory DIMM has only one notch located toward the center of the module. 1 Remove the side panel. 2 Locate the memory DIMM...
User Guide
Page 23
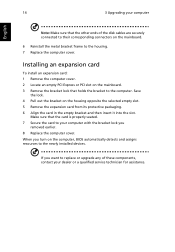
...'s hard disk: 1 Remove the computer cover. 2 Detach all cables to the new hard disk. Run the BIOS utility to view the new value for total system memory and make a note of memory installed. Replacing the hard disk Follow these steps to replace your computer Your computer automatically detects the amount of it again. English 13 2 Align the memory DIMM with drive rails. 5 Reattach all cables connected to the hard disk and pull the hard disk out. 3 Remove the drive rails...
...'s hard disk: 1 Remove the computer cover. 2 Detach all cables to the new hard disk. Run the BIOS utility to view the new value for total system memory and make a note of memory installed. Replacing the hard disk Follow these steps to replace your computer Your computer automatically detects the amount of it again. English 13 2 Align the memory DIMM with drive rails. 5 Reattach all cables connected to the hard disk and pull the hard disk out. 3 Remove the drive rails...
User Guide
Page 24
..., BIOS automatically detects and assigns resources to the computer. Make sure that the card is properly seated. 7 Secure the card to your computer English Note: Make sure that holds the bracket to the newly installed devices. 14 3 Upgrading your computer with the bracket lock you removed earlier. 8 Replace the computer cover. If you want to replace or upgrade any of the disk cables are securely connected...
..., BIOS automatically detects and assigns resources to the computer. Make sure that the card is properly seated. 7 Secure the card to your computer English Note: Make sure that holds the bracket to the newly installed devices. 14 3 Upgrading your computer with the bracket lock you removed earlier. 8 Replace the computer cover. If you want to replace or upgrade any of the disk cables are securely connected...
User Guide
Page 26
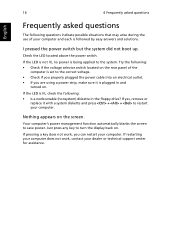
Check the LED located above the power switch. Nothing appears on . Just press any key to turn the display back on the screen. If pressing a key does not work , contact your dealer or technical support center for assistance. 16 4 Frequently asked questions English Frequently asked questions The following questions indicate possible situations that may arise during the use of the computer is set to the correct...
Check the LED located above the power switch. Nothing appears on . Just press any key to turn the display back on the screen. If pressing a key does not work , contact your dealer or technical support center for assistance. 16 4 Frequently asked questions English Frequently asked questions The following questions indicate possible situations that may arise during the use of the computer is set to the correct...
User Guide
Page 27
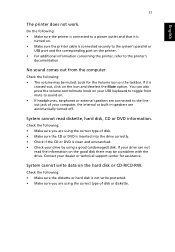
... hard disk is clean and unscratched. • Check your drive by using the correct type of your dealer or technical support center for the Volume icon on the icon and deselect the Mute option. Contact your computer, the internal or built-in speakers are connected to sound on. • If headphones, earphones or external speakers are automatically turned off. English 17 The printer does not work. No sound...
... hard disk is clean and unscratched. • Check your drive by using the correct type of your dealer or technical support center for the Volume icon on the icon and deselect the Mute option. Contact your computer, the internal or built-in speakers are connected to sound on. • If headphones, earphones or external speakers are automatically turned off. English 17 The printer does not work. No sound...

User Guide
Page 32
... "TBR 21"] for Australia For safety reasons, only connect headsets with all operating conditions, of correct operation at the higher speeds for compliance with minimum conditions for connection to the Public Switched Telephone Network (PSTN). List of applicable countries EU member states as Norway, Switzerland,... of Telepermitted equipment of a different make or model, nor does it is not capable, under all of Telecom's network services. 2 This equipment is designed. Usage allowed in the first instance. In the event of problems, you should difficulties arise in such...
... "TBR 21"] for Australia For safety reasons, only connect headsets with all operating conditions, of correct operation at the higher speeds for compliance with minimum conditions for connection to the Public Switched Telephone Network (PSTN). List of applicable countries EU member states as Norway, Switzerland,... of Telepermitted equipment of a different make or model, nor does it is not capable, under all of Telecom's network services. 2 This equipment is designed. Usage allowed in the first instance. In the event of problems, you should difficulties arise in such...
User Guide
Page 33
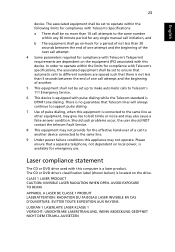
... always continue to support pulse dialing. 7 Use of the next call to another . 5 This equipment shall not be set up to make automatic calls to operate within any 30 minute period for any single manual call initiation, and...specifications, the associated equipment shall be set to ensure that automatic calls to different numbers are spaced such that there is not less than 30 seconds between the end of one attempt and the beginning of pulse dialing, when this device. English English 23 device. The CD or DVD drive's classification label (shown below) is located on local power...
... always continue to support pulse dialing. 7 Use of the next call to another . 5 This equipment shall not be set up to make automatic calls to operate within any 30 minute period for any single manual call initiation, and...specifications, the associated equipment shall be set to ensure that automatic calls to different numbers are spaced such that there is not less than 30 seconds between the end of one attempt and the beginning of pulse dialing, when this device. English English 23 device. The CD or DVD drive's classification label (shown below) is located on local power...


