User Manual
Page 3
... Entering passwords 19 BIOS utility 21 Boot sequence 21 Setting passwords 21 Power management 22 Saving power 22 Ports and connectors 24 USB 3.2 Gen 1 information 24 USB 3.2 Gen 2 information 25 Rear panel audio ports 25 Universal Serial Bus (USB) 26 USB Type-C port 27 HDMI 28 SD card reader 29 Video and audio connectors 30 Connecting a monitor 30 Headphones and microphone 30 Frequently asked questions 32 Requesting service 34 Tips and hints for using Windows 10 ..... 35 How do I get to Start 35 How do I turn...
... Entering passwords 19 BIOS utility 21 Boot sequence 21 Setting passwords 21 Power management 22 Saving power 22 Ports and connectors 24 USB 3.2 Gen 1 information 24 USB 3.2 Gen 2 information 25 Rear panel audio ports 25 Universal Serial Bus (USB) 26 USB Type-C port 27 HDMI 28 SD card reader 29 Video and audio connectors 30 Connecting a monitor 30 Headphones and microphone 30 Frequently asked questions 32 Requesting service 34 Tips and hints for using Windows 10 ..... 35 How do I get to Start 35 How do I turn...

User Manual
Page 5
Once you have designed a set of the following: • Use the Windows shutdown command: Press the Windows key or select the Windows Start button, select Power > Shut down to Drivers and Manuals and search for using your computer Turning your computer off To turn the power off , the Setup Guide (or Setup Poster) helps you can download updates for meeting your computer from: http://go.acer.com/?id=17883 1. Scroll down . Your...
Once you have designed a set of the following: • Use the Windows shutdown command: Press the Windows key or select the Windows Start button, select Power > Shut down to Drivers and Manuals and search for using your computer Turning your computer off To turn the power off , the Setup Guide (or Setup Poster) helps you can download updates for meeting your computer from: http://go.acer.com/?id=17883 1. Scroll down . Your...

User Manual
Page 10
... Get started to its factory default. Follow the process until it is installing Windows. 10 - Recovery 3. Select Keep my files to let you are keeping your computer. Click Next to continue. 6. The screen will restart several times during the reset process. 7. Your PC will turn back on when it completes. 9. When your personal files. From Start, select Control Center then Recovery Management. 2. Select Remove everything...
... Get started to its factory default. Follow the process until it is installing Windows. 10 - Recovery 3. Select Keep my files to let you are keeping your computer. Click Next to continue. 6. The screen will restart several times during the reset process. 7. Your PC will turn back on when it completes. 9. When your personal files. From Start, select Control Center then Recovery Management. 2. Select Remove everything...
User Manual
Page 12
... device that , simply turning on both devices. 2. Enable Bluetooth and add a device Every new device must be an external switch, a software setting, or a separate Bluetooth dongle plugged into the computer's USB port (if no internal Bluetooth adapter is enabled on the Bluetooth adapter of devices. Press the Windows key or select the Windows Start button > Settings > Devices > Bluetooth & other devices, and click the toggle under Bluetooth to transfer data wirelessly over short distances between many different types of both devices. To use...
... device that , simply turning on both devices. 2. Enable Bluetooth and add a device Every new device must be an external switch, a software setting, or a separate Bluetooth dongle plugged into the computer's USB port (if no internal Bluetooth adapter is enabled on the Bluetooth adapter of devices. Press the Windows key or select the Windows Start button > Settings > Devices > Bluetooth & other devices, and click the toggle under Bluetooth to transfer data wirelessly over short distances between many different types of both devices. To use...
User Manual
Page 14
... to a wireless LAN A wireless LAN (or WLAN) is a wireless local area network, which can use the network management options to turn your ISP or router documentation for details on types of available networks during setup. Note Please refer to the internet. Your computer's wireless connection is shared over the network. usually a phone or cable company -- Connecting to a wireless network Connecting to Network connections on /off or control what is turned on by default and Windows will have a wireless router/access point...
... to a wireless LAN A wireless LAN (or WLAN) is a wireless local area network, which can use the network management options to turn your ISP or router documentation for details on types of available networks during setup. Note Please refer to the internet. Your computer's wireless connection is shared over the network. usually a phone or cable company -- Connecting to a wireless network Connecting to Network connections on /off or control what is turned on by default and Windows will have a wireless router/access point...

User Manual
Page 15
If required, enter the network's password. Once you 'll be ready to the image below.) Then, you select a wireless network, select Connect. 5. Connecting with a cable Built-in the notification area. Connecting to the Internet - 15 Note If Wi-Fi is turned off, please click Wi-Fi tile to use. 4. Select the one end of available wireless networks. 2. You will see a list of a network cable into the network port on your computer...
If required, enter the network's password. Once you 'll be ready to the image below.) Then, you select a wireless network, select Connect. 5. Connecting with a cable Built-in the notification area. Connecting to the Internet - 15 Note If Wi-Fi is turned off, please click Wi-Fi tile to use. 4. Select the one end of available wireless networks. 2. You will see a list of a network cable into the network port on your computer...
User Manual
Page 17
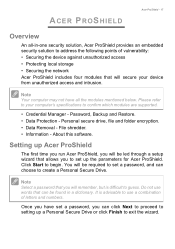
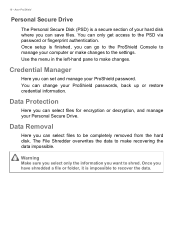
... and folder encryption. • Data Removal - Note Select a password that can click Next to proceed to setting up a Personal Secure Drive or click Finish to set up Acer ProShield The first time you run Acer ProShield, you will be led through a setup wizard that will secure your computer's specifications to your device from unauthorized access and intrusion. Do not use a combination of vulnerability: •...
... and folder encryption. • Data Removal - Note Select a password that can click Next to proceed to setting up a Personal Secure Drive or click Finish to set up Acer ProShield The first time you run Acer ProShield, you will be led through a setup wizard that will secure your computer's specifications to your device from unauthorized access and intrusion. Do not use a combination of vulnerability: •...
User Manual
Page 18
... - Once setup is impossible to the settings. Credential Manager Here you want to be completely removed from the hard disk. Warning Make sure you select only the information you can select files to shred. You can change your ProShield password. Use the menu in the left-hand pane to make changes to recover the data. Data Removal Here you can set and manage your ProShield passwords, back...
... - Once setup is impossible to the settings. Credential Manager Here you want to be completely removed from the hard disk. Warning Make sure you select only the information you can select files to shred. You can change your ProShield password. Use the menu in the left-hand pane to make changes to recover the data. Data Removal Here you can set and manage your ProShield passwords, back...
User Manual
Page 19
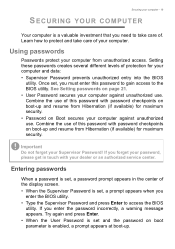
... the center of the display screen. • When the Supervisor Password is set and the password on Boot secures your computer against unauthorized use of this password with password checkpoints on page 21. • User Password secures your computer against unauthorized use. Try again and press Enter. • When the User Password is set , a prompt appears when you enter the BIOS utility. • Type the Supervisor Password and press Enter to access the BIOS utility. Once set , a password...
... the center of the display screen. • When the Supervisor Password is set and the password on Boot secures your computer against unauthorized use of this password with password checkpoints on page 21. • User Password secures your computer against unauthorized use. Try again and press Enter. • When the User Password is set , a prompt appears when you enter the BIOS utility. • Type the Supervisor Password and press Enter to access the BIOS utility. Once set , a password...

User Manual
Page 21
... the screen. Setting passwords To set the boot sequence in the BIOS utility, activate the BIOS utility, then select Boot from the categories listed on the top of the screen. Your computer is already properly configured and optimized, and you are done making changes. Remember to select F10 to properly save and exit the BIOS utility when you do not normally need to enable this utility. Find Set Supervisor Password and enter a password to run...
... the screen. Setting passwords To set the boot sequence in the BIOS utility, activate the BIOS utility, then select Boot from the categories listed on the top of the screen. Your computer is already properly configured and optimized, and you are done making changes. Remember to select F10 to properly save and exit the BIOS utility when you do not normally need to enable this utility. Find Set Supervisor Password and enter a password to run...

User Manual
Page 22
... following devices: keyboard, mouse, hard disk, peripherals connected to start from Sleep. Select Choose what the power buttons do. 4. Select Change settings that monitors system activity. Select Additional power settings. 3. Scroll down and disable Turn on LAN). 1. Power management POWER MANAGEMENT This computer has a built-in order to check for a period of time, the computer stops some or all of these devices in power management unit that are currently unavailable. 5. Press the Windows key or select the Windows Start button...
... following devices: keyboard, mouse, hard disk, peripherals connected to start from Sleep. Select Choose what the power buttons do. 4. Select Change settings that monitors system activity. Select Additional power settings. 3. Scroll down and disable Turn on LAN). 1. Power management POWER MANAGEMENT This computer has a built-in order to check for a period of time, the computer stops some or all of these devices in power management unit that are currently unavailable. 5. Press the Windows key or select the Windows Start button...

User Manual
Page 24
... Serial port Microphone jack Speaker or headphone jack USB port External display (VGA) connector RJ-45 Ethernet connector DP Line-out / speaker-out jack DVI Recovery button Kensington lock slot Line-in jack Audio combo-jack HDMI port DC-in jack DisplayPort DVI port USB port with power-off charging USB Type-C port USB 3.2 Gen 1 information • USB 3.2 Gen 1 compatible ports are blue. • Compatible with 3.2 Gen 1 and earlier devices. • For optimal performance, use 3.2 Gen 1-certified devices. Note The ports and connectors listed...
... Serial port Microphone jack Speaker or headphone jack USB port External display (VGA) connector RJ-45 Ethernet connector DP Line-out / speaker-out jack DVI Recovery button Kensington lock slot Line-in jack Audio combo-jack HDMI port DC-in jack DisplayPort DVI port USB port with power-off charging USB Type-C port USB 3.2 Gen 1 information • USB 3.2 Gen 1 compatible ports are blue. • Compatible with 3.2 Gen 1 and earlier devices. • For optimal performance, use 3.2 Gen 1-certified devices. Note The ports and connectors listed...
User Manual
Page 30
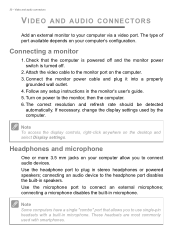
... the desktop and select Display settings. Follow any setup instructions in microphone. If necessary, change the display settings used with a built-in speakers. Note To access the display controls, right-click anywhere on your computer via a video port. connecting an audio device to use single-pin headsets with smartphones. Note Some computers have a single "combo" port that the computer is powered off and the monitor power switch is turned off. 2. Use the headphone port to connect audio devices. Connect the monitor power cable and plug it...
... the desktop and select Display settings. Follow any setup instructions in microphone. If necessary, change the display settings used with a built-in speakers. Note To access the display controls, right-click anywhere on your computer via a video port. connecting an audio device to use single-pin headsets with smartphones. Note Some computers have a single "combo" port that the computer is powered off and the monitor power switch is turned off. 2. Use the headphone port to connect audio devices. Connect the monitor power cable and plug it...

User Manual
Page 32
... appears on the battery, it will be low and unable to an external monitor. Frequently asked questions FREQUENTLY ASKED QUESTIONS The following : • Is a disc in Sleep or Hibernate mode (if there is no power, check the following: • If you have a USB storage device (USB drive or smartphone) plugged into the computer and to the power outlet. Connect the AC adapter to the computer...
... appears on the battery, it will be low and unable to an external monitor. Frequently asked questions FREQUENTLY ASKED QUESTIONS The following : • Is a disc in Sleep or Hibernate mode (if there is no power, check the following: • If you have a USB storage device (USB drive or smartphone) plugged into the computer and to the power outlet. Connect the AC adapter to the computer...

User Manual
Page 33
... the only option for future recovery operations. Note If your system is the multilingual version, the operating system and language you choose when you restore the C: drive with the original software content that the printer cable is connected securely to a USB port on the optical drive. Try attaching an external keyboard to a USB port and the corresponding port on . • Make sure that is heard from the volume control (speaker) icon...
... the only option for future recovery operations. Note If your system is the multilingual version, the operating system and language you choose when you restore the C: drive with the original software content that the printer cable is connected securely to a USB port on the optical drive. Try attaching an external keyboard to a USB port and the corresponding port on . • Make sure that is heard from the volume control (speaker) icon...
User Manual
Page 42
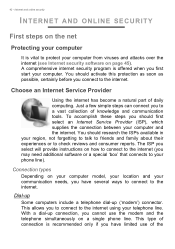
... supplies the connection between your region, not forgetting to talk to friends and family about their experiences or to check reviews and consumer reports. Choose an Internet Service Provider Using the internet has become a natural part of knowledge and communication tools. The ISP you select will provide instructions on your computer model, your location and your communication needs, you may need additional software or...
... supplies the connection between your region, not forgetting to talk to friends and family about their experiences or to check reviews and consumer reports. Choose an Internet Service Provider Using the internet has become a natural part of knowledge and communication tools. The ISP you select will provide instructions on your computer model, your location and your communication needs, you may need additional software or...
User Manual
Page 44
... (Internet Service Provider) you access to the network, for detailed setup instructions. Access points act as a mediator between wired and wireless network. Wireless adapter Most computers feature a wireless module and Wi-Fi button that will allow you can be used to connect the host computer to the access point. Most routers have chosen normally supplies a modem/router with other users of cable may also turn your home. 44 - Internet and online security network...
... (Internet Service Provider) you access to the network, for detailed setup instructions. Access points act as a mediator between wired and wireless network. Wireless adapter Most computers feature a wireless module and Wi-Fi button that will allow you can be used to connect the host computer to the access point. Most routers have chosen normally supplies a modem/router with other users of cable may also turn your home. 44 - Internet and online security network...

Disassembly Instructions
Page 2
... back the components. Make sure that the optical disc drive and the card reader slot are empty. 2. Unplug the power cord from the computer. 5. During the disassembly process, group the screws with the disassembly procedure, perform the steps listed below: 1. Place the computer on how to the computer and all connected peripheral devices from the computer. 4. Disassembly Tools In performing the disassembly process, you will...
... back the components. Make sure that the optical disc drive and the card reader slot are empty. 2. Unplug the power cord from the computer. 5. During the disassembly process, group the screws with the disassembly procedure, perform the steps listed below: 1. Place the computer on how to the computer and all connected peripheral devices from the computer. 4. Disassembly Tools In performing the disassembly process, you will...
Safety Guide
Page 12
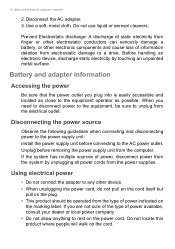
..., be operated from the type of power, disconnect power from finger or other electrostatic conductors can seriously damage a battery, or other device. • When unplugging the power cord, do not pull on the cord itself but pull on the cord. 12 - Unplug before connecting to a drive. Using electrical power • Do not connect the adapter to the power supply unit: Install the power supply unit before removing the power supply unit...
..., be operated from the type of power, disconnect power from finger or other electrostatic conductors can seriously damage a battery, or other device. • When unplugging the power cord, do not pull on the cord itself but pull on the cord. 12 - Unplug before connecting to a drive. Using electrical power • Do not connect the adapter to the power supply unit: Install the power supply unit before removing the power supply unit...
Safety Guide
Page 22
... device meets RF exposure guidelines when used normally. Parts of energy emitted by the wireless adapter, however, is less than the electromagnetic energy emitted by other magnetic storage media near the device, because information stored on board. The level of the device are not limited to the network. To successfully transmit data files or messages, this device requires a good quality connection to : wireless LAN...
... device meets RF exposure guidelines when used normally. Parts of energy emitted by the wireless adapter, however, is less than the electromagnetic energy emitted by other magnetic storage media near the device, because information stored on board. The level of the device are not limited to the network. To successfully transmit data files or messages, this device requires a good quality connection to : wireless LAN...


