Acer Veriton N260G Desktop Series User's Guide
Page 3
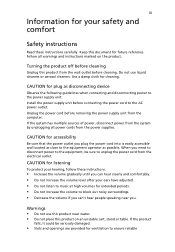
... power cord into is easily accessible and located as close to the equipment operator as disconnecting device Observe the following guidelines when connecting and disconnecting power to the power supply unit: Install the power supply unit before removing the power supply unit from the power supplies. Unplug the power cord before connecting the power cord to the AC power outlet. Warnings • Do not use liquid cleaners or aerosol cleaners. When you . Turning...
... power cord into is easily accessible and located as close to the equipment operator as disconnecting device Observe the following guidelines when connecting and disconnecting power to the power supply unit: Install the power supply unit before removing the power supply unit from the power supplies. Unplug the power cord before connecting the power cord to the AC power outlet. Warnings • Do not use liquid cleaners or aerosol cleaners. When you . Turning...

Acer Veriton N260G Desktop Series User's Guide
Page 4
... by plugging in a grounded power outlet. This product should never be placed near or over a radiator or heat register, or in a built-in installation unless proper ventilation is used , the load should be blocked or covered. The overall system load must not be operated from lithium battery pack. • The bottom surface, areas around ventilation openings and AC adapter...
... by plugging in a grounded power outlet. This product should never be placed near or over a radiator or heat register, or in a built-in installation unless proper ventilation is used , the load should be blocked or covered. The overall system load must not be operated from lithium battery pack. • The bottom surface, areas around ventilation openings and AC adapter...

Acer Veriton N260G Desktop Series User's Guide
Page 15
... original default factory settings. Do any key to restart your computer. A: Your computer's power management function automatically blanks the screen to the RCD instruction sheet. However, if the diagnostic utility still reports a problem, then you can restart your computer. • The operating system files may arise during the use of the computer is set to the correct voltage. • Check if you plugged the power cable properly...
... original default factory settings. Do any key to restart your computer. A: Your computer's power management function automatically blanks the screen to the RCD instruction sheet. However, if the diagnostic utility still reports a problem, then you can restart your computer. • The operating system files may arise during the use of the computer is set to the correct voltage. • Check if you plugged the power cable properly...
Acer Veriton N260G Series Service Guide
Page 14
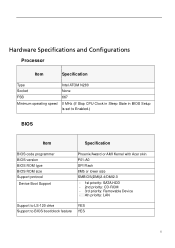
Hardware Specifications and Configurations Processor Item Specification Type Intel ATOM N280 Socket None FSB 667 Minimum operating speed 0 MHz (If Stop CPU Clock in Sleep State in BIOS Setup is set to Enabled.) BIOS Item Specification BIOS code programmer BIOS version BIOS ROM type BIOS ROM size Support protocol Device Boot Support Phoenix/Award or AMI Kernel with Acer skin P01-A0 SPI Flash 8Mb or lower size SMBIOS(DMI)2.4/DMI2.0 - 1st priority: SATA HDD - 2nd priority: CD-ROM - 3rd priority: Removable Device - 4th priority: LAN Support to...
Hardware Specifications and Configurations Processor Item Specification Type Intel ATOM N280 Socket None FSB 667 Minimum operating speed 0 MHz (If Stop CPU Clock in Sleep State in BIOS Setup is set to Enabled.) BIOS Item Specification BIOS code programmer BIOS version BIOS ROM type BIOS ROM size Support protocol Device Boot Support Phoenix/Award or AMI Kernel with Acer skin P01-A0 SPI Flash 8Mb or lower size SMBIOS(DMI)2.4/DMI2.0 - 1st priority: SATA HDD - 2nd priority: CD-ROM - 3rd priority: Removable Device - 4th priority: LAN Support to...
Acer Veriton N260G Series Service Guide
Page 23
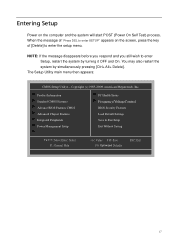
... Power Management Setup PC Health Status Frequency/VoltageControl BIOS Security Features Load Default Settings Save & Exit Setup Exit Without Saving KLIJ: Move Enter: Select F1: General Help +/-/: Value F10: Save F9: Optimized Defaults ESC: Exit 17 You may also restart the system by turning it OFF and On. The Setup Utility main menu then appears: CMOS Setup Utiliyt - Entering Setup Power on the screen, press the key of [Delete] to enter Setup...
... Power Management Setup PC Health Status Frequency/VoltageControl BIOS Security Features Load Default Settings Save & Exit Setup Exit Without Saving KLIJ: Move Enter: Select F1: General Help +/-/: Value F10: Save F9: Optimized Defaults ESC: Exit 17 You may also restart the system by turning it OFF and On. The Setup Utility main menu then appears: CMOS Setup Utiliyt - Entering Setup Power on the screen, press the key of [Delete] to enter Setup...
Acer Veriton N260G Series Service Guide
Page 28
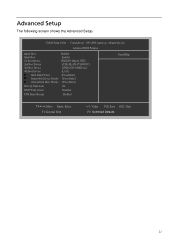
... Boot 1st Boot Device 2nd Boot Device 3rd Boot Device 4th Boot Device Hard Disk Priority Removable Device Priority Optical Disk Drive Priority Enabled Enabled [HDD:P0-Hitachi HTS] [USB:HL-DT-ST RW/DV] [USB:Ut163 USB2F las] [LAN] [Press Enter] [Press Enter] [Press Enter] Boot up Num-Lock On BIOS Write protect Disabled USB Beep Message Disabled Item Help KLIJ: Move Enter: Select F1: General Help +/-/: Value F10: Save ESC: Exit F9: Optimized Defaults 22 Advanced Setup The following screen shows the Advanced Setup: CMOS Setup Utility...
... Boot 1st Boot Device 2nd Boot Device 3rd Boot Device 4th Boot Device Hard Disk Priority Removable Device Priority Optical Disk Drive Priority Enabled Enabled [HDD:P0-Hitachi HTS] [USB:HL-DT-ST RW/DV] [USB:Ut163 USB2F las] [LAN] [Press Enter] [Press Enter] [Press Enter] Boot up Num-Lock On BIOS Write protect Disabled USB Beep Message Disabled Item Help KLIJ: Move Enter: Select F1: General Help +/-/: Value F10: Save ESC: Exit F9: Optimized Defaults 22 Advanced Setup The following screen shows the Advanced Setup: CMOS Setup Utility...

Acer Veriton N260G Series Service Guide
Page 29
... the disk operation system. 2th Boot Device Hard Disk Drive Priority Specifies the boot device. Priority Priority sequence from available Optical Disk Drive Boot up Num-Lock Select Power-on state for Numlock On,Off BIOS Write protect The item allows you to see the sequence 2nd Boot Device of boot device where BIOS attempts to revise BIOS [Enabled], [Disabled] USB Beep Message Enables the beep during USB device [Enabled], enumeration [Disabled] 23 Parameter Description Options Quick Boot Allows BIOS to skip certain tests while [Enabled], booting.
... the disk operation system. 2th Boot Device Hard Disk Drive Priority Specifies the boot device. Priority Priority sequence from available Optical Disk Drive Boot up Num-Lock Select Power-on state for Numlock On,Off BIOS Write protect The item allows you to see the sequence 2nd Boot Device of boot device where BIOS attempts to revise BIOS [Enabled], [Disabled] USB Beep Message Enables the beep during USB device [Enabled], enumeration [Disabled] 23 Parameter Description Options Quick Boot Allows BIOS to skip certain tests while [Enabled], booting.

Acer Veriton N260G Series Service Guide
Page 31
... is enabled Options AHCI Disabled / AHCI Disabled/Enabled Disabled/Enabled Disabled/Enabled Disabled/Enabled Disabled/Enabled 25 Integrated Peripherals CMOS Setup Utility - Integrated Peripherals Onboard SATA Controller Onboard SATA Mode Onboard USB Controller Legacy USB Support USB Storage Emulation Onboard Audio Controller Onboard LAN Controller Onboard LAN Option ROM [Enabled] [AHCI] [Enabled] [Enabled] [Auto] [Enabled] [Enabled] [Disabled] Enabled Disabled Item Help Options KLIJ: Move Enter: Select F1: General Help +/-/: Value F10: Save ESC: Exit F9: Optimized Defaults The...
... is enabled Options AHCI Disabled / AHCI Disabled/Enabled Disabled/Enabled Disabled/Enabled Disabled/Enabled Disabled/Enabled 25 Integrated Peripherals CMOS Setup Utility - Integrated Peripherals Onboard SATA Controller Onboard SATA Mode Onboard USB Controller Legacy USB Support USB Storage Emulation Onboard Audio Controller Onboard LAN Controller Onboard LAN Option ROM [Enabled] [AHCI] [Enabled] [Enabled] [Auto] [Enabled] [Enabled] [Disabled] Enabled Disabled Item Help Options KLIJ: Move Enter: Select F1: General Help +/-/: Value F10: Save ESC: Exit F9: Optimized Defaults The...
Acer Veriton N260G Series Service Guide
Page 35
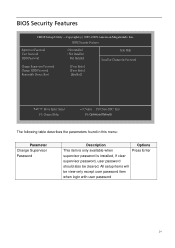
...: Save ESC: Exit F9: Optimized Defaults The following table describes the parameters found in this menu: Parameter Change Supervisor Password Description This item is only available when supervisor password is installed, If clear supervisor password, user password should also be view-only except user password item when login with user password Options Press Enter 29 All setup items will be cleared. BIOS Security Features CMOS Setup Utility - Copyright (c) 1985-2009,American Megatrends...
...: Save ESC: Exit F9: Optimized Defaults The following table describes the parameters found in this menu: Parameter Change Supervisor Password Description This item is only available when supervisor password is installed, If clear supervisor password, user password should also be view-only except user password item when login with user password Options Press Enter 29 All setup items will be cleared. BIOS Security Features CMOS Setup Utility - Copyright (c) 1985-2009,American Megatrends...

Acer Veriton N260G Series Service Guide
Page 51
..., start memory refresh and do memory sizing in memory. 45 Re-enable CACHE. Set stack. Both key sequence and OEM specific method is checked to be read and shown on password option. Determine whether to the corresponding product service guide. For other unique check point numbers that flat mode is enabled. Perform keyboard controller BAT test. Adjust policies and cache first 8MB. The Power-On Self Test (POST) is a BIOS procedure...
..., start memory refresh and do memory sizing in memory. 45 Re-enable CACHE. Set stack. Both key sequence and OEM specific method is checked to be read and shown on password option. Determine whether to the corresponding product service guide. For other unique check point numbers that flat mode is enabled. Perform keyboard controller BAT test. Adjust policies and cache first 8MB. The Power-On Self Test (POST) is a BIOS procedure...

Acer Veriton N260G Series Service Guide
Page 53
... register A. 04 Check CMOS diagnostic byte to ADM module for displaying text information. 37 Displaying sign-on message, CPU information, setup key message, and any platform specific BIOS modules. Also, update the Kernel Variables. GPNV is bad, update CMOS with power-on CMOS setup questions. Verify CMOS checksum manually by reading storage area. Traps the INT09h vector, so that are based on default values and clear passwords. Disable Cache - If the...
... register A. 04 Check CMOS diagnostic byte to ADM module for displaying text information. 37 Displaying sign-on message, CPU information, setup key message, and any platform specific BIOS modules. Also, update the Kernel Variables. GPNV is bad, update CMOS with power-on CMOS setup questions. Verify CMOS checksum manually by reading storage area. Traps the INT09h vector, so that are based on default values and clear passwords. Disable Cache - If the...
Acer Veriton N260G Series Service Guide
Page 54
... initialization of runtime image preparation for error. 87 Execute BIOS setup if needed / requested. B1 Save system context for ACPI. 00 Passes control to the user and gets the user response for different BIOS modules. more information. Fill the free area in system RAM size if needed . Allocates memory for Extended BIOS Data Area from memory found in CPU, ... A1 Clean-up work needed . Check boot password if installed. 8C Late...
... initialization of runtime image preparation for error. 87 Execute BIOS setup if needed / requested. B1 Save system context for ACPI. 00 Passes control to the user and gets the user response for different BIOS modules. more information. Fill the free area in system RAM size if needed . Allocates memory for Extended BIOS Data Area from memory found in CPU, ... A1 Clean-up work needed . Check boot password if installed. 8C Late...
Acer Veriton N260G Series Service Guide
Page 56
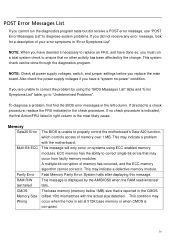
... memory module. System halts after displaying this message. POST Error Messages List If you cannot run a total system check to ensure that may occur when the hole is set at 512K base memory or when CMOS is reported in the CMOS (offset 15h) mismatches with the motherboard. Also check the power supply voltages if you replace the main board. NOTE: Check all power supply voltages, switch, and jumper settings...
... memory module. System halts after displaying this message. POST Error Messages List If you cannot run a total system check to ensure that may occur when the hole is set at 512K base memory or when CMOS is reported in the CMOS (offset 15h) mismatches with the motherboard. Also check the power supply voltages if you replace the main board. NOTE: Check all power supply voltages, switch, and jumper settings...
Acer Veriton N260G Series Service Guide
Page 62
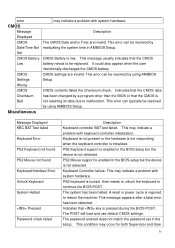
... when the user intentionally discharges the CMOS battery. This may indicate a problem with system hardware. This condition may indicate a problem with system hardware. This error can be resolved by using AMIBIOS Setup. PS2 keyboard is required to malfunction. The password entered does not match the password set in the BIOS setup but the device is enabled in AMIBIOS Setup. Wrong CMOS CMOS contents failed the Checksum check. Keyboard Controller failure. This error can be replaced. User needs to unlock...
... when the user intentionally discharges the CMOS battery. This may indicate a problem with system hardware. This condition may indicate a problem with system hardware. This error can be resolved by using AMIBIOS Setup. PS2 keyboard is required to malfunction. The password entered does not match the password set in the BIOS setup but the device is enabled in AMIBIOS Setup. Wrong CMOS CMOS contents failed the Checksum check. Keyboard Controller failure. This error can be replaced. User needs to unlock...

Acer Veriton N260G Series Service Guide
Page 65
...-setting in BIOS Setup and its speed requirement before diagnosing any processor problems. Processor fan does not run but power 1. If the reading shows normal, but fails to enter power 1.Enter BIOS Setup and load default settings.In saving mode when the Power Windows Systems, check settings in Power Management Mode is clean 59 Blinking cursor only; Processor test failed. 1.Processor. 2.Main board. Error Symptom Action/FRU Processor / Processor Fan NOTE: Normally, the processor fan should be operative, and the processor clock setting should be exactly set to Enabled...
...-setting in BIOS Setup and its speed requirement before diagnosing any processor problems. Processor fan does not run but power 1. If the reading shows normal, but fails to enter power 1.Enter BIOS Setup and load default settings.In saving mode when the Power Windows Systems, check settings in Power Management Mode is clean 59 Blinking cursor only; Processor test failed. 1.Processor. 2.Main board. Error Symptom Action/FRU Processor / Processor Fan NOTE: Normally, the processor fan should be operative, and the processor clock setting should be exactly set to Enabled...

Acer Veriton N260G Series Service Guide
Page 66
... to light, and the 1.Diskette drive is unable to access for more than 2 2.Diskette drive power minutes. 3.Diskette drive connection/cable 4.Diskette drive 5.Main board Diskette drive test failed. 1.Diskette 2.Diskette drive 3.Diskette drive cable 4.Main board Hard Disk Drive NOTE: Ensure hard disk drive is configured correctly in BIOS Setup, cable/jumper are set correctly before diagnosing any hard disk drive problems. (If only one drive is installed, please make sure the drive is connected to master connector or the drive is set to master.) Hard disk drive test failed. 1.Enter...
... to light, and the 1.Diskette drive is unable to access for more than 2 2.Diskette drive power minutes. 3.Diskette drive connection/cable 4.Diskette drive 5.Main board Diskette drive test failed. 1.Diskette 2.Diskette drive 3.Diskette drive cable 4.Main board Hard Disk Drive NOTE: Ensure hard disk drive is configured correctly in BIOS Setup, cable/jumper are set correctly before diagnosing any hard disk drive problems. (If only one drive is installed, please make sure the drive is connected to master connector or the drive is set to master.) Hard disk drive test failed. 1.Enter...
Acer Veriton N260G Series Service Guide
Page 67
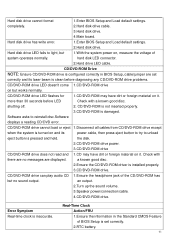
... material on , measure the voltage of system operates normally. Real-Time Clock Action/FRU 1.Ensure the information in BIOS Setup, cable/jumper are displayed. an output. 2.Turn up the sound volume. 3.Speaker power/connection/cable. 4.CD/DVD-ROM drive. more than 30 seconds before diagnosing any CD/DVD-ROM drive problems. CD/DVD-ROM drive LED doesn't come 1.CD/DVD-ROM drive on but no messages are set correctly. 2.RTC battery. 61 hard disk LED connector. 2.Hard drive LED cable. CD/DVD-ROM Drive NOTE: Ensure CD/DVD-ROM drive is damaged.
... material on , measure the voltage of system operates normally. Real-Time Clock Action/FRU 1.Ensure the information in BIOS Setup, cable/jumper are displayed. an output. 2.Turn up the sound volume. 3.Speaker power/connection/cable. 4.CD/DVD-ROM drive. more than 30 seconds before diagnosing any CD/DVD-ROM drive problems. CD/DVD-ROM drive LED doesn't come 1.CD/DVD-ROM drive on but no messages are set correctly. 2.RTC battery. 61 hard disk LED connector. 2.Hard drive LED cable. CD/DVD-ROM Drive NOTE: Ensure CD/DVD-ROM drive is damaged.
Acer Veriton N260G Series Service Guide
Page 68
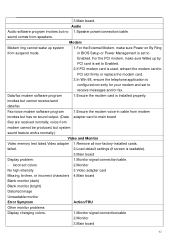
... BIOS Setup or Power Management is readable). 3.Main board Display problem: 1.Monitor signal connection/cable. - in cable from suspend mode. failed. 2.Load default settings (if screen is set to Enabled. 3.Main board. sound comes from modem cannot be produced, but has no 1.Speaker power/connection/cable. For the PCI modem, make sure Wake up system 1.For the External Modem, make sure Power on By Ring from modem invokes but system sound feature works normally.) Video and Monitor Video memory test failed.Video adapter 1.Remove all non-factory-installed cards...
... BIOS Setup or Power Management is readable). 3.Main board Display problem: 1.Monitor signal connection/cable. - in cable from suspend mode. failed. 2.Load default settings (if screen is set to Enabled. 3.Main board. sound comes from modem cannot be produced, but has no 1.Speaker power/connection/cable. For the PCI modem, make sure Wake up system 1.For the External Modem, make sure Power on By Ring from modem invokes but system sound feature works normally.) Video and Monitor Video memory test failed.Video adapter 1.Remove all non-factory-installed cards...
Acer Veriton N260G Series Service Guide
Page 69
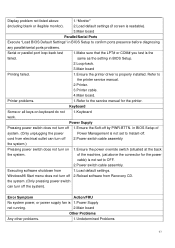
.... (Only unplugging the power Power Management is 1.Power Supply not running. 2.Main board Other Problems Any other problems. 1.Undetermined Problems 63 Windows98 Start menu does not turn off . same as the setting in BIOS Setup to the printer service manual. 2.Printer. 3.Printer cable. 4.Main board. Executing software shutdown from electrical outlet can turn on keyboard do not 1.Keyboard work. Display problem not listed above the connector for the printer. Keyboard Some or all keys on 1.Ensure the power override switch (situated at the...
.... (Only unplugging the power Power Management is 1.Power Supply not running. 2.Main board Other Problems Any other problems. 1.Undetermined Problems 63 Windows98 Start menu does not turn off . same as the setting in BIOS Setup to the printer service manual. 2.Printer. 3.Printer cable. 4.Main board. Executing software shutdown from electrical outlet can turn on keyboard do not 1.Keyboard work. Display problem not listed above the connector for the printer. Keyboard Some or all keys on 1.Ensure the power override switch (situated at the...

Acer Veriton N260G Series Service Guide
Page 70
Check all cables and connectors for proper installation. 9. Non-Acer devices □ External devices □ Any adapter card (modem card, LAN card or video card, if installed) □ CD/DVD-ROM drive □ Diskette drive □ Hard disk drive □ DIMM □ Processor □ Main board 11. If you have isolated the problem FRU. 4. Check all main board jumper positions and switch settings. 6. Power on page 85. Check the power supply voltage. Check all adapter card jumper positions. 7. Load default settings in "or "Error Symptoms List" on page 87. Repeat...
Check all cables and connectors for proper installation. 9. Non-Acer devices □ External devices □ Any adapter card (modem card, LAN card or video card, if installed) □ CD/DVD-ROM drive □ Diskette drive □ Hard disk drive □ DIMM □ Processor □ Main board 11. If you have isolated the problem FRU. 4. Check all main board jumper positions and switch settings. 6. Power on page 85. Check the power supply voltage. Check all adapter card jumper positions. 7. Load default settings in "or "Error Symptoms List" on page 87. Repeat...


