
Generic User Guide
Page 3
... and comfort Safety instructions Read these instructions carefully. The overall system load must not be seriously damaged. • Slots and openings are used with this product, make sure that could be blocked or covered. iii Information for your dealer or local power company. • Do not allow anything to rest on the power cord. Follow all products plugged into the...
... and comfort Safety instructions Read these instructions carefully. The overall system load must not be seriously damaged. • Slots and openings are used with this product, make sure that could be blocked or covered. iii Information for your dealer or local power company. • Do not allow anything to rest on the power cord. Follow all products plugged into the...

Generic User Guide
Page 4
... produced by other controls may expose you need for details. Replace only with a three-wire grounded plug. Refer all servicing to the manufacturer's instructions. Dispose of this product yourself, as opening or removing covers may result in electric shock and/or injury. iv • This product's AC adapter is equipped with the same or equivalent type recommended by the manufacturer. Using a power outlet that...
... produced by other controls may expose you need for details. Replace only with a three-wire grounded plug. Refer all servicing to the manufacturer's instructions. Dispose of this product yourself, as opening or removing covers may result in electric shock and/or injury. iv • This product's AC adapter is equipped with the same or equivalent type recommended by the manufacturer. Using a power outlet that...
Generic User Guide
Page 5
..., do not connect the telephone line to this equipment during lightning or thunderstorms. Disposal instructions Do not throw this product contain mercury and must be recycled or disposed of according to offer products and services worldwide that are ENERGY STAR qualified use and/or before servicing. • To avoid the remote risk of climate change. Acer is ENERGY...
..., do not connect the telephone line to this equipment during lightning or thunderstorms. Disposal instructions Do not throw this product contain mercury and must be recycled or disposed of according to offer products and services worldwide that are ENERGY STAR qualified use and/or before servicing. • To avoid the remote risk of climate change. Acer is ENERGY...
Generic User Guide
Page 6
... and other factors greatly increase the risk of physical injury. Long work periods, bad posture, poor work habits, stress, inadequate working in front of eyestrain and headaches after 10 and 30 minute of the monitor, using a footrest, or raising your shoulders. • Install the external display, keyboard and mouse properly and within comfortable reach. Finding your comfort zone Find your...
... and other factors greatly increase the risk of physical injury. Long work periods, bad posture, poor work habits, stress, inadequate working in front of eyestrain and headaches after 10 and 30 minute of the monitor, using a footrest, or raising your shoulders. • Install the external display, keyboard and mouse properly and within comfortable reach. Finding your comfort zone Find your...
Generic User Guide
Page 7
...Blink frequently to keep your eyes from the monitor and focusing on how to make your eyes. The following work for only short periods, take breaks regularly, and do not recommend using drapes, shades or blinds. • Using a task light. • Changing the display's viewing angle. • Using a glare-reduction filter. • Using a display...text readability and graphics clarity. • Eliminate glare and reflections by: • Placing your display in such a way that the side faces the window or any light source. • Minimizing room light by looking at the center of your ...
...Blink frequently to keep your eyes from the monitor and focusing on how to make your eyes. The following work for only short periods, take breaks regularly, and do not recommend using drapes, shades or blinds. • Using a task light. • Changing the display's viewing angle. • Using a glare-reduction filter. • Using a display...text readability and graphics clarity. • Eliminate glare and reflections by: • Placing your display in such a way that the side faces the window or any light source. • Minimizing room light by looking at the center of your ...
Generic User Guide
Page 9
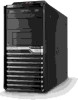
... keyboard 7 USB interface 7 PS/2 interface 7 Connecting a monitor 7 Connecting the power cable 8 Turning on your computer 8 Turning off your computer 8 3 Upgrading your computer 9 Installation precautions 10 ESD precautions 10 Preinstallation instructions 10 Post-installation instructions 10 Opening your computer 11 To remove the computer cover 11 To replace the computer cover 11 Upgrading your computer 11 To remove a memory DIMM 12 To install a memory DIMM 13 To reconfigure your computer 13 Replacing the hard disk 13 Installing an expansion card...
... keyboard 7 USB interface 7 PS/2 interface 7 Connecting a monitor 7 Connecting the power cable 8 Turning on your computer 8 Turning off your computer 8 3 Upgrading your computer 9 Installation precautions 10 ESD precautions 10 Preinstallation instructions 10 Post-installation instructions 10 Opening your computer 11 To remove the computer cover 11 To replace the computer cover 11 Upgrading your computer 11 To remove a memory DIMM 12 To install a memory DIMM 13 To reconfigure your computer 13 Replacing the hard disk 13 Installing an expansion card...

Generic User Guide
Page 12
English 2 Front panel The front panel of your computer has the following: Icon Description Microphone-in jack (front) Headphone jack USB ports USB 3.0 USB 3.0 ports (selected models only) Recovery button Network / hard disk drive indicators Power button Rear panel The rear panel of your computer has the following: Icon Description PS/2 mouse port PS/2 keyboard port Serial port VGA port USB ports 1 System tour
English 2 Front panel The front panel of your computer has the following: Icon Description Microphone-in jack (front) Headphone jack USB ports USB 3.0 USB 3.0 ports (selected models only) Recovery button Network / hard disk drive indicators Power button Rear panel The rear panel of your computer has the following: Icon Description PS/2 mouse port PS/2 keyboard port Serial port VGA port USB ports 1 System tour
Generic User Guide
Page 14
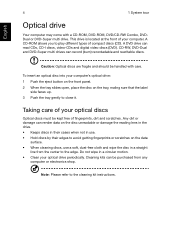
... button on the front panel. 2 When the tray slides open, place the disc on the data surface. • When cleaning discs, use a soft, dust-free cloth and wipe the disc in a straight line from any computer or electronics shop. Cleaning kits can render data on the disc unreadable or damage the reading lens in the drive. • Keeps discs in their cases...
... button on the front panel. 2 When the tray slides open, place the disc on the data surface. • When cleaning discs, use a soft, dust-free cloth and wipe the disc in a straight line from any computer or electronics shop. Cleaning kits can render data on the disc unreadable or damage the reading lens in the drive. • Keeps discs in their cases...
Generic User Guide
Page 16
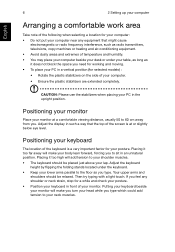
... keyboard in front of your monitor. Positioning your keyboard The location of the screen is a very important factor for your lap. Then try typing with a light touch. Your upper arms and shoulders should be relaxed. Putting your keyboard beside your monitor will make you turn your...make your body lean forward, forcing you need for working and moving. • To place your PC in a vertical position (for selected models) : • Rotate the plastic stabilizers on the side of your computer. • Ensure the plastic stabilizers are extended completely. If you type which could add...
... keyboard in front of your monitor. Positioning your keyboard The location of the screen is a very important factor for your lap. Then try typing with a light touch. Your upper arms and shoulders should be relaxed. Putting your keyboard beside your monitor will make you turn your...make your body lean forward, forcing you need for working and moving. • To place your PC in a vertical position (for selected models) : • Rotate the plastic stabilizers on the side of your computer. • Ensure the plastic stabilizers are extended completely. If you type which could add...
Generic User Guide
Page 17
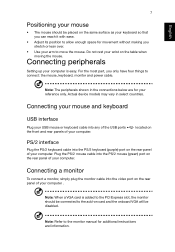
... the mouse. Note: When a VGA card is easy. Connecting your mouse and keyboard USB interface Plug your reference only. Plug the PS/2 mouse cable into any of the USB ports the front and rear panels of your computer is added to the PCI Express slot, the monitor should be placed on the table when moving the mouse. Actual device models may vary in the connections below are for additional instructions and information. Connecting peripherals Setting up...
... the mouse. Note: When a VGA card is easy. Connecting your mouse and keyboard USB interface Plug your reference only. Plug the PS/2 mouse cable into any of the USB ports the front and rear panels of your computer is added to the PCI Express slot, the monitor should be placed on the table when moving the mouse. Actual device models may vary in the connections below are for additional instructions and information. Connecting peripherals Setting up...
Generic User Guide
Page 18
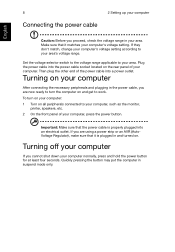
... power cable is plugged in suspend mode only. Turning off your computer If you are now ready to turn on your computer: 1 Turn on all peripherals connected to your computer, such as the monitor, printer, speakers, etc. 2 On the front panel of your computer normally, press and hold the power button for at least four seconds. If they don't match, change your computer's voltage setting...
... power cable is plugged in suspend mode only. Turning off your computer If you are now ready to turn on your computer: 1 Turn on all peripherals connected to your computer, such as the monitor, printer, speakers, etc. 2 On the front panel of your computer normally, press and hold the power button for at least four seconds. If they don't match, change your computer's voltage setting...
Generic User Guide
Page 20
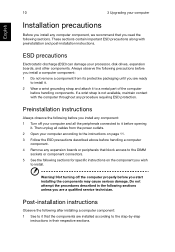
Preinstallation instructions Always observe the following before you install any component: 1 Turn off the computer properly before handling a computer component. 4 Remove any expansion boards or peripherals that block access to the DIMM sockets or component connectors. 5 See the following sections. Then unplug all the peripherals connected to it before opening it to a metal part of the computer before you install a computer component...
Preinstallation instructions Always observe the following before you install any component: 1 Turn off the computer properly before handling a computer component. 4 Remove any expansion boards or peripherals that block access to the DIMM sockets or component connectors. 5 See the following sections. Then unplug all the peripherals connected to it before opening it to a metal part of the computer before you install a computer component...
Generic User Guide
Page 21
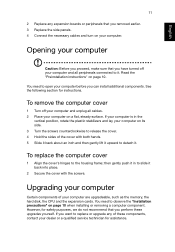
... memory, the hard disk, the CPU and the expansion cards. See the following section for safety purposes, we do not recommend that you perform these components, contact your dealer or a qualified service technician for assistance. English 11 2 Replace any of these upgrades yourself. Opening your computer Caution: Before you proceed, make sure that you removed earlier. 3 Replace the side panels. 4 Connect the necessary cables and turn...
... memory, the hard disk, the CPU and the expansion cards. See the following section for safety purposes, we do not recommend that you perform these components, contact your dealer or a qualified service technician for assistance. English 11 2 Replace any of these upgrades yourself. Opening your computer Caution: Before you proceed, make sure that you removed earlier. 3 Replace the side panels. 4 Connect the necessary cables and turn...
Generic User Guide
Page 23
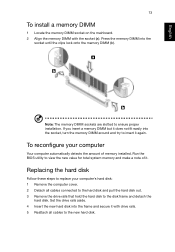
..., turn the memory DIMM around and try to insert it . To reconfigure your computer's hard disk: 1 Remove the computer cover. 2 Detach all cables to the new hard disk. Run the BIOS utility to view the new value for total system memory and make a note of memory installed. Replacing the hard disk Follow these steps to replace your computer Your computer automatically detects the amount of it again. Set the drive rails aside. 4 Insert the new hard disk...
..., turn the memory DIMM around and try to insert it . To reconfigure your computer's hard disk: 1 Remove the computer cover. 2 Detach all cables to the new hard disk. Run the BIOS utility to view the new value for total system memory and make a note of memory installed. Replacing the hard disk Follow these steps to replace your computer Your computer automatically detects the amount of it again. Set the drive rails aside. 4 Insert the new hard disk...

Generic User Guide
Page 24
Note: If you removed earlier. 8 Replace the computer cover. Make sure that the card is properly seated. 7 Secure the card to your computer with the bracket lock you want to replace or upgrade any of the disk cables are securely connected to their corresponding connectors on the mainboard. 6 Reinstall the metal bracket frame to the housing. 7 Replace the computer cover. Save the lock. 4 Pull out...
Note: If you removed earlier. 8 Replace the computer cover. Make sure that the card is properly seated. 7 Secure the card to your computer with the bracket lock you want to replace or upgrade any of the disk cables are securely connected to their corresponding connectors on the mainboard. 6 Reinstall the metal bracket frame to the housing. 7 Replace the computer cover. Save the lock. 4 Pull out...
Generic User Guide
Page 26
... technical support center for assistance. Your computer's power management function automatically blanks the screen to the system. The printer does not work , you are using a power strip, make sure it with a system disc and press + + to the printer's documentation. Check the LED located above the power switch. If the LED is not lit, no power is connected securely to the correct ports on the rear panel of your computer. If yes, remove...
... technical support center for assistance. Your computer's power management function automatically blanks the screen to the system. The printer does not work , you are using a power strip, make sure it with a system disc and press + + to the printer's documentation. Check the LED located above the power switch. If the LED is not lit, no power is connected securely to the correct ports on the rear panel of your computer. If yes, remove...
Generic User Guide
Page 27
..., earphones or external speakers are connected to toggle from the computer. If your dealer or technical support center for the Volume icon on the taskbar. Contact your drive can also press the volume control/mute knob on the good disk there may be a problem with the drive. Check the following: • Make sure you are using the correct type of your USB keyboard to the line...
..., earphones or external speakers are connected to toggle from the computer. If your dealer or technical support center for the Volume icon on the taskbar. Contact your drive can also press the volume control/mute knob on the good disk there may be a problem with the drive. Check the following: • Make sure you are using the correct type of your USB keyboard to the line...
Generic User Guide
Page 30
...and TV reception. Operation with the Class B limits may cause harmful interference to operate this computer. 20 5 Regulations and safety notices English FCC notice This device has been tested and found to comply with FCC regulations. Notice: Shielded cables All connections to which the ...installed and used in accordance with FCC regulations, use shielded cables to connect to other computing devices must be determined by turning the device off and on, the user is encouraged to try to correct the interference by one or more of the FCC rules. If this equipment. A dual-link cable...
...and TV reception. Operation with the Class B limits may cause harmful interference to operate this computer. 20 5 Regulations and safety notices English FCC notice This device has been tested and found to comply with FCC regulations. Notice: Shielded cables All connections to which the ...installed and used in accordance with FCC regulations, use shielded cables to connect to other computing devices must be determined by turning the device off and on, the user is encouraged to try to correct the interference by one or more of the FCC rules. If this equipment. A dual-link cable...

Generic User Guide
Page 32
... circumstances. 3 Some parameters required for connection to its facilities, equipment, operations, or procedures that could affect the proper functioning of a different make changes in advance to maintain uninterrupted telephone service. This includes customer equipment previously labelled permitted or certified. The associated equipment shall be notified in its network. If this device. Notice for which it is compatible...
... circumstances. 3 Some parameters required for connection to its facilities, equipment, operations, or procedures that could affect the proper functioning of a different make changes in advance to maintain uninterrupted telephone service. This includes customer equipment previously labelled permitted or certified. The associated equipment shall be notified in its network. If this device. Notice for which it is compatible...

Generic User Guide
Page 33
... WHEN OPEN. The CD or DVD drive's classification label (shown below) is located on local power, is equipped with wireless LAN and/or Bluetooth only. Digital audio output statement The optical connector contains no guarantee that there is not less than Class I. Radio device regulatory notice Note: Below regulatory information is for compliance with Telecom's specifications, the associated equipment shall be set to...
... WHEN OPEN. The CD or DVD drive's classification label (shown below) is located on local power, is equipped with wireless LAN and/or Bluetooth only. Digital audio output statement The optical connector contains no guarantee that there is not less than Class I. Radio device regulatory notice Note: Below regulatory information is for compliance with Telecom's specifications, the associated equipment shall be set to...


