
User Guide
Page 3
... reliable operation of internal components and to prevent battery leakage, These openings must not be sure to unplug the power cord from overheating. Do not use this product through cabinet slots as they may touch dangerous voltage points or short-out parts that the power outlet you need to disconnect power to the equipment, be blocked or covered. English iii Information for plug...
... reliable operation of internal components and to prevent battery leakage, These openings must not be sure to unplug the power cord from overheating. Do not use this product through cabinet slots as they may touch dangerous voltage points or short-out parts that the power outlet you need to disconnect power to the equipment, be blocked or covered. English iii Information for plug...
User Guide
Page 4
... damage rotor devices, HDD, Optical drive, and even exposure risk from the type of the branch circuit rating. Do not insert the plug into the extension cord does not exceed the extension cord ampere rating. If you are used, the load should be operated from lithium battery pack. • Keep the product at high volume. • Avoid turning up the...
... damage rotor devices, HDD, Optical drive, and even exposure risk from the type of the branch circuit rating. Do not insert the plug into the extension cord does not exceed the extension cord ampere rating. If you are used, the load should be operated from lithium battery pack. • Keep the product at high volume. • Avoid turning up the...
User Guide
Page 5
... use and/or before servicing. • To avoid the remote risk of electric shock from unexpected noise produced by other nearby electrical devices that may interfere with the supplied power supply cord set , make sure that the new power cord meets the following the operating instructions Note: Adjust only those controls that are covered by the operating instructions, since improper adjustment of this product yourself, as opening or removing covers...
... use and/or before servicing. • To avoid the remote risk of electric shock from unexpected noise produced by other nearby electrical devices that may interfere with the supplied power supply cord set , make sure that the new power cord meets the following the operating instructions Note: Adjust only those controls that are covered by the operating instructions, since improper adjustment of this product yourself, as opening or removing covers...

User Guide
Page 6
... credit cards or other magnetic storage media near your body. Consult a physician or the manufacturer of 15.3 centimeters (6 inches) be erased. Use the device only in any radio transmitting equipment, including wireless phones, may be maintained between wireless devices and a pacemaker to external RF transmissions.. Medical devices Operation of any area, and always switch off all wireless or radio transmitting devices when using equipment...
... credit cards or other magnetic storage media near your body. Consult a physician or the manufacturer of 15.3 centimeters (6 inches) be erased. Use the device only in any radio transmitting equipment, including wireless phones, may be maintained between wireless devices and a pacemaker to external RF transmissions.. Medical devices Operation of any area, and always switch off all wireless or radio transmitting devices when using equipment...
User Guide
Page 10
..., glare, excessive room lighting, poorly focused screens, very small typefaces and low-contrast displays could stress your eyes. Observe the following sections provide suggestions on your leg muscles • take short rests to relax your neck and shoulders • avoid tensing your muscles or shrugging your shoulders • install the external display, keyboard and mouse properly and within...
..., glare, excessive room lighting, poorly focused screens, very small typefaces and low-contrast displays could stress your eyes. Observe the following sections provide suggestions on your leg muscles • take short rests to relax your neck and shoulders • avoid tensing your muscles or shrugging your shoulders • install the external display, keyboard and mouse properly and within...
User Guide
Page 13
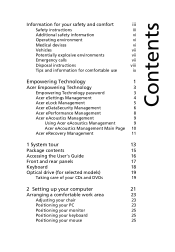
... Technology 3 Empowering Technology password 3 Acer eSettings Management 4 Acer eLock Management 5 Acer eDataSecurity Management 6 Acer ePerformance Management 8 Acer eAcoustics Management 9 Using Acer eAcoustics Management 9 Acer eAcoustics Management Main Page 10 Acer eRecovery Management 11 1 System tour 13 Package contents 15 Accessing the User's Guide 16 Front and rear panels 17 Keyboard 18 Optical drive (for selected models) 19 Taking care of your CDs and DVDs 19 2 Setting up your computer 21 Arranging a comfortable work area 23 Adjusting your...
... Technology 3 Empowering Technology password 3 Acer eSettings Management 4 Acer eLock Management 5 Acer eDataSecurity Management 6 Acer ePerformance Management 8 Acer eAcoustics Management 9 Using Acer eAcoustics Management 9 Acer eAcoustics Management Main Page 10 Acer eRecovery Management 11 1 System tour 13 Package contents 15 Accessing the User's Guide 16 Front and rear panels 17 Keyboard 18 Optical drive (for selected models) 19 Taking care of your CDs and DVDs 19 2 Setting up your computer 21 Arranging a comfortable work area 23 Adjusting your...

User Guide
Page 14
... Connecting a monitor 27 Connecting the power cable 28 Taking care of your AC adapter 28 Turning on your computer 29 Turning off your computer 30 Connecting options 31 Connecting to the network 31 Connecting multimedia devices 32 3 System utilities 35 Adobe Reader 37 Norton AntiVirus (for selected models) 38 NTI CD&DVD-Maker (for models with CD or DVD Burner) 39 PowerDVD (for models with DVD) 41 How do I open and watch a DVD? 41 BIOS utility...
... Connecting a monitor 27 Connecting the power cable 28 Taking care of your AC adapter 28 Turning on your computer 29 Turning off your computer 30 Connecting options 31 Connecting to the network 31 Connecting multimedia devices 32 3 System utilities 35 Adobe Reader 37 Norton AntiVirus (for selected models) 38 NTI CD&DVD-Maker (for models with CD or DVD Burner) 39 PowerDVD (for models with DVD) 41 How do I open and watch a DVD? 41 BIOS utility...

User Guide
Page 19
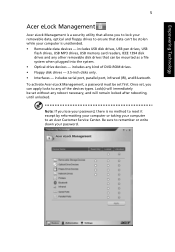
... to reset it features the following handy utilities: • Acer eSettings Management accesses system information and adjusts settings easily. • Acer eLock Management limits access to external storage media and interfaces. • Acer eDataSecurity Management protects data with your password. Be sure to balance your computing power needs with passwords and advanced encryption algorithms. • Acer ePerformance Management improves system performance by default in the upper-right corner of your screen...
... to reset it features the following handy utilities: • Acer eSettings Management accesses system information and adjusts settings easily. • Acer eLock Management limits access to external storage media and interfaces. • Acer eDataSecurity Management protects data with your password. Be sure to balance your computing power needs with passwords and advanced encryption algorithms. • Acer ePerformance Management improves system performance by default in the upper-right corner of your screen...
User Guide
Page 21
... Acer Customer Service Center. Once set, you can be mounted as a file system when plugged into the system. • Optical drive devices - includes USB disk drives, USB pen drives, USB flash drives, USB MP3 drives, USB memory card readers, IEEE 1394 disk drives and any of DVD-ROM drives. • Floppy disk drives - 3.5-inch disks only. • Interfaces - Lock(s) will remain locked after rebooting, until unlocked. Note: If you to lock your password. Enmgplioswh ering Technology 5 Acer eLock Management Acer eLock Management is unattended. • Removable data devices...
... Acer Customer Service Center. Once set, you can be mounted as a file system when plugged into the system. • Optical drive devices - includes USB disk drives, USB pen drives, USB flash drives, USB MP3 drives, USB memory card readers, IEEE 1394 disk drives and any of DVD-ROM drives. • Floppy disk drives - 3.5-inch disks only. • Interfaces - Lock(s) will remain locked after rebooting, until unlocked. Note: If you to lock your password. Enmgplioswh ering Technology 5 Acer eLock Management Acer eLock Management is unattended. • Removable data devices...
User Guide
Page 31
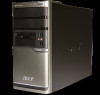
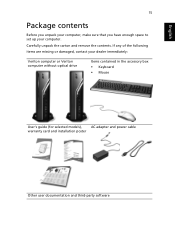
If any of the following items are missing or damaged, contact your computer. Carefully unpack the carton and remove the contents. English 15 Package contents Before you unpack your computer, make sure that you have enough space to set up your dealer immediately: Veriton computer or Veriton computer without optical drive Items contained in the accessory box • Keyboard • Mouse User's guide (for selected models), AC adapter and power cable warranty card and installation poster Other user documentation and third-party software
If any of the following items are missing or damaged, contact your computer. Carefully unpack the carton and remove the contents. English 15 Package contents Before you unpack your computer, make sure that you have enough space to set up your dealer immediately: Veriton computer or Veriton computer without optical drive Items contained in the accessory box • Keyboard • Mouse User's guide (for selected models), AC adapter and power cable warranty card and installation poster Other user documentation and third-party software

User Guide
Page 42
Note: The peripherals shown in select countries. Connecting your mouse and keyboard Plug your USB mouse or keyboard cable into any of the USB ports on the front and rear panels of your computer is easy. Actual device models may vary in the connections below are for your reference only. located For the most part, you only have four things to connect: the mouse, the keyboard, the monitor, and the power cable. English 26 2 Setting up your computer Connecting peripherals Setting up your computer.
Note: The peripherals shown in select countries. Connecting your mouse and keyboard Plug your USB mouse or keyboard cable into any of the USB ports on the front and rear panels of your computer is easy. Actual device models may vary in the connections below are for your reference only. located For the most part, you only have four things to connect: the mouse, the keyboard, the monitor, and the power cable. English 26 2 Setting up your computer Connecting peripherals Setting up your computer.

User Guide
Page 46
30 2 Setting up your computer English Turning off your computer To turn off all peripherals connected to your computer, follow the steps below. For Windows XP: 1 On the Windows XP taskbar, click on the Start button, and click Turn Off Computer, then click Turn Off. 2 Turn off your computer. If you cannot shut down your computer normally, press and hold the power button for at least four seconds. Quickly pressing the button may put the computer in suspend mode only.
30 2 Setting up your computer English Turning off your computer To turn off all peripherals connected to your computer, follow the steps below. For Windows XP: 1 On the Windows XP taskbar, click on the Start button, and click Turn Off Computer, then click Turn Off. 2 Turn off your computer. If you cannot shut down your computer normally, press and hold the power button for at least four seconds. Quickly pressing the button may put the computer in suspend mode only.

User Guide
Page 47
To do so, simply plug the network cable into the network port on how to a Local Area Network (LAN) using a network cable. Note: Consult your network system administrator or operating system manual for information on the rear panel of your network setup. English 31 Connecting options Connecting to the network You can connect your computer to configure your computer.
To do so, simply plug the network cable into the network port on how to a Local Area Network (LAN) using a network cable. Note: Consult your network system administrator or operating system manual for information on the rear panel of your network setup. English 31 Connecting options Connecting to the network You can connect your computer to configure your computer.

User Guide
Page 50
34 2 Setting up your computer English • Audio line-in device: Connects to the audio-in/line-in jack jack) located on the rear panel of your computer (light blue
34 2 Setting up your computer English • Audio line-in device: Connects to the audio-in/line-in jack jack) located on the rear panel of your computer (light blue

User Guide
Page 57
... play button to your computer's optical drive, PowerDVD will automatically open a viewer window and the control panel and begin playback. PowerDVD provides a complete set of commands for models with MPEG-2 video and Dolby Digital (AC-3) audio. For more information about Cyberlink PowerDVD and its other features, refer to online DVD resources via the Power DVD Desktop Portal Page. How do I open automatically: 1 Click the Start button in the...
... play button to your computer's optical drive, PowerDVD will automatically open a viewer window and the control panel and begin playback. PowerDVD provides a complete set of commands for models with MPEG-2 video and Dolby Digital (AC-3) audio. For more information about Cyberlink PowerDVD and its other features, refer to online DVD resources via the Power DVD Desktop Portal Page. How do I open automatically: 1 Click the Start button in the...
User Guide
Page 59
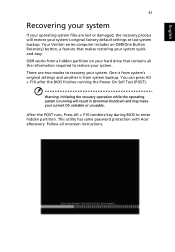
... operating system is from system backup. This utility has same password protection with Acer eRecovery. Follow all the information required to recovery your system. One is from a hidden partition on your hard drive that makes restoring your system quick and easy. OBR works from system's original settings and another is running the Power On Self Test (POST). After the POST runs, Press Alt + F10 combine key during BIOS...
... operating system is from system backup. This utility has same password protection with Acer eRecovery. Follow all the information required to recovery your system. One is from a hidden partition on your hard drive that makes restoring your system quick and easy. OBR works from system's original settings and another is running the Power On Self Test (POST). After the POST runs, Press Alt + F10 combine key during BIOS...

User Guide
Page 69
... plugged in the floppy drive? If the LED is being applied to the system. Insert the startup disk you created during the use of your system, see "Acer eRecovery Management" on the screen. If pressing a key does not work , contact your computer. I pressed the power switch but the system did not boot up. Your computer's power management function automatically blanks the screen to save power. If yes, remove or replace...
... plugged in the floppy drive? If the LED is being applied to the system. Insert the startup disk you created during the use of your system, see "Acer eRecovery Management" on the screen. If pressing a key does not work , contact your computer. I pressed the power switch but the system did not boot up. Your computer's power management function automatically blanks the screen to save power. If yes, remove or replace...

User Guide
Page 70
... USB port and the corresponding port on the printer. • For additional information concerning the printer, refer to a power outlet and that it is turned on. • Make sure the printer cable is crossed-out, click on the hard disk or CD-R/CD-RW. Contact your drive can also press the volume control/mute knob on the good disk there may be a problem...
... USB port and the corresponding port on the printer. • For additional information concerning the printer, refer to a power outlet and that it is turned on. • Make sure the printer cable is crossed-out, click on the hard disk or CD-R/CD-RW. Contact your drive can also press the volume control/mute knob on the good disk there may be a problem...
User Guide
Page 74
... the same number within the limits for compliance with Telecom's specifications, the associated equipment shall be set up to make or model, nor does it imply that any product is compatible with all of Telecom's network services. 2 This equipment is not capable, under all operating conditions, of correct operation at the higher speeds for which it is available for emergency use.
... the same number within the limits for compliance with Telecom's specifications, the associated equipment shall be set up to make or model, nor does it imply that any product is compatible with all of Telecom's network services. 2 This equipment is not capable, under all operating conditions, of correct operation at the higher speeds for which it is available for emergency use.

User Guide
Page 83
67 Index A accessing the online User's Guide 16 applications 37 B BIOS utility 42 C connecting options multimedia devices 32 audio line-in device 34 earphones/headphones 33 external speakers 32 microphone 32 network 31 serial mouse 31 D disk drives CD-ROM/DVD-ROM/CD-RW drive inserting CDs/DVDs 19 taking care CDs/DVDs 19 F Frequently-asked questions 53 blank screen 53 no audio 54 no sound 54 printer not working 54 system cannot read disk 54 system cannot write...
67 Index A accessing the online User's Guide 16 applications 37 B BIOS utility 42 C connecting options multimedia devices 32 audio line-in device 34 earphones/headphones 33 external speakers 32 microphone 32 network 31 serial mouse 31 D disk drives CD-ROM/DVD-ROM/CD-RW drive inserting CDs/DVDs 19 taking care CDs/DVDs 19 F Frequently-asked questions 53 blank screen 53 no audio 54 no sound 54 printer not working 54 system cannot read disk 54 system cannot write...


