Generic User Guide
Page 9
...-installation instructions 10 Opening your computer 11 To remove the computer cover 11 To replace the computer cover 11 Upgrading your computer 11 To remove a memory DIMM 12 To install a memory DIMM 12 To reconfigure your computer 13 Replacing the hard disk 13
...-installation instructions 10 Opening your computer 11 To remove the computer cover 11 To replace the computer cover 11 Upgrading your computer 11 To remove a memory DIMM 12 To install a memory DIMM 12 To reconfigure your computer 13 Replacing the hard disk 13
Generic User Guide
Page 21
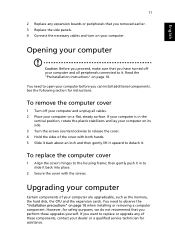
... perform these components, contact your dealer or a qualified service technician for instructions. Upgrading your computer Certain components of your computer are upgradeable, such as the memory, the hard disk, the CPU and the expansion cards. English 11 2 Replace any of these upgrades yourself.
... perform these components, contact your dealer or a qualified service technician for instructions. Upgrading your computer Certain components of your computer are upgradeable, such as the memory, the hard disk, the CPU and the expansion cards. English 11 2 Replace any of these upgrades yourself.
Generic User Guide
Page 22
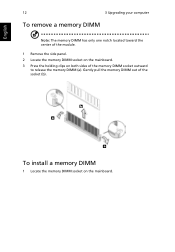
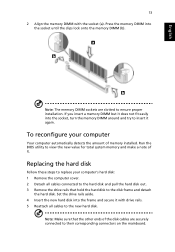
To install a memory DIMM 1 Locate the memory DIMM socket on both sides of the socket (b). Gently pull the memory DIMM out of the memory DIMM socket outward to release the memory DIMM (a). English 12 3 Upgrading your computer To remove a memory DIMM Note: The memory DIMM has only one notch located toward the center of the module. 1 Remove the side panel. 2 Locate the memory DIMM socket on the mainboard. 3 Press the holding clips on the mainboard.
To install a memory DIMM 1 Locate the memory DIMM socket on both sides of the socket (b). Gently pull the memory DIMM out of the memory DIMM socket outward to release the memory DIMM (a). English 12 3 Upgrading your computer To remove a memory DIMM Note: The memory DIMM has only one notch located toward the center of the module. 1 Remove the side panel. 2 Locate the memory DIMM socket on the mainboard. 3 Press the holding clips on the mainboard.
Generic User Guide
Page 23
... a note of it again. Note: Make sure that hold the hard disk to the disk frame and detach the hard disk. Note: The memory DIMM sockets are securely connected to their corresponding connectors on the mainboard. Replacing the hard disk Follow these steps to replace your computer Your computer ... to insert it . Set the drive rails aside. 4 Insert the new hard disk into the socket until the clips lock onto the memory DIMM (b). English 13 2 Align the memory DIMM with drive rails. 5 Reattach all cables connected to the hard disk and pull the hard disk out. 3 Remove the drive rails...
... a note of it again. Note: Make sure that hold the hard disk to the disk frame and detach the hard disk. Note: The memory DIMM sockets are securely connected to their corresponding connectors on the mainboard. Replacing the hard disk Follow these steps to replace your computer Your computer ... to insert it . Set the drive rails aside. 4 Insert the new hard disk into the socket until the clips lock onto the memory DIMM (b). English 13 2 Align the memory DIMM with drive rails. 5 Reattach all cables connected to the hard disk and pull the hard disk out. 3 Remove the drive rails...


