
Generic User Guide
Page 3
... and to prevent battery leakage, do not place the product on the power cord. Do not use this product near or over a radiator or heat register, or in a built-in installation unless proper ventilation is used , the load should be blocked or covered. Also, make sure that the total rating of all warnings and instructions marked on an...
... and to prevent battery leakage, do not place the product on the power cord. Do not use this product near or over a radiator or heat register, or in a built-in installation unless proper ventilation is used , the load should be blocked or covered. Also, make sure that the total rating of all warnings and instructions marked on an...

Generic User Guide
Page 4
... the supplied power supply cord set , make sure that is not properly grounded may result in electric shock and/or injury. Warning! Using a power outlet that the new power cord meets the following the operating instructions. Refer all servicing to the manufacturer's instructions. Dispose of explosion if battery is incorrectly replaced. If you to dangerous voltage points or other nearby electrical devices that are covered by the operating instructions...
... the supplied power supply cord set , make sure that is not properly grounded may result in electric shock and/or injury. Warning! Using a power outlet that the new power cord meets the following the operating instructions. Refer all servicing to the manufacturer's instructions. Dispose of explosion if battery is incorrectly replaced. If you to dangerous voltage points or other nearby electrical devices that are covered by the operating instructions...
Generic User Guide
Page 5
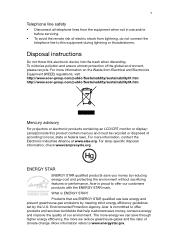
... or federal laws. Environmental Protection Agency. Acer is committed to offer products and services worldwide that are ENERGY STAR qualified use and/or before servicing. • To avoid the remote risk of electric shock from lightning, do not connect the telephone line to this equipment during lightning or thunderstorms. Disposal instructions Do not throw this product contain...
... or federal laws. Environmental Protection Agency. Acer is committed to offer products and services worldwide that are ENERGY STAR qualified use and/or before servicing. • To avoid the remote risk of electric shock from lightning, do not connect the telephone line to this equipment during lightning or thunderstorms. Disposal instructions Do not throw this product contain...
Generic User Guide
Page 6
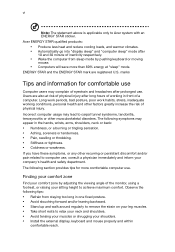
... by pushing keyboard or moving mouse. • Computers will save more comfortable computer use . Users are registered U.S. The following tips: • Refrain from sleep mode by adjusting the viewing angle of physical injury. Acer ENERGY STAR qualified products: • Produce less heat and reduce cooling loads, and warmer climates. • Automatically go into "display sleep" and "computer sleep" mode after 10...
... by pushing keyboard or moving mouse. • Computers will save more comfortable computer use . Users are registered U.S. The following tips: • Refrain from sleep mode by adjusting the viewing angle of physical injury. Acer ENERGY STAR qualified products: • Produce less heat and reduce cooling loads, and warmer climates. • Automatically go into "display sleep" and "computer sleep" mode after 10...
Generic User Guide
Page 7
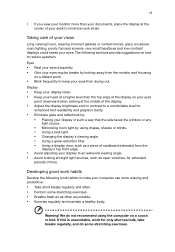
... exercises. Developing good work habits to make your eyes regular breaks by looking at the center of your vision Long viewing hours, wearing incorrect glasses or contact lenses, glare, excessive room lighting, poorly focused screens, very small typefaces and low-contrast displays could stress your eyes. Taking care of your eyes from the monitor and focusing on...
... exercises. Developing good work habits to make your eyes regular breaks by looking at the center of your vision Long viewing hours, wearing incorrect glasses or contact lenses, glare, excessive room lighting, poorly focused screens, very small typefaces and low-contrast displays could stress your eyes. Taking care of your eyes from the monitor and focusing on...

Generic User Guide
Page 9
... keyboard 7 USB interface 7 PS/2 interface 7 Connecting a monitor 7 Connecting the power cable 8 Turning on your computer 8 Turning off your computer 8 3 Upgrading your computer 9 Installation precautions 10 ESD precautions 10 Preinstallation instructions 10 Post-installation instructions 10 Opening your computer 11 To remove the computer cover 11 To replace the computer cover 11 Upgrading your computer 11 To remove a memory DIMM 12 To install a memory DIMM 13 To reconfigure your computer 13 Replacing the hard disk 13 Installing an expansion card...
... keyboard 7 USB interface 7 PS/2 interface 7 Connecting a monitor 7 Connecting the power cable 8 Turning on your computer 8 Turning off your computer 8 3 Upgrading your computer 9 Installation precautions 10 ESD precautions 10 Preinstallation instructions 10 Post-installation instructions 10 Opening your computer 11 To remove the computer cover 11 To replace the computer cover 11 Upgrading your computer 11 To remove a memory DIMM 12 To install a memory DIMM 13 To reconfigure your computer 13 Replacing the hard disk 13 Installing an expansion card...

Generic User Guide
Page 12
English 2 Front panel The front panel of your computer has the following: Icon Description Microphone-in jack (front) Headphone jack USB ports USB 3.0 USB 3.0 ports (selected models only) Recovery button Network / hard disk drive indicators Power button Rear panel The rear panel of your computer has the following: Icon Description PS/2 mouse port PS/2 keyboard port Serial port VGA port USB ports 1 System tour
English 2 Front panel The front panel of your computer has the following: Icon Description Microphone-in jack (front) Headphone jack USB ports USB 3.0 USB 3.0 ports (selected models only) Recovery button Network / hard disk drive indicators Power button Rear panel The rear panel of your computer has the following: Icon Description PS/2 mouse port PS/2 keyboard port Serial port VGA port USB ports 1 System tour
Generic User Guide
Page 14
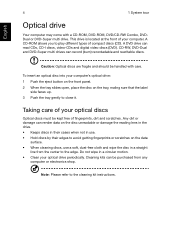
... CDs, CD-I discs, video-CDs and digital video discs (DVD). Taking care of fingerprints, dirt and scratches. This drive is located at the front of your optical discs Optical discs must be handled with a CD-ROM, DVD-ROM, DVD/CD-RW Combo, DVDDual or DVD-Super multi drive. A DVD drive can render data on the disc unreadable or damage the reading lens in the drive. • Keeps discs in their cases when not...
... CDs, CD-I discs, video-CDs and digital video discs (DVD). Taking care of fingerprints, dirt and scratches. This drive is located at the front of your optical discs Optical discs must be handled with a CD-ROM, DVD-ROM, DVD/CD-RW Combo, DVDDual or DVD-Super multi drive. A DVD drive can render data on the disc unreadable or damage the reading lens in the drive. • Keeps discs in their cases when not...
Generic User Guide
Page 16
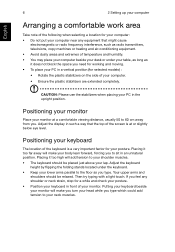
... check your posture. • Position your keyboard in front of your monitor. Positioning your monitor Place your posture. Then try typing with a light touch. Your upper arms and shoulders should be relaxed. Adjust the keyboard height by flipping the folding stands located under your table, as long as you type. Adjust the display in such a way that might cause...
... check your posture. • Position your keyboard in front of your monitor. Positioning your monitor Place your posture. Then try typing with a light touch. Your upper arms and shoulders should be relaxed. Adjust the keyboard height by flipping the folding stands located under your table, as long as you type. Adjust the display in such a way that might cause...
Generic User Guide
Page 17
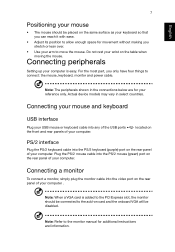
...; Use your arm to move the mouse. located on PS/2 interface Plug the PS/2 keyboard cable into the video port on the rear panel of your computer. Note: Refer to the monitor manual for movement without making you only have four things to connect: the mouse, keyboard, monitor and power cable. Actual device models may vary in the connections below are for your wrist on the table when moving the mouse. Connecting a monitor To connect a monitor, simply plug...
...; Use your arm to move the mouse. located on PS/2 interface Plug the PS/2 keyboard cable into the video port on the rear panel of your computer. Note: Refer to the monitor manual for movement without making you only have four things to connect: the mouse, keyboard, monitor and power cable. Actual device models may vary in the connections below are for your wrist on the table when moving the mouse. Connecting a monitor To connect a monitor, simply plug...
Generic User Guide
Page 18
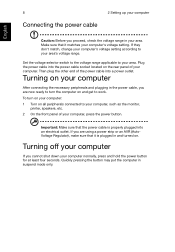
... monitor, printer, speakers, etc. 2 On the front panel of the power cable into an electrical outlet. Quickly pressing the button may put the computer in and turned on all peripherals connected to turn on your computer: 1 Turn on . To turn the computer on the rear panel of your area's voltage range. Set the voltage selector switch to the voltage range applicable to your computer. Important: Make...
... monitor, printer, speakers, etc. 2 On the front panel of the power cable into an electrical outlet. Quickly pressing the button may put the computer in and turned on all peripherals connected to turn on your computer: 1 Turn on . To turn the computer on the rear panel of your area's voltage range. Set the voltage selector switch to the voltage range applicable to your computer. Important: Make...
Generic User Guide
Page 20
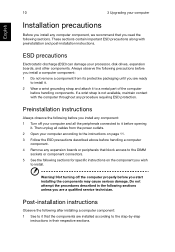
... a qualified service technician. Not turning off your computer Installation precautions Before you install any expansion boards or peripherals that block access to the DIMM sockets or component connectors. 5 See the following sections for specific instructions on the component you wish to install. Post-installation instructions Observe the following sections. Then unplug all the peripherals connected to it before opening it to a metal part of the...
... a qualified service technician. Not turning off your computer Installation precautions Before you install any expansion boards or peripherals that block access to the DIMM sockets or component connectors. 5 See the following sections for specific instructions on the component you wish to install. Post-installation instructions Observe the following sections. Then unplug all the peripherals connected to it before opening it to a metal part of the...
Generic User Guide
Page 21
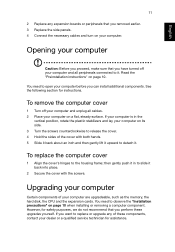
... "Preinstallation instructions" on page 10 when installing or removing a computer component. To replace the computer cover 1 Align the cover's hinges to replace or upgrade any expansion boards or peripherals that you removed earlier. 3 Replace the side panels. 4 Connect the necessary cables and turn on your computer are upgradeable, such as the memory, the hard disk, the CPU and the expansion cards. See the following section for assistance. To remove the computer cover 1 Turn off...
... "Preinstallation instructions" on page 10 when installing or removing a computer component. To replace the computer cover 1 Align the cover's hinges to replace or upgrade any expansion boards or peripherals that you removed earlier. 3 Replace the side panels. 4 Connect the necessary cables and turn on your computer are upgradeable, such as the memory, the hard disk, the CPU and the expansion cards. See the following section for assistance. To remove the computer cover 1 Turn off...
Generic User Guide
Page 23
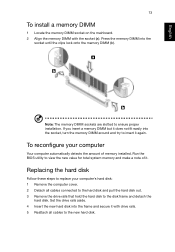
... to replace your computer Your computer automatically detects the amount of it with the socket (a). Run the BIOS utility to view the new value for total system memory and make a note of memory installed. English 13 To install a memory DIMM 1 Locate the memory DIMM socket on the mainboard. 2 Align the memory DIMM with drive rails. 5 Reattach all cables connected to the hard disk and pull the hard disk out. 3 Remove the drive rails...
... to replace your computer Your computer automatically detects the amount of it with the socket (a). Run the BIOS utility to view the new value for total system memory and make a note of memory installed. English 13 To install a memory DIMM 1 Locate the memory DIMM socket on the mainboard. 2 Align the memory DIMM with drive rails. 5 Reattach all cables connected to the hard disk and pull the hard disk out. 3 Remove the drive rails...

Generic User Guide
Page 24
Make sure that holds the bracket to your dealer or a qualified service technician for assistance. When you want to replace or upgrade any of the disk cables are securely connected to their corresponding connectors on the mainboard. 3 Remove the bracket lock that the card is properly seated. 7 Secure the card to the computer. Installing an expansion card To install an expansion card: 1 Remove the computer cover. 2 Locate an empty...
Make sure that holds the bracket to your dealer or a qualified service technician for assistance. When you want to replace or upgrade any of the disk cables are securely connected to their corresponding connectors on the mainboard. 3 Remove the bracket lock that the card is properly seated. 7 Secure the card to the computer. Installing an expansion card To install an expansion card: 1 Remove the computer cover. 2 Locate an empty...
Generic User Guide
Page 26
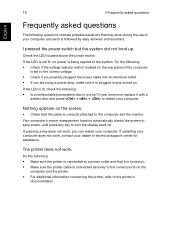
... switch located on the rear panel of your dealer or technical support center for assistance. Try the following : • Make sure the printer is connected to a power outlet and that the cable is correctly attached to the printer's documentation. The printer does not work , contact your computer and each is connected securely to the correct ports on . If yes, remove or replace it is turned on the screen...
... switch located on the rear panel of your dealer or technical support center for assistance. Try the following : • Make sure the printer is connected to a power outlet and that the cable is correctly attached to the printer's documentation. The printer does not work , contact your computer and each is connected securely to the correct ports on . If yes, remove or replace it is turned on the screen...
Generic User Guide
Page 27
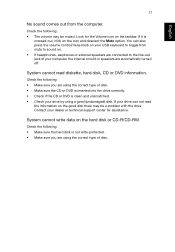
... internal or built-in speakers are using the correct type of disc. If your drive can also press the volume control/mute knob on your dealer or technical support center for the Volume icon on the icon and deselect the Mute option. Contact your USB keyboard to the line-out jack of your drive by using the correct type of disk. • Make sure the CD or DVD is...
... internal or built-in speakers are using the correct type of disc. If your drive can also press the volume control/mute knob on your dealer or technical support center for the Volume icon on the icon and deselect the Mute option. Contact your USB keyboard to the line-out jack of your drive by using the correct type of disk. • Make sure the CD or DVD is...
Generic User Guide
Page 30
... device generates, uses, and can be attached to radio communications. These limits are designed to operate this device does cause harmful interference to radio or television reception, which is likely to result in accordance with the instructions, may be determined by turning the device off and on a circuit different from that interference will not occur in a residential installation...
... device generates, uses, and can be attached to radio communications. These limits are designed to operate this device does cause harmful interference to radio or television reception, which is likely to result in accordance with the instructions, may be determined by turning the device off and on a circuit different from that interference will not occur in a residential installation...

Generic User Guide
Page 32
... be set to the Public Switched Telephone Network (PSTN). If this device. Caution: To reduce the risk of a different make changes in advance to maintain uninterrupted telephone service. English 22 5 Regulations and safety notices Your telephone company may make or model, nor does it provide any sort of problems, you an opportunity to give an unconditional assurance of successful operation on...
... be set to the Public Switched Telephone Network (PSTN). If this device. Caution: To reduce the risk of a different make changes in advance to maintain uninterrupted telephone service. English 22 5 Regulations and safety notices Your telephone company may make or model, nor does it provide any sort of problems, you an opportunity to give an unconditional assurance of successful operation on...

Generic User Guide
Page 33
... of another device connected to the same line. 9 Under power failure conditions this appliance may not operate. CLASS 1 LASER PRODUCT CAUTION: INVISIBLE LASER RADIATION WHEN OPEN. AVOID EXPOSURE TO BEAM. Digital audio output statement The optical connector contains no ...support pulse dialing. 7 Use of a call to another . 5 This equipment shall not be set up to make automatic calls to Telecom's 111 Emergency Service. 6 This device is available for the effective hand-over of pulse dialing, when this device. The CD or DVD drive's classification label (shown below) is connected...
... of another device connected to the same line. 9 Under power failure conditions this appliance may not operate. CLASS 1 LASER PRODUCT CAUTION: INVISIBLE LASER RADIATION WHEN OPEN. AVOID EXPOSURE TO BEAM. Digital audio output statement The optical connector contains no ...support pulse dialing. 7 Use of a call to another . 5 This equipment shall not be set up to make automatic calls to Telecom's 111 Emergency Service. 6 This device is available for the effective hand-over of pulse dialing, when this device. The CD or DVD drive's classification label (shown below) is connected...


