
Veriton 3600G/5600G/7600G Service Guide
Page 5
... generic service guide. To better fit local market requirements and enhance product competitiveness, your Acer office may have decided to provide you with all technical information relating to those given in the printed Service Guide. In such cases, please contact your regional web or channel. Please note WHEN ORDERING FRU PARTS, that...
... generic service guide. To better fit local market requirements and enhance product competitiveness, your Acer office may have decided to provide you with all technical information relating to those given in the printed Service Guide. In such cases, please contact your regional web or channel. Please note WHEN ORDERING FRU PARTS, that...

Veriton 3600G/5600G/7600G Service Guide
Page 43
... configured by the manufacturer or the dealer. There is not part of the system RAM. NOTE: If you have saved all open files. In this case, the system cannot retain configuration values in CMOS. The Setup program loads configuration values into the battery-backed nonvolatile memory called CMOS RAM. Before you...
... configured by the manufacturer or the dealer. There is not part of the system RAM. NOTE: If you have saved all open files. In this case, the system cannot retain configuration values in CMOS. The Setup program loads configuration values into the battery-backed nonvolatile memory called CMOS RAM. Before you...
Veriton 3600G/5600G/7600G Service Guide
Page 47
... OS/2 can use VGA only, this function is VGA/EGA. EGA/VGA CGA40 CGA80 MONO This parameter enables you to control the system stops in case of conventional memory. Extended memory is not configured in PCs with an Intel 80286 or later microprocessor. This leaves 640 KB of Power-on self...
... OS/2 can use VGA only, this function is VGA/EGA. EGA/VGA CGA40 CGA80 MONO This parameter enables you to control the system stops in case of conventional memory. Extended memory is not configured in PCs with an Intel 80286 or later microprocessor. This leaves 640 KB of Power-on self...

Veriton 3600G/5600G/7600G Service Guide
Page 72
Turn the housing back. 3. Removing the Housing Cover 1. Place the system unit on a flat, steady surface. 2. Slide the upper case back out about an inch and then gently pull it outward to detach it . CAUTION: Before you proceed, make sure that you need to it from the housing. Veriton 3600(D/G)/5600(D/G)/7600(D/G) 63 Disassembling the Veriton 3600D/ 3600G Opening the Housing This section tells you how to open the housing cover when you have turned off the system and all peripherals connected to install additional components inside the system unit.
Turn the housing back. 3. Removing the Housing Cover 1. Place the system unit on a flat, steady surface. 2. Slide the upper case back out about an inch and then gently pull it outward to detach it . CAUTION: Before you proceed, make sure that you need to it from the housing. Veriton 3600(D/G)/5600(D/G)/7600(D/G) 63 Disassembling the Veriton 3600D/ 3600G Opening the Housing This section tells you how to open the housing cover when you have turned off the system and all peripherals connected to install additional components inside the system unit.

Veriton 3600G/5600G/7600G Service Guide
Page 74
... and then remove the EMI audio cover from the slot. Remove the screw as shown below and then remove the modem card from the lower case. See "Removing the Housing Cover" on page 63 2. Disconnect the DVD-ROM power cable, DVD-ROM IDE cable, and audio cable from the floppy disk... the DVD-ROM drive. Push the two latches of both sides then lift up the FDD and DVD frame . 3. Removing the FDD and DVD Frame 1. Veriton 3600(D/G)/5600(D/G)/7600(D/G) 65 See "Removing the Housing Cover" on page 63 2.
... and then remove the EMI audio cover from the slot. Remove the screw as shown below and then remove the modem card from the lower case. See "Removing the Housing Cover" on page 63 2. Disconnect the DVD-ROM power cable, DVD-ROM IDE cable, and audio cable from the floppy disk... the DVD-ROM drive. Push the two latches of both sides then lift up the FDD and DVD frame . 3. Removing the FDD and DVD Frame 1. Veriton 3600(D/G)/5600(D/G)/7600(D/G) 65 See "Removing the Housing Cover" on page 63 2.

Veriton 3600G/5600G/7600G Service Guide
Page 75
Remove the four screws as shown here then detach the DVD-ROM drive from the frame. 66 Chapter 3 Remove the floppy disk drive cable and optical drive IDE cable from the lower case . 6. 5. Disconnect the intrusion alarm cable from the main board and then pull the FDD and DVD frame from the main board. . 7. Remove the four screws as shown here then detach the floppy disk drive from the frame. 8.
Remove the four screws as shown here then detach the DVD-ROM drive from the frame. 66 Chapter 3 Remove the floppy disk drive cable and optical drive IDE cable from the lower case . 6. 5. Disconnect the intrusion alarm cable from the main board and then pull the FDD and DVD frame from the main board. . 7. Remove the four screws as shown here then detach the floppy disk drive from the frame. 8.
Veriton 3600G/5600G/7600G Service Guide
Page 78
Disconnect the memory stick cable and USB cable from the USB/ audio board. 6. Disconnect the memory stick cable and USB cable from the main board. . 5. See "Removing the Housing Cover" on page 65 3. Veriton 3600(D/G)/5600(D/G)/7600(D/G) 69 Remove the two screws as shown here and then detach the USB/ audio board from the lower case. Removing the USB/ Audio Board 1. See "Removing the FDD and DVD Frame" on page 63 2. See "Removing the LAN Card" on page 65 4.
Disconnect the memory stick cable and USB cable from the USB/ audio board. 6. Disconnect the memory stick cable and USB cable from the main board. . 5. See "Removing the Housing Cover" on page 65 3. Veriton 3600(D/G)/5600(D/G)/7600(D/G) 69 Remove the two screws as shown here and then detach the USB/ audio board from the lower case. Removing the USB/ Audio Board 1. See "Removing the FDD and DVD Frame" on page 63 2. See "Removing the LAN Card" on page 65 4.

Veriton 3600G/5600G/7600G Service Guide
Page 79
Detach the hard disk drive power connector and hard disk drive IDE cable from the lower case. Slide the hard disk drive frame to the right and then gently move it inward to detach it from the hard disk drive. 4. Remove the four screws as shown here and then hold the hard disk drive frame. 5. See "Removing the Housing Cover" on page 65 3. Remove the two screws as shown and then detach the hard disk drive from the main board. Removing the Hard Disk Drive 1. Disconnect the hard disk drive IDE from the frame. 70 Chapter 3 See "Removing the FDD and DVD Frame" on page 63 2.
Detach the hard disk drive power connector and hard disk drive IDE cable from the lower case. Slide the hard disk drive frame to the right and then gently move it inward to detach it from the hard disk drive. 4. Remove the four screws as shown here and then hold the hard disk drive frame. 5. See "Removing the Housing Cover" on page 65 3. Remove the two screws as shown and then detach the hard disk drive from the main board. Removing the Hard Disk Drive 1. Disconnect the hard disk drive IDE from the frame. 70 Chapter 3 See "Removing the FDD and DVD Frame" on page 63 2.

Veriton 3600G/5600G/7600G Service Guide
Page 83
... 64 4. See "Removing the FDD and DVD Frame" on page 65 5. Removing the I /O port bracket from the housing and then detach it from the lower case. Removing the System Main board 1. See "Removing the LAN Card" on page 65 3. See "Removing the Housing Cover" on page 63 2.
... 64 4. See "Removing the FDD and DVD Frame" on page 65 5. Removing the I /O port bracket from the housing and then detach it from the lower case. Removing the System Main board 1. See "Removing the LAN Card" on page 65 3. See "Removing the Housing Cover" on page 63 2.

Veriton 3600G/5600G/7600G Service Guide
Page 115
... for P6 class CPU & program CPU with proper cacheable range. 3. Reserved Initialize USB Reserved Test all memory (clear all extended memory to smaller one in case the cacheable ranges between each 64K page. 2. Display PnP logo 2. Reserved Initialize the combined Trend Anti-Virus code. Calculate total memory by testing the last...
... for P6 class CPU & program CPU with proper cacheable range. 3. Reserved Initialize USB Reserved Test all memory (clear all extended memory to smaller one in case the cacheable ranges between each 64K page. 2. Display PnP logo 2. Reserved Initialize the combined Trend Anti-Virus code. Calculate total memory by testing the last...

Veriton 7600G
Page 34
... holding a disc, hold them by the edges to avoid leaving smudges or fingerprints. 3. Do not wipe in a circular motion. • Clean your disc in its case when not in use a clean, dust-free cloth and wipe in any computer or electronics shop. You may refer to close the tray. Make sure...
... holding a disc, hold them by the edges to avoid leaving smudges or fingerprints. 3. Do not wipe in a circular motion. • Clean your disc in its case when not in use a clean, dust-free cloth and wipe in any computer or electronics shop. You may refer to close the tray. Make sure...
Veriton 7600G
Page 91
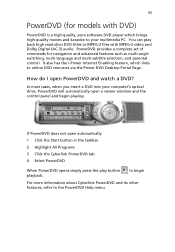
... begin playing. You can play button playback. PowerDVD provides a complete set of commands for models with MPEG-2 video and Dolby Digital (AC-3) audio. In most cases, when you insert a DVD into your multimedia PC.
... begin playing. You can play button playback. PowerDVD provides a complete set of commands for models with MPEG-2 video and Dolby Digital (AC-3) audio. In most cases, when you insert a DVD into your multimedia PC.

Veriton 7600G
Page 103
However, if a more serious problem arises, contact your computer is not working properly. This chapter tells you what to do in case your dealer or the technical support center (www.acersupport.com) for assistance.
However, if a more serious problem arises, contact your computer is not working properly. This chapter tells you what to do in case your dealer or the technical support center (www.acersupport.com) for assistance.

Veriton 7600G Service Guide
Page 5
...WHEN ORDERING FRU PARTS, that you should check the most up-to extend the functionality of a machine (e.g. In such cases, please contact your Acer office may have decided to -date information available on card, modem, or extra memory capability). This Service Guide provides ...you with all technical information relating to provide you with further technical details. 2. Preface Before using this generic service guide. For ACER-AUTHORIZED SERVICE PROVIDERS, your regional offices or the responsible personnel/channel to the BASIC CONFIGURATION decided for whatever reason, a part ...
...WHEN ORDERING FRU PARTS, that you should check the most up-to extend the functionality of a machine (e.g. In such cases, please contact your Acer office may have decided to -date information available on card, modem, or extra memory capability). This Service Guide provides ...you with all technical information relating to provide you with further technical details. 2. Preface Before using this generic service guide. For ACER-AUTHORIZED SERVICE PROVIDERS, your regional offices or the responsible personnel/channel to the BASIC CONFIGURATION decided for whatever reason, a part ...
Veriton 7600G Service Guide
Page 44
... configuration values into the battery-backed nonvolatile memory called CMOS RAM. Before you run Setup when starting the computer unless you exit Setup. In this case, the system cannot retain configuration values in CMOS. Chapter 2 34 Chapter 2 System Utilities Most systems are already configured by the manufacturer or the dealer. There...
... configuration values into the battery-backed nonvolatile memory called CMOS RAM. Before you run Setup when starting the computer unless you exit Setup. In this case, the system cannot retain configuration values in CMOS. Chapter 2 34 Chapter 2 System Utilities Most systems are already configured by the manufacturer or the dealer. There...

Veriton 7600G Service Guide
Page 48
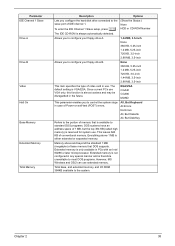
... B Video Halt On Base Memory Extended Memory Total Memory Description Options Allows you to configure your floppy drive B. The default setting is only available in case of conventional memory. This leaves 640 KB of Power-on self-test (POST) errors. Total base, and extended memory, and I/O ROM 384KB available to control...
... B Video Halt On Base Memory Extended Memory Total Memory Description Options Allows you to configure your floppy drive B. The default setting is only available in case of conventional memory. This leaves 640 KB of Power-on self-test (POST) errors. Total base, and extended memory, and I/O ROM 384KB available to control...

Veriton 7600G Service Guide
Page 81
Slide the upper case back out about an inch and then gently pull it outward to detach it . Removing the Housing Cover 1. Place the system unit on a flat, steady surface. 2. Veriton 3600(D/G)/5600(D/G)/7600(D/G) 72 Disassembling the Veriton 3600D/ 3600G Opening the Housing This section tells you how to open the housing cover when you have turned off the system and all peripherals connected to install additional components inside the system unit. CAUTION: Before you proceed, make sure that you need to it from the housing. Turn the housing back. 3.
Slide the upper case back out about an inch and then gently pull it outward to detach it . Removing the Housing Cover 1. Place the system unit on a flat, steady surface. 2. Veriton 3600(D/G)/5600(D/G)/7600(D/G) 72 Disassembling the Veriton 3600D/ 3600G Opening the Housing This section tells you how to open the housing cover when you have turned off the system and all peripherals connected to install additional components inside the system unit. CAUTION: Before you proceed, make sure that you need to it from the housing. Turn the housing back. 3.

Veriton 7600G Service Guide
Page 83
... below and then remove the modem card from the floppy disk drive. 4. Press and then remove the EMI audio cover from the DVD-ROM drive. Veriton 3600(D/G)/5600(D/G)/7600(D/G) 74 See "Removing the Housing Cover" on page 72 2. Push the two latches of both sides then lift up the FDD and... DVD frame . 3. Disconnect the DVD-ROM power cable, DVD-ROM IDE cable, and audio cable from the lower case. Removing the LAN Card 1. Removing the EMI Audio Cover 1. Removing the FDD and DVD Frame 1.
... below and then remove the modem card from the floppy disk drive. 4. Press and then remove the EMI audio cover from the DVD-ROM drive. Veriton 3600(D/G)/5600(D/G)/7600(D/G) 74 See "Removing the Housing Cover" on page 72 2. Push the two latches of both sides then lift up the FDD and... DVD frame . 3. Disconnect the DVD-ROM power cable, DVD-ROM IDE cable, and audio cable from the lower case. Removing the LAN Card 1. Removing the EMI Audio Cover 1. Removing the FDD and DVD Frame 1.

Veriton 7600G Service Guide
Page 84
Remove the four screws as shown here then detach the floppy disk drive from the frame. 8. Remove the four screws as shown here then detach the DVD-ROM drive from the frame. 75 Chapter 3 Remove the floppy disk drive cable and optical drive IDE cable from the lower case . 6. 5. Disconnect the intrusion alarm cable from the main board and then pull the FDD and DVD frame from the main board. . 7.
Remove the four screws as shown here then detach the floppy disk drive from the frame. 8. Remove the four screws as shown here then detach the DVD-ROM drive from the frame. 75 Chapter 3 Remove the floppy disk drive cable and optical drive IDE cable from the lower case . 6. 5. Disconnect the intrusion alarm cable from the main board and then pull the FDD and DVD frame from the main board. . 7.

Veriton 7600G Service Guide
Page 87
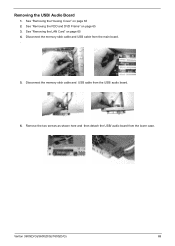
Removing the USB/ Audio Board 1. See "Removing the Housing Cover" on page 74 3. See "Removing the FDD and DVD Frame" on page 72 2. Disconnect the memory stick cable and USB cable from the lower case. Remove the two screws as shown here and then detach the USB/ audio board from the USB/ audio board. 6. See "Removing the LAN Card" on page 74 4. Disconnect the memory stick cable and USB cable from the main board. . 5. Veriton 3600(D/G)/5600(D/G)/7600(D/G) 78
Removing the USB/ Audio Board 1. See "Removing the Housing Cover" on page 74 3. See "Removing the FDD and DVD Frame" on page 72 2. Disconnect the memory stick cable and USB cable from the lower case. Remove the two screws as shown here and then detach the USB/ audio board from the USB/ audio board. 6. See "Removing the LAN Card" on page 74 4. Disconnect the memory stick cable and USB cable from the main board. . 5. Veriton 3600(D/G)/5600(D/G)/7600(D/G) 78

