
Veriton 3600G/5600G/7600G Service Guide
Page 7
... 62 Disassembling the Veriton 3600D/ 3600G 63 Opening the Housing 63 Removing the Front Panel 64 Removing the AGP VGA Card 64 Removing the LAN Card 65 Removing the EMI Audio Cover 65 Removing the FDD and DVD Frame 65 Removing the Intrusion Alarm Cable Module 67 Removing the DIMM 67 Removing and Installing the RTC Battery 68 Removing the Power Switch Cable 68 Removing the USB/ Audio Board 69 Removing the Hard Disk Drive 70 Removing the LED Activity Indicators 71 Removing the Power Supply 72 Removing the CPU Fan Sink...
... 62 Disassembling the Veriton 3600D/ 3600G 63 Opening the Housing 63 Removing the Front Panel 64 Removing the AGP VGA Card 64 Removing the LAN Card 65 Removing the EMI Audio Cover 65 Removing the FDD and DVD Frame 65 Removing the Intrusion Alarm Cable Module 67 Removing the DIMM 67 Removing and Installing the RTC Battery 68 Removing the Power Switch Cable 68 Removing the USB/ Audio Board 69 Removing the Hard Disk Drive 70 Removing the LED Activity Indicators 71 Removing the Power Supply 72 Removing the CPU Fan Sink...

Veriton 3600G/5600G/7600G Service Guide
Page 8
... Disassembling the Veriton 7600D/ 7600G 89 Opening the Housing 89 Removing the Front Panel 89 Removing the Modem Card 90 Removing the AGP VGA Card 90 Removing the USB/ Audio Board 91 Removing the DVD-ROM and CD-RW Drive 92 Removing the Floppy Disk Drive 93 Removing the Hard Disk Drive 94 Removing the Intrusion Alarm Cable Module 95 Removing a DIMM 95 Removing the CPU Fan Sink 96 Removing and Installing the Processor 97 Removing and Installing the RTC Battery 97 Removing the Power Supply 98 Removing the LED Activity Indicators With Power Switch Cable...
... Disassembling the Veriton 7600D/ 7600G 89 Opening the Housing 89 Removing the Front Panel 89 Removing the Modem Card 90 Removing the AGP VGA Card 90 Removing the USB/ Audio Board 91 Removing the DVD-ROM and CD-RW Drive 92 Removing the Floppy Disk Drive 93 Removing the Hard Disk Drive 94 Removing the Intrusion Alarm Cable Module 95 Removing a DIMM 95 Removing the CPU Fan Sink 96 Removing and Installing the Processor 97 Removing and Installing the RTC Battery 97 Removing the Power Supply 98 Removing the LED Activity Indicators With Power Switch Cable...
Veriton 3600G/5600G/7600G Service Guide
Page 50
... be used for the 1.1 operating system. 41 Chapter 2 Floppy, LS120, Hard Disk, CD-ROM, ZIP100, LAN (on board LAN-- This item allows you to run in faster system performance. Floppy, LS120, Hard Disk, CDROM, ZIP100, LAN (on board LAN-- Enabled Disabled Sets the NumLock status when the system is to set the rate (characters/second) at which MPS (Multi- 1.4 Processor Specification) version to specify the system boot up search sequence. Setup means...
... be used for the 1.1 operating system. 41 Chapter 2 Floppy, LS120, Hard Disk, CD-ROM, ZIP100, LAN (on board LAN-- This item allows you to run in faster system performance. Floppy, LS120, Hard Disk, CDROM, ZIP100, LAN (on board LAN-- Enabled Disabled Sets the NumLock status when the system is to set the rate (characters/second) at which MPS (Multi- 1.4 Processor Specification) version to specify the system boot up search sequence. Setup means...

Veriton 3600G/5600G/7600G Service Guide
Page 55
... interact with a USB Enabled keyboard or mouse to work with Serial ATA Port 1 set to enable/disable the onboard USB controller. Chapter 2 46 If your hard drive and your IDE hard drive supports it and the operating environment includes a DMA driver. Auto Disables SATA Mode Select SATA Mode IDE, RAID On-Chip Serial ATA This setting is used to Native Mode Master. If [Auto] is selected, PATA and SATA will be combined. Primary Master: Compatible Mode with Port 2 set to use any USB 2.0 device in Standard...
... interact with a USB Enabled keyboard or mouse to work with Serial ATA Port 1 set to enable/disable the onboard USB controller. Chapter 2 46 If your hard drive and your IDE hard drive supports it and the operating environment includes a DMA driver. Auto Disables SATA Mode Select SATA Mode IDE, RAID On-Chip Serial ATA This setting is used to Native Mode Master. If [Auto] is selected, PATA and SATA will be combined. Primary Master: Compatible Mode with Port 2 set to use any USB 2.0 device in Standard...
Veriton 3600G/5600G/7600G Service Guide
Page 56
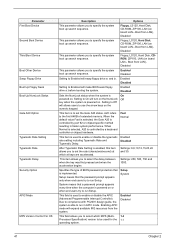
... onboard audio controller will be disabled. Enabled Disabled Auto allows the motherboard's BIOS to enter the sub-menu and the following screen appears: Parameter POWER ON Function Onboard FDC Controller Onboard Serial Port 1 Onboard Serial Port 2 Onboard Parallel Port Parallel Port Mode ECP Mode Use DMA PWRON After PWR-fail Description Options This controls how the PS/2 mouse or keyboard BUTTON ONLY, Any KEY, can use different controller cards to connect audio connectors, set to the status before power failure or interrupt occurred. Parameter USB Mouse Support AC97 Audio...
... onboard audio controller will be disabled. Enabled Disabled Auto allows the motherboard's BIOS to enter the sub-menu and the following screen appears: Parameter POWER ON Function Onboard FDC Controller Onboard Serial Port 1 Onboard Serial Port 2 Onboard Parallel Port Parallel Port Mode ECP Mode Use DMA PWRON After PWR-fail Description Options This controls how the PS/2 mouse or keyboard BUTTON ONLY, Any KEY, can use different controller cards to connect audio connectors, set to the status before power failure or interrupt occurred. Parameter USB Mouse Support AC97 Audio...
Veriton 3600G/5600G/7600G Service Guide
Page 118
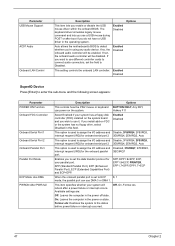
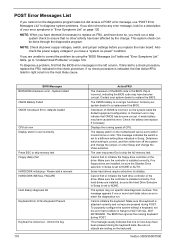
... memory test Floppy disk(s) fail HARD DISK initializing - POST Error Messages List If you cannot run the diagnostics program tests but did receive a POST error message, use "POST Error Messages List" to diagnose system problems. If you did not receive any error message, look for a replacement the BIOS. To purposely configure the system without a keyboard, set the error halt condition in right column is set to either turn off the system and change the jumper, or enter Setup...
... memory test Floppy disk(s) fail HARD DISK initializing - POST Error Messages List If you cannot run the diagnostics program tests but did receive a POST error message, use "POST Error Messages List" to diagnose system problems. If you did not receive any error message, look for a replacement the BIOS. To purposely configure the system without a keyboard, set the error halt condition in right column is set to either turn off the system and change the jumper, or enter Setup...
Veriton 3600G/5600G/7600G Service Guide
Page 119
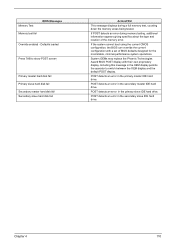
... hard disk fail Secondary slave hard disk fail Action/FRU This message displays during memory testing, additional information appears giving specifics about the type and location of BIOS defaults designed for the most stable, minimal-performance system operations. POST detects an error in the primary master IDE hard drive. POST detects an error in the secondary master IDE hard drive. Chapter 4 110 If the system cannot boot using the current CMOS configuration, the BIOS...
... hard disk fail Secondary slave hard disk fail Action/FRU This message displays during memory testing, additional information appears giving specifics about the type and location of BIOS defaults designed for the most stable, minimal-performance system operations. POST detects an error in the primary master IDE hard drive. POST detects an error in the secondary master IDE hard drive. Chapter 4 110 If the system cannot boot using the current CMOS configuration, the BIOS...
Veriton 3600G/5600G/7600G Service Guide
Page 121
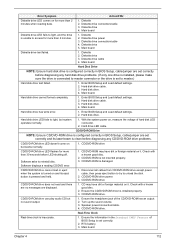
... in BIOS Setup, cable/jumper are set correctly. 2. Main board Diskette drive LED fails to light, and the drive is unable to access for more than 30 seconds before diagnosing any CD/DVD-ROM drive problems. CD/DVD-ROM drive LED doesn't come on , measure the voltage of the CD/DVD-ROM has an output. 2. Diskette drive 5. Main board. Hard disk drive cable. 3. Main board. Hard disk drive LED fails to reinstall disc. CD/DVD-ROM drive power. 3. Check with a known good disc. 2. CD/DVD-ROM drive. RTC battery. 3. Diskette 2. Hard disk drive cable. 3. Enter BIOS Setup and...
... in BIOS Setup, cable/jumper are set correctly. 2. Main board Diskette drive LED fails to light, and the drive is unable to access for more than 30 seconds before diagnosing any CD/DVD-ROM drive problems. CD/DVD-ROM drive LED doesn't come on , measure the voltage of the CD/DVD-ROM has an output. 2. Diskette drive 5. Main board. Hard disk drive cable. 3. Main board. Hard disk drive LED fails to reinstall disc. CD/DVD-ROM drive power. 3. Check with a known good disc. 2. CD/DVD-ROM drive. RTC battery. 3. Diskette 2. Hard disk drive cable. 3. Enter BIOS Setup and...

Veriton 3600G/5600G/7600G Service Guide
Page 154
..., Machine 60 replacing HDD 82 RIMM Removing 71, 95 RMA 120 Routing Map 29 145 S Serial Port 28 Serial port 12, 14, 19 socket memory 24 Socket 370 23 Suspend Mode 33 Switching Power Supply 102W 32 Symptoms List Audio 113 CD/DVD-ROM Drive 112 Diskette Drive 111 Keyboard 114 Memory 111 Modem 113 Monitor 113 Other 114 Parallel Port 114 Power Supply 114 Processor / Processor Fan 111 Real-Time Clock 112 Serial Port 114 System Board 111 Video 113 System Board removing...
..., Machine 60 replacing HDD 82 RIMM Removing 71, 95 RMA 120 Routing Map 29 145 S Serial Port 28 Serial port 12, 14, 19 socket memory 24 Socket 370 23 Suspend Mode 33 Switching Power Supply 102W 32 Symptoms List Audio 113 CD/DVD-ROM Drive 112 Diskette Drive 111 Keyboard 114 Memory 111 Modem 113 Monitor 113 Other 114 Parallel Port 114 Power Supply 114 Processor / Processor Fan 111 Real-Time Clock 112 Serial Port 114 System Board 111 Video 113 System Board removing...
Veriton 7600G
Page 4
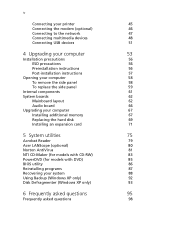
... replace the side panel 59 Internal components 61 System boards 62 Mainboard layout 62 Audio board 66 Upgrading your computer 67 Installing additional memory 67 Replacing the hard disk 69 Installing an expansion card 71 5 System utilities 75 Acrobat Reader 79 Acer LANScope (optional) 80 Norton AntiVirus 81 NTI CD-Maker (for models with CD-RW) 83 PowerDVD (for models with DVD) 85 BIOS utility 86 Reinstalling programs 87 Recovering your system 88 Using Backup (Windows...
... replace the side panel 59 Internal components 61 System boards 62 Mainboard layout 62 Audio board 66 Upgrading your computer 67 Installing additional memory 67 Replacing the hard disk 69 Installing an expansion card 71 5 System utilities 75 Acrobat Reader 79 Acer LANScope (optional) 80 Norton AntiVirus 81 NTI CD-Maker (for models with CD-RW) 83 PowerDVD (for models with DVD) 85 BIOS utility 86 Reinstalling programs 87 Recovering your system 88 Using Backup (Windows...
Veriton 7600G
Page 18
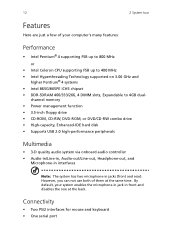
...; Power management function • 3.5-inch floppy drive • CD-ROM, CD-RW, DVD-ROM, or DVD/CD-RW combo drive • High-capacity, Enhanced-IDE hard disk • Supports USB 2.0 high-performance peripherals Multimedia • 3-D quality audio system via onboard audio controller • Audio-in/Line-in, Audio-out/Line-out, Headphone-out, and Microphone-in interfaces Note: The system has two microphone-in front and disables the...
...; Power management function • 3.5-inch floppy drive • CD-ROM, CD-RW, DVD-ROM, or DVD/CD-RW combo drive • High-capacity, Enhanced-IDE hard disk • Supports USB 2.0 high-performance peripherals Multimedia • 3-D quality audio system via onboard audio controller • Audio-in/Line-in, Audio-out/Line-out, Headphone-out, and Microphone-in interfaces Note: The system has two microphone-in front and disables the...
Veriton 7600G
Page 62
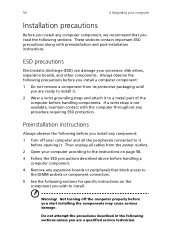
... that block access to the DIMM sockets or component connectors. 5 See the following sections for specific instructions on the component you are a qualified service technician. ESD precautions Electrostatic discharge (ESD) can damage your computer and all cables from its protective packaging until you wish to install. Then unplug all the peripherals connected to it before opening it to install it...
... that block access to the DIMM sockets or component connectors. 5 See the following sections for specific instructions on the component you are a qualified service technician. ESD precautions Electrostatic discharge (ESD) can damage your computer and all cables from its protective packaging until you wish to install. Then unplug all the peripherals connected to it before opening it to install it...
Veriton 7600G
Page 94
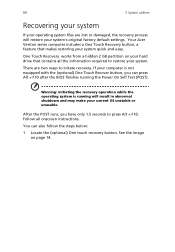
... + F10 after the BIOS finishes running will restore your system's original factory default settings. One Touch Recovery works from a hidden 2 GB partition on page 14. 88 5 System utilities Recovering your system If your operating system files are two ways to initate recovery. See the image on your system quick and easy. Your Acer Veriton series computer includes a One Touch Recovery button, a feature that makes restoring your hard drive that contains all onscreen instructions.
... + F10 after the BIOS finishes running will restore your system's original factory default settings. One Touch Recovery works from a hidden 2 GB partition on page 14. 88 5 System utilities Recovering your system If your operating system files are two ways to initate recovery. See the image on your system quick and easy. Your Acer Veriton series computer includes a One Touch Recovery button, a feature that makes restoring your hard drive that contains all onscreen instructions.
Veriton 7600G
Page 115
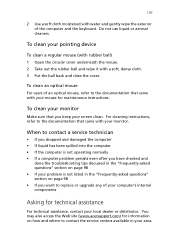
... service centers available in the "Frequently-asked questions" section on page 98 • If your problem is not listed in your local dealer or distributor. You may also access the Web site (www.acersupport.com) for technical assistance For technical assistance, contact your area. To clean an optical mouse For users of an optical mouse, refer to replace or upgrade any of your computer's internal...
... service centers available in the "Frequently-asked questions" section on page 98 • If your problem is not listed in your local dealer or distributor. You may also access the Web site (www.acersupport.com) for technical assistance For technical assistance, contact your area. To clean an optical mouse For users of an optical mouse, refer to replace or upgrade any of your computer's internal...
Veriton 7600G Service Guide
Page 54
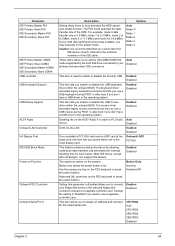
... UDMA USB controller USB Keyboard Support USB Mouse Support AC97 Audio Onboard LAN Controller Init Display First IDE HDD Block Mode Power on Function Onboard FDC Controller Onboard Serial Port 1 Description Options Setting these items to use a separate controller card. If your Disabled primary and secondary IDE connectors. The keyboard driver simulates legacy keyboard command and lets you use a USB keyboard during POST or after boot if you want to Auto activates the HDD speed auto-detect function. Change the setting to Disabled if you don't have a USB driver...
... UDMA USB controller USB Keyboard Support USB Mouse Support AC97 Audio Onboard LAN Controller Init Display First IDE HDD Block Mode Power on Function Onboard FDC Controller Onboard Serial Port 1 Description Options Setting these items to use a separate controller card. If your Disabled primary and secondary IDE connectors. The keyboard driver simulates legacy keyboard command and lets you use a USB keyboard during POST or after boot if you want to Auto activates the HDD speed auto-detect function. Change the setting to Disabled if you don't have a USB driver...
Veriton 7600G Service Guide
Page 59
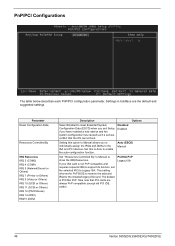
... to enable the auto-configuration function. This setting informs the PnP BIOS to reset Extended System Configuration Data (ESCD) when you exit Setup if you to individually assign the IRQs and DMAs to show the IRQ Resources. Auto (ESCD) Manual Set " Resources Controlled By" to Manual to the ISA and PCI devices. Take note that the OS cannot boot. Set this option to Manual allows you have installed a new add...
... to enable the auto-configuration function. This setting informs the PnP BIOS to reset Extended System Configuration Data (ESCD) when you exit Setup if you to individually assign the IRQs and DMAs to show the IRQ Resources. Auto (ESCD) Manual Set " Resources Controlled By" to Manual to the ISA and PCI devices. Take note that the OS cannot boot. Set this option to Manual allows you have installed a new add...
Veriton 7600G Service Guide
Page 127
... the switch is set incorrectly Press ESC to skip memory test Floppy disk(s) fail HARD DISK initializing - Some hard drives require extra time to a check procedure, replace the FRU indicated in Setup is set to either turn off the system and change the jumper, or enter Setup and change . BIOS Messages BIOS ROM checksum error - If no objects are unable to correct the problem by the change the Video selection. To purposely configure the system without a keyboard, set...
... the switch is set incorrectly Press ESC to skip memory test Floppy disk(s) fail HARD DISK initializing - Some hard drives require extra time to a check procedure, replace the FRU indicated in Setup is set to either turn off the system and change the jumper, or enter Setup and change . BIOS Messages BIOS ROM checksum error - If no objects are unable to correct the problem by the change the Video selection. To purposely configure the system without a keyboard, set...

Veriton 7600G Service Guide
Page 128
... operator to show POST screen Primary master hard disk fail Primary slave hard disk fail Secondary master hard disk fail Secondary slave hard disk fail Action/FRU This message displays during memory testing, additional information appears giving specifics about the type and location of BIOS defaults designed for the most stable, minimal-performance system operations. Memory Test: BIOS Messages Memory test fail Override enabled - System OEMs may replace the Phoenix Technologies Award BIOS POST display with a set of the memory error...
... operator to show POST screen Primary master hard disk fail Primary slave hard disk fail Secondary master hard disk fail Secondary slave hard disk fail Action/FRU This message displays during memory testing, additional information appears giving specifics about the type and location of BIOS defaults designed for the most stable, minimal-performance system operations. Memory Test: BIOS Messages Memory test fail Override enabled - System OEMs may replace the Phoenix Technologies Award BIOS POST display with a set of the memory error...

Veriton 7600G Service Guide
Page 130
... CD/DVD-ROM has an output. 2. Diskette 2. Ensure the CD/DVD-ROM driver is damaged. Main board Hard Disk Drive NOTE: Ensure hard disk drive is set to light, but no messages are set correctly and its eject button is configured correctly in BIOS Setup, cable/jumper are set correctly before diagnosing any hard disk drive problems. (If only one drive is installed, please make sure the drive is connected to master connector or the drive is turned on , measure the voltage of hard disk LED connector. 2. Main board.
... CD/DVD-ROM has an output. 2. Diskette 2. Ensure the CD/DVD-ROM driver is damaged. Main board Hard Disk Drive NOTE: Ensure hard disk drive is set to light, but no messages are set correctly and its eject button is configured correctly in BIOS Setup, cable/jumper are set correctly before diagnosing any hard disk drive problems. (If only one drive is installed, please make sure the drive is connected to master connector or the drive is turned on , measure the voltage of hard disk LED connector. 2. Main board.
Veriton 7600G Service Guide
Page 163
.../2 mouse port 12, 14, 18 R Removal and Replacement 69 removing 88, 90, 106 Replacement Assembly, Machine 69 replacing HDD 91 RIMM Removing 80, 104 RMA 129 Routing Map 29 S Security 55 Serial Port 28 Serial port 12, 14, 19 socket memory 24 Socket 370 23 Suspend Mode 33 Switching Power Supply 102W 32 Symptoms List Audio 122 CD/DVD-ROM Drive 121 Diskette Drive 120 Keyboard 123 Memory 120 Modem 122 Monitor 122 Other 123 Parallel Port 123 Power Supply 123 Processor / Processor Fan...
.../2 mouse port 12, 14, 18 R Removal and Replacement 69 removing 88, 90, 106 Replacement Assembly, Machine 69 replacing HDD 91 RIMM Removing 80, 104 RMA 129 Routing Map 29 S Security 55 Serial Port 28 Serial port 12, 14, 19 socket memory 24 Socket 370 23 Suspend Mode 33 Switching Power Supply 102W 32 Symptoms List Audio 122 CD/DVD-ROM Drive 121 Diskette Drive 120 Keyboard 123 Memory 120 Modem 122 Monitor 122 Other 123 Parallel Port 123 Power Supply 123 Processor / Processor Fan...


