

Veriton 7200
Page 10
... 63 Norton AntiVirus 64 NTI CD-Maker 2000 (for models with CD-RW) 65 PowerDVD (for models with DVD) 66 VariSpeed (Windows Me only) 67 BIOS utility 68 Reinstalling programs 69 6 Q&A 71 Index 77
... 63 Norton AntiVirus 64 NTI CD-Maker 2000 (for models with CD-RW) 65 PowerDVD (for models with DVD) 66 VariSpeed (Windows Me only) 67 BIOS utility 68 Reinstalling programs 69 6 Q&A 71 Index 77

Veriton 7200
Page 62
52 4 Upgrading your computer with a screw. 8. Reinstall the side panel (see page 46). Secure the card to the newly-installed devices. When you turn on the computer, BIOS (Basic Input/Output System) automatically detects and assigns resources to your computer 7.
52 4 Upgrading your computer with a screw. 8. Reinstall the side panel (see page 46). Secure the card to the newly-installed devices. When you turn on the computer, BIOS (Basic Input/Output System) automatically detects and assigns resources to your computer 7.

Veriton 7200
Page 65
55 Label Component FN1 3-pin CPU fan connector FN2 3-pin system fan connector FN3 3-pin system fan connector JP1 LAN active LED connector JP3 Model select JP14 1-2 Clear CMOS 2-3 Normal2 PCI1 to 3 PCI slots 1 to 3 U5 CPU socket U12 Intel 845 chipset U16 SMSC chipset U21 Intel ICH2 chipset U29 BIOS chipset 1 Share connection with serial port 2 (COM 2) 2 Default value
55 Label Component FN1 3-pin CPU fan connector FN2 3-pin system fan connector FN3 3-pin system fan connector JP1 LAN active LED connector JP3 Model select JP14 1-2 Clear CMOS 2-3 Normal2 PCI1 to 3 PCI slots 1 to 3 U5 CPU socket U12 Intel 845 chipset U16 SMSC chipset U21 Intel ICH2 chipset U29 BIOS chipset 1 Share connection with serial port 2 (COM 2) 2 Default value

Veriton 7200
Page 68
... easily into the socket until the clips lock onto the DIMM (b). Turn the DIMM and try to the Veriton 7200 online guide (see page 45). 1. To reconfigure your computer Note: Observe the "Installation precautions" on BIOS, refer to insert it incorrectly. Open the clips on page 6). Also, make a note of memory installed. 58.... Press the DIMM into the socket, you have inserted it again. For more information on page 43 when installing or removing a computer component. Run the BIOS utility to ensure proper installation.
... easily into the socket until the clips lock onto the DIMM (b). Turn the DIMM and try to the Veriton 7200 online guide (see page 45). 1. To reconfigure your computer Note: Observe the "Installation precautions" on BIOS, refer to insert it incorrectly. Open the clips on page 6). Also, make a note of memory installed. 58.... Press the DIMM into the socket, you have inserted it again. For more information on page 43 when installing or removing a computer component. Run the BIOS utility to ensure proper installation.

Veriton 7200
Page 71
However, if you need more help and information, you may refer to use. 61 Your computer comes with the following applications: • Acrobat® Reader™ • LDCM • Norton AntiVirus • NTI CD-Maker 2000 • PowerDVD • VariSpeed • BIOS utility All of the applications that came with your computer are very easy to the online help documentation provided in each software application.
However, if you need more help and information, you may refer to use. 61 Your computer comes with the following applications: • Acrobat® Reader™ • LDCM • Norton AntiVirus • NTI CD-Maker 2000 • PowerDVD • VariSpeed • BIOS utility All of the applications that came with your computer are very easy to the online help documentation provided in each software application.

Veriton 7200
Page 78
... computer's Basic Input/Output System (BIOS). To run BIOS, make sure that you have saved all open files. Since most computers are already properly configured and optimized, there is a hardware configuration program built into your computer, refer to the Veriton 7200 online guide (see "Accessing the ...online guide"on page 6). 68 5 Software BIOS utility The BIOS utility is no need to run this utility.
... computer's Basic Input/Output System (BIOS). To run BIOS, make sure that you have saved all open files. Since most computers are already properly configured and optimized, there is a hardware configuration program built into your computer, refer to the Veriton 7200 online guide (see "Accessing the ...online guide"on page 6). 68 5 Software BIOS utility The BIOS utility is no need to run this utility.

Veriton 7200
Page 87
77 Index A accessing the online guide 6 applications 61 B BIOS utility 68 C computer maintenance 4 cleaning 4 servicing 4 connecting options multimedia devices 37 audio line-in device 39 earphones/headphones 37 external speakers 37 joystick 37 microphone ...
77 Index A accessing the online guide 6 applications 61 B BIOS utility 68 C computer maintenance 4 cleaning 4 servicing 4 connecting options multimedia devices 37 audio line-in device 39 earphones/headphones 37 external speakers 37 joystick 37 microphone ...
Veriton 7200 Service Guide
Page 5
...7200 4 Rear Panel-Veriton 7200 6 System Block Diagram 8 Main Board Layout 9 Keyboard 11 Hardware Specifications and Configurations 13 Power Management Functions 21 Chapter 2 System Utilities 22 Entering Setup 23 Product Information 24 Standard CMOS Features 25 IDE Primary Master/Slave and IDE Secondary Master/Slave Setup . . . . .27 Advanced BIOS... the Password 42 Load Default Settings 43 Exiting Setup 44 Advanced Options 45 Product Information 45 Advanced BIOS Features 46 Advanced Chipset Features 47 Integrated Peripherals 48 Power Management Setup 49 PC Health Status 50...
...7200 4 Rear Panel-Veriton 7200 6 System Block Diagram 8 Main Board Layout 9 Keyboard 11 Hardware Specifications and Configurations 13 Power Management Functions 21 Chapter 2 System Utilities 22 Entering Setup 23 Product Information 24 Standard CMOS Features 25 IDE Primary Master/Slave and IDE Secondary Master/Slave Setup . . . . .27 Advanced BIOS... the Password 42 Load Default Settings 43 Exiting Setup 44 Advanced Options 45 Product Information 45 Advanced BIOS Features 46 Advanced Chipset Features 47 Integrated Peripherals 48 Power Management Setup 49 PC Health Status 50...

Veriton 7200 Service Guide
Page 17
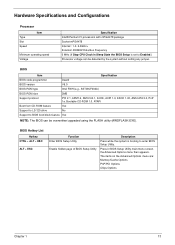
... connector 3-pin fan CPU connector 3-pin fan SYS connector PCI slot 1 PCI slot 2 PCI slot 3 CPU socket Intel 845 socket SMSC chipset Intel ICH2 chipset BIOS chipset LAN active LED connector Model Select 1-2 Clear CMOS 2-3 Normal** 10 Chapter 1 Label AGP BT1 CN2 CN3 CN4 CN5 CN6 CN7 CN8 CN9 CN10 CN14...
... connector 3-pin fan CPU connector 3-pin fan SYS connector PCI slot 1 PCI slot 2 PCI slot 3 CPU socket Intel 845 socket SMSC chipset Intel ICH2 chipset BIOS chipset LAN active LED connector Model Select 1-2 Clear CMOS 2-3 Normal** 10 Chapter 1 Label AGP BT1 CN2 CN3 CN4 CN5 CN6 CN7 CN8 CN9 CN10 CN14...

Veriton 7200 Service Guide
Page 19
.... 8 Application key Opens the applications context menu (same function as clicking the right button of the computer's controls like screen brightness, volume output and the BIOS utility. 12 Chapter 1 Turn it to toggle between mute and sound. 5 Scroll Lock When activated, the screen moves one line up arrow or down when...
.... 8 Application key Opens the applications context menu (same function as clicking the right button of the computer's controls like screen brightness, volume output and the BIOS utility. 12 Chapter 1 Turn it to toggle between mute and sound. 5 Scroll Lock When activated, the screen moves one line up arrow or down when...
Veriton 7200 Service Guide
Page 20
... Utility main menu screen, the Advanced Options menu then appears. Press in Sleep State the BIOS Setup is booting to enter BIOS Setup Utility. BIOS Item Specification BIOS code programmer Award BIOS version V6.0 BIOS ROM type Intel FWH (e.g., SST49LF002A) BIOS ROM size 2MB Support protocol PCI 2.1, APM1.2, DMI 2.00.1, E-IDE, ACPI 1.0, ESCD 1.03, ANSI ATA 3.0, PnP...
... Utility main menu screen, the Advanced Options menu then appears. Press in Sleep State the BIOS Setup is booting to enter BIOS Setup Utility. BIOS Item Specification BIOS code programmer Award BIOS version V6.0 BIOS ROM type Intel FWH (e.g., SST49LF002A) BIOS ROM size 2MB Support protocol PCI 2.1, APM1.2, DMI 2.00.1, E-IDE, ACPI 1.0, ESCD 1.03, ANSI ATA 3.0, PnP...
Veriton 7200 Service Guide
Page 21
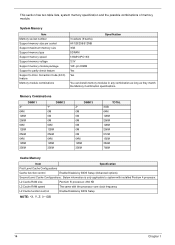
... TOTAL 3GB 64M 128M 256M 128M 256M 512M 192M 384M 768M Cache Memory Item Specification First-Level Cache Configurations Cache function control Enable/Disable by BIOS Setup NOTE: *X, Y, Z: 0~1GB 14 Chapter 1 System Memory Item Memory socket number Support memory size per socket Support maximum memory size Support ...: 256 KB L2 Cache RAM speed The same with the processor core clock frequency L2 Cache function control Enable/Disable by BIOS Setup (Advanced options) Second-Level Cache Configurations: Below information is only applicable to Error Correction Code (ECC) feature.
... TOTAL 3GB 64M 128M 256M 128M 256M 512M 192M 384M 768M Cache Memory Item Specification First-Level Cache Configurations Cache function control Enable/Disable by BIOS Setup NOTE: *X, Y, Z: 0~1GB 14 Chapter 1 System Memory Item Memory socket number Support memory size per socket Support maximum memory size Support ...: 256 KB L2 Cache RAM speed The same with the processor core clock frequency L2 Cache function control Enable/Disable by BIOS Setup (Advanced options) Second-Level Cache Configurations: Below information is only applicable to Error Correction Code (ECC) feature.

Veriton 7200 Service Guide
Page 22
... synthesizer Sampling rate MPU-401 UART support Microphone jack Headphone jack Package Specification Embedded in Intel 82801BA ICH II AC'97 link Enable/disable by BIOS Setup Stereo 16 bits AC'97 2.1 compliant Sound Blaster Pro compatible Mixed digital and analog high performance chip Enhanced stereo full duplex operation High performance...
... synthesizer Sampling rate MPU-401 UART support Microphone jack Headphone jack Package Specification Embedded in Intel 82801BA ICH II AC'97 link Enable/disable by BIOS Setup Stereo 16 bits AC'97 2.1 compliant Sound Blaster Pro compatible Mixed digital and analog high performance chip Enhanced stereo full duplex operation High performance...

Veriton 7200 Service Guide
Page 24
... 07h Route Reg. UPPER LIMIT UPPER LIMIT - 4GBytes 64KBytes Function Host Memory Host/PCI Memory PCI/ISA Video Buffer Memory Video BIOS Memory ISA Card BIOS & Buffer Memory BIOS Extension Memory Setup and Post Memory PCI Development BIOS System BIOS Memory Main Memory PCI Memory Note : UPPER LIMIT means the maximum size of installed memory.
... 07h Route Reg. UPPER LIMIT UPPER LIMIT - 4GBytes 64KBytes Function Host Memory Host/PCI Memory PCI/ISA Video Buffer Memory Video BIOS Memory ISA Card BIOS & Buffer Memory BIOS Extension Memory Setup and Post Memory PCI Development BIOS System BIOS Memory Main Memory PCI Memory Note : UPPER LIMIT means the maximum size of installed memory.

Veriton 7200 Service Guide
Page 30
... pressing w, y , z, or x ,then press e ! The grayed items on the screens show default values. The Setup Utility main menu then appears: The above screen is the BIOS Utility Basic Level screen. These values may not be the same as those in the main menu, press ^ again to pop out the screen with...
... pressing w, y , z, or x ,then press e ! The grayed items on the screens show default values. The Setup Utility main menu then appears: The above screen is the BIOS Utility Basic Level screen. These values may not be the same as those in the main menu, press ^ again to pop out the screen with...

Veriton 7200 Service Guide
Page 31
... from the main menu: The Product Information menu contains general data about the system, such as the product name, serial number, BIOS version, etc. Hardware checking is necessary for troubleshooting (maybe required when asking for technical support). These information is done via software during... the main version of the SMBIOS utility installed in this menu: Parameter Product Name System S/N Main Board ID Main Board S/N System BIOS Version SMBIOS version Description Displays the model name of your system. Chapter 2 24 Displays your main board's serial number. This parameter ...
... from the main menu: The Product Information menu contains general data about the system, such as the product name, serial number, BIOS version, etc. Hardware checking is necessary for troubleshooting (maybe required when asking for technical support). These information is done via software during... the main version of the SMBIOS utility installed in this menu: Parameter Product Name System S/N Main Board ID Main Board S/N System BIOS Version SMBIOS version Description Displays the model name of your system. Chapter 2 24 Displays your main board's serial number. This parameter ...

Veriton 7200 Service Guide
Page 35
... search sequence. Enabled Disabled Chapter 2 28 CD-ROM, Floppy, LS120, Hard Disk, ZIP100, LAN (on board LAN-- Advanced BIOS Features The following table describes each Advanced BIOS Features parameter. Hard Disk, Floppy, LS120, CD-ROM, ZIP100, LAN (on board LAN-- Boot from LAN), Disabled This parameter... Boot Other Device Description Options Allows you to decide if the system logo displays when the system boots up search sequence. If this area, BIOS will show a warning message on board LAN-- Flopp , LS120, Hard Disk, CD-ROM, ZIP100, LAN (on screen and alarm beep....
... search sequence. Enabled Disabled Chapter 2 28 CD-ROM, Floppy, LS120, Hard Disk, ZIP100, LAN (on board LAN-- Advanced BIOS Features The following table describes each Advanced BIOS Features parameter. Hard Disk, Floppy, LS120, CD-ROM, ZIP100, LAN (on board LAN-- Boot from LAN), Disabled This parameter... Boot Other Device Description Options Allows you to decide if the system logo displays when the system boots up search sequence. If this area, BIOS will show a warning message on board LAN-- Flopp , LS120, Hard Disk, CD-ROM, ZIP100, LAN (on screen and alarm beep....

Veriton 7200 Service Guide
Page 36
Parameter Security Option Description The Setup option limits access only to both the System boot and BIOS setup. Options 29 Chapter 2 To disable the security option, select Password Setting from the main menu, don't type anything and just press e. Setup System The System option limits access to BIOS setup. A prompt asking you to enter your password appears on the screen every time you boot the system.
Parameter Security Option Description The Setup option limits access only to both the System boot and BIOS setup. Options 29 Chapter 2 To disable the security option, select Password Setting from the main menu, don't type anything and just press e. Setup System The System option limits access to BIOS setup. A prompt asking you to enter your password appears on the screen every time you boot the system.
Veriton 7200 Service Guide
Page 39
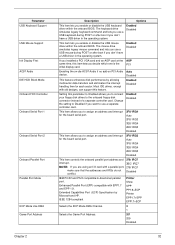
... a USB driver in the operating system. Enabled Disabled Setting this item lets you enable or disable the USB keyboard driver within the onboard BIOS. Enabled Disabled This item lets you to connect your floppy disk drives to Enabled allows you enable or disable the USB mouse driver within ...the onboard BIOS. IEEE 1284 compliant Printer Show SPP PP1.9+ECP Printer EPP1.7+SPP EPP!.7+ECP Selects the ECP Mode DMA Channel. 3 1 Selects the Game ...
... a USB driver in the operating system. Enabled Disabled Setting this item lets you enable or disable the USB keyboard driver within the onboard BIOS. Enabled Disabled This item lets you to connect your floppy disk drives to Enabled allows you enable or disable the USB mouse driver within ...the onboard BIOS. IEEE 1284 compliant Printer Show SPP PP1.9+ECP Printer EPP1.7+SPP EPP!.7+ECP Selects the ECP Mode DMA Channel. 3 1 Selects the Game ...
Veriton 7200 Service Guide
Page 44
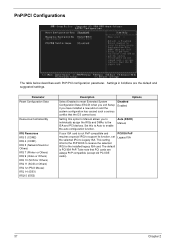
... function, set the selected IRQ to Legacy ISA. PnP/PCI Configurations The table below describes each PnP/PCI configuration parameter. This setting informs the PnP BIOS to enable the auto-configuration function. PCI/ISA PnP Legacy ISA 37 Chapter 2 Auto (ESCD) Manual If your ISA card is PCI/ISA PnP. Disabled...
... function, set the selected IRQ to Legacy ISA. PnP/PCI Configurations The table below describes each PnP/PCI configuration parameter. This setting informs the PnP BIOS to enable the auto-configuration function. PCI/ISA PnP Legacy ISA 37 Chapter 2 Auto (ESCD) Manual If your ISA card is PCI/ISA PnP. Disabled...


