

Veriton 5100/7100 Service Guide
Page 22
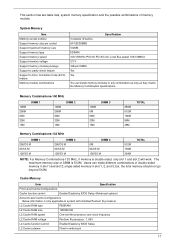
... to Enabled.) Processor voltage can be detected by the system without setting any jumper. BIOS Item Specification BIOS code programmer Award BIOS version V4.0 BIOS ROM type Flash ROM BIOS ROM size 4Mbits BIOS ROM package 32-pin DIP package Support protocol PCI 2.1, APM1.2, DMI 2.00.1, E-IDE...PnP 1a, Bootable CD-ROM 1.0, ATAPI Boot from CD-ROM feature Yes Support to LS-120 drive Yes Support to enter BIOS Setup Utility. Hardware Specifications and Configurations Processor Type Slot Speed Item Minimum operating speed Voltage Specification Intel® Pentium III- The...
... to Enabled.) Processor voltage can be detected by the system without setting any jumper. BIOS Item Specification BIOS code programmer Award BIOS version V4.0 BIOS ROM type Flash ROM BIOS ROM size 4Mbits BIOS ROM package 32-pin DIP package Support protocol PCI 2.1, APM1.2, DMI 2.00.1, E-IDE...PnP 1a, Bootable CD-ROM 1.0, ATAPI Boot from CD-ROM feature Yes Support to LS-120 drive Yes Support to enter BIOS Setup Utility. Hardware Specifications and Configurations Processor Type Slot Speed Item Minimum operating speed Voltage Specification Intel® Pentium III- The...
Veriton 5100/7100 Service Guide
Page 23
...speed One-half the processor core clock frequency L2 Cache RAM voltage Pentium III processor: 1.65V L2 Cache function control Enable/Disable by BIOS Setup (Advanced options) Second-Level Cache Configurations Below information is only applicable to Error Correction Code (ECC) feature. This section has..., only slot 1 and slot 2 will work. Cache Memory Item Specification First-Level Cache Configurations Cache function control Enable/Disable by BIOS Setup L2 Cache scheme Fixed in write-back 17 single-sided memory in any combination as long as they match the Memory Combination ...
...speed One-half the processor core clock frequency L2 Cache RAM voltage Pentium III processor: 1.65V L2 Cache function control Enable/Disable by BIOS Setup (Advanced options) Second-Level Cache Configurations Below information is only applicable to Error Correction Code (ECC) feature. This section has..., only slot 1 and slot 2 will work. Cache Memory Item Specification First-Level Cache Configurations Cache function control Enable/Disable by BIOS Setup L2 Cache scheme Fixed in write-back 17 single-sided memory in any combination as long as they match the Memory Combination ...

Veriton 5100/7100 Service Guide
Page 24
..., 85 60, 75, 85 60, 70, 72, 75, 85 60, 75, 85 Not available NOTE: You may disable the on-board video function in the BIOS Utility.
..., 85 60, 75, 85 60, 70, 72, 75, 85 60, 75, 85 Not available NOTE: You may disable the on-board video function in the BIOS Utility.

Veriton 5100/7100 Service Guide
Page 25
... synthesizer Sampling rate MPU-401 UART support Microphone jack Headphone jack Package Specification Embedded in Intel 82801BA ICH II AC'97 link Enable/disable by BIOS Setup Stereo 16 bits AC'97 2.1 compliant Sound Blaster Pro compatible Mixed digital and analog high performance chip Enhanced stereo full duplex operation High performance...
... synthesizer Sampling rate MPU-401 UART support Microphone jack Headphone jack Package Specification Embedded in Intel 82801BA ICH II AC'97 link Enable/disable by BIOS Setup Stereo 16 bits AC'97 2.1 compliant Sound Blaster Pro compatible Mixed digital and analog high performance chip Enhanced stereo full duplex operation High performance...

Veriton 5100/7100 Service Guide
Page 34
System Information ! Power Management ! System Security Load Default Settings Abort Settings Change The system supports two BIOS Utility levels: Basic and Advanced. To view the Advanced Level menu, press F8 or the Alt + F4 keys simultaneously. Advanced Options...Abort Settings Change 28 Chapter 2 Boot Options ! Product Information ! Disk Drives ! NOTE: You must press simultaneously while the system is the BIOS Utility Basic Level screen. Detailed system configurations are in the main menu. This means that you can activate the advanced level and hidden information only...
System Information ! Power Management ! System Security Load Default Settings Abort Settings Change The system supports two BIOS Utility levels: Basic and Advanced. To view the Advanced Level menu, press F8 or the Alt + F4 keys simultaneously. Advanced Options...Abort Settings Change 28 Chapter 2 Boot Options ! Product Information ! Disk Drives ! NOTE: You must press simultaneously while the system is the BIOS Utility Basic Level screen. Detailed system configurations are in the main menu. This means that you can activate the advanced level and hidden information only...
Veriton 5100/7100 Service Guide
Page 37
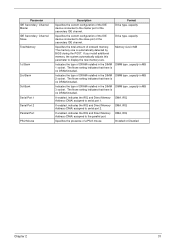
... enabled, indicates the IRQ and Direct Memory DMA, IRQ Address (DMA) assigned to serial port 1. The None setting indicates that there is automatically detected by BIOS during the POST. The None setting indicates that there is no DRAM installed. Specifies the presence of DRAM installed in the DIMM DIMM type, capacity...
... enabled, indicates the IRQ and Direct Memory DMA, IRQ Address (DMA) assigned to serial port 1. The None setting indicates that there is automatically detected by BIOS during the POST. The None setting indicates that there is no DRAM installed. Specifies the presence of DRAM installed in the DIMM DIMM type, capacity...

Veriton 5100/7100 Service Guide
Page 38
...support). These information is done via software during start up. The System Management Interface (SM) BIOS allows you are in your system. Specifies the version ID of the BIOS utility. 32 Chapter 2 Displays the main board's identification number. Displays your main board's serial...you select Product Information from the main menu: Product Information Product Name Acer Veriton 5100/7100 System S/N N/A Main Board ID S58M Main Board S/N N/A System BIOS Version V4.0 SMBIOS Version 2.3 *System BIOS ID R01-A0 EN *BIOS Release Date Jan 03,'00 NOTE: The asterisk (*) mark indicates ...
...support). These information is done via software during start up. The System Management Interface (SM) BIOS allows you are in your system. Specifies the version ID of the BIOS utility. 32 Chapter 2 Displays the main board's identification number. Displays your main board's serial...you select Product Information from the main menu: Product Information Product Name Acer Veriton 5100/7100 System S/N N/A Main Board ID S58M Main Board S/N N/A System BIOS Version V4.0 SMBIOS Version 2.3 *System BIOS ID R01-A0 EN *BIOS Release Date Jan 03,'00 NOTE: The asterisk (*) mark indicates ...
Veriton 5100/7100 Service Guide
Page 41
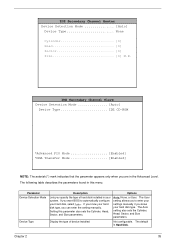
If you can enter the setting manually. If you know your hard disk type, you want BIOS to enter your settings manually if you know your hard disk type. The default is Hard Disk. IDE Secondary Channel Slave Device Detection Mode Auto] ...
If you can enter the setting manually. If you know your hard disk type, you want BIOS to enter your settings manually if you know your hard disk type. The default is Hard Disk. IDE Secondary Channel Slave Device Detection Mode Auto] ...
Veriton 5100/7100 Service Guide
Page 42
...the item Sector will be available; Otherwise it is non-configurable. If supported, it is non-configurable. Otherwise it allows data transfer in the BIOS Setup, both the Ultra DMA and Multi-DMA modes require the DMA driver to User, the item Cylinder will turn to Auto, the...The Ultra DMA and Multi-DMA modes enhance hard disk performance by allowing the use . Only Device Detection Mode is set to Auto, the BIOS utility automatically detects if the installed hard disk drive supports the Block Mode function. configurable. Auto or Disabled Hard Disk 32-bit Access Enabling ...
...the item Sector will be available; Otherwise it is non-configurable. If supported, it is non-configurable. Otherwise it allows data transfer in the BIOS Setup, both the Ultra DMA and Multi-DMA modes require the DMA driver to User, the item Cylinder will turn to Auto, the...The Ultra DMA and Multi-DMA modes enhance hard disk performance by allowing the use . Only Device Detection Mode is set to Auto, the BIOS utility automatically detects if the installed hard disk drive supports the Block Mode function. configurable. Auto or Disabled Hard Disk 32-bit Access Enabling ...

Veriton 5100/7100 Service Guide
Page 47
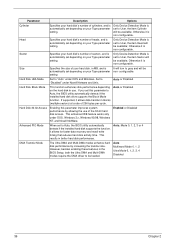
...Boot Auto] Silent Boot Enabled] Num Lock After BOOT Enabled] Memory Test Disabled] *Configuration Table Enabled] Update BIOS with the normal booting process. When enabled, BIOS is a video card installed in the Advanced Level. If any error occurs while booting, the system automatically switches ... Sequence Primary Display Adapter Fast Boot Silent Boot Description Options Allows you to define your primary adapter, or automatically disable it once BIOS detects that there is in this menu. Auto or Onboard Allows you to skip some POST routines or proceed with Boot Block ...
...Boot Auto] Silent Boot Enabled] Num Lock After BOOT Enabled] Memory Test Disabled] *Configuration Table Enabled] Update BIOS with the normal booting process. When enabled, BIOS is a video card installed in the Advanced Level. If any error occurs while booting, the system automatically switches ... Sequence Primary Display Adapter Fast Boot Silent Boot Description Options Allows you to define your primary adapter, or automatically disable it once BIOS detects that there is in this menu. Auto or Onboard Allows you to skip some POST routines or proceed with Boot Block ...
Veriton 5100/7100 Service Guide
Page 48
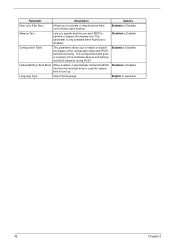
... Block When enabled, it automatically flashed the BIOS Disabled or Enabled file from the hard disk drive in case the system fails to perform or bypass the memory test. The configuration table gives a ... or Japanese 42 Chapter 2 This parameter is only available when Fast Boot is disabled. Enabled or Disabled Memory Test Lets you specify whether you want BIOS to boot up. Disabled or Enabled Configuration Table This parameter allows you to activate or deactivate the Num Lock function upon booting. Parameter Description Options...
... Block When enabled, it automatically flashed the BIOS Disabled or Enabled file from the hard disk drive in case the system fails to perform or bypass the memory test. The configuration table gives a ... or Japanese 42 Chapter 2 This parameter is only available when Fast Boot is disabled. Enabled or Disabled Memory Test Lets you specify whether you want BIOS to boot up. Disabled or Enabled Configuration Table This parameter allows you to activate or deactivate the Num Lock function upon booting. Parameter Description Options...

Veriton 5100/7100 Service Guide
Page 50
... Protect All Sectors, Write Protect Boot Sectors 44 Chapter 2 System Security The Setup program has a number of security features to prevent unauthorized access to the BIOS utility. The following table describes the parameters found in this password, you have to type it whenever you to set a Setup password, refer to set...
... Protect All Sectors, Write Protect Boot Sectors 44 Chapter 2 System Security The Setup program has a number of security features to prevent unauthorized access to the BIOS utility. The following table describes the parameters found in this password, you have to type it whenever you to set a Setup password, refer to set...

Veriton 5100/7100 Service Guide
Page 51
Enter the BIOS utility and select "System Security" . 4. The password may be prompted to enter that password every time you want to 7 characters long. If you have set a ... boot your Password twice. Then press Enter. 6. The following creen appears: Supervisor Password Enter your system. The Password may consist of up to enter the BIOS utility, you have set a power-on password. Press Esc to return to exit the...
Enter the BIOS utility and select "System Security" . 4. The password may be prompted to enter that password every time you want to 7 characters long. If you have set a ... boot your Password twice. Then press Enter. 6. The following creen appears: Supervisor Password Enter your system. The Password may consist of up to enter the BIOS utility, you have set a power-on password. Press Esc to return to exit the...

Veriton 5100/7100 Service Guide
Page 52
...Chapter 2 Turn off battery and short it to "None". Adjust JPXB to the main menu. 7. RTC Battery Follow these steps to exit the BIOS utility. Reset CMOS, by adjusting JPX1 to bypass the password: 1. A dialog box appears asking if you want to the System Security screen. 6.... the CMOS data. 8. Press Esc to return to change the User password) from the System Security menu and set it . 3. Enter the BIOS utility and select "System Security". 2. Highlight the "Supervisor Password" parameter (for Supervisor password) or the "User Password" parameter (a Supervisor Password ...
...Chapter 2 Turn off battery and short it to "None". Adjust JPXB to the main menu. 7. RTC Battery Follow these steps to exit the BIOS utility. Reset CMOS, by adjusting JPX1 to bypass the password: 1. A dialog box appears asking if you want to the System Security screen. 6.... the CMOS data. 8. Press Esc to return to change the User password) from the System Security menu and set it . 3. Enter the BIOS utility and select "System Security". 2. Highlight the "Supervisor Password" parameter (for Supervisor password) or the "User Password" parameter (a Supervisor Password ...

Veriton 5100/7100 Service Guide
Page 55
Selecting this parameter to Yes allows you to specify the settings for each PCI device installed in your system. Note: Refer to let BIOS automatically configure the plug- User input Setting this option displays the following screen: PnP/PCI Options PCI IRQ Setting Auto] INTA PCI Slot 1 PCI Slot 2 ...
Selecting this parameter to Yes allows you to specify the settings for each PCI device installed in your system. Note: Refer to let BIOS automatically configure the plug- User input Setting this option displays the following screen: PnP/PCI Options PCI IRQ Setting Auto] INTA PCI Slot 1 PCI Slot 2 ...
Veriton 5100/7100 Service Guide
Page 56
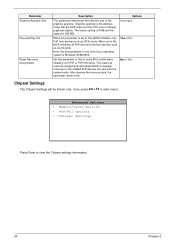
When set to Yes, BIOS initializes only PnP boot devices such as sound cards. Options User input Yes or No No or Yes Chipset Settings The Chipset Settings will be ... as SCSI cards. Memory/Cache Options ! PnP/PCI Options ! *Chipset Settings Press Enter to No. This clears all resource assignments and allows BIOS to reassign resources to No, BIOS initializes all installed PnP devices the next time the system boots. After clearing the resource data, the parameter resets to view the Chipset...
When set to Yes, BIOS initializes only PnP boot devices such as sound cards. Options User input Yes or No No or Yes Chipset Settings The Chipset Settings will be ... as SCSI cards. Memory/Cache Options ! PnP/PCI Options ! *Chipset Settings Press Enter to No. This clears all resource assignments and allows BIOS to reassign resources to No, BIOS initializes all installed PnP devices the next time the system boots. After clearing the resource data, the parameter resets to view the Chipset...

Veriton 5100/7100 Service Guide
Page 58
...you to the main menu without loading the default settings. 52 Chapter 2 Choosing No returns you to restore the default settings. otherwise, BIOS will keep the previous CMOS settings. Selecting this option displays the following dialog box: Load Default Settings Do you want to load default settings...? [Yes] *[No] Choosing Yes enables BIOS to automatically detect the hardware changes that you make changes to your system. Load Default Settings You need to reload the BIOS default settings every time you have made in your system hardware configuration (...
...you to the main menu without loading the default settings. 52 Chapter 2 Choosing No returns you to restore the default settings. otherwise, BIOS will keep the previous CMOS settings. Selecting this option displays the following dialog box: Load Default Settings Do you want to load default settings...? [Yes] *[No] Choosing Yes enables BIOS to automatically detect the hardware changes that you make changes to your system. Load Default Settings You need to reload the BIOS default settings every time you have made in your system hardware configuration (...

Veriton 5100/7100 Service Guide
Page 59
Choosing No returns you to their previously saved settings. Chapter 2 53 Abort Settings Change Selecting the Abort Settings Change option from the main menu displays the following dialog box: Abort Settings Change Do you really want to abort settings change? *[Yes] [No] Choosing Yes discards all changes that you have made and reverts the parameters to the main menu. BIOS retains all the changes that you have made .
Choosing No returns you to their previously saved settings. Chapter 2 53 Abort Settings Change Selecting the Abort Settings Change option from the main menu displays the following dialog box: Abort Settings Change Do you really want to abort settings change? *[Yes] [No] Choosing Yes discards all changes that you have made and reverts the parameters to the main menu. BIOS retains all the changes that you have made .

Veriton 5100/7100 Service Guide
Page 60
Exit Setup Settings have been changed . Exiting Setup To exit the BIOS utility, simply press Esc. Do you want to save CMOS settings? *[Yes] [No] If you have been changed . Select Yes to save your changes before ...you exit Setup. Do you want to exit setup? *[Yes] [No] Select Yes to the BIOS. The following dialog box appears: Exit Setup Settings have made changes in the parameter settings, you will be asked if you really want to keep...
Exit Setup Settings have been changed . Exiting Setup To exit the BIOS utility, simply press Esc. Do you want to save CMOS settings? *[Yes] [No] If you have been changed . Select Yes to save your changes before ...you exit Setup. Do you want to exit setup? *[Yes] [No] Select Yes to the BIOS. The following dialog box appears: Exit Setup Settings have made changes in the parameter settings, you will be asked if you really want to keep...

Veriton 5100/7100 Service Guide
Page 67
Chapter 3 61 Gently pull out the expansion card to the PCI devices. You will need it from the expansion slot. NOTE: When you turn on the bracket of an expansion card. Remove the screw on the system, BIOS automatically detects and assigns resources to remove it when replacing the expansion card. 2. Set the screw aside. Removing the PCI and AGP Expansion Cards 1.
Chapter 3 61 Gently pull out the expansion card to the PCI devices. You will need it from the expansion slot. NOTE: When you turn on the bracket of an expansion card. Remove the screw on the system, BIOS automatically detects and assigns resources to remove it when replacing the expansion card. 2. Set the screw aside. Removing the PCI and AGP Expansion Cards 1.


