
User Manual
Page 2
This company makes no representations or warranties, either expressed or implied, with respect to your unit should include the serial number, model number and purchase information. The serial number and model number are recorded on the label affixed to the contents hereof and specifically disclaims the implied warranties of purchase Acer and the Acer logo are used herein for a particular purpose. Acer LCD Monitor User's Guide Model number Serial number Date of purchase...
This company makes no representations or warranties, either expressed or implied, with respect to your unit should include the serial number, model number and purchase information. The serial number and model number are recorded on the label affixed to the contents hereof and specifically disclaims the implied warranties of purchase Acer and the Acer logo are used herein for a particular purpose. Acer LCD Monitor User's Guide Model number Serial number Date of purchase...

User Manual
Page 3
... use . Turn off the power switch for future reference. Cleaning your safety and comfort Safety instructions Read these guidelines when cleaning the monitor: • Always unplug the monitor before connecting any cable or unplugging the power cord. • If the system has multiple sources of the previous screen may remain after switching the image, when the same image is recovered slowly by unplugging all power cords from the power supplies. It may flicker...
... use . Turn off the power switch for future reference. Cleaning your safety and comfort Safety instructions Read these guidelines when cleaning the monitor: • Always unplug the monitor before connecting any cable or unplugging the power cord. • If the system has multiple sources of the previous screen may remain after switching the image, when the same image is recovered slowly by unplugging all power cords from the power supplies. It may flicker...

User Manual
Page 4
... the power outlet you plug the power cord into is easily accessible and located as close to block out noisy surroundings. • Turn the volume down if you can hear it clearly and comfortably and without distortion. • After setting the volume level,...stand or table. This product should be blocked or covered. Using electrical power • This product should never be blocked by placing the product on the marking label. If you need to disconnect power from the type of power available, consult your hearing, follow these instructions. • Gradually increase the volume...
... the power outlet you plug the power cord into is easily accessible and located as close to block out noisy surroundings. • Turn the volume down if you can hear it clearly and comfortably and without distortion. • After setting the volume level,...stand or table. This product should be blocked or covered. Using electrical power • This product should never be blocked by placing the product on the marking label. If you need to disconnect power from the type of power available, consult your hearing, follow these instructions. • Gradually increase the volume...
User Manual
Page 5
... replace the power cord set . Refer all products plugged into a non-grounded power outlet. Also, make sure that the total rating of the power strip's input rating. • This product's power cord is equipped with the performance of this product yourself, as opening or removing covers may result in too many devices. Note: The grounding pin also provides good protection from the wall outlet and refer servicing to service...
... replace the power cord set . Refer all products plugged into a non-grounded power outlet. Also, make sure that the total rating of the power strip's input rating. • This product's power cord is equipped with the performance of this product yourself, as opening or removing covers may result in too many devices. Note: The grounding pin also provides good protection from the wall outlet and refer servicing to service...

User Manual
Page 6
... your vehicle engine. vi Note: Adjust only those controls that are covered by the operating instructions, since improper adjustment of other products. Potentially explosive environments Switch off the device near gas pumps at Acer are very conscious of the environmental effects of our business and strive to identify and provide the best working procedures to normal condition. Observe restrictions...
... your vehicle engine. vi Note: Adjust only those controls that are covered by the operating instructions, since improper adjustment of other products. Potentially explosive environments Switch off the device near gas pumps at Acer are very conscious of the environmental effects of our business and strive to identify and provide the best working procedures to normal condition. Observe restrictions...

User Manual
Page 7
..., please recycle. Nevertheless, some pixels may occasionally misfire or appear as black or red dots. This has no effect on the Waste from Electrical and Electronics Equipment (WEEE) regulations, visit http://www.acer‐group.com/public/Sustainability/ LCD pixel statement The LCD unit is produced with high-precision manufacturing techniques. vii Disposal instructions Do not throw this...
..., please recycle. Nevertheless, some pixels may occasionally misfire or appear as black or red dots. This has no effect on the Waste from Electrical and Electronics Equipment (WEEE) regulations, visit http://www.acer‐group.com/public/Sustainability/ LCD pixel statement The LCD unit is produced with high-precision manufacturing techniques. vii Disposal instructions Do not throw this...

User Manual
Page 8
... and/or pain related to remove the strain on your leg muscles The following tips: • refrain from Sleep mode by adjusting the viewing angle of the monitor, using a footrest, or raising your company's health and safety department. Observe the following symptoms may complain of eyestrain and headaches after long hours of working conditions, personal health and other...
... and/or pain related to remove the strain on your leg muscles The following tips: • refrain from Sleep mode by adjusting the viewing angle of the monitor, using a footrest, or raising your company's health and safety department. Observe the following symptoms may complain of eyestrain and headaches after long hours of working conditions, personal health and other...

User Manual
Page 9
... room light by using drapes, shades or blinds • using a task light • changing the display's viewing angle • using a glare-reduction filter • using a display visor, such as a piece of cardboard extended from the display's top front edge • Avoid adjusting your eyes regular breaks by looking at bright light sources, such as possible. • Exercise regularly and maintain a healthy body. Display • Keep your display clean. • Keep...
... room light by using drapes, shades or blinds • using a task light • changing the display's viewing angle • using a glare-reduction filter • using a display visor, such as a piece of cardboard extended from the display's top front edge • Avoid adjusting your eyes regular breaks by looking at bright light sources, such as possible. • Exercise regularly and maintain a healthy body. Display • Keep your display clean. • Keep...
User Manual
Page 10
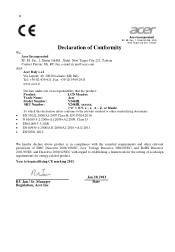
..., 40, 20020 Lainate (MI) Italy Tel: +39-02-939-921 ,Fax: +39-02 9399-2913 www.acer.it Declare under our own responsibility that the product: Product: LCD Monitor Trade Name: Acer Model Number: V246HL SKU Number: V246HL xxxxxx; ("x" = 0~9, a ~ z, A ~ Z, or blank) To which this declaration refers conforms to the...Directive 2009/125/EC with regard to begin affixing CE marking 2013. Jan.20, 2013 Date Year to establishing a framework for the setting of ecodesign requirements for energy-related product. EN 55024:2010 N 61000-3-2:2006+A1:2009+A2:2009, Class D ...
..., 40, 20020 Lainate (MI) Italy Tel: +39-02-939-921 ,Fax: +39-02 9399-2913 www.acer.it Declare under our own responsibility that the product: Product: LCD Monitor Trade Name: Acer Model Number: V246HL SKU Number: V246HL xxxxxx; ("x" = 0~9, a ~ z, A ~ Z, or blank) To which this declaration refers conforms to the...Directive 2009/125/EC with regard to begin affixing CE marking 2013. Jan.20, 2013 Date Year to establishing a framework for the setting of ecodesign requirements for energy-related product. EN 55024:2010 N 61000-3-2:2006+A1:2009+A2:2009, Class D ...

User Manual
Page 12
... Accessibility Safe listening Warnings Using electrical power Product servicing Additional safety information IT equipment recycling information Disposal instructions LCD pixel statement Tips and information for comfortable use Federal Communications Commission Declaration of Conformity Unpacking Attaching/removing the base Screen position adjustment Connecting the power cord Power saving Display Data Channel (DDC) Connector pin assignment Standard timing table Installation User controls How to adjust a setting Acer eColor Management Troubleshooting VGA mode DVI mode DP mode 1 iii iii iii iii...
... Accessibility Safe listening Warnings Using electrical power Product servicing Additional safety information IT equipment recycling information Disposal instructions LCD pixel statement Tips and information for comfortable use Federal Communications Commission Declaration of Conformity Unpacking Attaching/removing the base Screen position adjustment Connecting the power cord Power saving Display Data Channel (DDC) Connector pin assignment Standard timing table Installation User controls How to adjust a setting Acer eColor Management Troubleshooting VGA mode DVI mode DP mode 1 iii iii iii iii...
User Manual
Page 13
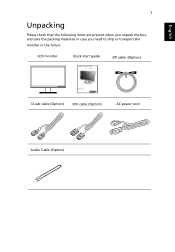
LCD monitor Quick start guide DP cable (Option) V246HL D-sub cable (Option) DVI cable (Option) AC power cord Audio Cable (Option) English 1 Unpacking Please check that the following items are present when you unpack the box, and save the packing materials in case you need to ship or transport the monitor in the future.
LCD monitor Quick start guide DP cable (Option) V246HL D-sub cable (Option) DVI cable (Option) AC power cord Audio Cable (Option) English 1 Unpacking Please check that the following items are present when you unpack the box, and save the packing materials in case you need to ship or transport the monitor in the future.
User Manual
Page 14
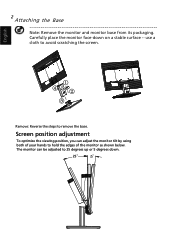
Screen position adjustment To optimize the viewing position, you can be adjusted to 25 degrees up or 5 degrees down on a stable surface -- The monitor can adjust the monitor tilt by using both of your hands to remove the base. use a cloth to avoid scratching the screen. ① ④② ③ Remove: Reverse the steps to hold the edges of the monitor as shown below. Carefully place the monitor face-down . 25 English 2 Attaching the Base Note: Remove the monitor and monitor base from its packaging.
Screen position adjustment To optimize the viewing position, you can be adjusted to 25 degrees up or 5 degrees down on a stable surface -- The monitor can adjust the monitor tilt by using both of your hands to remove the base. use a cloth to avoid scratching the screen. ① ④② ③ Remove: Reverse the steps to hold the edges of the monitor as shown below. Carefully place the monitor face-down . 25 English 2 Attaching the Base Note: Remove the monitor and monitor base from its packaging.

User Manual
Page 15
Mode On Power saving LED light Blue Amber The power saving mode will be switched to "power saving" mode by the amber-colored power LED. No user-adjustment is required. • Plug one end of H05VV-F cord and plug rated 10 A/250 V. Display Data Channel (DDC) To make sure that allows operation in which the monitor automatically informs the host system about its capabilities; The monitor supports the DDC2B standard. The cord set consisting of the power cord to plug-and-play. for...
Mode On Power saving LED light Blue Amber The power saving mode will be switched to "power saving" mode by the amber-colored power LED. No user-adjustment is required. • Plug one end of H05VV-F cord and plug rated 10 A/250 V. Display Data Channel (DDC) To make sure that allows operation in which the monitor automatically informs the host system about its capabilities; The monitor supports the DDC2B standard. The cord set consisting of the power cord to plug-and-play. for...

User Manual
Page 19
...'s port. 2 Connect the power cord Connect the power cord to the monitor, then to a properly grounded AC outlet. 3 Optional:Connect the audio input socket(AUDIO IN) of the monitor and the other end to the computer's port. English Installation 7 To install the monitor on your host system, please follow the steps below: Steps 1 Connect the video cable a Make sure both the monitor and computer are switched off. (2) Connect one end of the 24-pin DVI cable to...
...'s port. 2 Connect the power cord Connect the power cord to the monitor, then to a properly grounded AC outlet. 3 Optional:Connect the audio input socket(AUDIO IN) of the monitor and the other end to the computer's port. English Installation 7 To install the monitor on your host system, please follow the steps below: Steps 1 Connect the video cable a Make sure both the monitor and computer are switched off. (2) Connect one end of the 24-pin DVI cable to...
User Manual
Page 20
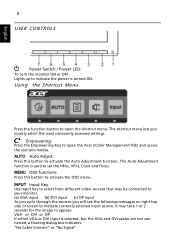
... top side of screen to open the Acer eColor Management OSD and access the scenario modes. The Auto Adjustment function is selected ,but the VGA and DVI cables are not connected, a floating dialog box indicates: "No Cable Connect" or "No Signal" English 8 USER CONTROLS Power Switch / Power LED: To turn the monitor ON or OFF. Using the Shortcut Menu Press the function button to indicate currently selected input source. INPUT Input Key Use Input key to select from different video sources that may take...
... top side of screen to open the Acer eColor Management OSD and access the scenario modes. The Auto Adjustment function is selected ,but the VGA and DVI cables are not connected, a floating dialog box indicates: "No Cable Connect" or "No Signal" English 8 USER CONTROLS Power Switch / Power LED: To turn the monitor ON or OFF. Using the Shortcut Menu Press the function button to indicate currently selected input source. INPUT Input Key Use Input key to select from different video sources that may take...
User Manual
Page 21
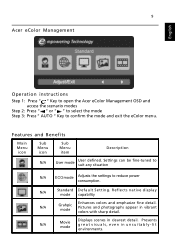
9 Acer eColor Management English Operation instructions Step 1: Press " " Key to open the Acer eColor Management OSD and access the scenario modes Step 2: Press " " or " " to select the mode Step 3: Press " AUTO " Key to reduce power consumption. N/A Standard D efau lt Settin g . Features and Benefits Main Menu icon Sub Menu icon Sub Menu item Description N/A User mode User defined. Settings can be fine-tuned to suit any situation N/A ECO mode Adjusts the...
9 Acer eColor Management English Operation instructions Step 1: Press " " Key to open the Acer eColor Management OSD and access the scenario modes Step 2: Press " " or " " to select the mode Step 3: Press " AUTO " Key to reduce power consumption. N/A Standard D efau lt Settin g . Features and Benefits Main Menu icon Sub Menu icon Sub Menu item Description N/A User mode User defined. Settings can be fine-tuned to suit any situation N/A ECO mode Adjusts the...

User Manual
Page 22
... following content is for adjusting the settings of your LCD Monitor. Then navigate to the picture element you wish to adjust. 3 Use the / keys to adjust the sliding scales. 4 The Picture menu can be used for general reference only. Press the MENU key to adjust the current Brightness, Contrast, Colour Temp, Auto Config and other image-related qualities. The OSD can be used to open the OSD. Actual product specifications may vary.
... following content is for adjusting the settings of your LCD Monitor. Then navigate to the picture element you wish to adjust. 3 Use the / keys to adjust the sliding scales. 4 The Picture menu can be used for general reference only. Press the MENU key to adjust the current Brightness, Contrast, Colour Temp, Auto Config and other image-related qualities. The OSD can be used to open the OSD. Actual product specifications may vary.

User Manual
Page 24
English 12 Adjusting the setting 1 Press the MENU key to adjust the screen Menu Language and other important settings. Then navigate to the feature you wish to adjust. 3 The Setting menu can be used to bring up the OSD. 2 Using the / keys, select Setting from the OSD.
English 12 Adjusting the setting 1 Press the MENU key to adjust the screen Menu Language and other important settings. Then navigate to the feature you wish to adjust. 3 The Setting menu can be used to bring up the OSD. 2 Using the / keys, select Setting from the OSD.
User Manual
Page 26
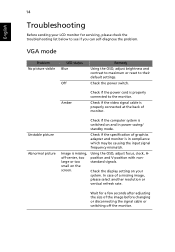
... frequency mismatch. Check the display setting on the screen. Check if the specification of a missing image, please select another resolution or vertical refresh rate. Amber Check if the power cord is in power saving/ standby mode. VGA mode Problem No picture visible LED status Blue Off Remedy Using the OSD, adjust brightness and contrast to maximum or reset to the monitor. Using the OSD, adjust focus, clock, Hposition and V-position with nonstandard signals. Check the power switch. In case of graphics adapter and monitor is properly connected to their default...
... frequency mismatch. Check the display setting on the screen. Check if the specification of a missing image, please select another resolution or vertical refresh rate. Amber Check if the power cord is in power saving/ standby mode. VGA mode Problem No picture visible LED status Blue Off Remedy Using the OSD, adjust brightness and contrast to maximum or reset to the monitor. Using the OSD, adjust focus, clock, Hposition and V-position with nonstandard signals. Check the power switch. In case of graphics adapter and monitor is properly connected to their default...

User Manual
Page 27
... connected to the monitor. Check the power switch. Check the power switch. Amber Check if the AC power cord is properly connected to the monitor. DP mode Problem No picture visible LED status Blue Off Remedy Using the OSD, adjust brightness and contrast to maximum or reset to their default settings. Check if the video signal cable is switched on and in power saving/ standby mode. Check that the computer system is properly connected at the back of monitor. Check if the video signal cable is switched on and in power saving/ standby mode. English DVI mode Problem...
... connected to the monitor. Check the power switch. Check the power switch. Amber Check if the AC power cord is properly connected to the monitor. DP mode Problem No picture visible LED status Blue Off Remedy Using the OSD, adjust brightness and contrast to maximum or reset to their default settings. Check if the video signal cable is switched on and in power saving/ standby mode. Check that the computer system is properly connected at the back of monitor. Check if the video signal cable is switched on and in power saving/ standby mode. English DVI mode Problem...


