
User Manual
Page 2
... new editions of this publication without the prior written permission of purchase Acer and the Acer logo are used herein for a particular purpose. All correspondence concerning your computer. Acer LCD Monitor User's Guide Model number Serial number Date of purchase Place of Acer Incorporated. Copyright © 2008. This company makes no representations or warranties, either...
... new editions of this publication without the prior written permission of purchase Acer and the Acer logo are used herein for a particular purpose. All correspondence concerning your computer. Acer LCD Monitor User's Guide Model number Serial number Date of purchase Place of Acer Incorporated. Copyright © 2008. This company makes no representations or warranties, either...

User Manual
Page 3
... the power switch and then turn it on again to the AC power outlet. • Make sure both the LCD monitor and the computer are normal with the LCD monitor and do not indicate a problem. • Due to the nature of the LCD screen, an afterimage of 0.01%...% or more effective pixels. Information for future reference. Cleaning your safety and comfort Safety instructions Read these guidelines when cleaning the monitor: • Always unplug the monitor before connecting the power cord to make sure the flicker disappears. • You may find slightly uneven brightness on the screen ...
... the power switch and then turn it on again to the AC power outlet. • Make sure both the LCD monitor and the computer are normal with the LCD monitor and do not indicate a problem. • Due to the nature of the LCD screen, an afterimage of 0.01%...% or more effective pixels. Information for future reference. Cleaning your safety and comfort Safety instructions Read these guidelines when cleaning the monitor: • Always unplug the monitor before connecting the power cord to make sure the flicker disappears. • You may find slightly uneven brightness on the screen ...

User Manual
Page 7
.... This has no effect on the Waste from Electrical and Electronics Equipment (WEEE) regulations, visit http://global.acer.com/about/sustainability.htm Mercury advisory For projectors or electronic products containing an LCD/CRT monitor or display: lamp(s) inside this electronic device into the trash when discarding. LCD pixel statement The LCD unit...
.... This has no effect on the Waste from Electrical and Electronics Equipment (WEEE) regulations, visit http://global.acer.com/about/sustainability.htm Mercury advisory For projectors or electronic products containing an LCD/CRT monitor or display: lamp(s) inside this electronic device into the trash when discarding. LCD pixel statement The LCD unit...
User Manual
Page 8
... around regularly to remove the strain on your leg muscles The following tips: • refrain from Sleep mode by adjusting the viewing angle of the monitor, using a footrest, or raising your sitting height to achieve maximum comfort. Observe the following section provides tips for more comfortable computer use. viii This product...
... around regularly to remove the strain on your leg muscles The following tips: • refrain from Sleep mode by adjusting the viewing angle of the monitor, using a footrest, or raising your sitting height to achieve maximum comfort. Observe the following section provides tips for more comfortable computer use. viii This product...
User Manual
Page 9
... at the middle of the display. • Adjust the display brightness and/or contrast to an awkward viewing angle. • Avoid looking away from the monitor and focusing on how to keep your eyes from the display's top front edge • Avoid adjusting your eyes. Developing good work habits Develop the...
... at the middle of the display. • Adjust the display brightness and/or contrast to an awkward viewing angle. • Avoid looking away from the monitor and focusing on how to keep your eyes from the display's top front edge • Avoid adjusting your eyes. Developing good work habits Develop the...

User Manual
Page 10
... by weight in homogenous material are in Electrical and Electronic Equipment: -. Easy Lai /Manager Regulation, Acer Inc. EN55022, AS/NZS CISPR22 Class B. -. EN61000-3-2, Class D -. x Acer Incorporated 8F, 88, Sec. 1, Hsin Tai Wu Rd., Hsichih Taipei Hsien 221, Taiwan Tel ...221, Taiwan Contact Person: Mr. Easy Lai, E-mail: easy_lai@acer.com.tw And, Acer Europe SA Via Cantonale, Centro Galleria 2 6928 Manno Switzerland Hereby declare that: Product: LCD Monitor Trade Name: Model Number: Series Model Type: SKU Number: Acer V243HQ V243HQxxxx ("x" = 0~9, a ~ z, or A ~ Z) ...
... by weight in homogenous material are in Electrical and Electronic Equipment: -. Easy Lai /Manager Regulation, Acer Inc. EN55022, AS/NZS CISPR22 Class B. -. EN61000-3-2, Class D -. x Acer Incorporated 8F, 88, Sec. 1, Hsin Tai Wu Rd., Hsichih Taipei Hsien 221, Taiwan Tel ...221, Taiwan Contact Person: Mr. Easy Lai, E-mail: easy_lai@acer.com.tw And, Acer Europe SA Via Cantonale, Centro Galleria 2 6928 Manno Switzerland Hereby declare that: Product: LCD Monitor Trade Name: Model Number: Series Model Type: SKU Number: Acer V243HQ V243HQxxxx ("x" = 0~9, a ~ z, or A ~ Z) ...

User Manual
Page 11
... manufacturer/importer is responsible for this declaration: Product name: Model number: SKU number: 23.6" LCD Monitor V243HQ V243HQxxxx Name of responsible party: Acer America Corporation Address of the FCC Rules. San Jose, CA 95110 USA Contact person: Acer Representative Tel: 1-254-298-4000 Fax: 1-254-298-4147 xi Federal Communications Commission Declaration of Conformity...
... manufacturer/importer is responsible for this declaration: Product name: Model number: SKU number: 23.6" LCD Monitor V243HQ V243HQxxxx Name of responsible party: Acer America Corporation Address of the FCC Rules. San Jose, CA 95110 USA Contact person: Acer Representative Tel: 1-254-298-4000 Fax: 1-254-298-4147 xi Federal Communications Commission Declaration of Conformity...
User Manual
Page 12
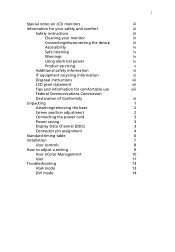
... for your safety and comfort Safety instructions Cleaning your monitor Connecting/disconnecting the device Accessibility Safe listening Warnings Using electrical power Product servicing Additional safety information IT equipment recycling information Disposal instructions ... position adjustment Connecting the power cord Power saving Display Data Channel (DDC) Connector pin assignment Standard timing table Installation User controls How to adjust a setting Acer eColor Management User Troubleshooting VGA mode DVI mode 1 iii iii iii iii iii iv iv iv iv v vi vi vii vii viii xi 1 2 2 3 3 3 4 6 7 8 ...
... for your safety and comfort Safety instructions Cleaning your monitor Connecting/disconnecting the device Accessibility Safe listening Warnings Using electrical power Product servicing Additional safety information IT equipment recycling information Disposal instructions ... position adjustment Connecting the power cord Power saving Display Data Channel (DDC) Connector pin assignment Standard timing table Installation User controls How to adjust a setting Acer eColor Management User Troubleshooting VGA mode DVI mode 1 iii iii iii iii iii iv iv iv iv v vi vi vii vii viii xi 1 2 2 3 3 3 4 6 7 8 ...

User Manual
Page 13
English 1 Unpacking Please check that the following items are present when you unpack the box, and save the packing materials in case you need to ship or transport the monitor in the future. LCD monitor User's guide Quick start guide D-sub cable DVI cable (only dualinput models) AC power cord Audio Cable (Option)
English 1 Unpacking Please check that the following items are present when you unpack the box, and save the packing materials in case you need to ship or transport the monitor in the future. LCD monitor User's guide Quick start guide D-sub cable DVI cable (only dualinput models) AC power cord Audio Cable (Option)
User Manual
Page 14
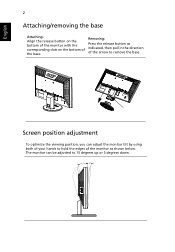
Screen position adjustment To optimize the viewing position, you can be adjusted to 15 degrees up or 5 degrees down. Removing: Press the release button as shown below. The monitor can adjust the monitor tilt by using both of your hands to hold the edges of the monitor as indicated, then pull in the direction of the base. English 2 Attaching/removing the base Attaching: Align the release button on the bottom of the monitor with the corresponding slots on the bottom of the arrow to remove the base.
Screen position adjustment To optimize the viewing position, you can be adjusted to 15 degrees up or 5 degrees down. Removing: Press the release button as shown below. The monitor can adjust the monitor tilt by using both of your hands to hold the edges of the monitor as indicated, then pull in the direction of the base. English 2 Attaching/removing the base Attaching: Align the release button on the bottom of the monitor with the corresponding slots on the bottom of the arrow to remove the base.

User Manual
Page 15
...cord you use is the correct type required for your system supports the DDC protocol, the monitor is activated. for example, supported resolutions and corresponding timing. The monitor supports the DDC2B standard. 3 English Connecting the power cord • Check first to make ... AC voltage area. The recovery time from the display controller, as your area. • The monitor has a universal power supply that allows operation in which the monitor automatically informs the host system about its capabilities; The DDC is a communication protocol through which the equipment...
...cord you use is the correct type required for your system supports the DDC protocol, the monitor is activated. for example, supported resolutions and corresponding timing. The monitor supports the DDC2B standard. 3 English Connecting the power cord • Check first to make ... AC voltage area. The recovery time from the display controller, as your area. • The monitor has a universal power supply that allows operation in which the monitor automatically informs the host system about its capabilities; The DDC is a communication protocol through which the equipment...

User Manual
Page 19
... 1-2 2 1-2 1-1 b Connect the VGA video cable to diagnose the problem. English 7 Installation To install the monitor on your host system, please follow the steps below: Steps 1 Connect the video cable a Make sure both the monitor and computer are switched off . (2) Connect one end of the 24-pin DVI cable to the back... of the monitor and the other end to the computer's port. 2 Connect the power cord Connect the...
... 1-2 2 1-2 1-1 b Connect the VGA video cable to diagnose the problem. English 7 Installation To install the monitor on your host system, please follow the steps below: Steps 1 Connect the video cable a Make sure both the monitor and computer are switched off . (2) Connect one end of the 24-pin DVI cable to the back... of the monitor and the other end to the computer's port. 2 Connect the power cord Connect the...

User Manual
Page 25
... in compliance which may be causing the input signal frequency mismatch. Check the power switch. Amber Check if the power cord is missing, off the monitor. Check if the video signal cable is properly connected at the back of graphics adapter and... monitor is switched on the screen. Check the display setting on your LCD monitor for a few seconds after adjusting the size of a missing image, please select another resolution or vertical refresh rate. Check if the specification of...
... in compliance which may be causing the input signal frequency mismatch. Check the power switch. Amber Check if the power cord is missing, off the monitor. Check if the video signal cable is properly connected at the back of graphics adapter and... monitor is switched on the screen. Check the display setting on your LCD monitor for a few seconds after adjusting the size of a missing image, please select another resolution or vertical refresh rate. Check if the specification of...
User Manual
Page 26
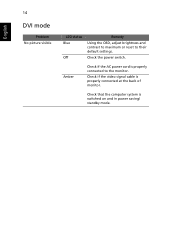
Check the power switch. Amber Check if the AC power cord is switched on and in power saving/ standby mode. English 14 DVI mode Problem No picture visible LED status Blue Off Remedy Using the OSD, adjust brightness and contrast to maximum or reset to the monitor. Check that the computer system is properly connected to their default settings. Check if the video signal cable is properly connected at the back of monitor.
Check the power switch. Amber Check if the AC power cord is switched on and in power saving/ standby mode. English 14 DVI mode Problem No picture visible LED status Blue Off Remedy Using the OSD, adjust brightness and contrast to maximum or reset to the monitor. Check that the computer system is properly connected to their default settings. Check if the video signal cable is properly connected at the back of monitor.


