TravelMate 8200 Service Guide
Page 9
... 50 Launch Buttons 51 Power Button 51 Lid Switch 51 Auto-Dim 51 Information Menu 52 Main Menu 53 Advanced Menu 55 Security Menu 56 Boot Menu 58 Exit Menu 59 Chapter 3 General Information 61 Before You Begin 61 Disassembly Procedure Flowchart 62 Disassembly Procedure 64 Removing the Battery Pack 64...
... 50 Launch Buttons 51 Power Button 51 Lid Switch 51 Auto-Dim 51 Information Menu 52 Main Menu 53 Advanced Menu 55 Security Menu 56 Boot Menu 58 Exit Menu 59 Chapter 3 General Information 61 Before You Begin 61 Disassembly Procedure Flowchart 62 Disassembly Procedure 64 Removing the Battery Pack 64...

TravelMate 8200 Service Guide
Page 34
... security and safety concerns mean that Acer eNet Management does not store username and password information. 24 Chapter 1 Acer eNet Management automatically detects the best settings for a location to a profile, and automatically apply the appropriate profile when you boot up the PC. To access this... utility, either click on the "Acer eNet Management" icon on the icon in a variety of locations. Acer eNet Management Acer eNet Management helps you the freedom to manually adjust the ...
... security and safety concerns mean that Acer eNet Management does not store username and password information. 24 Chapter 1 Acer eNet Management automatically detects the best settings for a location to a profile, and automatically apply the appropriate profile when you boot up the PC. To access this... utility, either click on the "Acer eNet Management" icon on the icon in a variety of locations. Acer eNet Management Acer eNet Management helps you the freedom to manually adjust the ...
TravelMate 8200 Service Guide
Page 52
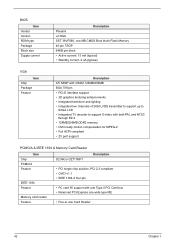
BIOS Item Vendor Version ROM type Package Block size Supply current Description Phoenix v2.002e SST 39VF080, one MB CMOS Boot block Flash Memory 40-pin TSOP 64KB per block • Active current: 15 mA (typical) • Standby current: 4 uA (typical) VGA Item Chip Package Feature ...
BIOS Item Vendor Version ROM type Package Block size Supply current Description Phoenix v2.002e SST 39VF080, one MB CMOS Boot block Flash Memory 40-pin TSOP 64KB per block • Active current: 15 mA (typical) • Standby current: 4 uA (typical) VGA Item Chip Package Feature ...

TravelMate 8200 Service Guide
Page 59
...CMOS setting and exit Setup. NOTE: During setup, all Fn function keys and power saving function are Information, Main, Advanced, Security, Boot and Exit. There are six prime items in the BIOS (Basic Input / Output System) of the system. Part Information Main Advanced Security... IBM PC AT system parameters. Provides security setting of the screen). However, if you encounter configuration problems, you may need to specify the boot options. Allows the user to run Setup. Invoking BIOS Setup To activate the BIOS Utility, press F2 during POST (when "Press to enter...
...CMOS setting and exit Setup. NOTE: During setup, all Fn function keys and power saving function are Information, Main, Advanced, Security, Boot and Exit. There are six prime items in the BIOS (Basic Input / Output System) of the system. Part Information Main Advanced Security... IBM PC AT system parameters. Provides security setting of the screen). However, if you encounter configuration problems, you may need to specify the boot options. Allows the user to run Setup. Invoking BIOS Setup To activate the BIOS Utility, press F2 during POST (when "Press to enter...
TravelMate 8200 Service Guide
Page 60
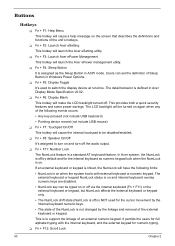
...features and some power savings. T Fn + F4: Sleep Button It is a standard AT keyboard feature. This is defined in Windows Power Options. In Acer system, the NumLock is off . If an external keyboard or keypad is linked, the NumLock will have the following events occurs: • Any key ... (NumLock is off the audio output. Buttons Hotkeys T Fn + F1: Help Menu This hotkey will cause a help message on when the system boots with the internal keyboard, and the external keypad for numeric typing. T Fn + F6: Display Blank This hotkey will cause the internal touchpad to ...
...features and some power savings. T Fn + F4: Sleep Button It is a standard AT keyboard feature. This is defined in Windows Power Options. In Acer system, the NumLock is off . If an external keyboard or keypad is linked, the NumLock will have the following events occurs: • Any key ... (NumLock is off the audio output. Buttons Hotkeys T Fn + F1: Help Menu This hotkey will cause a help message on when the system boots with the internal keyboard, and the external keypad for numeric typing. T Fn + F6: Display Blank This hotkey will cause the internal touchpad to ...
TravelMate 8200 Service Guide
Page 61
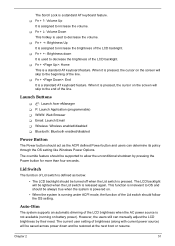
... power). When it is pressed, the cursor on . • When the system is used to increase the volume. Launch Buttons T : Launch Acer eManager T P: Launch Application (programmable) T WWW: Web Browser T Email: Launch Email T Wireless: Wireless enabled/disabled T Bluetooth: Bluetooth enabled/disabled... Power Button The Power button should be restored at the next boot or resume. Auto-Dim The system supports an automatic dimming of brightness (along with current power source) will skip to decrease the...
... power). When it is pressed, the cursor on . • When the system is used to increase the volume. Launch Buttons T : Launch Acer eManager T P: Launch Application (programmable) T WWW: Web Browser T Email: Launch Email T Wireless: Wireless enabled/disabled T Bluetooth: Bluetooth enabled/disabled... Power Button The Power button should be restored at the next boot or resume. Auto-Dim The system supports an automatic dimming of brightness (along with current power source) will skip to decrease the...
TravelMate 8200 Service Guide
Page 62
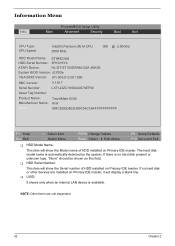
...: Other items are installed on Primary IDE master. If there is automatically detected by the system. PhoenixBIOS Setup Utility Main Advanced Security Boot Exit CPU Type: : CPU Speed: Intel(R) Pentium (R) M CPU 2000 MHz 000 @ 2.00GHz HDD Model Name: ST98823AS HDD ... VGA BIOS Version: ATi 009.012.001.000 KBC Version: V.1A17 Serial Number: LXT123ZC1000420076EF00 Asset Tag Number: Product Name: TravelMate 8200 Manufacturer Name: Acer UUID: 004CEEEDBC630010AC3AFFFFFFFFFFFF F1 Help ↑ ↓ Select Item F5/F6 Change Values F9 Setup Defaults Esc Exit ← ...
...: Other items are installed on Primary IDE master. If there is automatically detected by the system. PhoenixBIOS Setup Utility Main Advanced Security Boot Exit CPU Type: : CPU Speed: Intel(R) Pentium (R) M CPU 2000 MHz 000 @ 2.00GHz HDD Model Name: ST98823AS HDD ... VGA BIOS Version: ATi 009.012.001.000 KBC Version: V.1A17 Serial Number: LXT123ZC1000420076EF00 Asset Tag Number: Product Name: TravelMate 8200 Manufacturer Name: Acer UUID: 004CEEEDBC630010AC3AFFFFFFFFFFFF F1 Help ↑ ↓ Select Item F5/F6 Change Values F9 Setup Defaults Esc Exit ← ...

TravelMate 8200 Service Guide
Page 63
...item reports the memory size of the extended memory in these two items take effect immediately. The extended memory size is enabled. T Quiet Boot: • Enabled: Customer Logo is displayed, and Summary Screen is disabled. • Disabled: Customer Logo is displayed, and Summary ...projector) Chapter 2 53 Main PhoenixBIOS Setup Utility Advanced Security System Time: System Date: System Memory: Extended Memory: Video Memory Quiet Boot: Power On Display: Network Boot F12 Boot Menu: D2D Recovery: Processor Power Management: [14:13:43] [11/25/2005] 640 KB 1022 MB 256 MB [Enabled...
...item reports the memory size of the extended memory in these two items take effect immediately. The extended memory size is enabled. T Quiet Boot: • Enabled: Customer Logo is displayed, and Summary Screen is disabled. • Disabled: Customer Logo is displayed, and Summary ...projector) Chapter 2 53 Main PhoenixBIOS Setup Utility Advanced Security System Time: System Date: System Memory: Extended Memory: Video Memory Quiet Boot: Power On Display: Network Boot F12 Boot Menu: D2D Recovery: Processor Power Management: [14:13:43] [11/25/2005] 640 KB 1022 MB 256 MB [Enabled...
TravelMate 8200 Service Guide
Page 64
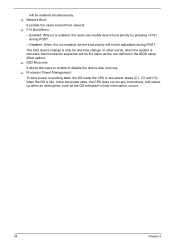
...C3) when the OS is idle. T Processor Power Management: To save power in the BIOS setup (Boot option). T F12 Boot Menu: • Enabled: When it is enabled, the users can modify device boot priority by pressing during POST. T D2D Recovery: It allows the users to enable or disable the disk... is only for one defined in working state, the OS leads the CPU to boot from network. The boot device change . will not be adjustable during POST. • Disabled: When it is not enabled, device boot priority will be the same as the OS scheduler's timer interruption, occurs. 54 Chapter...
...C3) when the OS is idle. T Processor Power Management: To save power in the BIOS setup (Boot option). T F12 Boot Menu: • Enabled: When it is enabled, the users can modify device boot priority by pressing during POST. T D2D Recovery: It allows the users to enable or disable the disk... is only for one defined in working state, the OS leads the CPU to boot from network. The boot device change . will not be adjustable during POST. • Disabled: When it is not enabled, device boot priority will be the same as the OS scheduler's timer interruption, occurs. 54 Chapter...

TravelMate 8200 Service Guide
Page 65
... configuration • Auto: BIOS or OS chooses configuration. Main PhoenixBIOS Setup Utility Advanced Security Serial port A: Infrared Port: Parallel port: Mode: [Auto] [Auto] [Auto] [ECP] Boot Exit Item Specific Help Configure serial port A using options: [Disable] No configuration [Enabled] User configuration [Auto] BIOS or OS chooses configuration (OS Controlled) Displayed when...
... configuration • Auto: BIOS or OS chooses configuration. Main PhoenixBIOS Setup Utility Advanced Security Serial port A: Infrared Port: Parallel port: Mode: [Auto] [Auto] [Auto] [ECP] Boot Exit Item Specific Help Configure serial port A using options: [Disable] No configuration [Enabled] User configuration [Auto] BIOS or OS chooses configuration (OS Controlled) Displayed when...

TravelMate 8200 Service Guide
Page 66
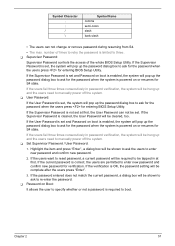
... Is: User Password Is: HDD Password Is: HDD Master ID: Set Supervisor Password Set User Passord Set HDD Password Password on boot: Clear Clear Clear 19893803 [Enter] [Enter] [Enter] [Disabled] Boot Exit Item Specific Help Supervisor Password controls access to Z (not case sensitive) numerical characters dash equal sign left bracket right bracket...
... Is: User Password Is: HDD Password Is: HDD Master ID: Set Supervisor Password Set User Passord Set HDD Password Password on boot: Clear Clear Clear 19893803 [Enter] [Enter] [Enter] [Disabled] Boot Exit Item Specific Help Supervisor Password controls access to Z (not case sensitive) numerical characters dash equal sign left bracket right bracket...
TravelMate 8200 Service Guide
Page 67
...If the current password is cleared, the User Password will be complete after the users press "Enter". 3. If the verification is required to boot. Chapter 2 57 T Password on Boot: It allows the user to specify whether or not a password is OK, the password setting will be cleared, too. Highlight the item and...not set at first. If the User Password is set and Password on or resumes for S4 state. If the Supervisor Password is powered on boot is enabled, the system will be shown to ask to re-enter the password. If the password entered does not match the current password, a...
...If the current password is cleared, the User Password will be complete after the users press "Enter". 3. If the verification is required to boot. Chapter 2 57 T Password on Boot: It allows the user to specify whether or not a password is OK, the password setting will be cleared, too. Highlight the item and...not set at first. If the User Password is set and Password on or resumes for S4 state. If the Supervisor Password is powered on boot is enabled, the system will be shown to ask to re-enter the password. If the password entered does not match the current password, a...

TravelMate 8200 Service Guide
Page 68
.... Bootable devices include the diskette drive in module bay, the hard disk and the CD-ROM/DVD drive in the order specified. Main Advanced Security Boot Exit 1: USB KEY: 2: USB FDC: 3: USB HDD: FUJITSU MHT2040AH-(USB 2. 4: IDE 0: ST98823ASIDE S 5: IDE 1: 6: IDE 2: HL-DT-ST DVDRAM GSA-4082N ...7: USB CDROM: 8: PCI LAN: IBA GE Slot 0300 v1230 Item Specific Help Keys used to boot them in module bay and onboard LAN device. 58 Chapter 2 enables or disables a device. It identifies all the bootable devices in the system and attempts...
.... Bootable devices include the diskette drive in module bay, the hard disk and the CD-ROM/DVD drive in the order specified. Main Advanced Security Boot Exit 1: USB KEY: 2: USB FDC: 3: USB HDD: FUJITSU MHT2040AH-(USB 2. 4: IDE 0: ST98823ASIDE S 5: IDE 1: 6: IDE 2: HL-DT-ST DVDRAM GSA-4082N ...7: USB CDROM: 8: PCI LAN: IBA GE Slot 0300 v1230 Item Specific Help Keys used to boot them in module bay and onboard LAN device. 58 Chapter 2 enables or disables a device. It identifies all the bootable devices in the system and attempts...

TravelMate 8200 Service Guide
Page 69
... the Setup not to CMOS. Exit Menu PhoenixBIOS Setup Utility Info. T Discard Changes: The users can discard previous changes in CMOS Setup. Main Advanced Security Boot Exit Exit Saving Changes Exit Dicarding Changes Load Setup Defaults Discard Changes Save Changes Item Specific Help Exit System Setup and save changes to load...
... the Setup not to CMOS. Exit Menu PhoenixBIOS Setup Utility Info. T Discard Changes: The users can discard previous changes in CMOS Setup. Main Advanced Security Boot Exit Exit Saving Changes Exit Dicarding Changes Load Setup Defaults Discard Changes Save Changes Item Specific Help Exit System Setup and save changes to load...
TravelMate 8200 Service Guide
Page 88
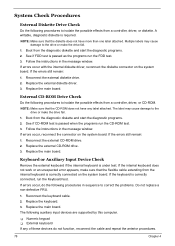
Boot from the diagnostic diskette and start the diagnostic programs. 2. If errors occur with the internal diskette driver, reconnect the diskette connector on the system board. ... driver. 3. NOTE: Make sure that the diskette does not have any of these devices do the following auxiliary input devices are supported by this computer. Boot from the internal keyboard is under test. If the keyboard is passed when the programs run the FDD test. 3. Follow the instructions in the message...
Boot from the diagnostic diskette and start the diagnostic programs. 2. If errors occur with the internal diskette driver, reconnect the diskette connector on the system board. ... driver. 3. NOTE: Make sure that the diskette does not have any of these devices do the following auxiliary input devices are supported by this computer. Boot from the internal keyboard is under test. If the keyboard is passed when the programs run the FDD test. 3. Follow the instructions in the message...
TravelMate 8200 Service Guide
Page 89
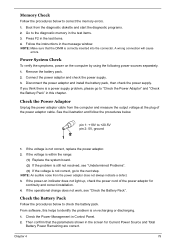
... power-on the computer by using the following power sources separately. 1. Chapter 4 79 Memory Check Follow the procedures below to +20.5V pin 2: 0V, ground 1. Boot from the diagnostic diskette and start the diagnostic programs. 2. NOTE: Make sure that the parameters shown in this helps to "Check the Power Adaptor" and...
... power-on the computer by using the following power sources separately. 1. Chapter 4 79 Memory Check Follow the procedures below to +20.5V pin 2: 0V, ground 1. Boot from the diagnostic diskette and start the diagnostic programs. 2. NOTE: Make sure that the parameters shown in this helps to "Check the Power Adaptor" and...
TravelMate 8200 Service Guide
Page 92
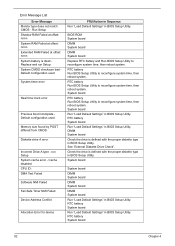
run Setup System CMOS checksum bad Default configuration used System timer error Real time clock error Previous boot incomplete Default configuration used Memory size found by POST differed from CMOS Diskette drive A error Incorrect Drive A type - RTC battery Run BIOS Setup Utility to ...
run Setup System CMOS checksum bad Default configuration used System timer error Real time clock error Previous boot incomplete Default configuration used Memory size found by POST differed from CMOS Diskette drive A error Incorrect Drive A type - RTC battery Run BIOS Setup Utility to ...
TravelMate 8200 Service Guide
Page 94
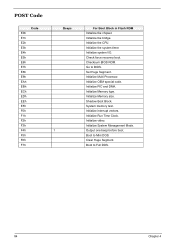
... vectors. Initialize System Management Mode. Initialize the CPU. Initialize the system timer. Go to Full DOS. 84 Chapter 4 System memory test. Boot to BIOS. Initialize Multi Processor. Initialize video. Boot to Mini DOS. Initialize PIC and DMA. POST Code Code E0h E1h E2h E3h E4h E5h E6h E7h E8h E9h EAh EBh... ECh EDh EEh EFh F0h F1h F2h F3h F4h F5h F6h F7h Beeps 1 For Boot Block in Flash ROM Initialize the chipset. Initialize system I/O. Initialize Memory size. Output one beep before...
... vectors. Initialize System Management Mode. Initialize the CPU. Initialize the system timer. Go to Full DOS. 84 Chapter 4 System memory test. Boot to BIOS. Initialize Multi Processor. Initialize video. Boot to Mini DOS. Initialize PIC and DMA. POST Code Code E0h E1h E2h E3h E4h E5h E6h E7h E8h E9h EAh EBh... ECh EDh EEh EFh F0h F1h F2h F3h F4h F5h F6h F7h Beeps 1 For Boot Block in Flash ROM Initialize the chipset. Initialize system I/O. Initialize Memory size. Output one beep before...

TravelMate 8200 Service Guide
Page 101
Please press any key to Disk Recovery 1. Put NAPP CD into the optical drive then boot up the system. 3. NAPP CD will ask you if you want to preload the system, please press [Y]. The system will start to build NAPP Master HDD. Use NAPP CD to Build Master Hard Disk Drive CD to continue. 4. Chapter 4 91 Prepare NAPP CD, Recovery CD and System CD. 2.
Please press any key to Disk Recovery 1. Put NAPP CD into the optical drive then boot up the system. 3. NAPP CD will ask you if you want to preload the system, please press [Y]. The system will start to build NAPP Master HDD. Use NAPP CD to Build Master Hard Disk Drive CD to continue. 4. Chapter 4 91 Prepare NAPP CD, Recovery CD and System CD. 2.

TravelMate 8200 Service Guide
Page 104
Disk to continue. 4. NAPP CD will ask you if you want to preload the system, please press [Y]. 94 Chapter 4 The system will start to build NAPP Master HDD. Please press any key to Disk Recovery 1. Put NAPP CD into the optical drive then boot up the system. 3. Prepare NAPP CD, Recovery CD and System CD. 2.
Disk to continue. 4. NAPP CD will ask you if you want to preload the system, please press [Y]. 94 Chapter 4 The system will start to build NAPP Master HDD. Please press any key to Disk Recovery 1. Put NAPP CD into the optical drive then boot up the system. 3. Prepare NAPP CD, Recovery CD and System CD. 2.

