
TravelMate 8200 Service Guide
Page 17
...-launch buttons" on page 10 # Icon Item Description "Easy-launch buttons" on page 10 "Launch keys" on page 10 N/A Latch Locks and releases the LCD panel. port 12 Infrared port Interfaces with S/ PDIF support 9 Bluetooth Slide to enable/disable Bluetooth function. indicator (manufacturing option) 10 Wireless ## IcIcoonn ItecmommunIticeamtions button/indicator Slide...
...-launch buttons" on page 10 # Icon Item Description "Easy-launch buttons" on page 10 "Launch keys" on page 10 N/A Latch Locks and releases the LCD panel. port 12 Infrared port Interfaces with S/ PDIF support 9 Bluetooth Slide to enable/disable Bluetooth function. indicator (manufacturing option) 10 Wireless ## IcIcoonn ItecmommunIticeamtions button/indicator Slide...
TravelMate 8200 Service Guide
Page 25
... keys" on page 10 The power, battery and wireless communication status indicators are on . Power Lights when the computer is on even when the LCD panel is being charged. Bl1u.eCtohoatrhging: Indicates the status of the computer and its components. Icon Function Description # IconIcon Item Item Caps Lock # Icon Item # Icon...
... keys" on page 10 The power, battery and wireless communication status indicators are on . Power Lights when the computer is on even when the LCD panel is being charged. Bl1u.eCtohoatrhging: Indicates the status of the computer and its components. Icon Function Description # IconIcon Item Item Caps Lock # Icon Item # Icon...
TravelMate 8200 Service Guide
Page 36
...what actions will be taken when the cover is "Maximum Performance." Acer ePower Management Acer ePower Management features a straightforward user interface. To launch it, select Acer ePower Management from the Empowering Technology interface, or double click the Acer ePower Management icon in the task tray. DC mode To suit...time battery life estimates based on buttons to the system after Hibernation or Stand-by. 26 Chapter 1 You can define up to the panel on or off: Wireless LAN, Bluetooth, CardBus, Memory Card, Audio, and Wired LAN. AC mode The default setting is closed, ...
...what actions will be taken when the cover is "Maximum Performance." Acer ePower Management Acer ePower Management features a straightforward user interface. To launch it, select Acer ePower Management from the Empowering Technology interface, or double click the Acer ePower Management icon in the task tray. DC mode To suit...time battery life estimates based on buttons to the system after Hibernation or Stand-by. 26 Chapter 1 You can define up to the panel on or off: Wireless LAN, Bluetooth, CardBus, Memory Card, Audio, and Wired LAN. AC mode The default setting is closed, ...

TravelMate 8200 Service Guide
Page 39
...high-resolution photos or videos up front or at the back of the LCD panel. Chapter 1 29 Acer OrbiCam The Acer OrbiCam is a 1.3 megapixel CMOS camera appropriately mounted on the top of the LCD panel. The camera's 225-degree ergonomic rotation allows you can transmit the best video...2 # Ite3m Item Lens Power indicator Rubber grip (selected models only) Rotating the Acer Orbicam The Acer OrbiCam rotates 225 degrees counterclockwise to match the position of your face in front in back of the LCD panel. Refer to the illustrations below: For your convenience, the camera snaps 45 degrees ...
...high-resolution photos or videos up front or at the back of the LCD panel. Chapter 1 29 Acer OrbiCam The Acer OrbiCam is a 1.3 megapixel CMOS camera appropriately mounted on the top of the LCD panel. The camera's 225-degree ergonomic rotation allows you can transmit the best video...2 # Ite3m Item Lens Power indicator Rubber grip (selected models only) Rotating the Acer Orbicam The Acer OrbiCam rotates 225 degrees counterclockwise to match the position of your face in front in back of the LCD panel. Refer to the illustrations below: For your convenience, the camera snaps 45 degrees ...
TravelMate 8200 Service Guide
Page 47
... appropriate grid. 3. Drag and drop each display from the task bar. 2. To enable the dual monitor feature of a well-organized desktop. Acer GridVista is connected, then select Start, Control Panel, DisplaSytaarntd CcloicnktoronlSPeattninegls.DSiseplelactythe secondary monitoSre(2tt)inicgons in the display box and then click th(e2)check box Extend my windows desktop...
... appropriate grid. 3. Drag and drop each display from the task bar. 2. To enable the dual monitor feature of a well-organized desktop. Acer GridVista is connected, then select Start, Control Panel, DisplaSytaarntd CcloicnktoronlSPeattninegls.DSiseplelactythe secondary monitoSre(2tt)inicgons in the display box and then click th(e2)check box Extend my windows desktop...

TravelMate 8200 Service Guide
Page 83
Carefully detach the tapes then disconnect the LCD cable. 10. Remove the two screws fastening the LCD right bracket and detach the bracket. 8. Remove the two screws fastening the antenna set from the LCD panel. 73 Chapter 3 Remove the two screws fastening the LCD left bracket and detach the bracket. 9. Then carefully detach the antenna set . 11. 7.
Carefully detach the tapes then disconnect the LCD cable. 10. Remove the two screws fastening the LCD right bracket and detach the bracket. 8. Remove the two screws fastening the antenna set from the LCD panel. 73 Chapter 3 Remove the two screws fastening the LCD left bracket and detach the bracket. 9. Then carefully detach the antenna set . 11. 7.

TravelMate 8200 Service Guide
Page 84
Remove the two screws fastening the LCD panel latch. 13. Then remove the latch. 16. 12. Remove the screw fastening the CCD module. 17. Detach the CCD module carefully from the LCD panel. Take out the right LCD panel latch lock with tweezers. 14. Chapter 3 74 Take out the left LCD panel latch lock with tweezers. 15.
Remove the two screws fastening the LCD panel latch. 13. Then remove the latch. 16. 12. Remove the screw fastening the CCD module. 17. Detach the CCD module carefully from the LCD panel. Take out the right LCD panel latch lock with tweezers. 14. Chapter 3 74 Take out the left LCD panel latch lock with tweezers. 15.
TravelMate 8200 Service Guide
Page 89
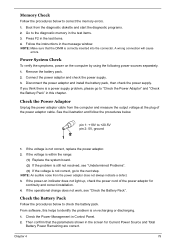
... into the connector. If the power-on indicator does not light up, check the power cord of the power adaptor cable. Press F2 in Control Panel. 2. NOTE: An audible noise from the diagnostic diskette and start the diagnostic programs. 2. Check the Power Management in the test items. 4. Follow the instructions in...
... into the connector. If the power-on indicator does not light up, check the power cord of the power adaptor cable. Press F2 in Control Panel. 2. NOTE: An audible noise from the diagnostic diskette and start the diagnostic programs. 2. Check the Power Management in the test items. 4. Follow the instructions in...

TravelMate 8200 Service Guide
Page 119
....004 LCD BEZEL W/ RUBBER PAD 15.4 IN. HDD BRACKET ZC1 HDD BRACKET S/P 33.TAXV7.002 HDD DOOR ZC1 HDD DOOR ASSY S/P 42.TAXV7.004 LCD PANEL CARBON 15.4 IN.
....004 LCD BEZEL W/ RUBBER PAD 15.4 IN. HDD BRACKET ZC1 HDD BRACKET S/P 33.TAXV7.002 HDD DOOR ZC1 HDD DOOR ASSY S/P 42.TAXV7.004 LCD PANEL CARBON 15.4 IN.
TravelMate 8200 User's Guide - EN
Page 18
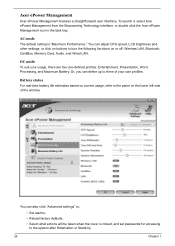
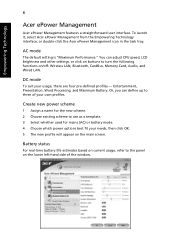
Empowering Technology 8 Acer ePower Management Acer ePower Management features a straightforward user interface. You can define up to use as a template. 3 Select whether used for... your own profiles. Or, you can adjust CPU speed, LCD brightness and other settings, or click on buttons to the panel on the lower left-hand side of your usage, there are four pre-defined profiles - Battery status For real-time battery... usage, refer to turn the following functions on the main screen. To launch it, select Acer ePower Management from the Empowering Technology interface, or double-click the...
Empowering Technology 8 Acer ePower Management Acer ePower Management features a straightforward user interface. You can define up to use as a template. 3 Select whether used for... your own profiles. Or, you can adjust CPU speed, LCD brightness and other settings, or click on buttons to the panel on the lower left-hand side of your usage, there are four pre-defined profiles - Battery status For real-time battery... usage, refer to turn the following functions on the main screen. To launch it, select Acer ePower Management from the Empowering Technology interface, or double-click the...

TravelMate 8200 User's Guide - EN
Page 28
... soDIMM modules (dualchannel support) • 15.4" WSXGA+ TFT LCD: 1680 x 1050 resolution, 16.7 million colors, supporting simultaneous multiwindow viewing via Acer GridVista™ • ATI MOBILITY™ RADEON X1600 with 256 MB of GDDR3 VRAM, supporting ATI POWERPLAY™ 5.0, Microsoft DirectX® ...9.0 and PCI Express® • DualView™ support • Simultaneous LCD and CRT display, with LCD panel resolution at 70 Hz refresh rate • Up to 2048 x 1536 resolution on non-interlaced CRT display • MPEG-2/DVD hardware-assisted ...
... soDIMM modules (dualchannel support) • 15.4" WSXGA+ TFT LCD: 1680 x 1050 resolution, 16.7 million colors, supporting simultaneous multiwindow viewing via Acer GridVista™ • ATI MOBILITY™ RADEON X1600 with 256 MB of GDDR3 VRAM, supporting ATI POWERPLAY™ 5.0, Microsoft DirectX® ...9.0 and PCI Express® • DualView™ support • Simultaneous LCD and CRT display, with LCD panel resolution at 70 Hz refresh rate • Up to 2048 x 1536 resolution on non-interlaced CRT display • MPEG-2/DVD hardware-assisted ...

TravelMate 8200 User's Guide - EN
Page 30
... • • • • • • • • • • • • Acer Video Conference featuring Acer Orbicam and optional Acer Bluetooth® VoIP phone Acer Orbicam 1.3 megapixel CMOS camera (LCD panel-mounted) featuring: • 225-degree ergonomic rotation • Acer VisageOn technology • Acer PrimaLite technology WPAN: Bluetooth® 2.0+EDR (Enhanced Data Rate) WLAN : Intel®...
... • • • • • • • • • • • • Acer Video Conference featuring Acer Orbicam and optional Acer Bluetooth® VoIP phone Acer Orbicam 1.3 megapixel CMOS camera (LCD panel-mounted) featuring: • 225-degree ergonomic rotation • Acer VisageOn technology • Acer PrimaLite technology WPAN: Bluetooth® 2.0+EDR (Enhanced Data Rate) WLAN : Intel®...

TravelMate 8200 User's Guide - EN
Page 33
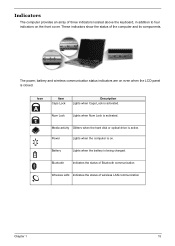
English 23 Indicators The computer has seven easy-to-read status indicators, including four on the front panel. Battery Indicates the computer's batttery status. Num Lock Caps Lock Power Lights up when Caps Lock is closed. Icon Function HDD Description Indicates when the ...
English 23 Indicators The computer has seven easy-to-read status indicators, including four on the front panel. Battery Indicates the computer's batttery status. Num Lock Caps Lock Power Lights up when Caps Lock is closed. Icon Function HDD Description Indicates when the ...

TravelMate 8200 User's Guide - EN
Page 44
..., the camera snaps to 45 degrees to match the position of the LCD panel. The Acer OrbiCam fully supports the Acer Video Conference technology so you to know your face in front or at the back of your Acer OrbiCam 1 23 # Item 1 Lens 2 Power indicator 3 Rubber grip (...selected models only) Rotating the Acer OrbiCam The Acer OrbiCam rotates 225 degrees counterclockwise to achieve the desired angle. Getting to capture high-resolution photos or videos up front or at the back of the LCD panel. The camera's 225-degree ergonomic rotation allows you ...
..., the camera snaps to 45 degrees to match the position of the LCD panel. The Acer OrbiCam fully supports the Acer Video Conference technology so you to know your face in front or at the back of your Acer OrbiCam 1 23 # Item 1 Lens 2 Power indicator 3 Rubber grip (...selected models only) Rotating the Acer OrbiCam The Acer OrbiCam rotates 225 degrees counterclockwise to achieve the desired angle. Getting to capture high-resolution photos or videos up front or at the back of the LCD panel. The camera's 225-degree ergonomic rotation allows you ...

TravelMate 8200 User's Guide - EN
Page 54
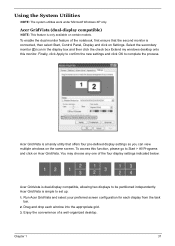
.... Finally, click Apply to confirm the new settings and click OK to be partitioned independently. Acer GridVista is a handy utility that the second monitor is connected, then, select Start, Control Panel, Display and click on certain models. English 44 Using the system utilities Note: The system utilities...click the check box Extend my Windows desktop onto this function, please go to Start, All Programs and click on the same screen. Acer GridVista (dual-display compatible) Note: This feature is dual-display compatible, allowing two displays to complete the process. To enable the dual...
.... Finally, click Apply to confirm the new settings and click OK to be partitioned independently. Acer GridVista is a handy utility that the second monitor is connected, then, select Start, Control Panel, Display and click on certain models. English 44 Using the system utilities Note: The system utilities...click the check box Extend my Windows desktop onto this function, please go to Start, All Programs and click on the same screen. Acer GridVista (dual-display compatible) Note: This feature is dual-display compatible, allowing two displays to complete the process. To enable the dual...

TravelMate 8200 User's Guide - EN
Page 56
If you do I check for Viruses panel, click Scan My Computer. 4 Under Actions, click Scan. 5 When the scan is an anti-virus software that you are using the computer when the scheduled ...
If you do I check for Viruses panel, click Scan My Computer. 4 Under Actions, click Scan. 5 When the scan is an anti-virus software that you are using the computer when the scheduled ...

TravelMate 8200 User's Guide - EN
Page 59
... Enabled. 3 Exit the BIOS utility and save changes. Before performing a restore operation, please check the BIOS settings. 1 Check to see if Acer disk-to the Windows manual. The system will be erased.) It is important to back up your communication software (e.g. To properly use the internal ... the multilingual version, the operating system and language you choose when you need to set up your location: 1 Click on Start, Settings, Control Panel. 2 Double-click on Phone and Modem Options. 3 Click on the printer. This recovery process helps you can skip the Internet Connection setup, ...
... Enabled. 3 Exit the BIOS utility and save changes. Before performing a restore operation, please check the BIOS settings. 1 Check to see if Acer disk-to the Windows manual. The system will be erased.) It is important to back up your communication software (e.g. To properly use the internal ... the multilingual version, the operating system and language you choose when you need to set up your location: 1 Click on Start, Settings, Control Panel. 2 Double-click on Phone and Modem Options. 3 Click on the printer. This recovery process helps you can skip the Internet Connection setup, ...


