TravelMate 6492/6492G User's Guide EN
Page 30
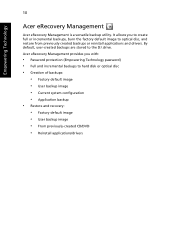
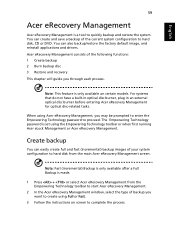
Acer eRecovery Management provides you to create full or incremental backups, burn the factory default image to optical disc, and restore from previously created backups or reinstall applications and drivers. By default, user-created backups are stored to hard disk or optical disc • ...• Factory default image • User backup image • From previously-created CD/DVD • Reinstall applications/drivers It allows you with: • Password protection (Empowering Technology password) • Full and incremental backups to the D:\ drive. Empowering Technology 10...
Acer eRecovery Management provides you to create full or incremental backups, burn the factory default image to optical disc, and restore from previously created backups or reinstall applications and drivers. By default, user-created backups are stored to hard disk or optical disc • ...• Factory default image • User backup image • From previously-created CD/DVD • Reinstall applications/drivers It allows you with: • Password protection (Empowering Technology password) • Full and incremental backups to the D:\ drive. Empowering Technology 10...

TravelMate 6492/6492G User's Guide EN
Page 33
... Settings include display brightness, power plan, volume, wireless networking on or off , external display settings, display orientation and synchronization status. Windows Mobility Center also includes Acer-specific settings like Bluetooth Add Device (if applicable), sharing folders overview/sharing service on /off , and a shortcut to fit the situation as you can quickly...
... Settings include display brightness, power plan, volume, wireless networking on or off , external display settings, display orientation and synchronization status. Windows Mobility Center also includes Acer-specific settings like Bluetooth Add Device (if applicable), sharing folders overview/sharing service on /off , and a shortcut to fit the situation as you can quickly...
TravelMate 6492/6492G User's Guide EN
Page 61
If it will not have the appropriate drivers (for printing to an infrared printer). • During the POST, press to adjust the volume. See "Hotkeys" on the icon and deselect the Mute all ...
If it will not have the appropriate drivers (for printing to an infrared printer). • During the POST, press to adjust the volume. See "Hotkeys" on the icon and deselect the Mute all ...
TravelMate 6492/6492G User's Guide EN
Page 71
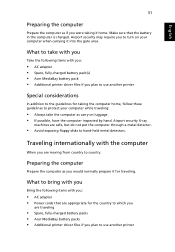
... that are appropriate for the country to which you are traveling • Spare, fully-charged battery packs • Acer MediaBay battery packs • Additional printer driver files if you to country. Preparing the computer Prepare the computer as carry-on your computer while traveling: •... with you Take the following items with you: • AC adapter • Spare, fully-charged battery pack(s) • Acer MediaBay battery pack • Additional printer driver files if you : • AC adapter • Power cords that the battery in the computer is charged. What to ...
... that are appropriate for the country to which you are traveling • Spare, fully-charged battery packs • Acer MediaBay battery packs • Additional printer driver files if you to country. Preparing the computer Prepare the computer as carry-on your computer while traveling: •... with you Take the following items with you: • AC adapter • Spare, fully-charged battery pack(s) • Acer MediaBay battery pack • Additional printer driver files if you : • AC adapter • Power cords that the battery in the computer is charged. What to ...
TravelMate 6492/6492G User's Guide EN
Page 79
... also backup/restore the factory default image, and reinstall applications and drivers. Acer eRecovery Management consists of backup you through each process. When using Acer eRecovery Management, you may be prompted to enter the Empowering Technology password to start Acer eRecovery Management. 2 In the Acer eRecovery Management window, select the type of the following functions...
... also backup/restore the factory default image, and reinstall applications and drivers. Acer eRecovery Management consists of backup you through each process. When using Acer eRecovery Management, you may be prompted to enter the Empowering Technology password to start Acer eRecovery Management. 2 In the Acer eRecovery Management window, select the type of the following functions...

TravelMate 6492/6492G User's Guide EN
Page 80
... restore and recovery features allow you to complete the process. this disc will allow you to browse the contents and install selected drivers and applications, create an application backup image instead - You can also choose to recover the system from a factory default image,... recover from a previously created CD/DVD or reinstall applications and drivers. 4 Follow the instructions on screen to restore from the Empowering Technology toolbar to start Acer eRecovery Management. 2 Switch to the Burn Disc page by selecting the Restore button. 3 Select...
... restore and recovery features allow you to complete the process. this disc will allow you to browse the contents and install selected drivers and applications, create an application backup image instead - You can also choose to recover the system from a factory default image,... recover from a previously created CD/DVD or reinstall applications and drivers. 4 Follow the instructions on screen to restore from the Empowering Technology toolbar to start Acer eRecovery Management. 2 Switch to the Burn Disc page by selecting the Restore button. 3 Select...

Service Guide
Page 33
...). • Back up to CD/DVD. Chapter 1 23 q Recovery of applications and drivers. Acer eRecovery Management provides you with the need for recovery disks provided by the manufacturer. The Acer eRecovery Management utility occupies space in a hidden partition on D:\ drive. Acer eRecovery Management Acer eRecovery Management is a powerful utility that does away with : q Password protection...
...). • Back up to CD/DVD. Chapter 1 23 q Recovery of applications and drivers. Acer eRecovery Management provides you with the need for recovery disks provided by the manufacturer. The Acer eRecovery Management utility occupies space in a hidden partition on D:\ drive. Acer eRecovery Management Acer eRecovery Management is a powerful utility that does away with : q Password protection...

Service Guide
Page 40
...to an IM partner anywhere in the world. Minimal head movements are saved in the capture window. The Properties window willParopppeeratire.s Driver Settings Properties Device Settings Device Settings • Device Settings allows you to change the camera brightness, contrast, hue, saturation, ...service, then select the video/webcam feature. Note: By default, all photos and videos are tracked more efficiently. To enable the Acer VisageON: 1. Video, Audio Video, Audio Camera Settings ZCoaomme/rFaacSeetttriancgksing Zoom/Face tracking • Capture settings: From the Camera Settings...
...to an IM partner anywhere in the world. Minimal head movements are saved in the capture window. The Properties window willParopppeeratire.s Driver Settings Properties Device Settings Device Settings • Device Settings allows you to change the camera brightness, contrast, hue, saturation, ...service, then select the video/webcam feature. Note: By default, all photos and videos are tracked more efficiently. To enable the Acer VisageON: 1. Video, Audio Video, Audio Camera Settings ZCoaomme/rFaacSeetttriancgksing Zoom/Face tracking • Capture settings: From the Camera Settings...
Service Guide
Page 46
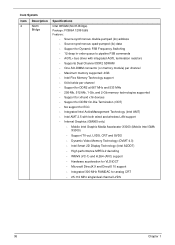
... synchronous quad-pumped (4x) data • Support for Dynamic FSB Frequency Switching • 12-deep in-order queue to pipeline FSB commands • AGTL+ bus driver with integrated AGTL termination resistors • Supports Dual Channel DDR2 SDRAM • One-SO-DIMM connector (or memory module) per channel • Maximum memory supported...
... synchronous quad-pumped (4x) data • Support for Dynamic FSB Frequency Switching • 12-deep in-order queue to pipeline FSB commands • AGTL+ bus driver with integrated AGTL termination resistors • Supports Dual Channel DDR2 SDRAM • One-SO-DIMM connector (or memory module) per channel • Maximum memory supported...
Service Guide
Page 69
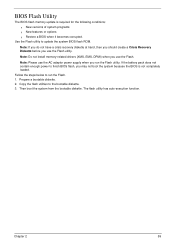
... update the system BIOS flash ROM. Note: Please use the AC adaptor power supply when you use the Flash. Note: Do not install memory-related drivers (XMS, EMS, DPMI) when you may not boot the system because the BIOS is required for the following conditions: q New versions of system programs q New...
... update the system BIOS flash ROM. Note: Please use the AC adaptor power supply when you use the Flash. Note: Do not install memory-related drivers (XMS, EMS, DPMI) when you may not boot the system because the BIOS is required for the following conditions: q New versions of system programs q New...

Service Guide
Page 71
... procedure, make sure that you do the following tools: q Wrist grounding strap and conductive mat for preventing electrostatic discharge q Small Philips screw driver q Philips screwdriver q Plastic flat head screw driver q Tweezers Note: The screws for maintenance and troubleshooting. To disassemble the computer, you remove the stripe cover, please be careful not to...
... procedure, make sure that you do the following tools: q Wrist grounding strap and conductive mat for preventing electrostatic discharge q Small Philips screw driver q Philips screwdriver q Plastic flat head screw driver q Tweezers Note: The screws for maintenance and troubleshooting. To disassemble the computer, you remove the stripe cover, please be careful not to...

Service Guide
Page 87
Using a screw driver, unscrew the CPU counter clockwise. 2. Removing the CPU 1. Chapter 3 77 Remove the CPU from the bracket as shown.
Using a screw driver, unscrew the CPU counter clockwise. 2. Removing the CPU 1. Chapter 3 77 Remove the CPU from the bracket as shown.

Service Guide
Page 95
Main Module Reassembly Procedure Replacing the CPU 1. Connect the Fan Module cable as shown. 2. Replacing the Heatsink and Fan Module 1. Chapter 3 85 Insert the CPU into the CPU bracket as shown. 3. Place the Fan Module in the mounting as shown to secure the CPU in place. Align the Heatsink Securing Bracket correctly and fix in place and place the Heatsink as shown. 4. Using a screw driver, tighten the screw clockwise as shown. 2. Hold the Fan Module in place using the two screws provided.
Main Module Reassembly Procedure Replacing the CPU 1. Connect the Fan Module cable as shown. 2. Replacing the Heatsink and Fan Module 1. Chapter 3 85 Insert the CPU into the CPU bracket as shown. 3. Place the Fan Module in the mounting as shown to secure the CPU in place. Align the Heatsink Securing Bracket correctly and fix in place and place the Heatsink as shown. 4. Using a screw driver, tighten the screw clockwise as shown. 2. Hold the Fan Module in place using the two screws provided.
Service Guide
Page 108
...: 1. Reconnect the keyboard cables. 2. Boot from the diagnostics diskette and start the diagnostics program. 2. Replace the main board. Boot from the keyboard is to a controller, driver, or diskette. See if FDD Test is passed when the program runs to select the test device. 1. Do the following to FDD Test. 3. Replace the...
...: 1. Reconnect the keyboard cables. 2. Boot from the diagnostics diskette and start the diagnostics program. 2. Replace the main board. Boot from the keyboard is to a controller, driver, or diskette. See if FDD Test is passed when the program runs to select the test device. 1. Do the following to FDD Test. 3. Replace the...
Service Guide
Page 121
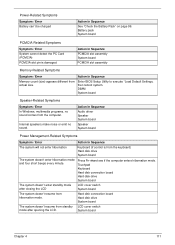
... Sequence See "Check the Battery Pack" on page 99. Enter BIOS Setup Utility to execute "Load Default Settings, then reboot system. Action in Sequence Audio driver Speaker System board Speaker System board Power Management-Related Symptoms Symptom / Error Action in Sequence The system will not enter hibernation Keyboard (if control is...
... Sequence See "Check the Battery Pack" on page 99. Enter BIOS Setup Utility to execute "Load Default Settings, then reboot system. Action in Sequence Audio driver Speaker System board Speaker System board Power Management-Related Symptoms Symptom / Error Action in Sequence The system will not enter hibernation Keyboard (if control is...

Service Guide
Page 122
...System board System board Ensure the "Parallel Port" in the "Onboard Devices Configuration" of BIOS Setup Utility is set to Enabled. Printer driver Printer cable Printer System Board Ensure the "Serial Port" in Sequence Enter BIOS Setup Utility to Enabled. Touchpad does not work correctly. Keyboard...board Note: If you cannot find a symptom or an error in Sequence Remove battery pack and let it cool for 2 hours. Device driver Device cable Device System board Keyboard/Touchpad-Related Symptoms Symptom / Error Keyboard (one or more keys) does not work correctly Print problems. ...
...System board System board Ensure the "Parallel Port" in the "Onboard Devices Configuration" of BIOS Setup Utility is set to Enabled. Printer driver Printer cable Printer System Board Ensure the "Serial Port" in Sequence Enter BIOS Setup Utility to Enabled. Touchpad does not work correctly. Keyboard...board Note: If you cannot find a symptom or an error in Sequence Remove battery pack and let it cool for 2 hours. Device driver Device cable Device System board Keyboard/Touchpad-Related Symptoms Symptom / Error Keyboard (one or more keys) does not work correctly Print problems. ...
Service Guide
Page 168
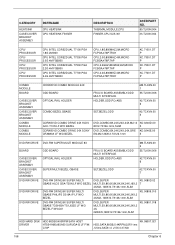
CATEGORY HEATSINK CASE/COVER/ BRACKET ASSEMBLY PARTNAME CPU HEATSINK CPU HEATSINK FINGER DESCRIPTON THERMAL MODULE,CPU FINGER,CPU,SUS 301 ACER PART NO. 60.TLK0N.004 33.TLK0N.004 CPU/ PROCESSOR CPU/ PROCESSOR CPU/ PROCESSOR CPU/ PROCESSOR CPU INTEL CORE2DUAL T7100 PGA 1.8G 2M 800 CPU ...,5X,8X,6X,8X,8X,8X,24X,24X,2 4X, GREEN,128X12.7X126.1mm,SLIM KU.00801.018 HDD/HARD DISK HDD 80GB 5400RPM SATA HGST DRIVER HTS541680J9SA00 SURUGA-B LF F/W: C70P KH.08007.021 HDD,SATA,80GB,5.4KRPM,22P,11ms ,5.5ms,SATA1.0 ,2.5X 0.37,M3 158 Chapter 6
CATEGORY HEATSINK CASE/COVER/ BRACKET ASSEMBLY PARTNAME CPU HEATSINK CPU HEATSINK FINGER DESCRIPTON THERMAL MODULE,CPU FINGER,CPU,SUS 301 ACER PART NO. 60.TLK0N.004 33.TLK0N.004 CPU/ PROCESSOR CPU/ PROCESSOR CPU/ PROCESSOR CPU/ PROCESSOR CPU INTEL CORE2DUAL T7100 PGA 1.8G 2M 800 CPU ...,5X,8X,6X,8X,8X,8X,24X,24X,2 4X, GREEN,128X12.7X126.1mm,SLIM KU.00801.018 HDD/HARD DISK HDD 80GB 5400RPM SATA HGST DRIVER HTS541680J9SA00 SURUGA-B LF F/W: C70P KH.08007.021 HDD,SATA,80GB,5.4KRPM,22P,11ms ,5.5ms,SATA1.0 ,2.5X 0.37,M3 158 Chapter 6

Service Guide
Page 169
...SATA WD DRIVER WD1600BEVS-22RST0 ...5mm Chapter 6 159 KH.12001.031 DRIVER ST9120822AS VENUS LF F/W:3.ALD 5ms,5.6ms,...DRIVER MK1237GSX GEMINI BS LF F/W:DL130J ms,5.6ms,SATA 2.0, 2.5X0.37,M3 HDD/HARD DISK HDD 120GB 5400RPM SATA WD DRIVER... HDD 160GB 5400RPM SATA HITACHI DRIVER HTS541616J9SA00 SURUGA-B LF F/ W:... DISK HDD 80GB 5400RPM SATA SEAGATE DRIVER ST980811AS(9S1132-190) VENUS LF F/...DRIVER MK8037GSX GEMINI BS LF F/W:DL230J s,5.6ms,SATA 2.0,2.5X0.37,M3 HDD/HARD DISK HDD 80GB 5400RPM SATA WD DRIVER... DISK HDD 120GB 5400RPM SATA HGST DRIVER HTS541612J9SA00 SURUGA-B LF F/ W:C70P ...
...SATA WD DRIVER WD1600BEVS-22RST0 ...5mm Chapter 6 159 KH.12001.031 DRIVER ST9120822AS VENUS LF F/W:3.ALD 5ms,5.6ms,...DRIVER MK1237GSX GEMINI BS LF F/W:DL130J ms,5.6ms,SATA 2.0, 2.5X0.37,M3 HDD/HARD DISK HDD 120GB 5400RPM SATA WD DRIVER... HDD 160GB 5400RPM SATA HITACHI DRIVER HTS541616J9SA00 SURUGA-B LF F/ W:... DISK HDD 80GB 5400RPM SATA SEAGATE DRIVER ST980811AS(9S1132-190) VENUS LF F/...DRIVER MK8037GSX GEMINI BS LF F/W:DL230J s,5.6ms,SATA 2.0,2.5X0.37,M3 HDD/HARD DISK HDD 80GB 5400RPM SATA WD DRIVER... DISK HDD 120GB 5400RPM SATA HGST DRIVER HTS541612J9SA00 SURUGA-B LF F/ W:C70P ...


